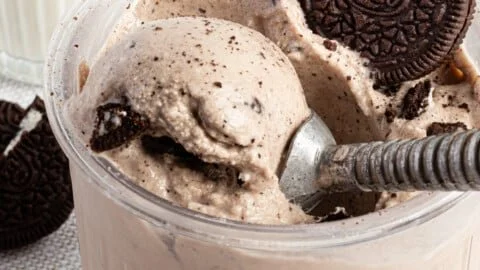
Protein Cookies and Cream Ninja Creami Ice Cream
There’s something wonderfully nostalgic about cookies and cream ice cream, isn’t there? It transports me right back to lazy summers, ice cream trucks jingling down the lane, and the simple joys of childhood. Now, imagine capturing that essence but with a protein-packed twist that’s equally delightful and guilt-free. This Protein Cookies and Cream Ninja Creami…
There’s something wonderfully nostalgic about cookies and cream ice cream, isn’t there? It transports me right back to lazy summers, ice cream trucks jingling down the lane, and the simple joys of childhood. Now, imagine capturing that essence but with a protein-packed twist that’s equally delightful and guilt-free. This Protein Cookies and Cream Ninja Creami Ice Cream not only satisfies your sweet tooth but also helps you hit your daily protein goals. Yes, please! Let’s dive into this sweet adventure together!
Why Protein Cookies and Cream Ninja Creami Ice Cream Stands Out
-
Guilt-Free Indulgence: With a boost of protein, this ice cream gives you a satisfyingly sweet treat without the glycemic guilt you often feel after indulging in traditional ice cream.
-
Simple Ingredients: This recipe comes together with just a handful of ingredients, making it accessible and easy to whip up anytime a craving strikes.
-
Versatile Flavor Profile: Not only does it deliver classic cookies and cream goodness, but you can easily transform it to fit your taste preferences with simple swaps.
-
Ninja Creami Magic: If you have a Ninja Creami, you know the joy it brings in creating homemade frozen treats. This recipe takes full advantage of that magic, giving you creamy, dreamy ice cream in no time.
-
Meal Prep Friendly: This ice cream can be made ahead of time. Just freeze it up, and you have a delicious, protein-boosted dessert ready to go whenever your sweet tooth demands a little love.
Gathering Your Ingredients
Before we embark on this delicious ice cream journey, let’s gather what we need. Here’s your shopping list:
-
1 1/2 cups milk (I prefer using Fairlife for that extra protein kick! Feel free to choose almond milk or oat milk if you want a dairy-free option.)
-
1 1/2 scoops vanilla protein powder (Pick your favorite brand, and if you’re not a fan of vanilla, chocolate works wonders too!)
-
2 tablespoons vanilla instant pudding mix (You can use sugar-free or regular, depending on your dietary needs. This adds that delightful creaminess we all love.)
-
3-4 Oreos (Crushed, of course! This is your chance to bring in that classic cookie flavor. Plus, who doesn’t love Oreos?)
Let’s Craft This Deliciousness!
Now that you have everything ready, it’s time to let the Ninja Creami work its magic. Follow these simple steps:
-
Combine Ingredients: In your Ninja Creami pint container, mix the milk, vanilla protein powder, and pudding mix together. I find using a small whisk or a spoon works wonders for achieving a smooth blend.
-
Freeze to Perfection: Once everything is nicely combined, place the pint container in the freezer. You’ll need to wait a full 24 hours, so just remind yourself that good things come to those who wait!
-
Ninja Time: After your freeze, retrieve that glorious pint and place it in the outer bowl of your Ninja Creami. Secure the lid with the blade and install it onto the machine.
-
Ice Cream Mode Activate: Run the lite ice cream mode for one cycle and check the consistency. Trust me, the aroma wafting from your kitchen will have you practically drooling!
-
Respin If Necessary: If it’s not quite creamy enough, just run it through the re-spin mode once. It’s like giving it a little extra love!
-
Take a Scoop! Scrape down the sides to remove any icy bits. Then, create a lovely hole in the center of the pint to ensure even distribution.
-
Add the Magic Touch: Toss in your crushed Oreos and secure the lid once more.
-
Mix-in Mode: Run the Ninja Creami on the mix-in mode until your Oreos are beautifully dispersed throughout the ice cream.
-
Scoop and Enjoy: Finally! Scoop this divine creation into bowls and delight in every creamy bite!
Tips for Success
-
Quality Matters: Use high-quality protein powder that you genuinely enjoy. The flavor of your protein will impact the final taste, so pick one that you love!
-
Chill Faster: If you’re in a hurry, placing your pint container in the freezer for an hour before freezing overnight can help speed up the ice cream-making process.
-
Oreo Alternatives: For a twist, try adding crushed cookie alternatives, like gluten-free cookies or different flavored sandwich cookies.
-
Layer it Up: For an inspiring presentation, layer the mixture with extra Oreos in a glass, allowing for that visual ‘wow’ factor when serving.
Delicious Twists to Try
-
Mint Cookies and Cream: Incorporate mint-flavored cookies or add a few drops of mint extract to give your ice cream a refreshing twist.
-
Chocolate Chips: Feel free to throw in some mini chocolate chips in place of Oreos. They’ll create a delightful chocolatey crunch throughout your creamy base.
-
Peanut Butter Swirl: Add a swirl of peanut butter into your mixture before it’s fully mixed in for a rich, nutty flavor that elevates the classic taste.
-
Fruit Additions: For a lighter version, add some crushed strawberries or bananas. Just be mindful that you may need to balance out the sweetness with additional vanilla or another protein source.
Serving It Up Right
Once your Protein Cookies and Cream Ninja Creami Ice Cream is ready, the fun doesn’t stop there! Picture yourself scooping this decadent treat into a chilled bowl, the creamy texture just waiting to melt in your mouth. Garnish it with a few extra crushed Oreos on top for flair, or drizzle a little chocolate sauce for a sweet touch. For an indulgent experience, serve alongside a warm brownie or some sliced fresh fruit for a delightful contrast of temperatures and textures. Each spoonful is not just dessert; it’s a celebration of flavor!
Keeping it Fresh
Storing your leftover ice cream is super easy! First, transfer any uneaten portions into an airtight container. If you want to keep the texture creamy, make sure to press a piece of plastic wrap directly onto the surface to limit any air exposure. It should hold well for around a week in the freezer, but trust me: it’s so delicious it probably won’t last that long! When you’re ready to serve again, let it sit at room temperature for a few minutes before scooping to soften.
Your Questions Answered
-
Can I use a different protein flavor? Absolutely! Chocolate, strawberry, and even unflavored protein powders work well. Just be sure to adjust any accompanying ingredients to maintain the balance of flavor.
-
What if I don’t have a Ninja Creami? You can still make this! Just blend everything in a traditional ice cream maker or place the mixture in a shallow dish and stir every hour until it reaches your desired consistency.
-
Is this keto-friendly? By choosing sugar-free pudding and sticking to low-carb cookies, you can easily make this a keto-friendly dessert. It’s all about those ingredient substitutions!
-
Can I double the recipe? You bet! Just make sure your Ninja Creami pint container can handle the volume, and adjust your freeze time as needed.
There you have it—creamy, dreamy, protein-packed goodness that feels like a treat but works hard for your dietary goals! Whether it’s a post-workout reward or a sweet ending to your day, I hope you give this recipe a try. Here’s to indulging together and making life just a bit sweeter! Enjoy!
Protein Cookies and Cream Ninja Creami Ice Cream
Ingredients
Method
- In your Ninja Creami pint container, mix the milk, vanilla protein powder, and pudding mix together until smooth.
- Place the pint container in the freezer for 24 hours.
- Retrieve the pint from the freezer and place it in the outer bowl of your Ninja Creami.
- Secure the lid with the blade and install it onto the machine.
- Run the lite ice cream mode for one cycle and check consistency.
- If necessary, run it through the re-spin mode once to achieve creaminess.
- Scrape down the sides to remove icy bits and create a hole in the center.
- Add in the crushed Oreos and secure the lid.
- Run the Ninja Creami on the mix-in mode until Oreos are evenly mixed.
- Scoop the ice cream into bowls and enjoy.