How to Make Pull-Apart Graveyard Cupcakes That Wow Kids
Oh, my friends, who here isn’t utterly charmed by the magic of Halloween? It’s the perfect excuse to get creative in the kitchen, especially with treats that bring a smile (or a delightful shiver!) to every face. Today at WiseRecipes, I’m beyond excited to share a recipe that perfectly embodies that spirit: these incredible Pull-Apart…
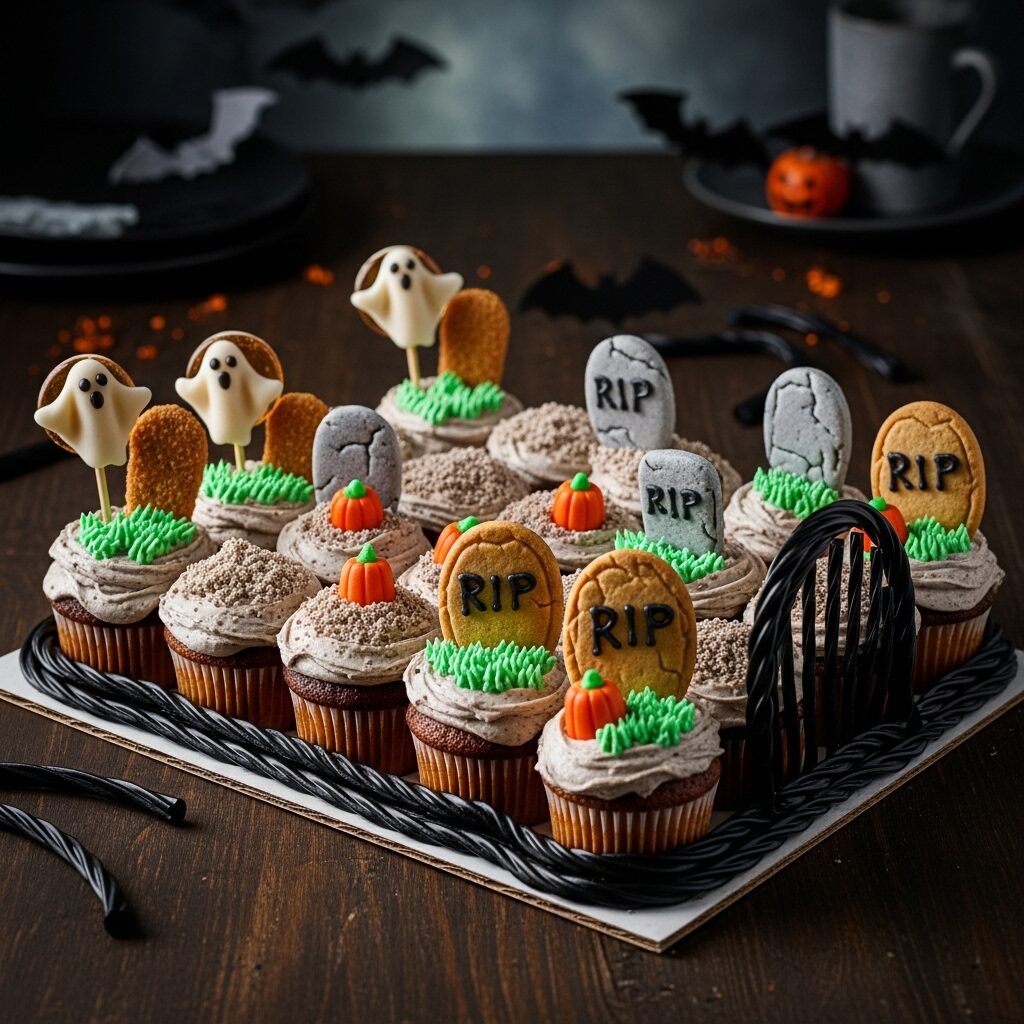
Oh, my friends, who here isn’t utterly charmed by the magic of Halloween? It’s the perfect excuse to get creative in the kitchen, especially with treats that bring a smile (or a delightful shiver!) to every face. Today at WiseRecipes, I’m beyond excited to share a recipe that perfectly embodies that spirit: these incredible Pull-Apart Graveyard Cupcakes! Seriously, prepare for pure bliss – a canvas of moist, tender cupcakes, frosted to resemble a spooky graveyard, complete with edible tombstones, adorable ghosts, and mini pumpkins. It’s a haunted masterpiece, and it is pure joy in every single bite!
I just adore a recipe that feels incredibly impressive and playful but is secretly super simple to make. This Halloween treat is exactly that! It’s a fantastic way to transform humble cupcakes into a powerhouse party food that will have everyone reaching for more. Forget complicated baking; we’re talking about ridiculously flavorful and satisfying treats that come together with just 1 hour of active prep and a bit of chilling. This isn’t just a dessert; it’s a mood-lifter, a fantastic Halloween party staple, and honestly, a guaranteed hit every single time. This Pull-Apart Graveyard Cupcakes recipe yields 24 individual monster treats, making it perfect for school parties, trick-or-treat gatherings, or any time you crave amazing, effortless fun. Trust me, once you try this incredible combination, you’ll be making them again and again!
Why These ULTIMATE! Pull-Apart Graveyard Cupcakes Will Be Your Halloween MVP!
This isn’t just another Halloween treat; it’s a creative, sweet, and incredibly satisfying culinary delight. Here’s why I’m absolutely smitten with it:
- Spooky Fun, Made Easy: These cupcakes look incredibly imaginative and festive, yet they’re surprisingly simple to make! Kids (and adults!) will adore creating their own tombstones, ghosts, and pumpkins, making it a fantastic Halloween activity.
- No Fuss Serving (Pull-Apart Magic!): The genius of a pull-apart cake is that it looks like one big cake but is actually individual cupcakes! This means no slicing, no plates needed for serving—just grab and go!
- Delicious & Tender Cupcakes: Our cupcakes are light, moist, and wonderfully tender, providing the perfect base for our rich, creamy frosting and fun decorations.
- Customizable Graveyard Fun: This is where the creativity shines! With various candy decorations, icing, and fun elements, you can personalize each cupcake and create a unique graveyard scene that’s both eerie and adorable.
- Perfect for Parties & Gifting: Yielding 24 delightful bites, these are ideal for Halloween parties, school events, or even as a fun homemade gift for friends and neighbors.
Your Shopping List for Graveyard Cake Bliss: Gather What You’ll Need
Creating these incredible Pull-Apart Graveyard Cupcakes uses a blend of classic baking ingredients and fun Halloween decorations. Here’s what you’ll want to grab to get started!
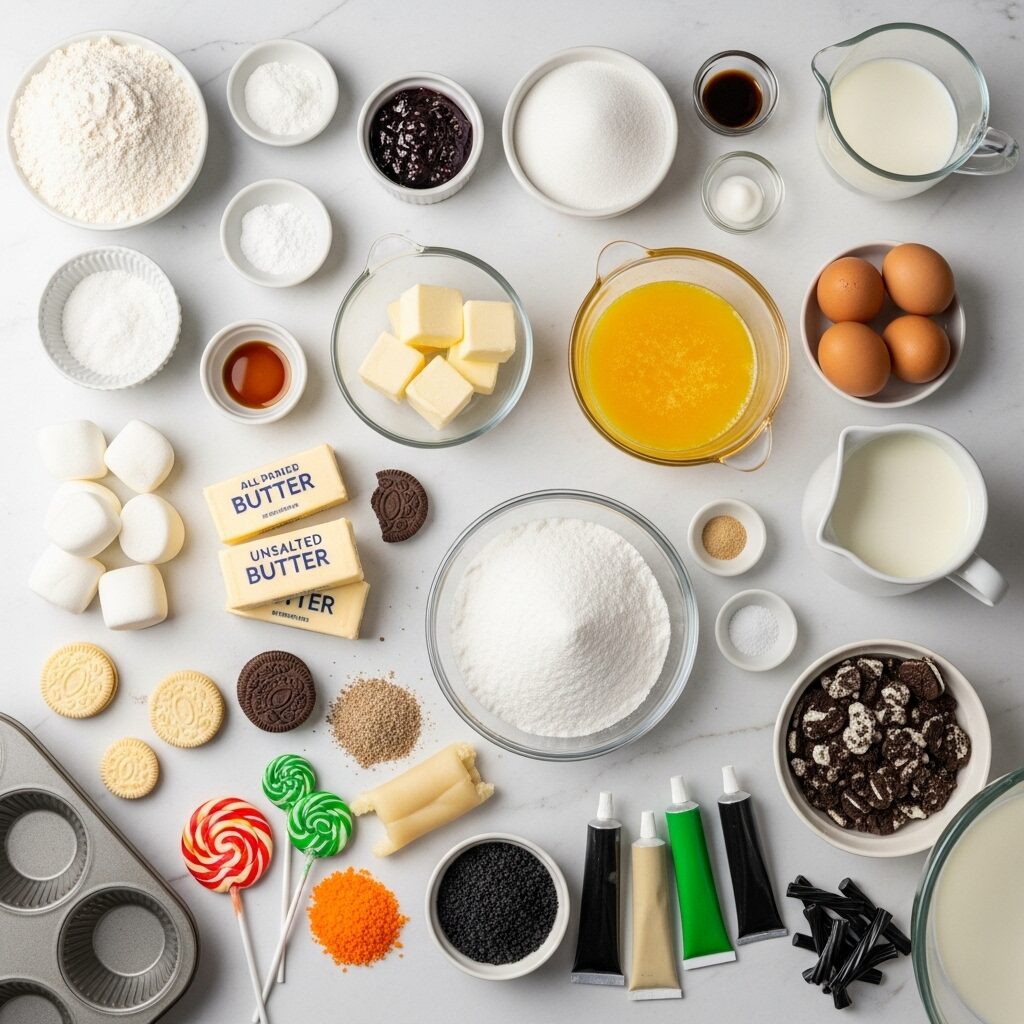
→ For the Light & Fluffy Cupcakes
- 3 cups all-purpose flour: Our base for tender cupcakes.
- 1 tablespoon baking powder: Our leavening agent for a beautiful rise.
- 1 teaspoon kosher salt: Balances sweetness and enhances flavor.
- ½ cup grape jelly: Our secret for a unique, fruity flavor swirl!
- 1 cup granulated sugar: For sweetness and a tender crumb.
- 4 large eggs, at room temperature: Binds the batter and adds richness.
- 12 ounces (3 sticks) unsalted butter, melted: For richness and moisture.
- 2 tablespoons pure vanilla extract: A warm, classic aroma.
- ⅔ cup milk: For extra moisture and tenderness.
→ For the Rich & Creamy “Dirt” Frosting
- 10 ounces (2 ½ sticks) unsalted butter, at room temperature: The base for our luscious frosting.
- ¼ teaspoon kosher salt: Balances sweetness.
- 3 ½ cups confectioners’ sugar, spooned and leveled: For sweetness and smooth consistency.
- 3 tablespoons milk: To achieve a smooth, spreadable consistency.
- 10 chocolate sandwich cookies, coarsely crushed: Our “dirt” for the frosting!
→ For the Spooky Graveyard Decorations
- 15 large white marshmallows: For filling gaps and creating a smooth surface.
- ¼ cup finely crushed chocolate sandwich cookies (about 3 cookies): Extra “dirt” for sprinkling on top!
- 1 tablespoon black or dark green decorating sugar: For extra “dirt” texture or eerie green glow.
- One 6.4-ounce tube black decorating icing, with tips: For tombstones, ghost faces, and gate details.
- 5 oval-shaped vanilla and chocolate sandwich cookies: Our perfect “tombstones”!
- One 7-ounce tube marzipan: For molding into adorable ghosts and pumpkins.
- 3 round lollipops, wrapped: Our ghost forms!
- ¼ cup orange decorating sugar: For coating our mini pumpkins.
- One 6.4-ounce tube green decorating icing, with tips: For piping on “grass” and leaves.
- Seven 8-inch pieces black licorice: For building our graveyard border and gate.
Let’s Bake! Crafting Your Perfect Pull-Apart Graveyard Cupcakes, Step-by-Step
This recipe has a few components, and some steps are quite detailed, but they are all manageable. Take your time, enjoy the creative process, and you’ll create a truly unforgettable Halloween masterpiece!
Part 1: Baking Our Fluffy Cake Layers
- Preheat Oven & Prep Tins: First things first! Preheat your oven to 350°F (175°C). Line two 12-cup standard muffin tins with paper cupcake liners.
- Whisk Dry Ingredients: In a medium bowl, whisk together the 3 cups all-purpose flour, 1 tablespoon baking powder, and 1 teaspoon kosher salt.
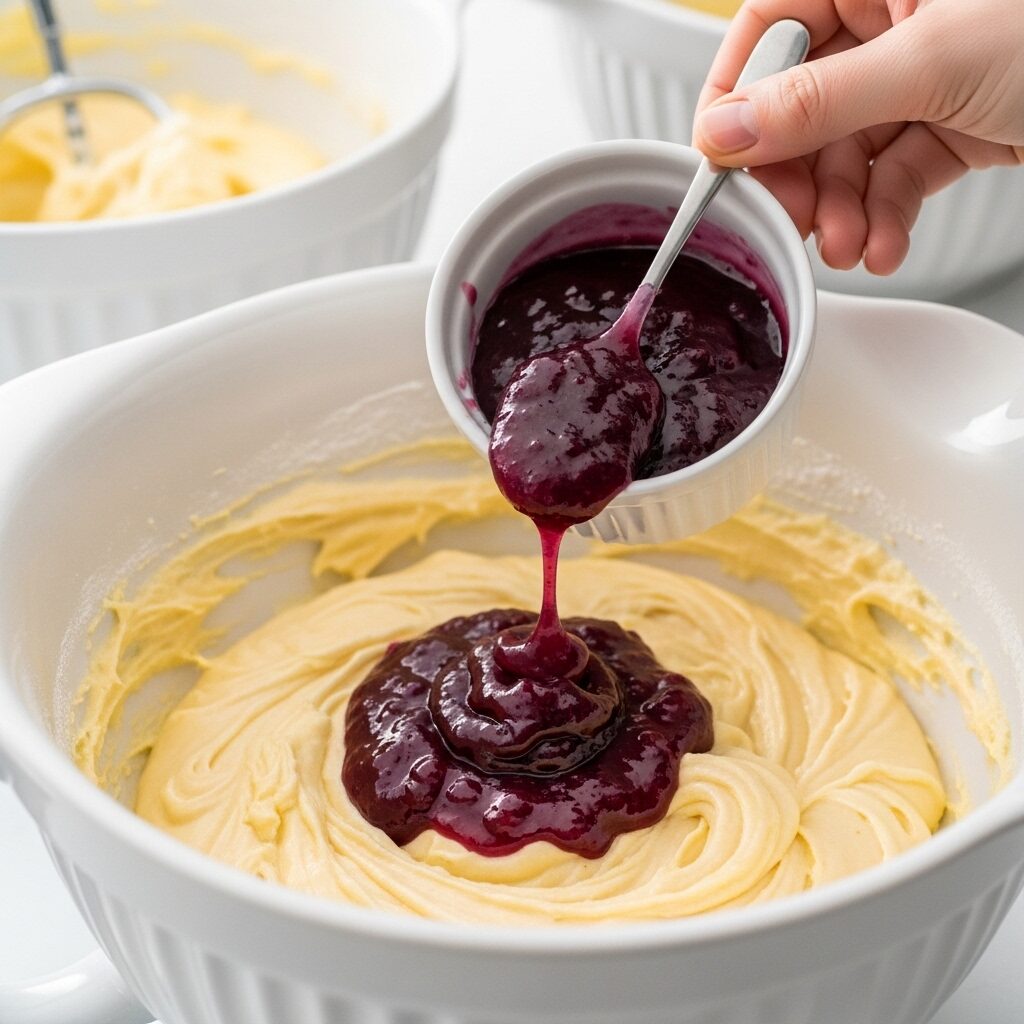
- Prepare Grape Jelly: Warm the ½ cup grape jelly in the microwave for 20 to 30 seconds until it’s loosened. Whisk until smooth, then set aside.
- Beat Wet Ingredients: In another medium bowl, beat together the 1 cup granulated sugar and 4 large room-temperature eggs with an electric mixer until light and foamy, about 2 minutes. While still beating, gradually pour in the 12 ounces (3 sticks) melted unsalted butter and then the 2 tablespoons pure vanilla extract, mixing until thoroughly combined.
- Combine & Mix Batter: While mixing slowly (on low speed), add half of the whisked dry ingredients to the wet mixture. Then add all of the 2/3 cup milk. Follow with the rest of the dry ingredients, mixing gently until just combined. Take care not to over-mix the batter!
- Swirl Grape Jelly Batter: Remove 2 cups of the plain cake batter to a separate bowl. Stir the warmed, smooth grape jelly into this 2 cups of batter until well combined – this creates our purple-swirled cupcakes!
- Fill Liners: Evenly fill the cupcake liners about two-thirds full, alternating between the yellow (plain) batter and the grape-swirled batter.
- Bake Cupcakes: Bake until a tester inserted in the center of the cupcakes comes out clean and the tops spring back lightly to the touch, 20 to 22 minutes.
- Cool Completely: Place the muffin tins on a wire rack to cool for 10 minutes. Then, remove the cupcakes from the tins to the wire rack to cool completely, about 1 hour. This is crucial before frosting!
Part 2: Preparing Our Delicious “Dirt” Frosting
- Make the Frosting: In a large bowl (or the bowl of a stand mixer fitted with a paddle attachment), beat the 10 ounces (2 ½ sticks) softened unsalted butter and ¼ teaspoon kosher salt until fluffy and combined. Gradually beat in the 3 ½ cups confectioners’ sugar, a little at a time, until smooth and fluffy.
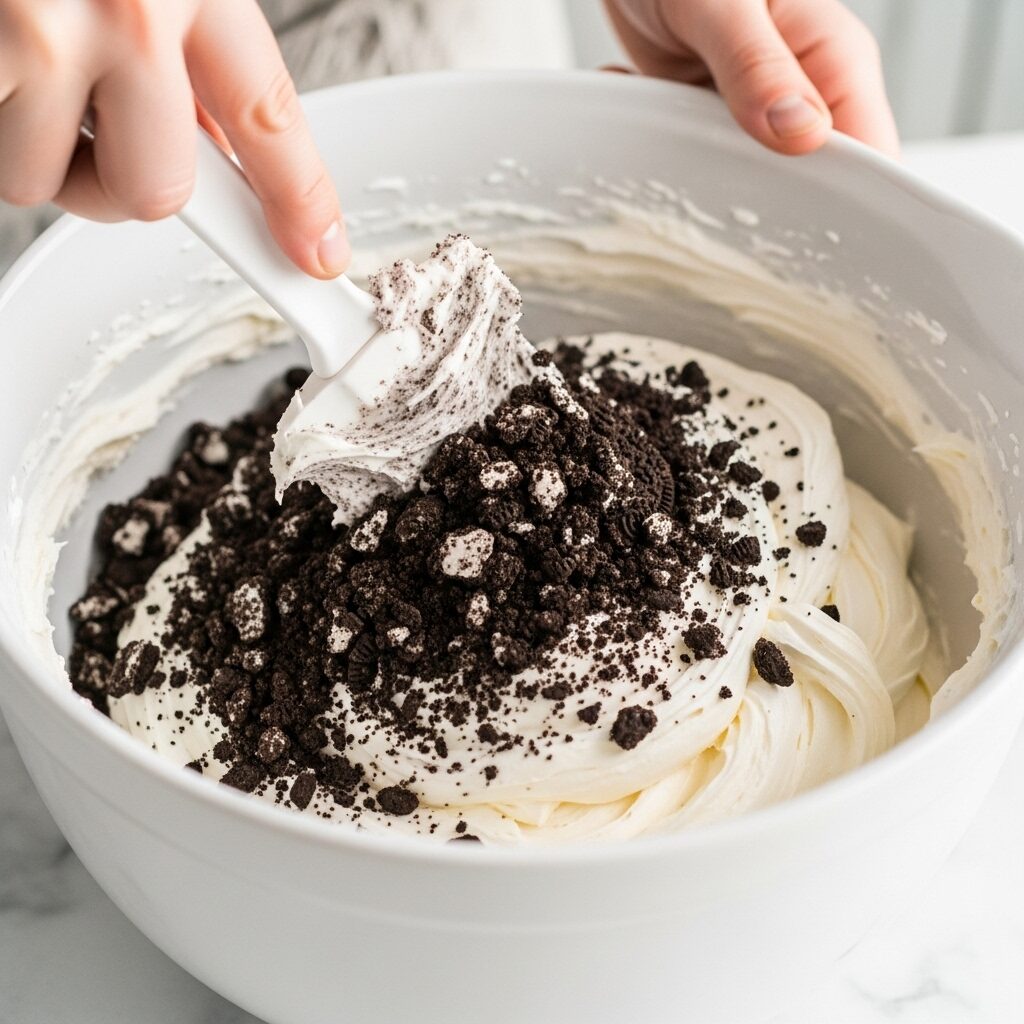
- Add Milk & Cookies: Beat in the milk one tablespoon at a time until the frosting has a nice spreadable consistency. Add the 10 coarsely crushed chocolate sandwich cookies and continue to beat until any large chunks are crushed to smaller bits and the frosting has a wonderfully speckled, grayish look, resembling fresh “dirt.”
Part 3: Decorating Our Spooky Graveyard Masterpiece!
- Arrange Cupcakes & Marshmallows: Arrange the 24 completely cooled cupcakes in a 4×6 grid on a large serving plate or cutting board. To fill in the gaps between the cupcakes and create a flat surface for the graveyard, fit a large white marshmallow between each cupcake, using 5 marshmallows per row. Spread the “dirt” frosting over the entire rectangle of cupcakes and marshmallows so it looks like one unified cake.
- Add “Dirt” & “Magic Dust”: Sprinkle the entire frosted “graveyard” with the ¼ cup finely crushed chocolate sandwich cookies and 1 tablespoon black or dark green decorating sugar. This creates a realistic “dirt” texture!
- Make Tombstones: Take your 5 oval-shaped vanilla and chocolate sandwich cookies (our tombstones!). Use the black decorating icing (fitted with a small round tip) to write “RIP” or other one-word epitaphs (like “EEK!” or “BOO!”) on the top half of each cookie. Stick these “tombstones” into the cupcakes randomly around the graveyard.
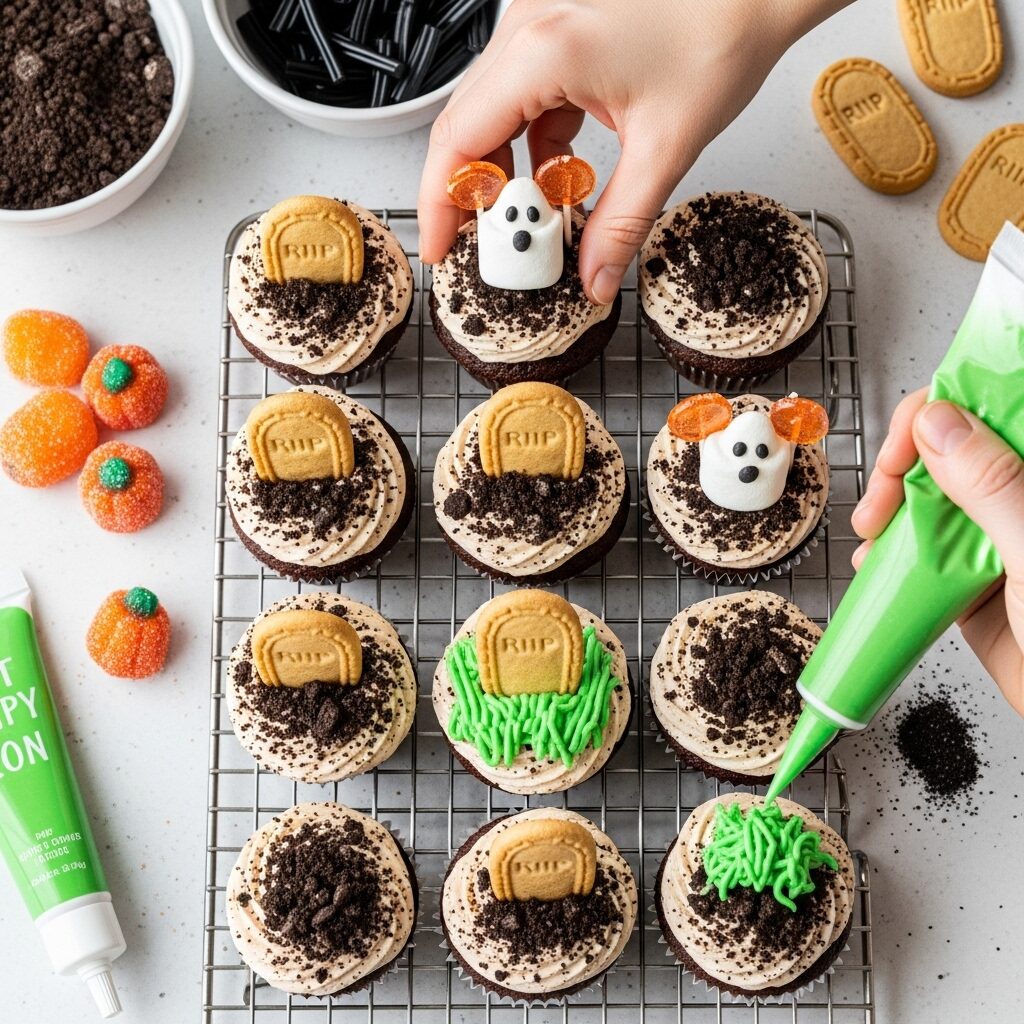
- Make Ghosts: Take two-thirds of the 7-ounce tube of marzipan. Place it between two sheets of wax paper or parchment paper and roll it out to about ⅛-inch thick. Use a 4-inch biscuit cutter to cut out 3 rounds. You may need to gather and re-roll the scraps for all 3 rounds. Drape these marzipan rounds over the 3 wrapped round lollipops, gently shaping them to look like floating ghosts. Stick these marzipan ghosts into the cupcakes randomly around the tombstones. Using the black decorating icing, dot small eyes and a mouth on each ghost.
- Make Pumpkins & Leaves: Divide the remaining marzipan into 4 small pieces and roll each into a small ball. Roll these balls in the ¼ cup orange decorating sugar until they are fully coated, resembling mini pumpkins. Place these “pumpkins” around the graveyard. Use the black icing to pipe a small stem on each pumpkin. Fit the tube of green decorating icing with a leaf or ribbon tip to dot small bits of green “grass” poking through the dirt around the graveyard and pumpkins.
- Create Border & Gate: Use 6 of the 8-inch pieces of black licorice, trimming to fit, to create a border around the entire cake (the frosted rectangle), leaving the middle of the front side open. Take the seventh piece of licorice, bend it into an upside-down “U” shape, and stick it into two cupcakes in the front to make an arched gateway.
- Chill & Serve! Chill the finished Pull-Apart Graveyard Cupcakes for at least 30 minutes to set the frosting and decorations. Serve and prepare for screams of delight!
WiseRecipes’ Top Tips for Graveyard Cake Mastery!
This show-stopping cake takes a little dedication, but these WiseRecipes insights will help you achieve Pull-Apart Graveyard Cupcakes perfection every single time!
- Room Temperature Ingredients are KEY: For your cupcakes and frosting, ensure your butter and eggs are at room temperature. This is crucial for creaming properly and achieving light, fluffy cupcakes and a smooth, lump-free frosting.
- Don’t Over-Mix the Cupcake Batter: Once you add the flour and milk, fold gently until just combined. Over-mixing develops gluten, leading to tougher cupcakes. A few small lumps are perfectly fine!
- Cool Cupcakes Completely: This is non-negotiable! Frosting warm cupcakes will cause the frosting to melt and slide off. Patience is key for a beautiful finish.
- The Crumb Coat is Your Friend: For tiered or combined cakes, a thin layer of “crumb coat” frosting (like the white frosting here) is crucial. It traps any loose crumbs, ensuring your final decorating is pristine.
- Chill Between Decorating Stages: Brief chilling (e.g., after assembling the cupcakes/marshmallows into a block, after the crumb coat) helps firm up the frosting, making subsequent decorating much easier and neater.
- Finely Crush Cookies for “Dirt”: When crushing cookies for the frosting and topping, aim for a fine, even crumb. A food processor works best for this. This creates a realistic “dirt” texture.
Creative Twists: Delicious Ways to Customize Your Spooky Cupcake Display!
This Pull-Apart Graveyard Cupcakes display is already fantastic, but it’s also a wonderful canvas for your culinary creativity! Here are some ideas I love to play with:
- Candy Worms: Poke tiny holes in the “dirt” frosting and insert colorful gummy worms, making them look like they’re crawling out of the ground!
- Chocolate Graveyard: Instead of a grape jelly swirl, make all the cupcakes chocolate-flavored, or add chocolate chips to the batter.
- Different “Tombstones”: Use small rectangular shortbread cookies or even chocolate-dipped graham crackers for different tombstone shapes.
- Spooky Sprinkles: Add extra Halloween-themed sprinkles (bats, pumpkins, ghosts) to the “dirt” or on the frosting swirls.
- Red “Blood” Drips: For a truly gory effect, drizzle a few drops of red gel icing (thinned with a tiny bit of water) strategically over the “graves” or from the mouths of the ghosts!
- Spiderweb Swirls: Use black decorating icing to pipe thin, concentric circles on some areas of the “graveyard,” then drag a toothpick from the center outwards to create spiderweb designs.
Pull-Apart Graveyard Cupcakes
Ingredients
Equipment
Method
- Preheat the oven to 350 degrees F (175C). Line two 12-cup standard muffin tins with paper cupcake liners.
- Whisk together the flour, baking powder, and salt in a medium bowl. Warm the grape jelly in the microwave (20-30 seconds), then whisk until smooth. Set aside.
- Beat sugar and eggs in another medium bowl with an electric mixer until light and foamy (about 2 minutes). Gradually pour in melted butter and then vanilla, beating well.
- Mixing slowly, add half the dry ingredients, then all the milk. Follow with the rest of the dry ingredients, taking care not to over mix.
- Remove 2 cups of the batter and stir in the grape jelly. Evenly fill liners about two-thirds full, alternating yellow and grape batter.
- Bake until a tester comes out clean (20-22 minutes). Place on a rack to cool 10 minutes, then remove cupcakes to rack to cool completely (about 1 hour).
- Beat 10 oz butter and 1/4 tsp salt in a large bowl until fluffy. Gradually beat in confectioners’ sugar until smooth and fluffy. Beat in 3 tbsp milk (1 tbsp at a time) until spreadable.
- Add 10 coarsely crushed chocolate sandwich cookies and continue to beat until large chunks are crushed to smaller bits and frosting has a speckled, grayish look.
- Arrange cupcakes in 4 rows on a large serving plate. Fit 15 marshmallows between cupcakes (5 per row) to fill gaps. Spread frosting over the whole rectangle. Sprinkle with 1/4 cup cookie crumbs and 1 tbsp black decorating sugar.
- To make tombstones: Use black decorating icing (small round tip) to write “RIP” on 5 oval sandwich cookies and stick into cupcakes.
- To make ghosts: Roll 2/3 of marzipan (1/8-inch thick), cut 3 rounds (4-inch cutter). Drape over 3 wrapped lollipops and stick into cupcakes. Dot eyes and mouth with black icing.
- To make pumpkins and leaves: Divide remaining marzipan into 4 balls. Roll in orange sugar until coated and place around graveyard. Use black icing to pipe small stem. Fit green decorating icing (leaf or ribbon tip) to dot green grass around graveyard and pumpkins.
- To make a border: Use 6 pieces of black licorice (trim to fit) for a border, leaving middle of front side open. Bend 7th piece into an upside down “U” and stick into 2 front cupcakes for a gate. Serve.
Notes
Keep It Spooky! Storing Your Halloween Masterpiece
You’ve created something truly special, so let’s make sure it stays fresh and delicious!
- Refrigerator Storage: Once completely assembled and decorated, store your Pull-Apart Graveyard Cupcakes (covered loosely with plastic wrap or a cake dome to protect decorations) in the refrigerator for up to 2-3 days.
- Serving Temperature: This dessert is best served chilled, straight from the refrigerator, to maintain the firmness of the frosting and decorations.
- Freezing Cupcakes (Un-frosted): You can freeze the baked and completely cooled cupcakes (before frosting and decorating!). Wrap each cupcake individually in plastic wrap, then place them in a freezer-safe bag. Freeze for up to 1-2 months. Thaw at room temperature before frosting.
- Freezing Frosting: The “dirt” frosting can be frozen in an airtight container for up to 1 month. Thaw overnight in the fridge, then bring to room temperature and re-whip with an electric mixer until fluffy again before using.
- Make-Ahead Prep: This recipe is perfect for making ahead! Bake cupcakes and make frosting a day or two in advance. Store separately. Assemble and decorate the entire graveyard cake on the day of your party for the freshest presentation.
FAQs: Your Top Graveyard Cupcake Questions, Answered!
Q: What is “baking spread”? Can I use butter or margarine?
A: “Baking spread” is a type of vegetable fat blend often used in baking, similar to margarine. You can typically substitute it with an equal amount of softened unsalted butter or a good quality vegetable margarine in this recipe. Ensure it’s softened to room temperature.
Q: My buttercream looks lumpy/split. What went wrong?
A: Lumpy buttercream usually occurs if the butter wasn’t soft enough, or if the icing sugar wasn’t sifted. Splitting can happen if ingredients are too cold or if it’s over-beaten. Ensure butter is room temperature, icing sugar is sifted, and beat only until smooth and fluffy.
Q: Can I use regular food coloring instead of gel or paste?
A: Gel or paste food coloring is highly recommended for frosting. It’s much more concentrated than liquid food coloring, so you need less to achieve vibrant colors, which prevents thinning out your frosting.
Q: What are chocolate sandwich cookies? Can I use another type?
A: Chocolate sandwich cookies (like Oreos) are used for the “dirt” effect. You can substitute with other dark chocolate cookies, chocolate wafers, or even crushed brownies for a similar dark, crumbly texture.
Q: How do I store fresh marzipan?
A: Unused marzipan should be wrapped very tightly in plastic wrap (to prevent it from drying out), then stored in an airtight container in a cool, dry place. It will last for several weeks.
And there you have it, my friends—your guide to crafting the most delightful, impressive, and truly satisfying Pull-Apart Graveyard Cupcakes! This WiseRecipes creation is more than just a dessert; it’s a testament to how simple ingredients, when treated with a little love and smart steps, can come together to create something truly extraordinary. It’s a vibrant, exciting meal that you’ll genuinely look forward to eating, day after day.
I am genuinely so excited for you to try these and experience the delicious magic yourself. Please, please come back and let me know in the comments below what your favorite part of this spooky-fun dessert was, or any fun twists you tried! Happy cooking from WiseRecipes!