The Easiest Pumpkin Dump Cake Recipe (From a Cake Mix!)
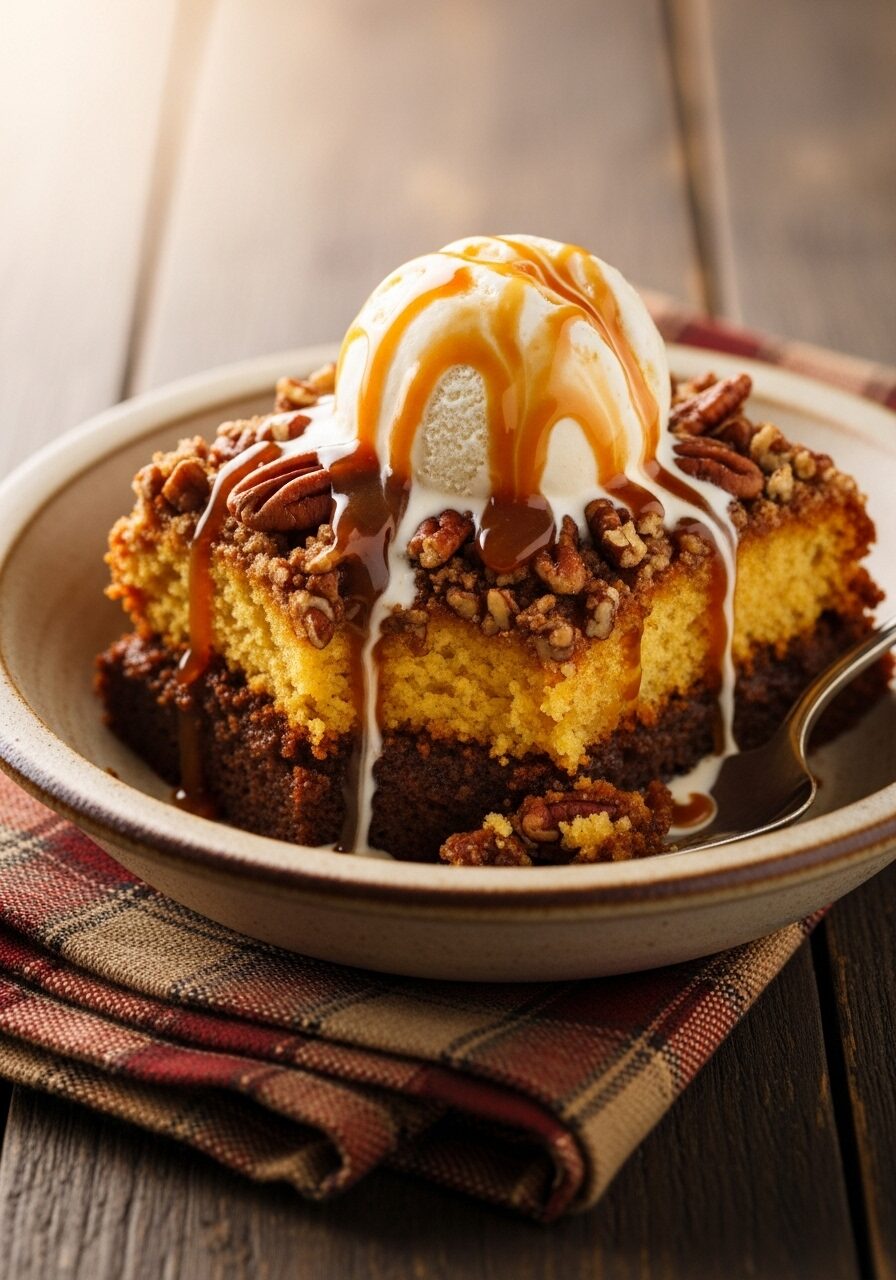
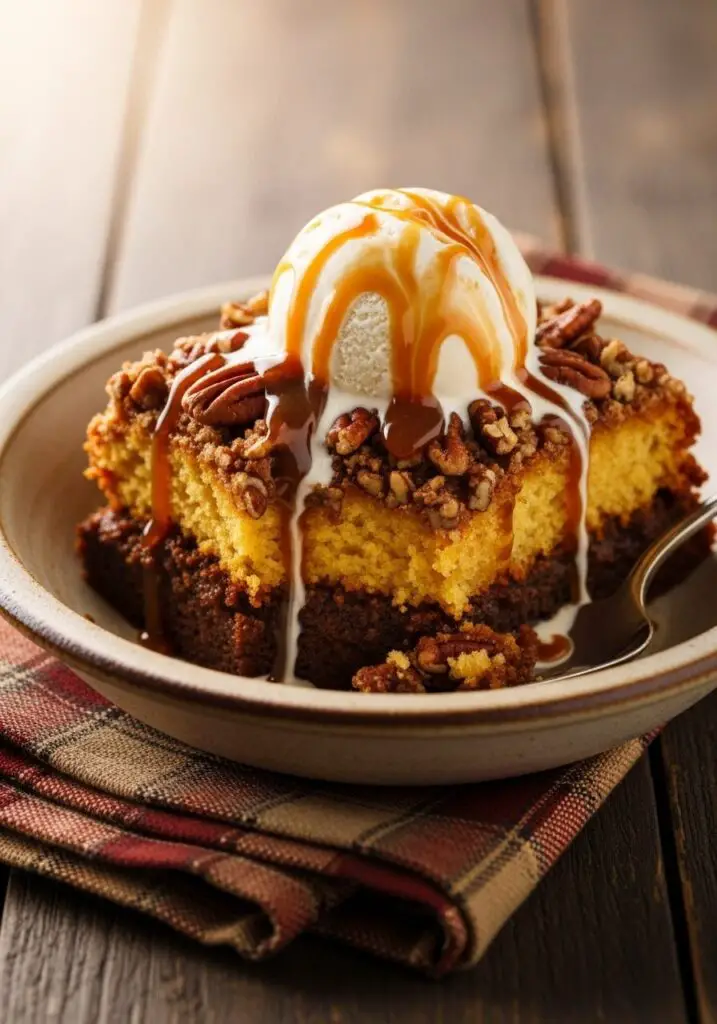
Imagine a dessert that magically creates its own layers in the oven: a rich, custardy pumpkin pie-like base, a tender, buttery cake middle, and a crunchy, toasted pecan topping. Now, imagine you can make this masterpiece by literally just dumping a few ingredients into a pan. That is the sheer, unadulterated brilliance of this Pumpkin…
Imagine a dessert that magically creates its own layers in the oven: a rich, custardy pumpkin pie-like base, a tender, buttery cake middle, and a crunchy, toasted pecan topping. Now, imagine you can make this masterpiece by literally just dumping a few ingredients into a pan. That is the sheer, unadulterated brilliance of this Pumpkin Dump Cake.
Here’s the thing about me and fall gatherings: I always want to bring the most delicious, crowd-pleasing dessert, but I don’t always have the time for a complicated, multi-step recipe. This dump cake is my secret weapon. It’s the recipe I turn to when I need something that tastes like I slaved away in the kitchen all day, but actually took me about 10 minutes of active prep time. It’s a miracle in a 9×13 pan.
I promise you, this is one of the most rewarding, low-effort desserts you will ever make. You don’t even need a mixing bowl for the topping! It’s the perfect blend of textures—creamy, cakey, and crunchy—and it’s brimming with all the cozy pumpkin spice flavors we crave during the fall.
Get ready to master the ultimate shortcut dessert that will have everyone scraping the pan and begging you for the recipe.
Why This Pumpkin Dump Cake is a Fall Essential!
You are going to be absolutely shocked at how something so easy can be this incredibly delicious. This recipe is a legend for a reason! Here’s why you’ll love it:
- The Easiest Dessert You’ll Ever Make: The name says it all! You just “dump” the layers in a pan. No complicated mixing, no fancy techniques. It’s practically foolproof.
- A Perfect Trio of Textures: It magically separates into three distinct, delicious layers: a creamy pumpkin custard, a moist butter cake, and a crunchy pecan topping.
- Uses Simple Pantry Staples: This recipe is a hero of the pantry, using canned pumpkin and a box of cake mix to create something truly spectacular.
- Perfect for Feeding a Crowd: Made in a 9×13-inch pan, this recipe makes enough to serve at any holiday gathering, potluck, or family dinner.
- The Ultimate Fall Comfort Food: It’s warm, gooey, spiced, and everything you want in a fall dessert. It’s pure comfort in every scoop.
Recipe Snapshot
| Prep Time | 10 minutes |
| Cook Time | 50 minutes |
| Total Time | 1 hour |
| Servings | 12 servings |
| Calories | 396 kcal per serving |
| Course | Dessert |
| Cuisine | American |
| Difficulty/Method | Easy / Baking |
Your Shopping List for This Easy Dessert
This recipe comes together with a handful of simple, easy-to-find ingredients. Let’s break it down.

→ For the Pumpkin Pie Filling
- 1 large can (29-30 oz) pumpkin puree → The heart of our dessert! Make sure it’s 100% pure pumpkin, not the pre-spiced pie filling.
- 1 can (12 oz) evaporated milk → The secret to a rich, creamy, and perfectly set custard base.
- ¾ cup brown sugar → For a deep, caramel-like sweetness.
- 2 teaspoons pumpkin pie spice & ½ teaspoon kosher salt → The essential warm spices and a touch of salt to balance the flavor.
- 3 large eggs → To set the custard and make it rich.
→ For the Buttery Pecan Topping
- 1 box (15.25 oz) yellow cake mix → The ultimate shortcut for a perfect cake layer!
- 1 cup chopped pecans → For that wonderful, toasty, crunchy topping.
- ½ cup (1 stick) unsalted butter, melted → This is what transforms the dry cake mix into a moist cake and crunchy topping.
Let’s Get Baking! The Easiest “Dump and Bake” Ever
Alright, get ready for a recipe that feels like a magic trick. This comes together so fast, you won’t believe it.
Part 1: The Creamy Pumpkin Base
- Prep Your Oven and Pan: First, preheat your oven to 350°F (177°C). Grab a 9×13-inch baking pan and give it a good grease.
- Mix the Filling: In a large bowl, whisk together the pumpkin puree, evaporated milk, brown sugar, pumpkin pie spice, and salt until it’s smooth.
- Add the Eggs: Whisk in the eggs until everything is just combined.
- Pour it In: Pour this beautiful pumpkin mixture into the bottom of your prepared baking pan and spread it into an even layer.
Part 2: The “Dump” Topping & Bake
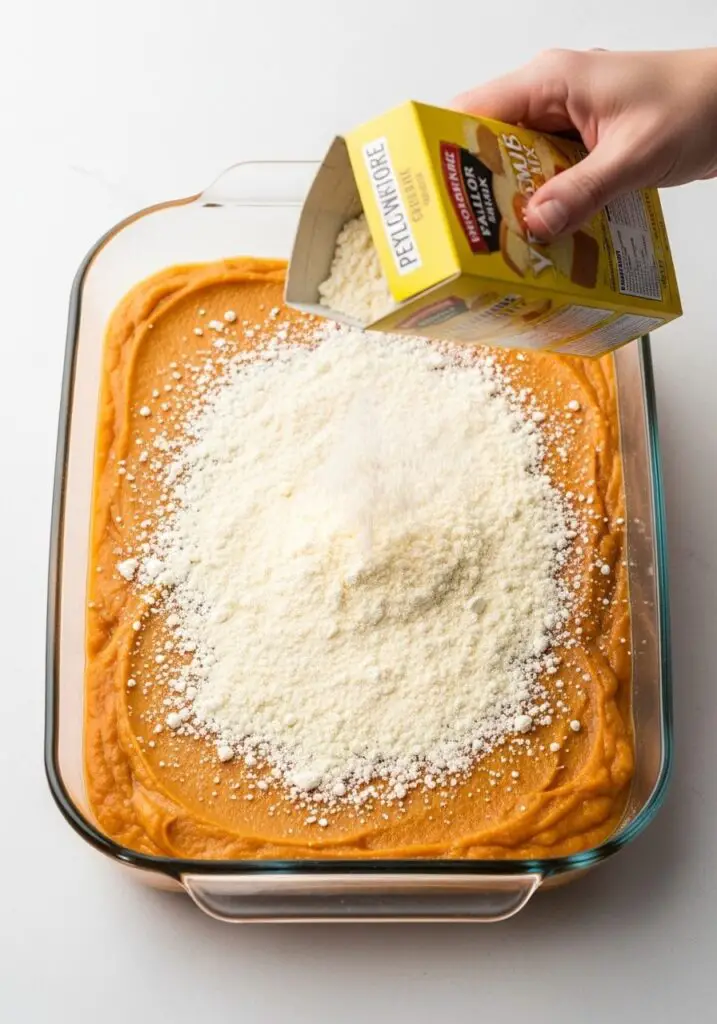
- The Cake Layer: Now for the fun part! Open your box of yellow cake mix and sprinkle the dry mix as evenly as you can all over the top of the pumpkin mixture. Do NOT stir it in!
- The Pecan Layer: Sprinkle the chopped pecans evenly over the dry cake mix.
- The Butter Drizzle: Drizzle the melted butter as evenly as possible over the entire surface of the cake mix and pecans. Try to cover as much of the dry mix as you can.
- Bake to Golden Perfection: Place the pan in the oven and bake for 50-55 minutes. Check it around the 30-minute mark; if the top is getting too brown, just loosely tent it with a piece of aluminum foil. It’s done when a toothpick inserted into the center comes out relatively clean (it will be a dense cake, not light and airy).
- Cool and Serve: Let the dump cake cool on a wire rack for at least 20-30 minutes before serving. It’s absolutely divine served warm with a scoop of vanilla ice cream or a dollop of whipped cream!

WiseRecipes’ Top Tips for a Perfect Dump Cake
This recipe is practically foolproof, but these little details ensure it comes out perfectly every single time.
- Do NOT Stir the Layers! I cannot stress this enough. The magic of a dump cake is that the layers separate and bake into distinct textures. Resist every urge you have to stir that cake mix into the pumpkin!
- Drizzle the Butter as Evenly as Possible. The melted butter is what hydrates the dry cake mix. Try to drizzle it slowly and evenly over the entire surface to avoid ending up with dry, powdery patches on your finished cake.
- Don’t Be Afraid to Tent with Foil. The pecans and the sugar in the cake mix can cause the top to brown quite quickly. Checking at the 30-minute mark and loosely covering it with foil if needed is the key to a perfectly baked cake that isn’t burnt on top.
- Let It Set! This cake is gooey and custardy, especially when it’s hot from the oven. Letting it cool on a wire rack for at least 20-30 minutes is crucial for it to set up, making it much easier to scoop and serve neat slices.
- Use Pumpkin PUREE, Not Pie Filling. Pumpkin pie filling is already sweetened and spiced, which would throw off the balance of this recipe and make it cloyingly sweet. Stick with 100% pure pumpkin puree.
Creative Twists: Delicious Ways to Customize It
The beauty of a dump cake is its simplicity, which makes it a fantastic canvas for your own ideas!
- Use a Spice Cake Mix: Swap the yellow cake mix for a spice cake mix for an even deeper, more intense fall spice flavor. A butter pecan cake mix would also be incredible.
- Add a Layer of Toffee Bits: Sprinkle a cup of English toffee bits over the pumpkin layer before adding the cake mix for a wonderful, crunchy caramel surprise.
- Different Nuts: Not a pecan fan? Chopped walnuts, sliced almonds, or even pumpkin seeds (pepitas) would be delicious.
- Chocolate Chip Surprise: Sprinkle a cup of semi-sweet or white chocolate chips over the pumpkin layer.
- Add a Caramel Drizzle: After it’s baked, drizzle the top with a generous amount of salted caramel sauce.
- Coconut Twist: Sprinkle a cup of sweetened shredded coconut over the cake mix along with the pecans.
- Cream Cheese Version: Dollop small spoonfuls of a softened cream cheese mixture (8 oz cream cheese, 1 egg, 1/4 cup sugar) over the pumpkin layer before adding the cake mix.
- Make it with Sweet Potato: Swap the pumpkin puree for an equal amount of canned sweet potato puree for a different but equally delicious twist.
Keep It Fresh! Storing Your Pumpkin Dump Cake
The leftovers are fantastic, especially for a sneaky breakfast the next day! Here’s how to store it.
- Refrigerator: Because of the custardy pumpkin base, this cake should be stored in the refrigerator. Cover the pan tightly with plastic wrap or foil, or transfer slices to an airtight container. It will keep beautifully for up to 5 days.
- Serving Leftovers: It’s delicious served cold, straight from the fridge! You can also let it come to room temperature, or my personal favorite: warm up a slice in the microwave for 20-30 seconds until it’s gooey and wonderful again.
- Freezing: You can freeze this cake. Let it cool completely, then wrap individual slices in plastic wrap and then foil. It will keep for up to 3 months. Thaw in the fridge or microwave from frozen.
Easy Pumpkin Dump Cake
Ingredients
Equipment
Method
- Preheat oven to 350°F (177°C). Grease a 9×13-inch baking pan.
- In a large bowl, whisk the pumpkin puree, evaporated milk, brown sugar, pumpkin pie spice, and salt together until smooth.
- Whisk in the eggs until just combined.
- Pour the pumpkin mixture into the prepared baking pan and spread evenly.
- Sprinkle the dry cake mix evenly over the pumpkin mixture. Then, sprinkle the chopped pecans over the cake mix.
- Drizzle the melted butter as evenly as possible over the top.
- Bake for 50-55 minutes. If the top begins to brown too quickly, loosely cover with foil. The cake is done when a toothpick inserted into the center comes out relatively clean.
- Let cool for at least 20-30 minutes before serving. Serve warm with whipped cream or ice cream if desired.
Notes
FAQs: Your Pumpkin Dump Cake Questions, Answered!
Do I really just dump the dry cake mix on top? It feels wrong!
I know, it feels like you’re breaking all the baking rules! But yes, you absolutely just sprinkle the dry mix right on top. As it bakes, the melted butter seeps down and combines with the cake mix, creating a moist, tender cake layer on top of the pumpkin custard. It’s a little bit of kitchen magic!
Can I use a homemade cake mix?
You can! You’ll need about 15-16 ounces of a homemade yellow cake mix. The key is just to sprinkle the dry mix evenly over the top, just as you would with the boxed version.
My topping has dry, powdery spots. What happened?
This is the most common dump cake issue, and it just means the melted butter didn’t quite reach those spots. The key is to drizzle the butter as slowly and as evenly as you possibly can to saturate all of the dry mix. Don’t worry if it’s not perfect—those little dry spots are still tasty!
Can I assemble this cake ahead of time?
I would not recommend assembling this one too far in advance. If you let the wet pumpkin layer sit with the dry cake mix on top for too long before baking, the cake mix can start to absorb moisture from the bottom, which can mess with the formation of those distinct, magical layers.
My Final Thoughts: The Easiest Fall Dessert Ever
This Pumpkin Dump Cake is the ultimate proof that you don’t need to be a professional baker to create a truly spectacular, crowd-pleasing dessert. It’s a warm, gooey, and incredibly satisfying celebration of fall flavors that is so easy, it almost feels like cheating. I hope this simple, magical recipe brings a lot of smiles to your table this season!