The Ultimate Pumpkin Patch Pull-Apart Cupcake Cake (So Easy!)
Imagine a sprawling, edible pumpkin patch that’s the instant centerpiece of your dessert table, where every piece is a perfect, personal-sized mini cupcake. That, my friends, is the absolute joy of this Pumpkin Patch Pull-Apart Cake. This isn’t just a dessert; it’s a fun, festive, and incredibly easy project that will have kids and adults…
Imagine a sprawling, edible pumpkin patch that’s the instant centerpiece of your dessert table, where every piece is a perfect, personal-sized mini cupcake. That, my friends, is the absolute joy of this Pumpkin Patch Pull-Apart Cake. This isn’t just a dessert; it’s a fun, festive, and incredibly easy project that will have kids and adults alike buzzing with excitement.
I promise you, there is no greater feeling than placing this vibrant, giant pumpkin on the table and watching everyone’s faces light up. Each mini cupcake is incredibly moist, thanks to the addition of pineapple and coconut, and the whole creation is a delight to pull apart and enjoy. It’s the perfect, low-stress way to make a big impression.
Get ready to create the most talked-about, fun-to-eat dessert of your Thanksgiving or Halloween gathering. This is a recipe for pure, delicious fun!

Why This Pull-Apart Cake is a Holiday Hero!
You are going to have an absolute blast making this festive creation. It’s a guaranteed hit for so many wonderful reasons:
- A True Show-Stopping Centerpiece: This isn’t just a dessert; it’s an edible decoration! The giant, colorful pumpkin shape is incredibly eye-catching and fun.
- Fantastically Fun and Easy to Make: Using a cake mix and pre-made frosting makes this a low-stress project that’s perfect for getting the kids involved in the holiday preparations.
- No Cutting Required!: The “pull-apart” nature means serving is a breeze. Guests can simply grab a mini cupcake, making it perfect for parties and casual gatherings.
- Deliciously Moist Cupcakes: The simple trick of adding crushed pineapple and coconut to a carrot cake mix creates an unbelievably moist, tender, and flavorful cupcake base.
- Feeds a Huge Crowd: This recipe makes a whopping 84 mini cupcakes, ensuring there’s more than enough for a large family gathering or a classroom party.
Recipe Snapshot
| Prep Time | 30 minutes |
| Cook Time | 45 minutes |
| Decorating Time | 15 minutes |
| Total Time | 1 hour 30 minutes |
| Servings | Serves 20-25 (yields 84 minis) |
| Calories | ~290 kcal per serving (3-4 minis) |
| Course | Dessert |
| Cuisine | American |
| Difficulty/Method | Easy / Baking & Decorating |
Your Shopping List for This Festive Project
This recipe is all about fun, easy-to-find ingredients for a stress-free and impressive dessert.
→ For the Cupcake Base
- 1 box carrot cake mix → Plus ingredients on the box to prepare it (usually oil, water, and eggs).
- 1 can crushed pineapple → Do not drain! The juice is key to the moisture.
- 1 cup sweetened flaked coconut → Adds wonderful texture and flavor.
→ For the Pumpkin Decorations
- 1 tub (16 oz) white frosting → Vanilla or cream cheese frosting works great.
- Orange, green, and chocolate brown gel food color → Gel colors give you the most vibrant and true colors.
- 1 cup chocolate frosting → For the face and stem. You can use store-bought or tint some of your white frosting brown.
- Chocolate jimmie sprinkles & pumpkin sprinkles → Optional, for a fun and festive border.
Let’s Make a Pumpkin Patch! Your Step-by-Step Guide
Ready to assemble the cutest dessert of the season? Let’s break it down into simple, fun stages.
Part 1: Bake the Mini Cupcakes
- Preheat and Prep: Preheat your oven to 350°F. Line miniature muffin pans with paper liners.
- Mix the Batter: In a large bowl, prepare the carrot cake mix according to the package directions. Once mixed, stir in the entire can of crushed pineapple (with juice) and the sweetened flaked coconut until just blended.
- Fill and Bake: Spoon about 1 tablespoon of batter into each mini muffin cup. Bake for 15 minutes, or until a wooden pick inserted in the center comes out clean.
- Cool Completely: Let the cupcakes cool in the pan for 5 minutes before removing them to a wire rack to cool completely. This is a crucial step—never frost warm cupcakes!
Part 2: Arrange and Frost the Pumpkin
- Tint the Frostings: Tint 4 cups of the white frosting a vibrant orange. Tint the remaining ½ cup a leafy green. Spoon the green and chocolate frostings into separate ziptop bags and snip off a tiny corner of each for piping.
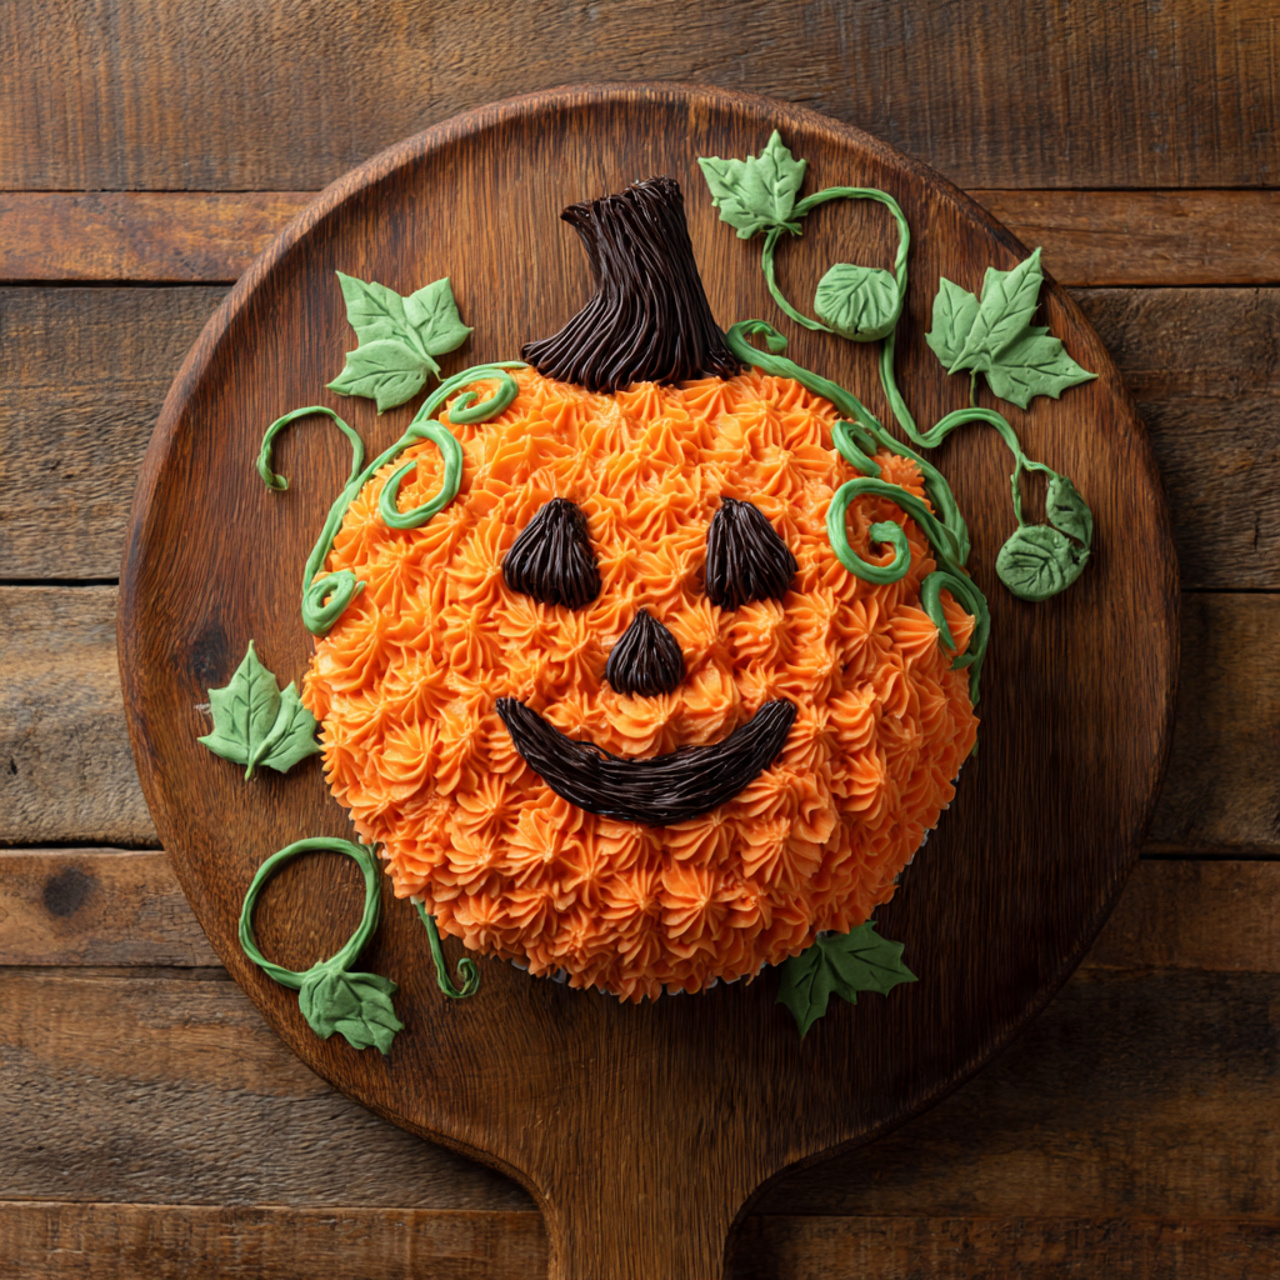
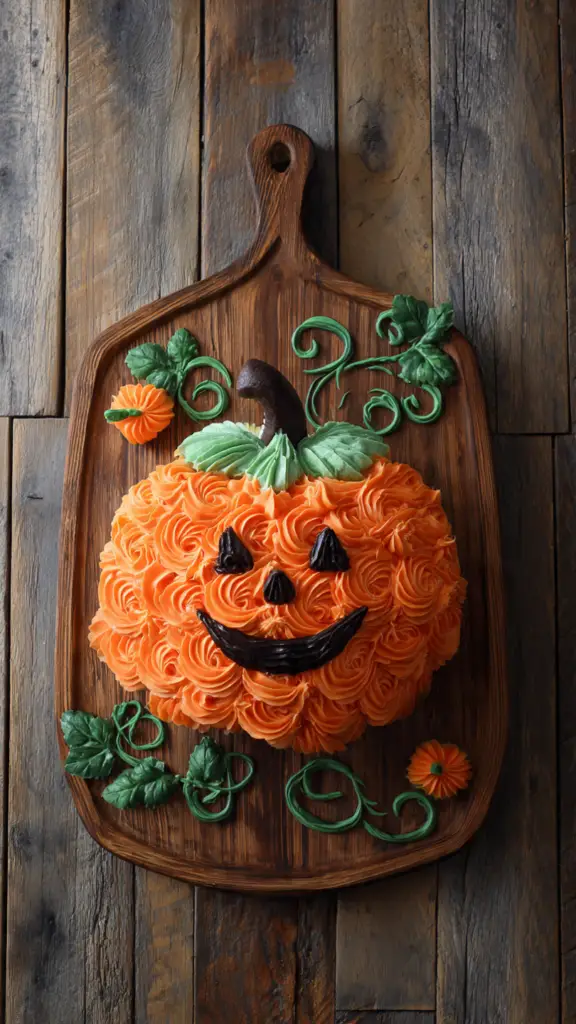
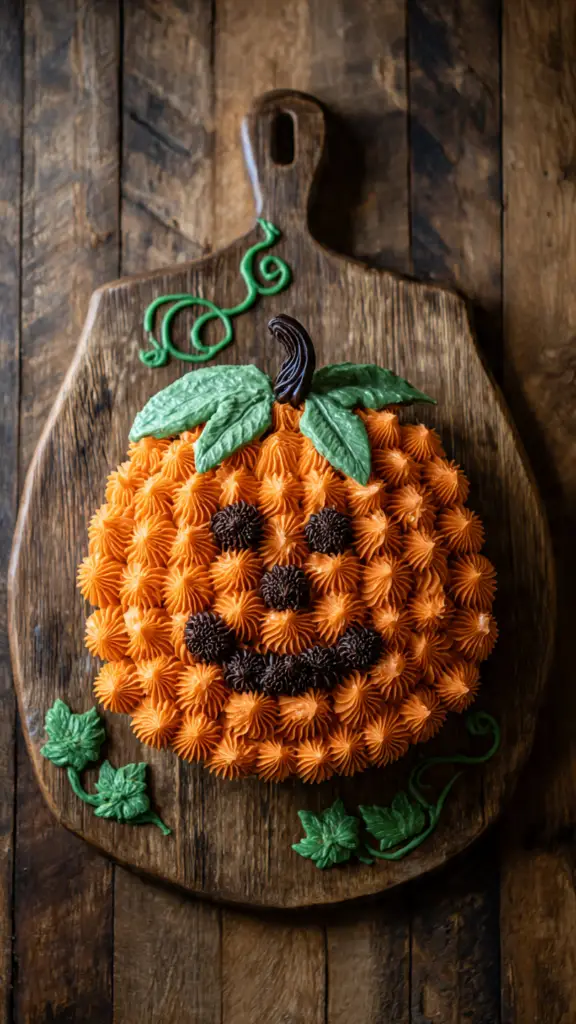
- Create Your Pumpkin Shape: On a very large platter or a foil-covered piece of cardboard (about 20×16 inches), arrange the completely cooled cupcakes close together to form a large, round pumpkin shape.
- Frost the Body: Using an offset spatula, spread the orange frosting over the entire body of the pumpkin, covering all the cupcakes to create one smooth, unified surface.
Part 3: Decorate Your Pumpkin
- Pipe the Details: Use the bag of chocolate frosting to pipe a stem at the top of the pumpkin. Then, pipe the eyes, nose, and a happy mouth to create a jack-o’-lantern face.
- Add Leaves and Vines: Use the bag of green frosting to pipe a few leaves and curly vines coming off the stem.
- Create a Border (Optional): If you have leftover colored frosting, you can create a fun multi-colored border around the pumpkin by piping small stars and adding festive sprinkles.
- Serve: Let the cake stand for a bit for the frosting to set, or present it immediately for everyone to pull apart and enjoy!
Pumpkin Patch Pull-Apart Cupcake Cake
Ingredients
Equipment
Method
- Heat oven to 350ºF. Line miniature muffin pans with paper liners.
- Prepare cake mix as package directs; stir in the crushed pineapple and coconut until just blended. Spoon 1 Tbsp of batter into each muffin cup.
- Bake for 15 minutes or until a wooden pick inserted in the center comes out clean. Let cupcakes cool in the pan for 5 minutes before removing to a wire rack to cool completely.
- Tint 4 cups of vanilla frosting orange and the remaining 1⁄2 cup green. Spoon green and chocolate frosting into separate ziptop bags and snip off a tiny corner.
- On a large flat platter, arrange the cooled cupcakes tightly together into a pumpkin shape.
- Frost the body of the pumpkin with the orange frosting, creating a smooth, unified surface.
- Pipe the pumpkin’s face and stem with the chocolate frosting. Use the green frosting to pipe leaves and vines. Decorate with sprinkles if desired.
Notes
WiseRecipes’ Top Tips for a Perfect Pull-Apart Cake
These simple secrets will ensure your festive creation is a huge success.
- Cool the Cupcakes Completely. This is the absolute most important rule! If you try to arrange or frost warm cupcakes, the frosting will melt, and you’ll have a sticky mess. Patience is your best friend.
- Don’t Drain the Pineapple. The juice from the crushed pineapple is a key ingredient that makes the carrot cake mix incredibly moist and flavorful. Add the whole can!
- Use a Large, Sturdy Base. You’ll need a very large serving platter, a big cutting board, or a piece of sturdy cardboard covered in foil or parchment paper to build your creation. Plan this out before you start arranging cupcakes.
- The Freezer Trick for Pans. The recipe note is genius! If you only have one mini muffin pan, you can speed up the process by placing the hot, empty pan in the freezer for a few minutes to cool it down quickly before lining it for the next batch.
- Arrange Cupcakes Tightly. When you’re forming the pumpkin shape, nestle the mini cupcakes as close together as possible. This minimizes the gaps and makes it much easier to create a smooth, unified frosted surface.
Keep It Fresh! Storing Your Creation
This cupcake cake is best enjoyed fresh but stores well for a couple of days.
- Room Temperature: Store the finished pull-apart cake loosely covered with plastic wrap or foil at room temperature for up to 2-3 days. There’s no need to refrigerate it, which can dry out the cake.
FAQs: Your Pull-Apart Cake Questions, Answered!
What if I can’t find carrot cake mix?
A spice cake mix would be the perfect substitute and would taste amazing with the pineapple and coconut. In a pinch, a yellow or butter cake mix would also work well.
How many mini cupcakes does a standard box mix make?
A standard cake mix will typically yield between 60 and 72 mini cupcakes, which is plenty for creating a large and impressive pumpkin shape. The recipe yield of 84 might be based on a larger-format mix.
Can I make homemade frosting instead of using store-bought?
Absolutely! A classic American buttercream or a cream cheese frosting would be delicious. You’ll need a large batch—about 5 cups total—to have enough for tinting and decorating.
What’s the easiest way to tint frosting a vibrant orange?
Gel food coloring is the key. It’s highly concentrated, so you don’t need to add a lot of liquid, which can change the frosting’s consistency. Start with a few drops, mix well, and add more until you reach your desired shade of pumpkin orange.
Final Thoughts: Your Most Playful Holiday Dessert
There is nothing more delightful than a dessert that doubles as a fun activity. This Pumpkin Patch Pull-Apart Cake is a celebration of creativity, simplicity, and the joy of sharing. It’s the perfect, stress-free way to bring a huge smile to everyone’s face this holiday season. Happy decorating!