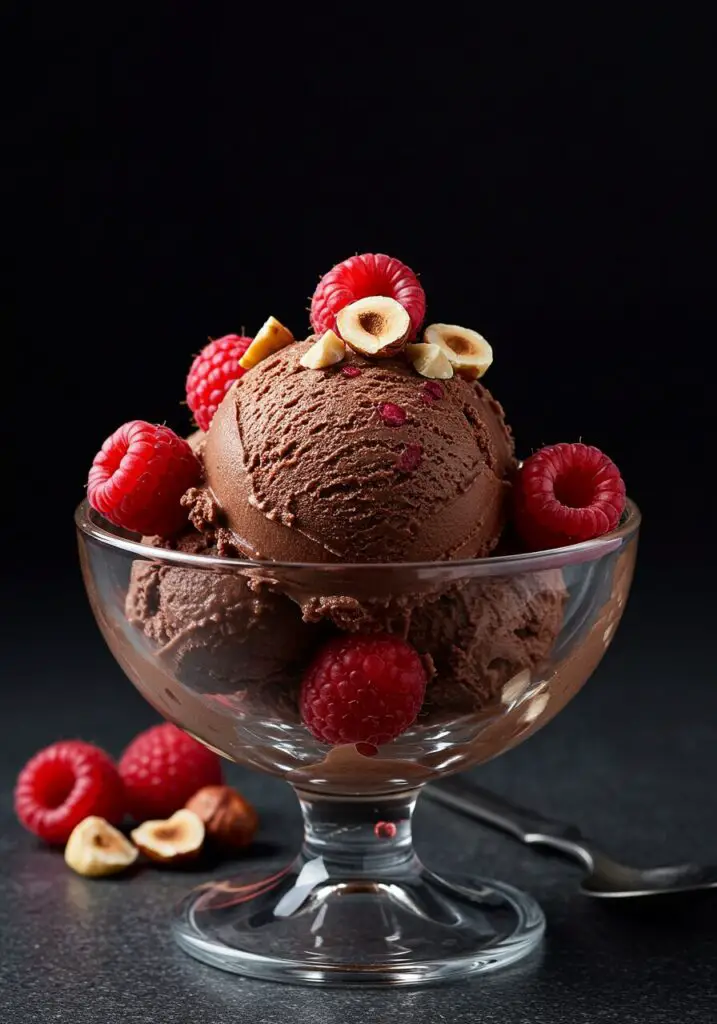
The Easiest Blender Chocolate Raspberry Ice Cream (Rich & Creamy!)
Hello, my friends! Get ready to have your mind blown by what might just be the easiest and most decadent homemade ice cream you will ever make. Today, we are making a luxuriously rich and creamy Chocolate Raspberry Ice Cream, and we’re doing it all in a blender—no ice cream maker, no complicated custard, and…
Hello, my friends! Get ready to have your mind blown by what might just be the easiest and most decadent homemade ice cream you will ever make. Today, we are making a luxuriously rich and creamy Chocolate Raspberry Ice Cream, and we’re doing it all in a blender—no ice cream maker, no complicated custard, and no churning required. Imagine a frozen dessert so velvety and smooth it feels like a high-end mousse, with the deep, rich flavor of dark chocolate perfectly cut by the bright, tartness of fresh raspberries.
This recipe uses a brilliant, unconventional method, relying on healthy fats from eggs, butter, and oils to create an incredibly smooth, low-carb base that freezes beautifully without becoming icy. It’s a fantastic treat for anyone looking for a richer, more satisfying frozen dessert without all the sugar. Let’s make something truly spectacular!
A Quick Note on “Keto-Friendly” and Sweeteners
Before we dive in, let’s have a quick chat. While this style of ice cream is very popular in low-carb and ketogenic communities for its high-fat, low-sugar profile, the original recipe inspiration uses a teaspoon of honey. Honey is a form of sugar and is not keto-friendly.
To make this recipe truly keto, simply replace the 1 teaspoon of honey with a keto-approved sweetener to your taste. You could use 1-2 tablespoons of powdered erythritol or allulose, or a few drops of liquid monk fruit or stevia. The recipe is delicious either way, but this is a crucial swap for anyone strictly following a ketogenic diet!
Why You Will Fall in Love with This Blender Ice Cream
This recipe is a true game-changer for homemade frozen desserts. Here’s why it’s so special.
- Incredibly Rich and Velvety: The high-fat content from the eggs, butter, and oils creates a luxuriously smooth, dense, and creamy texture that is unlike traditional ice cream. It’s more like a frozen mousse or custard.
- The Easiest Method Ever: You simply add all the ingredients to a blender and blitz! It is genuinely one of the simplest ways to make a gourmet-tasting frozen dessert at home.
- No Ice Cream Maker Needed: Your blender does all the work of emulsifying the fats, which is the key to the creamy texture. No churning required.
- A Perfect Flavor Combination: The deep, dark chocolate, the tart raspberries, and the bright pop of lime are a sophisticated and perfectly balanced flavor trio.
- Great for Low-Carb Lifestyles: When made with a keto-friendly sweetener, this recipe is a fantastic, satisfying treat that’s high in healthy fats and very low in carbs.
Gather Your Rich & Creamy Ingredients
Let’s get our simple, high-fat ingredients ready for this delicious frozen treat.
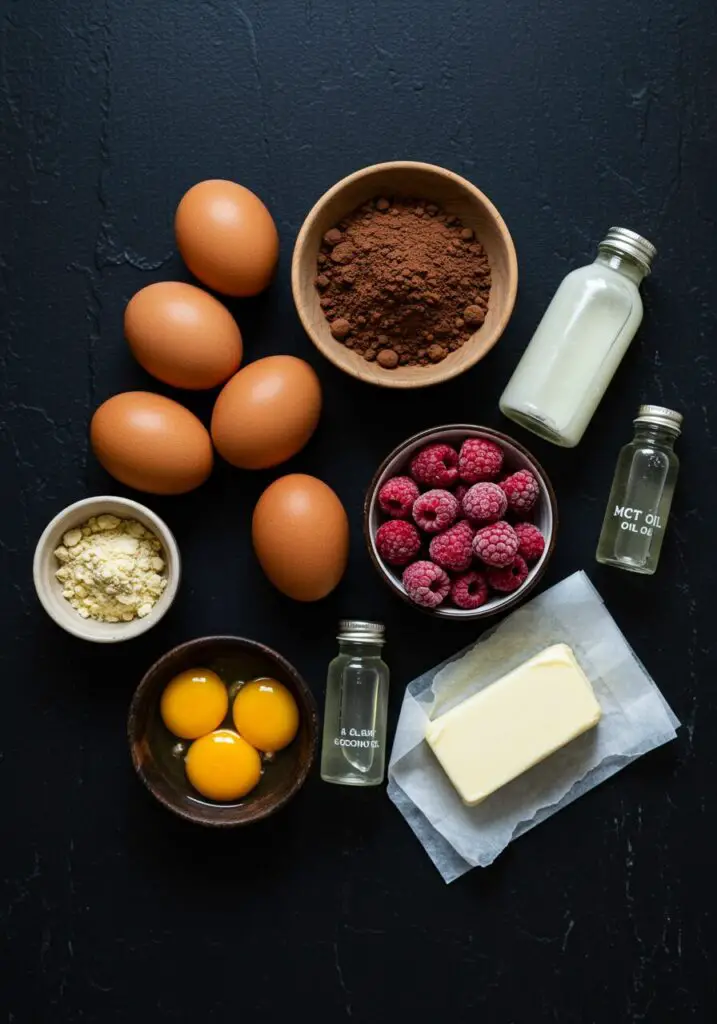
- 4 Whole Eggs
- 4 Egg Yolks
- 2 tsp Vanilla Extract
- 1 tsp Lime Juice: This brightens the raspberry flavor beautifully.
- 3 tbsp Coconut Oil
- 3 tbsp MCT Oil: Or use all coconut oil if you don’t have MCT oil.
- 100 g (about 7 tbsp) Butter
- ¾ cup Frozen Raspberries
- ½ cup Cocoa Powder
- 1 tsp Honey OR your favorite keto-friendly sweetener, to taste
Crafting Your Ice Cream: Step-by-Step Guide
Prepare to be amazed at how quickly this comes together.
- Blend Everything: This is the best part! In the canister of a high-powered blender, add all of your ingredients: the whole eggs, egg yolks, vanilla extract, lime juice, coconut oil, MCT oil, butter, frozen raspberries, cocoa powder, and your sweetener of choice (honey or a keto alternative).
- Blitz Until Smooth: Secure the lid and blend on high for just 10-20 seconds. That’s it! You just want to blend until the mixture is completely smooth, creamy, and there are no lumps remaining. Be careful not to over-blend, as you don’t want to heat the mixture.

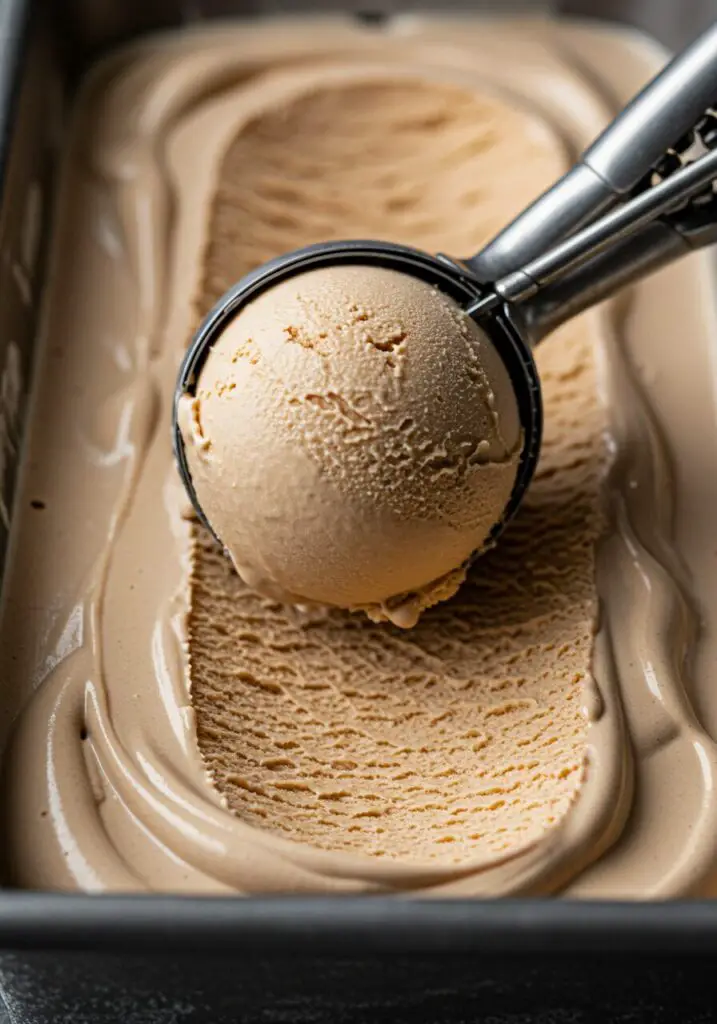
- Freeze Until Firm: Pour the smooth chocolate-raspberry mixture from the blender into a freezer-safe container, like a loaf pan or a designated ice cream container. Freeze for a minimum of 2 hours, or until it’s firm and scoopable.
- Temper and Serve: This ice cream will be quite hard straight from the freezer. For the best, creamiest texture, remove the container from the freezer and let it sit on the counter for 5-10 minutes to soften slightly before scooping. Top with some toasted nuts, fresh raspberries, or chocolate shavings and enjoy!
Wise Tips for the Best Results
- Use a High-Powered Blender: This recipe relies on the blender’s ability to completely emulsify all the fats into a smooth mixture. A high-powered blender will give you the best, creamiest results.
- Don’t Over-Blend: We’re just looking to combine everything until smooth. Blending for too long can start to generate heat from the friction of the blades, which we want to avoid.
- The 10-Minute Temper: Don’t skip letting the ice cream sit on the counter before serving! Because there are no gums or stabilizers like in commercial ice cream, it freezes very hard. That short resting period makes it perfectly scoopable and creamy.
Easy Blender Chocolate Raspberry Ice Cream (No-Churn)
Ingredients
Method
- Place all the ingredients (eggs, yolks, vanilla, lime juice, oils, butter, raspberries, cocoa, and sweetener) into a high-powered blender. Blitz for 10-20 seconds until the mixture is completely smooth and lump-free.
- Pour the mixture from the blender into a freezer-safe container, such as a loaf pan.
- Freeze for a minimum of 2 hours, or until the ice cream is firm and scoopable.
- Remove the container from the freezer and let it sit at room temperature for 5-10 minutes to soften slightly before scooping. Top with toasted nuts or fresh berries, if desired.
Frequently Asked Questions (FAQ) – Blender Ice Cream Recipe
- Is it safe to use raw eggs in this recipe?
Using raw eggs carries a small risk of salmonella. To ensure safety, it is highly recommended to use pasteurized eggs, which can be found in most major grocery stores, often in a carton next to the regular eggs. - Can I use a different kind of oil?
The coconut oil and MCT oil are used for their healthy fat content and how they solidify when cold. You could use all coconut oil if you don’t have MCT oil. I would not recommend substituting with a liquid vegetable oil, as it won’t provide the same firm, creamy texture upon freezing. - Why is there lime juice in a chocolate raspberry ice cream?
It may sound strange, but a small amount of acid, like lime or lemon juice, works wonders to brighten the flavor of berries and cut through the richness of the chocolate and fats, creating a more balanced and vibrant taste. - How do I store this ice cream?
Store it in a freezer-safe, airtight container. To help prevent ice crystals from forming, you can press a piece of parchment paper or plastic wrap directly against the surface of the ice cream before putting the lid on. It will keep for up to a month, though the texture is best within the first week.
Conclusion
This Blender Chocolate Raspberry Ice Cream is a truly unique and delicious way to create a gourmet frozen dessert at home. It’s rich, satisfying, and so incredibly simple to make. It’s a perfect treat for anyone looking for a healthier, low-carb alternative to traditional ice cream that doesn’t compromise on decadent flavor. I hope you love this little bit of kitchen magic!