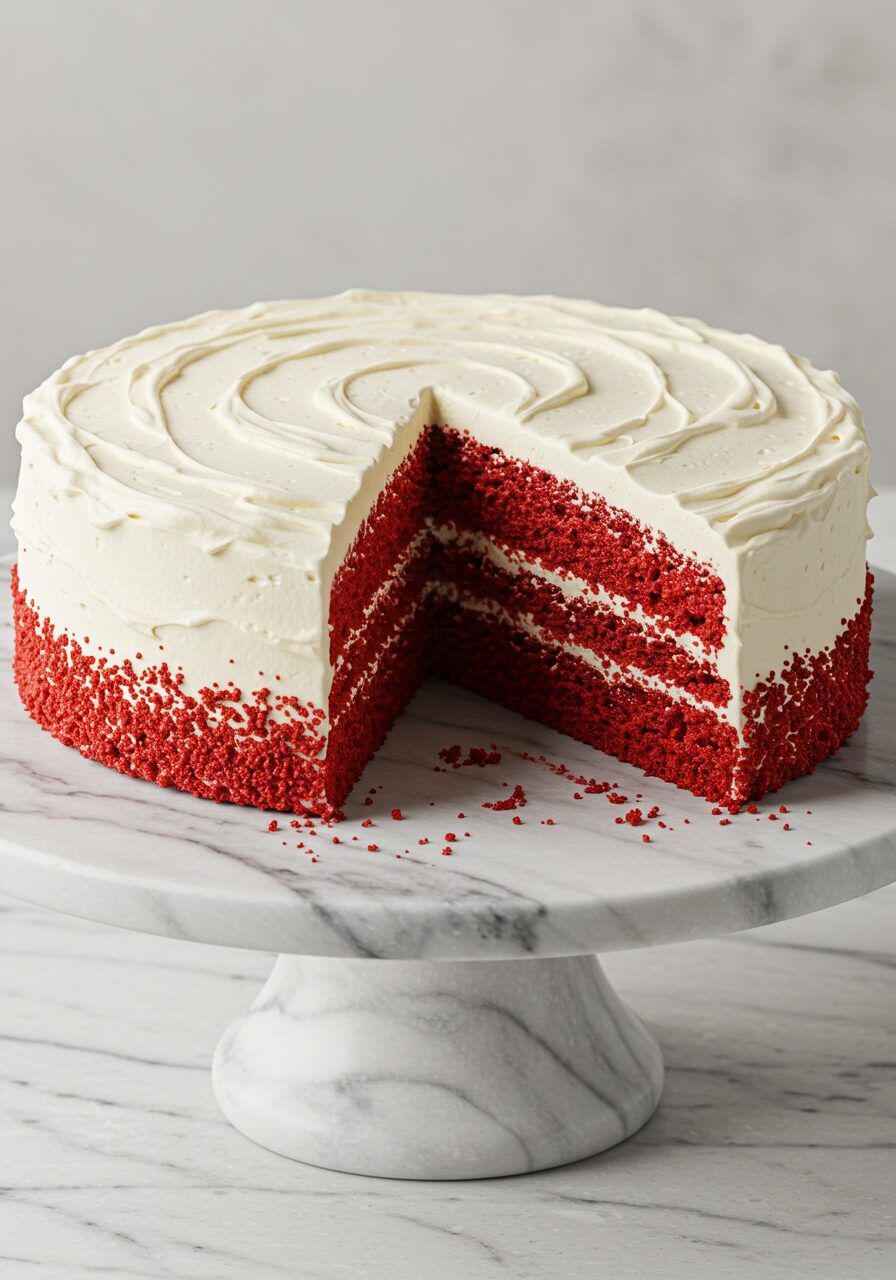
The Best Classic Red Velvet Cake (with Silky Cream Cheese Frosting!)
Hello, my friends, and welcome to a recipe for one of the most beloved, iconic, and stunningly beautiful cakes of all time. Today, we are making a true showstopper: the classic, the legendary, the absolutely irresistible Red Velvet Cake. This isn’t just a cake; it’s a statement dessert, perfect for birthdays, holidays, Valentine’s Day, or…
Hello, my friends, and welcome to a recipe for one of the most beloved, iconic, and stunningly beautiful cakes of all time. Today, we are making a true showstopper: the classic, the legendary, the absolutely irresistible Red Velvet Cake. This isn’t just a cake; it’s a statement dessert, perfect for birthdays, holidays, Valentine’s Day, or any time you want to make a truly special impression.
Forget any dry or lackluster red velvet cakes you’ve had in the past. This recipe is all about creating a wonderfully moist, tender, and velvety crumb with a subtle, tangy, chocolatey flavor and that signature, jaw-dropping deep red color. And of course, no red velvet cake is complete without its soulmate: a thick, luscious, and perfectly tangy cream cheese frosting. It’s a match made in dessert heaven!

Why This is The Ultimate Red Velvet Cake Recipe
This recipe is a timeless classic, perfected for the home baker.
- Incredibly Moist & Velvety Crumb: The combination of oil and tangy buttermilk is the classic secret to a red velvet cake that is exceptionally moist, tender, and has that signature “velvety” texture.
- The Perfect Tangy Cream Cheese Frosting: This is the quintessential pairing for a reason! Our simple, three-ingredient cream cheese frosting is perfectly smooth, tangy, and sweet, and it’s the ideal complement to the subtle chocolate notes of the cake.
- Stunning, Vibrant Red Color: The deep, dramatic red of the cake against the stark white of the frosting makes for a truly stunning and impressive presentation that is guaranteed to wow your guests.
- Surprisingly Simple to Make: While it looks and tastes incredibly gourmet and complex, this classic layer cake comes together with simple ingredients and straightforward steps.
Gather Your Classic Ingredients: What You’ll Need
This impressive cake is broken down into two delicious components: the red velvet sponge and the cream cheese frosting.
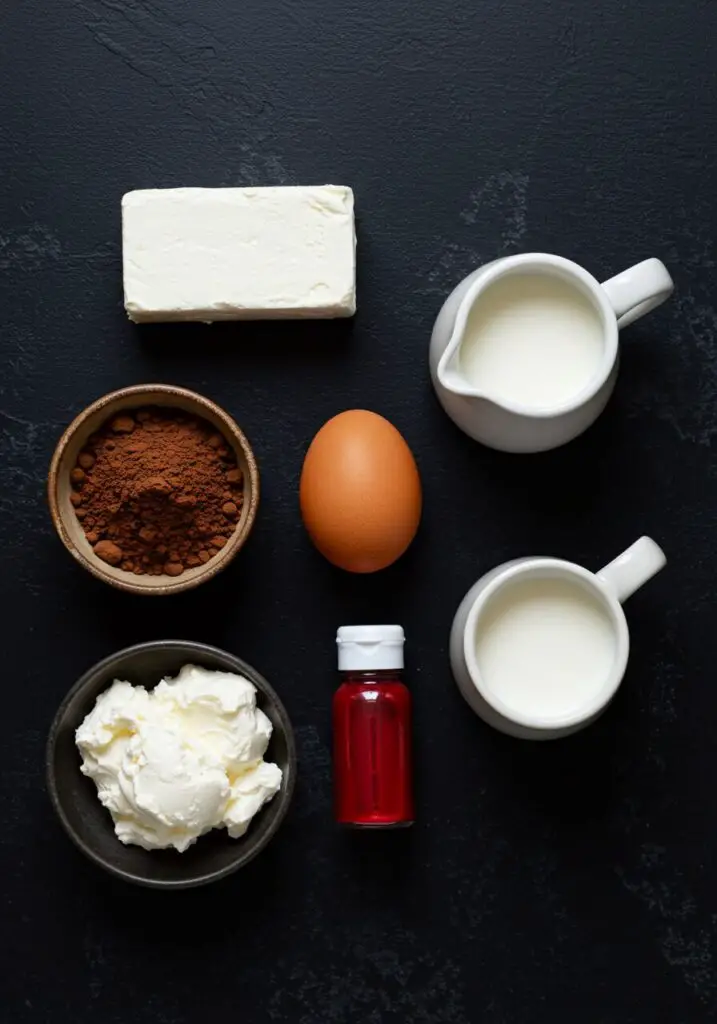
For the Red Velvet Cake:
- 175g (about 1 1/2 cups) self-raising flour
- 3 tbsp cocoa powder
- 1 tsp bicarbonate of soda (baking soda)
- 150g (about 3/4 cup) caster sugar (or granulated sugar)
- 2 large eggs
- 150ml (about 2/3 cup) sunflower oil (or other flavorless oil)
- 150ml (about 2/3 cup) buttermilk
- 2 tbsp red food coloring (gel is best for vibrant color)
For the Cream Cheese Frosting:
- 100g (about 1/2 cup) butter, softened
- 250g (about 2 cups) icing sugar (powdered sugar)
- 300g (about 1 1/3 cups) soft cheese (full-fat cream cheese)
Crafting Your Red Velvet Cake: Step-by-Step Guide
Let’s bake this beautiful and iconic cake. The method is simple and so rewarding!
- Prep the Oven and Mix the Batter: First, preheat your oven to 180°C/160°C Fan (350°F). Butter and line the bases of two 18cm (7-inch) sandwich tins. In a large bowl, stir the dry ingredients—self-raising flour, cocoa powder, and bicarbonate of soda—together. In a separate bowl, beat the eggs and add them to the oil and buttermilk. Stir in the red food coloring until you have a vibrant, uniform red liquid.
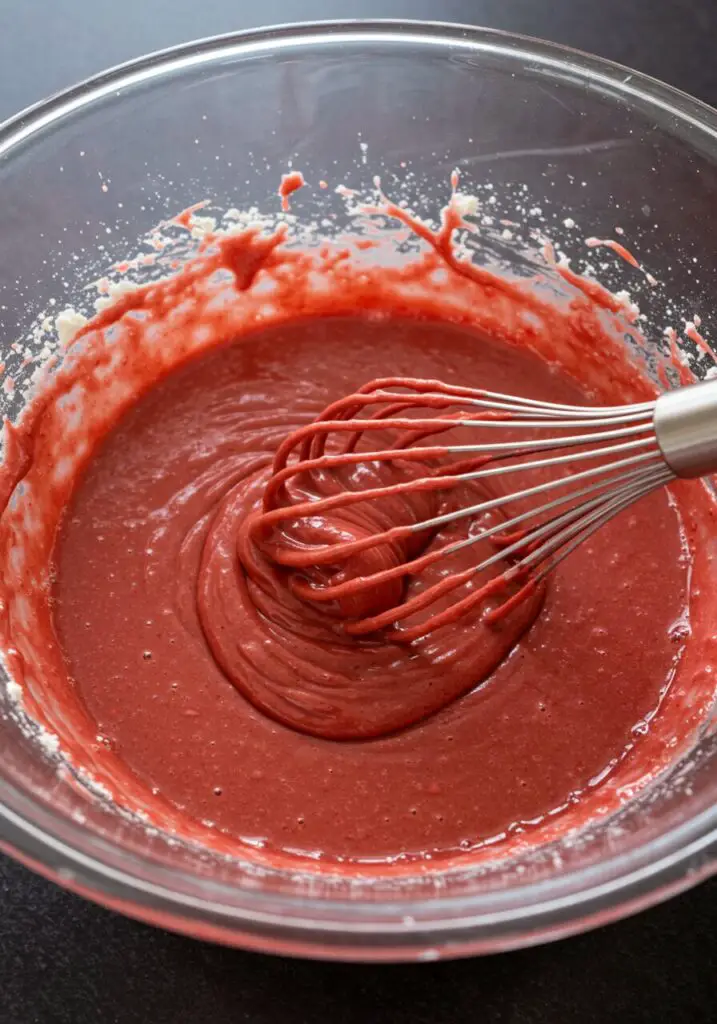
- Combine and Bake: Pour the wet, red ingredients into the dry ingredients. Use an electric whisk to beat them together until a smooth, beautiful batter forms. Divide the mixture evenly between your two prepared tins and bake for 25-30 minutes. The cakes are done when they are risen and a skewer inserted into the centers comes out clean.
- Cool the Cakes Completely: Let the cakes cool in their tins for a few minutes before turning them out onto a wire rack to cool completely. This is a crucial step!
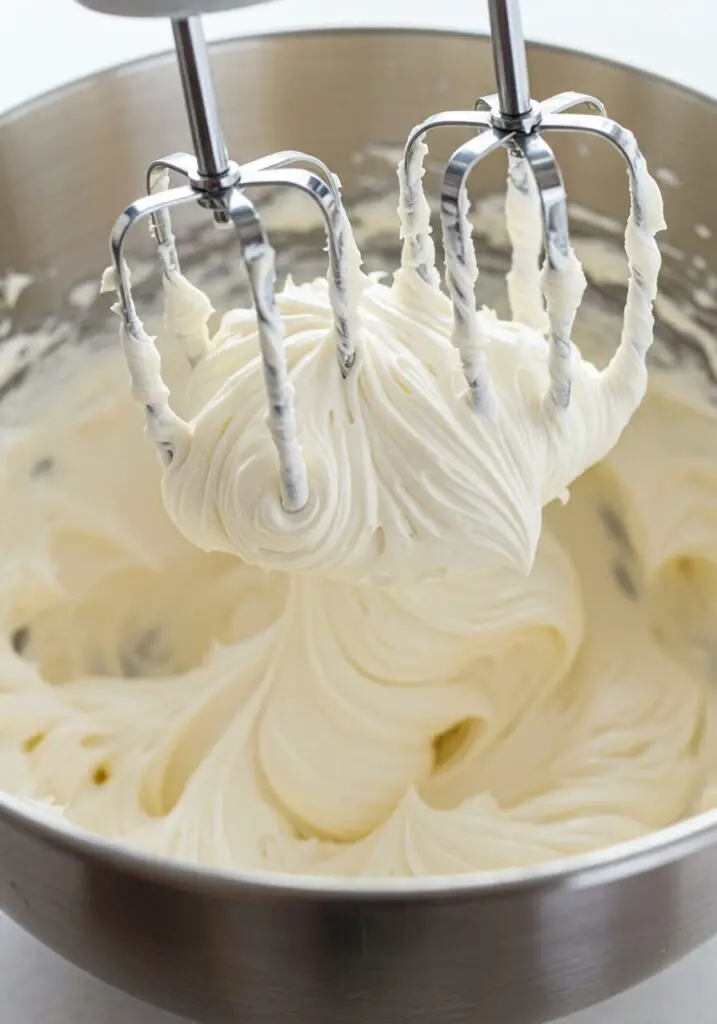
- Make the Cream Cheese Frosting: To make the iconic frosting, beat the softened butter and the icing sugar together with an electric mixer until the mixture is completely smooth. Add the soft cheese and beat again until it’s fully combined and beautifully thick and creamy. Be careful not to overbeat it once the cream cheese is in.
- Assemble and Frost: Once the cake layers are completely cool, it’s time to assemble! Place one of the cake layers on your serving plate or cake stand. Spread a generous layer of the cream cheese frosting over the top. Place the second cake layer on top, and then use the remaining frosting to cover the top and sides of the entire cake, creating beautiful, rustic swirls with your palette knife.
Wise Tips for the Perfect Red Velvet Cake
- Use Gel Food Coloring: For the most vibrant, deep red color without adding a lot of extra liquid to your batter, a good quality gel food coloring is highly recommended.
- Cool Cakes Completely: You must let your cake layers cool completely to room temperature before you attempt to frost them. A warm cake will melt your beautiful cream cheese frosting into a soupy mess.
- Room Temperature Ingredients are Key: For the smoothest frosting and a well-emulsified cake batter, it is essential that your butter, eggs, and especially your cream cheese are at room temperature.
- Don’t Overbeat the Frosting: Once you add the cream cheese, beat only until it’s just combined and smooth. Overbeating can cause the frosting to become too thin and runny.
Classic Red Velvet Cake
Ingredients
Equipment
Method
- Preheat oven to 180°C/160°C Fan (350°F). Butter and line two 18cm sandwich tins. In a large bowl, stir the dry ingredients together.
- In a separate bowl, beat the eggs and add them to the oil and buttermilk. Stir in the food colouring.
- Stir the wet ingredients into the dry and then beat with an electric whisk until a smooth batter forms. Divide the mixture between the tins and bake for 25-30 minutes, or until a skewer comes out clean. Cool completely on a wire rack.
- For the frosting, beat the softened butter and icing sugar together until smooth. Beat in the soft cheese until just combined and creamy.
- To assemble, place one cooled cake layer on a stand. Spread a thick layer of frosting on top. Place the second cake layer on top and use the remaining frosting to cover the top and sides of the cake.
Notes
Frequently Asked Questions (FAQ) – Red Velvet Cake
What is the flavor of red velvet cake?
It’s a unique and subtle flavor! It’s not just a vanilla cake with red coloring. It has a slight tang from the buttermilk and a very mild, background chocolate flavor from the cocoa powder, all of which is perfectly complemented by the tangy cream cheese frosting.
Can I make this cake ahead of time?
Yes. You can bake the cake layers a day in advance, let them cool completely, and store them, well-wrapped, at room temperature. The frosting can also be made a day ahead and stored in the fridge; just let it come to room temperature and give it a quick whip before frosting the cake.
How do I store the finished cake?
The finished cake must be stored in the refrigerator because of the cream cheese frosting. It will keep well in a cake carrier or covered for up to 4 days. Let it sit at room temperature for about 30 minutes before serving for the best flavor and texture.
Conclusion
This Classic Red Velvet Cake is a true showstopper that is perfect for any celebration. It’s a decadent, stunning, and incredibly satisfying dessert that is sure to make any occasion feel extra special. I hope you love every single velvety bite!