Red Velvet Cookie Cups with Cream Cheese Frosting
There’s something utterly irresistible about tiny, jewel-red cookie cups cradling a swirl of silky cream cheese frosting; they look like miniature desserts made for special occasions but are wonderfully easy to pull together. I love how baking these fills the kitchen with the warm scent of cocoa and sugar, and how the tangy frosting cuts…
There’s something utterly irresistible about tiny, jewel-red cookie cups cradling a swirl of silky cream cheese frosting; they look like miniature desserts made for special occasions but are wonderfully easy to pull together. I love how baking these fills the kitchen with the warm scent of cocoa and sugar, and how the tangy frosting cuts through the sweetness for a perfectly balanced bite. If you’re a fan of cream-cheese-forward treats, you might also enjoy my go-to for cream cheese sugar cookies with strawberry buttercream frosting for inspiration.
Why You’ll Love These Little Red Velvet Cups
- They deliver the classic red velvet flavor in single-serving form, so everyone gets an adorable, indulgent portion.
- The cream cheese frosting is tangy and luscious, creating a beautiful contrast with the cocoa-tinged cookie shell.
- They bake quickly in a muffin tin, making them perfect for last-minute parties or a cozy afternoon treat.
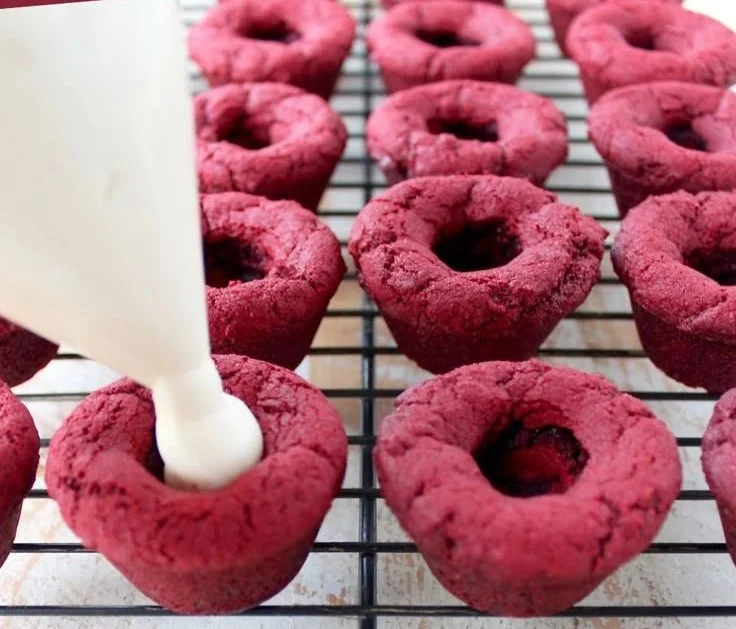
- The dented center is forgiving for texture: slightly crisp edges with a soft, tender center that holds the frosting like a tiny bowl.
Gathering Your Ingredients
- 2 cups all-purpose flour — provides structure so the cookie cups hold their shape.
- 1 tablespoon cocoa powder — adds that subtle chocolate essence that makes red velvet unique.
- 1 teaspoon baking soda — the leavening that gives the cookie a tender lift.
- 1/2 teaspoon salt — balances sweetness and highlights the cocoa.
- 3/4 cup unsalted butter, softened — richness and moisture; unsalted lets you control the salt level.
- 1 cup granulated sugar — for sweetness and a bit of crispness at the edges.
- 1/2 cup brown sugar — adds depth and chewiness with a hint of molasses.
- 1 large egg — binds the dough and adds tenderness.
- 1 tablespoon red food coloring — gives that iconic red hue; gel color is concentrated and won’t thin the batter.
- 1 teaspoon vanilla extract — rounds the flavors and lifts the cocoa.
- 1 cup cream cheese, softened — the star of the frosting; bring to room temperature for smooth results.
- 2 cups powdered sugar — sweetens and stabilizes the cream cheese frosting.
- 1 teaspoon vanilla extract (for frosting) — brightens the cream cheese and ties the frosting together.
For a few extra pointers on balancing red velvet dough and cream cheese filling techniques, I often refer back to the technique in red velvet cream cheese cookies for ideas.
Let’s Get Baking: Step-by-Step Instructions
Before you start, line your muffin tin with a light coat of butter or nonstick spray so the cookie cups release easily. These steps will guide you from mixing to piping that dreamy frosting.
- Preheat your oven to 350°F (175°C).
- In a bowl, whisk together flour, cocoa powder, baking soda, and salt.
- In another bowl, cream together the butter, granulated sugar, and brown sugar until fluffy.
- Beat in the egg, red food coloring, and vanilla extract until well combined.
- Gradually add the dry ingredients to the wet ingredients until just combined.
- Scoop the dough into a greased muffin tin, filling each cup about 2/3 full.
- Bake for about 12-15 minutes or until a toothpick comes out clean.
- Allow to cool slightly before pressing a dent in the center of each cookie cup for the frosting.
- In a bowl, beat the cream cheese and powdered sugar until smooth, then add the vanilla.
- Pipe or spoon the cream cheese frosting into the center of each cookie cup.
- Serve and enjoy your adorable Valentine’s Day dessert!
If you want to compare how the frosting consistency should look or try a different piping approach, check this helpful reference on red velvet cookies with easy cream cheese frosting.
My Favorite Tricks for Consistent Results
- Use room temperature butter and cream cheese so they blend into a silky frosting without lumps.
- Don’t overmix once the dry ingredients are added; overworking the dough can yield tough cookies.
- Press the center while the cookies are still slightly warm so the dent holds, but not right out of the oven or you risk collapsing the cup.
- If you want a glossy, smooth frosting, sift the powdered sugar before beating.
- Chill the filled cookie cups briefly if you plan to stack them or transport them; it helps set the frosting. For a different thumbprint technique tip, I like the method shown in red velvet cream cheese thumbprint cookies.
Creative Ways to Play with the Recipe
- Add a white chocolate chip or mini heart-shaped candy into the frosting for a festive surprise.
- Swap half the cocoa for instant espresso powder to deepen the chocolate notes.
- For a lighter frosting, fold whipped cream into the cream cheese mixture to make a mousse-like filling.
- Make them seasonal by stirring a tablespoon of pumpkin purée and warming spices into the dough for autumn flair.
- Try pairing the red velvet base with a brown butter frosting for a nutty twist and riff on cream cheese; for other cream cheese dessert ideas, see this carrot cake with cream cheese frosting inspiration.
How to Present These Little Delights
Serve them on a simple platter lined with parchment so the frosting pops against the red. Garnish with a light dusting of cocoa or a few chocolate shavings for contrast. They look wonderful arranged in a circle with edible flowers or sprinkled freeze-dried strawberry dust for a romantic look. For a casual coffee break, pair them with a strong espresso or a vanilla latte; the cream cheese frosting pairs beautifully with bitter coffee flavors.
Keep Them Fresh and Ready to Share
- Room temperature: Store in an airtight container in the refrigerator for up to 3 days to keep the cream cheese frosting safe and fresh.
- Freezing: For longer storage, freeze the unfilled cookie shells for up to 1 month. Thaw and then press the dents and fill with fresh frosting before serving. Filling them before freezing is possible, but the texture of cream cheese frosting may change.
- Reheating: If you like a slightly warm cookie cup, remove from the fridge and microwave a single serving for about 8 to 10 seconds to take the chill off without melting the frosting.
Answers to Common Questions I Get
Q: Can I make these without food coloring?
A: Yes. The red in red velvet is largely visual. Omitting the food coloring gives you a subtle chocolate cookie rather than bright red. You’ll still get the flavor, though the look will be different.
Q: Can I substitute low-fat cream cheese?
A: Low-fat options can be used, but full-fat cream cheese gives the creamiest texture and best mouthfeel for frosting. If using low-fat, consider adding a small amount of softened butter to improve spreadability.
Q: How can I prevent the cookie cups from sticking?
A: Make sure your muffin tin is well-greased or use silicone liners. Allow cups to cool slightly before attempting to remove them, and gently run a butter knife around the edges if needed.
Q: Can these be made ahead for parties?
A: Bake the shells a day ahead and store them in an airtight container. Fill with frosting the day of the event for the freshest presentation.
Conclusion
If you want to see another take on these charming treats, this collection offers a slightly different approach on Live Well Bake Often’s Red Velvet Cookie Cups with useful photos and notes. For a version that emphasizes a cream cheese filling with a chewy cookie shell, check out Red Velvet Cake Cookies (with Cream Cheese Filling) from Wild Wild Whisk. And if you’re intrigued by a cheesecake twist, explore the indulgent Red Velvet Cheesecake Cookie Cups from Life Love and Sugar for more inspiration. Give these little red velvet cookie cups a try; I promise the combination of tender, cocoa-kissed cookie and tangy cream cheese frosting will win over friends and family. Enjoy the baking, and don’t be surprised if you find yourself making them again and again.