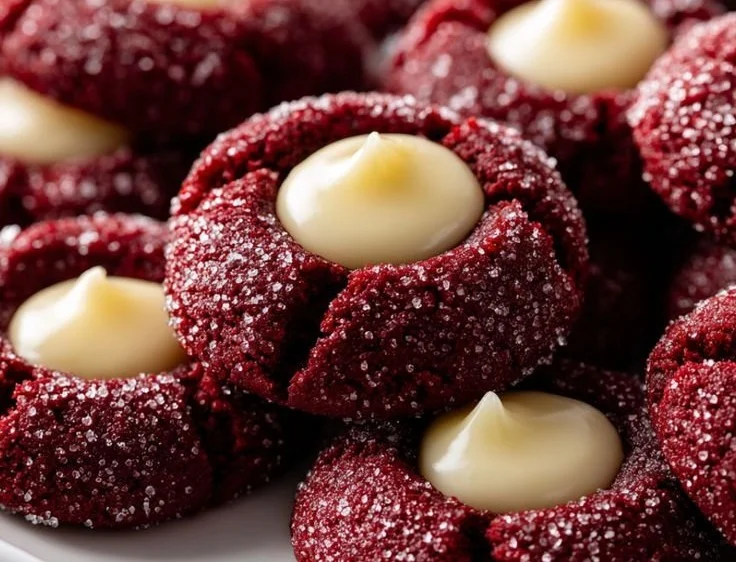
Red Velvet Cream Cheese Thumbprint Cookies
There’s something magical about the combination of vibrant red velvet and creamy, tangy cream cheese in a cookie that just steals the show. Imagine biting into a soft, pillowy cookie, the rich cocoa flavor dancing on your taste buds, followed by the luscious cream cheese sweetness that lingers just a moment longer. Red Velvet Cream…
There’s something magical about the combination of vibrant red velvet and creamy, tangy cream cheese in a cookie that just steals the show. Imagine biting into a soft, pillowy cookie, the rich cocoa flavor dancing on your taste buds, followed by the luscious cream cheese sweetness that lingers just a moment longer. Red Velvet Cream Cheese Thumbprint Cookies are perfect for celebrations, special family gatherings, or simply as a delightful everyday treat that brings joy with every bite. Let’s dive into this deliciousness, shall we?
Why Red Velvet Cream Cheese Thumbprint Cookies Deserve a Spot in Your Kitchen
- A Festive Treat: The stunning red hue of these cookies offers a wonderful aesthetic that brightens up any occasion, from birthdays to holiday parties.
- Cream Cheese Center: The creamy, sweet filling adds a luscious dimension that takes every bite over the top. It’s an indulgent complement to the soft cookie.
- Balance of Flavors: The slight bitterness from cocoa combined with the sweetness of sugar creates a beautiful symphony of flavors that feels so satisfying.
- Easy to Make: Despite their stunning appearance, these cookies are incredibly straightforward to create, making them perfect for bakers of all experience levels.
- Perfect for Sharing: Bake a batch, wrap them up in festive packaging, and share them with friends and family for an instant crowd-pleaser!
Gathering Your Ingredients
Before you embark on this delightful baking journey, gather the following ingredients. Each one plays a vital role in making your cookies as fantastic as they can be:
- 2 1/2 cups all-purpose flour: This is your base, giving structure to the cookies.
- 1/2 cup unsweetened cocoa powder: It imparts that rich, chocolate flavor that pairs beautifully with the red velvet.
- 1 teaspoon baking soda: This helps the cookies rise and become beautifully soft.
- 1 teaspoon salt: A pinch of salt balances the sweetness and enhances the flavors.
- 1 cup unsalted butter, softened: Butter adds a rich flavor and tender texture.
- 1 1/2 cups granulated sugar: It sweetens the dough and helps create that light, fluffy texture.
- 1 large egg: Binding the ingredients together and contributing to the richness of the cookies.
- 1 tablespoon red food coloring: This gives the iconic red velvet appearance that makes your cookies pop!
- 1 teaspoon vanilla extract: For that warm, aromatic flavor that makes everything better.
- 1 cup cream cheese, softened: The star of the filling, bringing creaminess and tang.
- 1/2 cup powdered sugar: For the cream cheese filling, it adds sweetness and smoothness.
Let’s Get Cooking!
Now that your ingredients are ready, it’s time to transform them into delicious cookies. Follow these steps closely, and you’ll be amazed at what you create!
- Preheat your oven: Set it to 350°F (175°C) and line a baking sheet with parchment paper—the foundation for your cookie baking adventure!
- Whisk the dry ingredients: In a bowl, combine the flour, cocoa powder, baking soda, and salt. Just look at that glossy cocoa powder; it’s like a chocolate dream waiting to happen.
- Cream the butter and sugar: In a large mixing bowl, beat together the softened butter and granulated sugar until light and fluffy. The texture should be airy and almost cloud-like, filling your kitchen with sweetness.
- Add the wet ingredients: Beat in the egg, red food coloring, and vanilla extract until everything is well combined. The batter will become a mesmerizing ruby red—just imagine the delight it’ll bring!
- Combine dry and wet: Gradually mix in the dry ingredients until just combined. Don’t overmix; we want these cookies to be soft and tender.
- Scoop the dough: Using a tablespoon, scoop out balls of dough and place them on the prepared baking sheet, spacing them about 2 inches apart.
- Make a thumbprint: With your thumb (or the back of a spoon), gently press an indentation in the center of each ball. This is where the cream cheese filling will go—just wait until you see the final masterpiece!
- Bake the cookies: Put them in the oven and bake for 10-12 minutes or until the edges are set but the centers are still soft.
- Mix the filling: While the cookies are baking, combine cream cheese and powdered sugar in a bowl until it’s smooth and creamy. This filling is heavenly!
- Fill the cookies: Once the cookies are out of the oven and slightly cooled, fill each thumbprint with the cream cheese mixture. See how the cream oozes slightly into the cookie? That’s a sign of deliciousness!
- Dust and cool: For an extra touch, feel free to dust them with additional powdered sugar if desired, then let the cookies cool completely before serving.
My Favorite Tricks
- Room Temperature Ingredients: Allow your butter and cream cheese to come to room temperature for a smoother mix and a fluffier texture in your cookies.
- Don’t Skip the Parchment Paper: This will ensure your cookies come off the baking sheet easily and prevent sticking—a total game changer!
- Experiment with Fillings: If cream cheese isn’t your thing, try mixing in some chocolate chips or a splash of almond extract for a unique twist.
- Chill the Dough: If you have extra time, chilling the dough for about 30 minutes can enhance the flavor and help the cookies retain their shape.
- Test for Doneness: Since ovens can vary, keep an eye on your cookies toward the end of baking. They should look slightly underbaked in the center—the residual heat will finish the cooking.
Creative Twists to Try
Feeling adventurous? Here are some fun variations you can make:
- Nutty Addition: Add chopped pecans or walnuts to the dough for a delightful crunch and nuttiness.
- Spice It Up: A dash of cinnamon or nutmeg can introduce a warm spice that complements the cocoa beautifully.
- Different Colors: Swap the red food coloring with blue or green for fun, festive variations that are perfect for any occasion.
- Chocolate Cream Cheese Filling: Mix in some melted chocolate into the cream cheese filling for a truly decadent treat.
- Fruit Infusion: Blend in some puréed strawberries or raspberries to the cream cheese for a fruity twist.
Best Ways to Enjoy
These gorgeous cookies deserve to be treated with care! Present them on a beautiful platter, perhaps next to fresh strawberries or a small bowl of chocolate sauce for dipping. They pair beautifully with a cup of freshly brewed coffee or a tall glass of cold milk. Imagine a cozy afternoon, a plate of these thumbprints in front of you, the warm sunlight filtering in—it’s pure bliss.
Keep It Fresh
To ensure your Red Velvet Cream Cheese Thumbprint Cookies remain delightful for as long as possible, here are a few storage tips:
- Room Temperature: Keep them in an airtight container at room temperature for up to five days. Just be sure to separate layers with parchment paper to prevent sticking.
- Refrigeration: If your kitchen runs warm or if you just love a chilled cookie, pop them in the fridge for up to a week. This will keep that cream cheese filling nice and fresh!
- Freezing Secrets: These cookies also freeze beautifully. Flash freeze them on a baking sheet, then transfer them to a zip-top bag for up to three months. Thaw at room temperature and enjoy!
- Reheating: If you prefer a warm cookie, you can pop them in the oven at a low temperature for a few minutes to bring back that just-baked feel.
Your Questions Answered
- Can I make these cookies gluten-free? Absolutely! Substitute all-purpose flour with a gluten-free blend that you love, and enjoy the same great flavor.
- What’s the best way to soften cream cheese quickly? If you’re in a hurry, cut the cream cheese into small cubes and let it sit at room temperature for about 15-20 minutes.
- How can I reduce the sweetness of the filling? Consider using less powdered sugar, or even adding a squeeze of lemon juice for a bit of zing that balances out the sweetness.
- What can I use instead of red food coloring? You can use beet juice or pomegranate juice for a natural alternative, though the color may differ slightly.
These Red Velvet Cream Cheese Thumbprint Cookies are a perfect blend of aesthetics and taste—an irresistible treat that brings joy to every occasion. Whether you’re baking for a gathering or treating yourself after a long day, these cookies are sure to elevate your dessert game. Trust me; once you take that first sweet, creamy bite, you’ll want to whip up a batch again and again! Happy baking!
Red Velvet Cream Cheese Thumbprint Cookies
Ingredients
Method
- Preheat your oven to 350°F (175°C) and line a baking sheet with parchment paper.
- In a bowl, whisk together the flour, cocoa powder, baking soda, and salt.
- In a large mixing bowl, beat together the softened butter and granulated sugar until light and fluffy.
- Beat in the egg, red food coloring, and vanilla extract until well combined.
- Gradually mix in the dry ingredients until just combined.
- Using a tablespoon, scoop out balls of dough and place them on the prepared baking sheet, spaced about 2 inches apart.
- With your thumb or the back of a spoon, gently press an indentation in the center of each ball.
- Bake cookies for 10-12 minutes or until the edges are set but the centers are still soft.
- While the cookies are baking, mix the cream cheese and powdered sugar in a bowl until smooth and creamy.
- Once the cookies are out and slightly cooled, fill each thumbprint with the cream cheese mixture.
- Dust with additional powdered sugar if desired, then cool completely before serving.