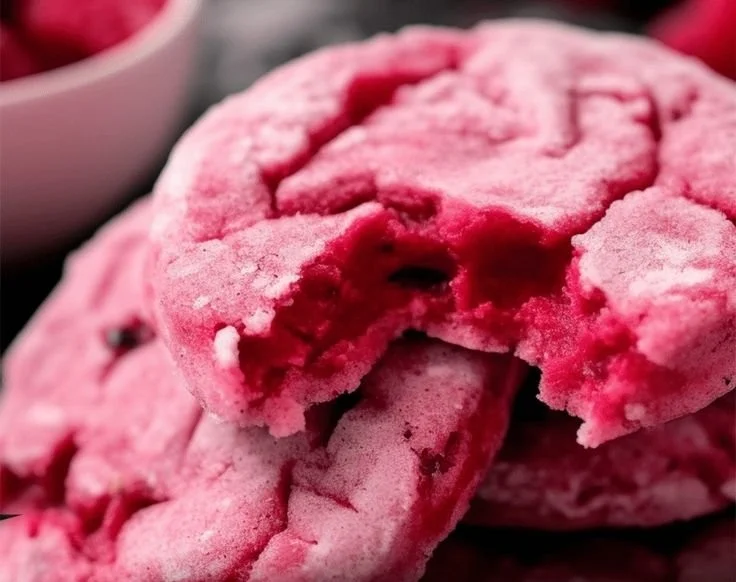
Red Velvet Oreo Cheesecake
There’s something utterly enchanting about a slice of Red Velvet Oreo Cheesecake. Each bite is a delightful journey through layers of creamy texture and rich flavor, with the iconic velvety sweetness of red velvet and the satisfying crunch of Oreo. As you savor this irresistible dessert, the celebration of taste and aesthetics comes alive, making…
There’s something utterly enchanting about a slice of Red Velvet Oreo Cheesecake. Each bite is a delightful journey through layers of creamy texture and rich flavor, with the iconic velvety sweetness of red velvet and the satisfying crunch of Oreo. As you savor this irresistible dessert, the celebration of taste and aesthetics comes alive, making it perfect for any occasion—from birthdays to just a cozy night in. So, gather your ingredients, and let’s dive into crafting this indulgent masterpiece that will leave everyone asking for seconds!
Why Red Velvet Oreo Cheesecake Deserves a Spot in Your Kitchen
- A Decadent Fusion: This dessert creatively combines the classic red velvet cake with rich cheesecake and cookie crunch. It’s a riot of flavors and textures that is undeniably a crowd-pleaser.
- Visually Stunning: The vibrant red hue against the creamy white filling and dark chocolate crust makes this cheesecake a showstopper on any dessert table. It’s as much a treat for the eyes as it is for the tastebuds.
- Perfect for All Occasions: Whether you’re hosting a dinner party, celebrating a special occasion, or simply enjoying a quiet dinner with loved ones, this cheesecake fits perfectly into any scenario.
- Easy to Customize: With a base of cream cheese and classic red velvet flavors, you can easily tweak this recipe to include your favorite flavors or toppings, making it your own.
Gather Your Ingredients
Before we jump into the delightful process of baking, let’s go through the essential ingredients for crafting this stunning Red Velvet Oreo Cheesecake. Each component plays a crucial role in creating the rich flavors and textures.
- 2 ½ cups Oreo cookie crumbs (about 25-30 cookies, crushed): This forms the base of our cheesecake, lending a delightful crunch and a rich chocolatey flavor.
- 5 tbsp unsalted butter, melted: Helps bind the Oreo crumbs together, creating a firm and flavorful crust.
- 16 oz (2 blocks) cream cheese, softened: The star of the dish, creating that creamy texture we all adore in cheesecakes. Make sure it’s softened for easier mixing!
- ¾ cup granulated sugar: Balances the flavors and adds sweetness, ensuring that the cheesecake is as indulgent as it should be.
- ¼ cup sour cream: Adds richness and a subtle tang that enhances the flavor profile of the cheesecake.
- 2 large eggs: Provide structure and creaminess to the cheesecake; don’t skip these!
- 1 ½ tbsp cocoa powder: Deepens the chocolate flavor, adding depth to the classic red velvet taste.
- 1 ½ tsp vanilla extract: Enhances the overall flavor with its warm, aromatic notes.
- 1 tbsp red food coloring: Gives our cheesecake its iconic red hue. Don’t be shy with the color, as it’s all part of the fun!
- ½ cup heavy cream: This creamy ingredient will be essential for our decadent ganache topping.
- ¾ cup semi-sweet chocolate chips: The rich chocolate flavor pairs beautifully with the cheesecake’s sweetness.
- Whipped cream, Oreo cookie crumbs, and whole Oreos for garnish: These are all about presentation and a touch of indulgence, making each slice inviting!
Let’s Get Cooking
Ready to make this beautiful dessert? Follow these steps to create your magnificent Red Velvet Oreo Cheesecake. Don’t worry; I’ll be right here cheering you on!
- Preheat your oven to 325°F (163°C) and grease a 9-inch springform pan. The springform pan allows for easy removal of the cheesecake without damaging its beautiful shape.
- In a medium-sized bowl, mix the Oreo cookie crumbs and melted butter until fully combined. This mixture should resemble damp sand.
- Press the crumb mixture firmly into the bottom of the prepared pan, forming an even layer for the crust. Bake the crust for 8-10 minutes, then remove it from the oven and let it cool completely.
- While the crust is cooling, in a large mixing bowl, beat together the softened cream cheese and sugar until smooth and creamy. This should take about 3-4 minutes; you want no lumps!
- Add the sour cream, eggs, cocoa powder, vanilla extract, and red food coloring to the cream cheese mixture. Beat again until everything is nicely combined. This luscious mixture is what dreams are made of!
- Pour the red velvet cheesecake mixture over the cooled Oreo crust, spreading it evenly.
- In another clean bowl, beat together the remaining cream cheese and sugar until smooth. Then, add the sour cream, eggs, and vanilla extract, mixing until thoroughly incorporated.
- Gently pour this mixture over the red velvet layer, creating a beautiful marbling effect as you layer.
- Bake the cheesecake for 50-60 minutes, until the edges are set but the center remains slightly jiggly. The residual heat will finish setting it as it cools.
- Once it’s done baking, let the cheesecake cool in the oven with the door slightly ajar for about an hour. Then, refrigerate it for a minimum of 6 hours (or overnight for the best results).
- For the ganache, heat the heavy cream in a small saucepan until it begins to simmer. Pour it over the chocolate chips in a bowl and let it sit for about 5 minutes. Stir until smooth and glossy.
- Once your cheesecake is chilled and ready, pour the ganache over the top. Decorate with whipped cream, sprinkles of Oreo crumbs, and whole Oreos for that finishing touch.
- Slice, serve, and watch the delight on everyone’s faces as they dive into this rich, creamy treat!
Helpful Hints for Success
- Room Temperature Ingredients: Ensure your cream cheese and eggs are at room temperature for the smoothest batter. This helps the ingredients blend seamlessly and avoids any lumps.
- Don’t Overmix: While it’s tempting to whip your batter into a frenzy, overmixing can incorporate too much air, leading to cracks during baking.
- Chill Time: Patience is key! Allow your cheesecake to chill thoroughly. This not only enhances the flavors but also helps it set perfectly.
- Use a Water Bath: For an ultra-smooth cheesecake, consider baking it in a water bath. Simply wrap the outside of your springform pan with aluminum foil to catch any leaks and place it in a larger pan filled with hot water as it bakes.
- Taste as You Go: Don’t hesitate to taste your batter along the way (just remember to omit the raw eggs)! Adjust the sweetness or flavor based on your preferences.
Mix It Up: Creative Twists
- Chocolate Drizzle: Add a drizzle of melted white or dark chocolate on top of the ganache for an extra layer of flavor.
- Minty Fresh: Add in peppermint extract for a refreshing mint chocolate experience that works beautifully with the red velvet.
- Nutty Upgrade: Incorporate chopped nuts, like walnuts or pecans, into the crust for an added crunch.
- Fruit Flavors: Consider swirls of raspberry or strawberry puree in the batter for a fruity twist that complements the creaminess beautifully.
- Candy Crush: Top your cheesecake with crushed candy bars or seasonal treats, like Halloween candy or mini eggs for Easter.
Enjoying the Final Masterpiece
When it comes to serving your Red Velvet Oreo Cheesecake, presentation is everything! I love to slice it into generous wedges, visually highlighting the layers of red velvet and creaminess. Serve it chilled, with a dollop of whipped cream and a sprinkle of Oreo crumbs on top for that extra flair.
Pair it with a piping hot cup of coffee or a glass of luxurious red wine for a delightful contrast. It’s perfect for sharing with friends and family, sparking conversations around the table as the rich flavors unfold with every bite.
Keep It Fresh: Storage Tips
To enjoy your cheesecake for days to come, proper storage is key! Here’s how to keep it fresh:
- Refrigerate: Store any leftovers in an airtight container in the fridge for up to five days. The cheesecake gets even better after a day as the flavors meld!
- Freezing: If you want to save some for later, you can definitely freeze it! Place slices in a single layer on a baking sheet, freeze until solid, and then wrap each slice in plastic wrap before placing them in a freezer-safe bag. They can stay frozen for up to two months.
- Thawing: To enjoy your frozen cheesecake, simply transfer it to the fridge the night before to thaw, or let them sit at room temperature for about 30 minutes before serving.
Your Questions Answered
- Can I use store-bought Oreo crumbs? Absolutely! Store-bought Oreo crumbs can save you time and still deliver the desired flavor and texture for the crust.
- What can I substitute for cream cheese? If you want a lighter version, you can use Greek yogurt or cottage cheese blended until smooth, but note that the texture and flavor will be slightly different.
- How do I fix cracks in my cheesecake? If your cheesecake cracks during baking, don’t fret! You can cover it with ganache or whipped cream as a “fix” that adds visual appeal.
- Can I make this cheesecake ahead of time? Yes! This cheesecake is perfect for making in advance. In fact, it often tastes better when made a day or two ahead, as the flavors have time to deepen.
Now that you’re equipped with all the knowledge and inspiration you need, it’s time to create your own Red Velvet Oreo Cheesecake! I’m sure that as you slice into this luscious treat, it will bring smiles and satisfaction to all who share in its magic. Enjoy every moment of this delicious journey—it’s a recipe that truly celebrates the joy of baking!

Red Velvet Oreo Cheesecake
Ingredients
Method
- Preheat your oven to 325°F (163°C) and grease a 9-inch springform pan.
- In a medium-sized bowl, mix the Oreo cookie crumbs and melted butter until fully combined.
- Press the crumb mixture firmly into the bottom of the prepared pan to form an even layer for the crust.
- Bake the crust for 8-10 minutes, then remove it from the oven and let it cool completely.
- In a large mixing bowl, beat together the softened cream cheese and sugar until smooth and creamy for about 3-4 minutes.
- Add sour cream, eggs, cocoa powder, vanilla extract, and red food coloring to the cream cheese mixture and beat until combined.
- Pour the red velvet cheesecake mixture over the cooled Oreo crust, spreading it evenly.
- In another bowl, beat together remaining cream cheese and sugar until smooth, then add sour cream, eggs, and vanilla extract, mixing until incorporated.
- Gently pour this mixture over the red velvet layer to create a marbling effect.
- Bake the cheesecake for 50-60 minutes until the edges are set but the center remains slightly jiggly.
- Let the cheesecake cool in the oven with the door slightly ajar for about an hour before refrigerating for a minimum of 6 hours.
- To make the ganache, heat the heavy cream in a small saucepan until it simmers.
- Pour it over chocolate chips in a bowl and let sit for about 5 minutes, then stir until smooth and glossy.
- Once cheesecake is chilled, pour the ganache over the top and decorate with whipped cream, Oreo crumbs, and whole Oreos.
- Slice, serve, and enjoy!