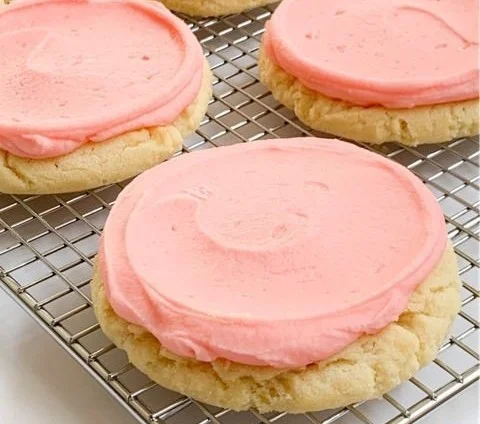
Red Velvet Thumbprint Cookies
Red Velvet Thumbprint Cookies are the kind of sweet indulgence that can turn an ordinary day into an extraordinary one. The vibrant crimson hue of these sumptuous cookies is a feast for the eyes, while the cream cheese filling creates a decadently rich surprise with every bite. Can you imagine the joy of presenting these…
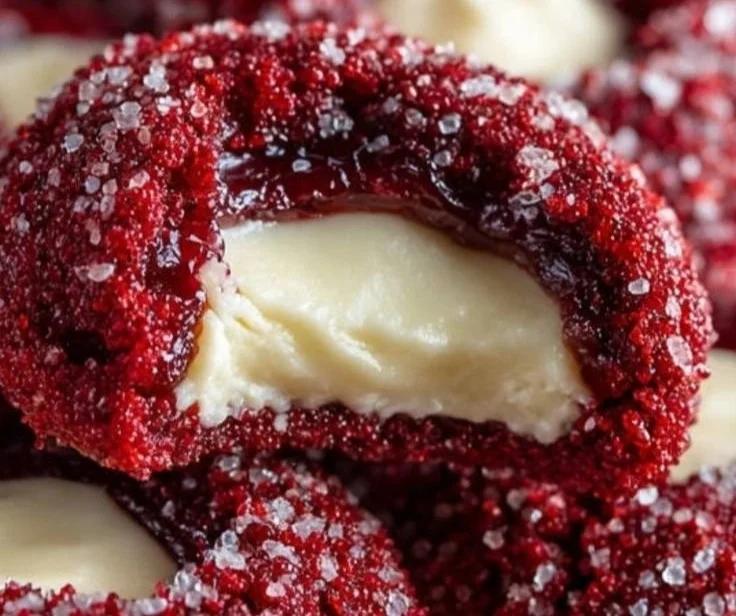
Red Velvet Thumbprint Cookies are the kind of sweet indulgence that can turn an ordinary day into an extraordinary one. The vibrant crimson hue of these sumptuous cookies is a feast for the eyes, while the cream cheese filling creates a decadently rich surprise with every bite. Can you imagine the joy of presenting these beauties at a gathering? The aroma wafting through your kitchen is just the beginning of this delightful baking adventure. Let’s dive into the magic of these delightful treats!
You’re Going to Love This
These Red Velvet Thumbprint Cookies are not just another cookie recipe; they are an experience! Here are a few reasons you’ll want to whip up a batch soon:
- A Beautiful Presentation: Their striking red color makes these cookies stand out, adding a touch of festivity to any occasion.
- Decadent Cream Cheese Filling: The creamy, tangy filling perfectly complements the rich cocoa flavor of the cookies, creating a delightful contrast.
- Perfect for Sharing: Whether it’s a holiday celebration, a bake sale, or just a Saturday afternoon treat, these cookies are sure to impress friends and family alike.
- Simple Yet Luxurious: Despite their gourmet appearance, these cookies are surprisingly easy to make, making them suitable for bakers of all skill levels.
- A Childhood Favorite: If you grew up loving red velvet cake, these cookies will bring back those warm, sweet memories with every bite.
Gathering Your Ingredients
Before we get started, let’s make sure you have everything you need for these delightful treats. Here’s the ingredient list with some helpful notes:
For the Cookies:
- 2 and 1/4 cups all-purpose flour: This gives the cookies structure and a nice chew.
- 1/4 cup unsweetened cocoa powder: This adds depth to the flavor, giving that signature red velvet taste.
- 1 teaspoon baking soda: This provides lift, helping your cookies puff up perfectly.
- 1/2 teaspoon salt: A touch of salt enhances all the sweet flavors in the recipe.
- 1 cup unsalted butter, softened: Butter adds richness and creates that flaky texture.
- 1 and 1/2 cups granulated sugar: Sweetness is essential, and sugar also helps the cookies spread just right.
- 2 large eggs, at room temperature: They bind the ingredients together and contribute to the cookie’s tenderness.
- 1 teaspoon vanilla extract: Vanilla complements the other flavors beautifully, making each bite more aromatic.
- 2 tablespoons red food coloring: This gives the cookies their iconic, eye-catching color!
- 1/2 cup buttermilk: The acidity of buttermilk adds moisture and tenderness, giving the cookies a lovely texture.
- 1/2 cup granulated sugar (for rolling): This adds a sweet, crunchy finish to the cookie exterior.
For the Cream Cheese Filling:
- 8 ounces cream cheese, softened: The star of the filling, bringing a luscious, tangy creaminess.
- 1/2 cup unsalted butter, softened: Adds creaminess and helps achieve a smooth texture in the filling.
- 4 cups powdered sugar, sifted: Sweetness is key here, and sifting ensures a lump-free filling.
- 1 teaspoon vanilla extract: Enhances the overall flavor profile of the filling, making it decadent.
Crafting Your Perfect Red Velvet Thumbprint Cookies
Now that we have our ingredients prepped, let’s get baking! Here’s how to make these irresistible cookies:
- In a medium bowl, whisk together the flour, cocoa powder, baking soda, and salt. Set aside.
- In a large bowl, cream together the softened butter and granulated sugar until light and fluffy, about 2 to 3 minutes. You’ll know it’s ready when it looks pale and airy.
- Beat in the eggs one at a time, mixing well after each addition. Then stir in the vanilla extract and red food coloring. That vibrant red mixture will be so mesmerizing!
- Alternately add the dry ingredients and buttermilk to the wet mixture, starting and ending with the dry ingredients. Mix on low speed until just combined. Remember, overmixing can lead to tough cookies, so keep this gentle!
- Cover the dough and refrigerate for at least 30 minutes, or up to 2 hours. Chilling is crucial for firming up the dough, helping your cookies maintain their shape.
- Preheat your oven to 375 degrees Fahrenheit (190 degrees Celsius) and line your baking sheets with parchment paper. Prepare a shallow dish with the additional 1/2 cup granulated sugar for rolling.
- Scoop out rounded tablespoons of dough and roll them into smooth balls. Roll each ball generously in the sugar until fully coated. Place the coated balls onto the prepared baking sheets, spaced about 2 inches apart.
- Using your thumb or the back of a small spoon, gently press an indent in the center of each cookie ball. Be cautious—don’t press all the way through!
- Bake for 8 to 10 minutes. The cookies are done when the edges are set and lightly browned, but the centers still look slightly soft. If you’re unsure, they will firm up as they cool, so it’s better to err on the side of underbaking slightly.
- Let the cookies cool completely on a wire rack before you prepare the cream cheese filling.
- For the cream cheese filling, beat the softened cream cheese and butter until smooth and creamy. Gradually add the sifted powdered sugar, beating until fluffy. Stir in the vanilla extract.
- Once the cookies are cool, spoon or pipe the cream cheese filling into the indents of each cookie. Serve immediately or store in an airtight container in the refrigerator.
Expert Advice
Baking can occasionally come with its challenges, so here are some of my favorite pro tips for ensuring your cookies turn out perfectly every time:
- Temperature Matters: Make sure your butter and eggs are at room temperature. This helps them blend better and creates a smoother cookie dough.
- Chill Your Dough: Don’t skip the chilling step! It’s crucial for controlling spread, ensuring that your cookies bake up with the perfect shape and texture.
- Use a Cookie Scoop: For evenly sized cookies, a medium cookie scoop is your best friend. This way, you’ll have uniform cookies that bake at the same rate!
- Experiment with Flavor Profiles: Feel free to tweak the flavors! Add a pinch of cinnamon or even some espresso powder to the dough for a unique twist!
- Don’t Rush the Cooling: Allowing the cookies to cool completely before adding the filling is important. If they’re warm, the filling might melt into the cookies.
Creative Twists
If you’re feeling adventurous or want to cater to specific tastes, here are a few delicious variations to consider:
- Nutty Additions: Mix in some chopped pecans or walnuts into the cookie dough for a delightful crunch and added flavor.
- Different Fillings: Swap out the cream cheese filling for a chocolate ganache or a raspberry jam for an exciting change!
- Gluten-Free Option: Substitute all-purpose flour with a gluten-free blend for a tasty version everyone can enjoy.
- Festive Colors: Use gel or liquid food coloring to create an ombre effect on the cookies for holidays or birthdays!
- Spicy Kick: Add a pinch of cayenne pepper or chili powder to the dough for an unexpected but delightful kick!
How to Enjoy Red Velvet Thumbprint Cookies
Presentation is everything, and these cookies can shine on any dessert table. Stack them neatly on a decorative platter, or arrange them with fresh strawberries and a drizzle of chocolate sauce for a decadent display. They pair beautifully with a chilled glass of milk or a warm cup of coffee, enticing the senses even further. The striking contrast between the deep red of the cookies and the creamy filling is visually stunning, making them a perfect centerpiece for any gathering.
Keeping Them Fresh
These cookies can be kept fresh for a delightful treat beyond the day of baking! Here are my top tips for keeping them delicious:
- Refrigeration: Store your cookies in an airtight container in the refrigerator for up to a week. Just remember, they might get a bit firmer than when fresh, so let them sit out for a bit before enjoying.
- Freezing: You can freeze any leftover cookies, either individually wrapped or in a single layer in an airtight container. They’ll stay good for about a month. Just thaw them in the fridge and enjoy!
- Reheating: If you prefer a warm cookie experience, pop them in the microwave for just a few seconds to bring them back to life!
Your Questions Answered
Can I make these cookies without food coloring?
Absolutely! You can skip the food coloring if you prefer. The cookies will still taste delicious, just without the iconic red hue.
Can I use cake flour instead of all-purpose flour?
While cake flour can be a substitute, the cookies may be lighter and softer. Make sure to adjust the amounts slightly, as cake flour has less protein than all-purpose flour.
What’s the best way to soften cream cheese quickly?
If you forget to take your cream cheese out ahead of time, cut it into small pieces and let it sit at room temperature for about 15-20 minutes, or microwave it for about 10 seconds at a time, checking to ensure it doesn’t melt.
Can I add other flavors to the cream cheese filling?
Definitely! You can incorporate flavors like lemon zest or chocolate for a creamy, flavorful twist.
There you have it, my fellow bakers! Red Velvet Thumbprint Cookies are a delightful treat that captures the essence of celebration and love in every bite. I invite you to bring the beautiful colors and the luscious flavors into your kitchen and share these cheerful cookies with those you love! Happy baking!
Red Velvet Thumbprint Cookies
Ingredients
Method
- In a medium bowl, whisk together the flour, cocoa powder, baking soda, and salt. Set aside.
- In a large bowl, cream together the softened butter and granulated sugar until light and fluffy, about 2 to 3 minutes.
- Beat in the eggs one at a time, mixing well after each addition. Stir in the vanilla extract and red food coloring.
- Alternately add the dry ingredients and buttermilk to the wet mixture, starting and ending with the dry ingredients. Mix on low speed until just combined.
- Cover the dough and refrigerate for at least 30 minutes.
- Preheat your oven to 375 degrees Fahrenheit (190 degrees Celsius) and line your baking sheets with parchment paper.
- Scoop out rounded tablespoons of dough and roll them into smooth balls, rolling each ball in the granulated sugar until fully coated.
- Place the coated balls on the prepared baking sheets, spaced about 2 inches apart.
- Using your thumb or a small spoon, gently press an indent in the center of each cookie ball.
- Bake for 8 to 10 minutes. The cookies should have set edges but soft centers.
- Let the cookies cool completely on a wire rack.
- In a bowl, beat the softened cream cheese and butter until smooth. Gradually add sifted powdered sugar, beating until fluffy. Stir in vanilla extract.
- Once the cookies are cool, spoon or pipe the cream cheese filling into the indents of each cookie.