How to Make Delicious Salted Maple Brownies
Oh, my friends, get ready for a dessert that hits all the right notes: rich, chocolatey, perfectly sweet, and with that irresistible salty kiss! Today at WiseRecipes, I’m absolutely thrilled to share a recipe that takes the humble brownie and elevates it to pure gourmet status: these incredible Salted Maple Brownies! Seriously, if you’ve been…
Oh, my friends, get ready for a dessert that hits all the right notes: rich, chocolatey, perfectly sweet, and with that irresistible salty kiss! Today at WiseRecipes, I’m absolutely thrilled to share a recipe that takes the humble brownie and elevates it to pure gourmet status: these incredible Salted Maple Brownies! Seriously, if you’ve been looking for a treat that’s guaranteed to be a crowd-pleaser, utterly decadent, and surprisingly simple to whip up, then you have found your new obsession right here.
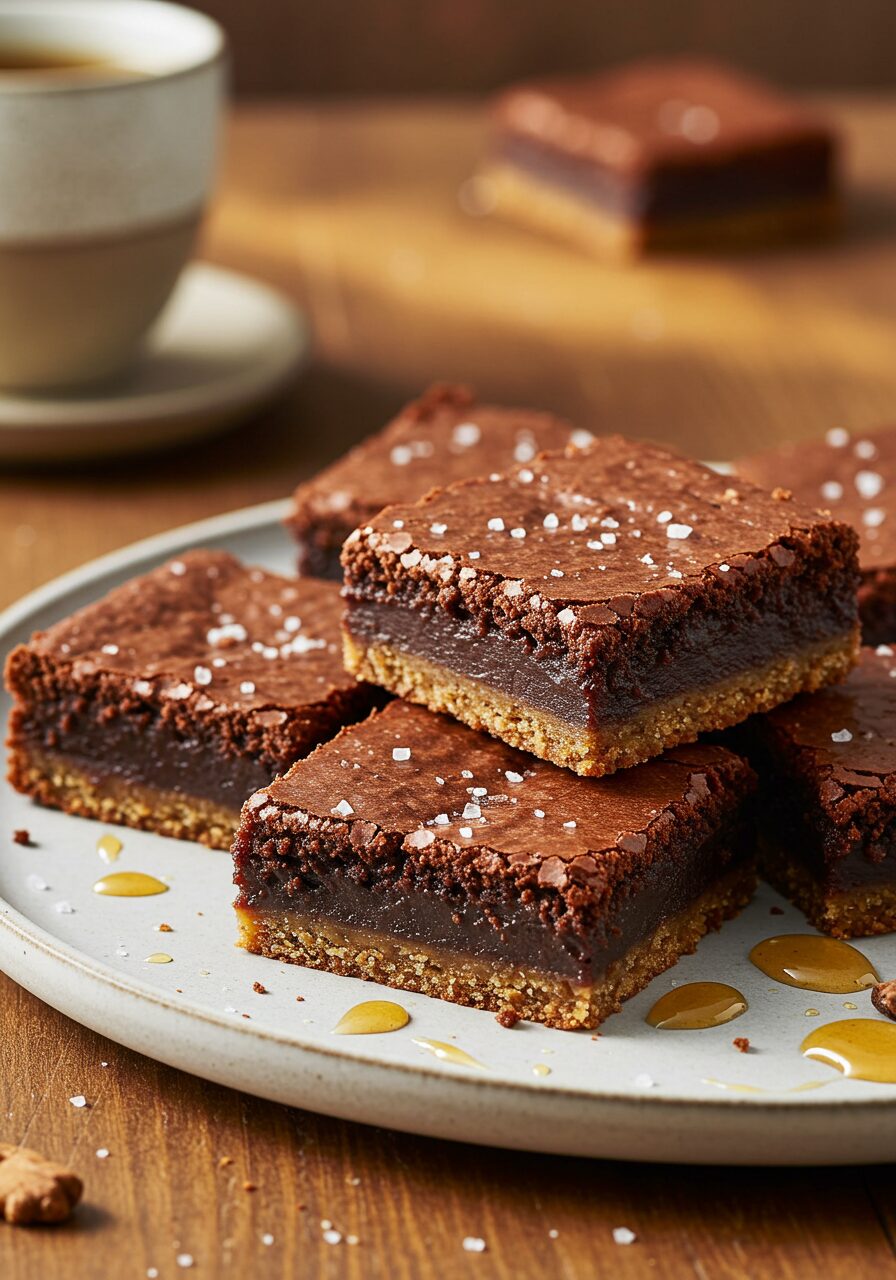
I just adore a recipe that delivers big on flavor and feels like pure comfort food magic. This brownie recipe is exactly that! Imagine: a crunchy, buttery digestive biscuit base, topped with an intensely chocolatey, fudgy brownie batter infused with the subtle, warm sweetness of maple syrup. Then, just before baking, a sprinkle of delicate salt flakes creates that perfect sweet-and-salty balance that makes every single bite sing. It’s gooey, it’s chewy, it’s got that satisfying crunch, and it is pure bliss in every single square! Whether you’re baking for a special occasion, a cozy night in, or just because you need a chocolate fix, these Salted Maple Brownies are your answer. In just about an hour of active time (plus cooling!), you can have 16 amazing squares ready to devour. Trust me, once you try this incredible combination, you’ll be making them again and again!

Why These Salted Maple Brownies Will Be Your New Favorite Treat!
This isn’t just another brownie recipe; it’s a decadent experience that’s deceptively easy. Here’s why I’m absolutely smitten with it:
- Irresistible Sweet & Salty Combo: The delicate crunch of salt flakes perfectly balances the rich sweetness of chocolate and maple, creating that addictive flavor profile that keeps you coming back for more.
- Gooey Fudgy Perfection: We’re talking real brownies here! These are dense, moist, and incredibly fudgy, with that signature cracked top that promises pure bliss inside.
- Unique Biscuit Base Crunch: Forget a plain brownie base! Our buttery, slightly salty digestive biscuit layer adds a fantastic textural contrast and an extra layer of flavor that elevates these brownies to something truly special.
- Warm Maple Infusion: Maple syrup isn’t just a topping; it’s subtly mixed into the brownie batter, adding a comforting, aromatic sweetness that beautifully complements the dark chocolate.
- Surprisingly Easy to Make: Despite looking and tasting incredibly gourmet, this recipe is straightforward and accessible for even beginner bakers. You’ll impress everyone with minimal fuss!
Your Shopping List for Brownie Bliss: Gather What You’ll Need
Creating these incredible Salted Maple Brownies uses a blend of pantry staples and rich chocolatey goodness. Here’s what you’ll want to grab to get started!
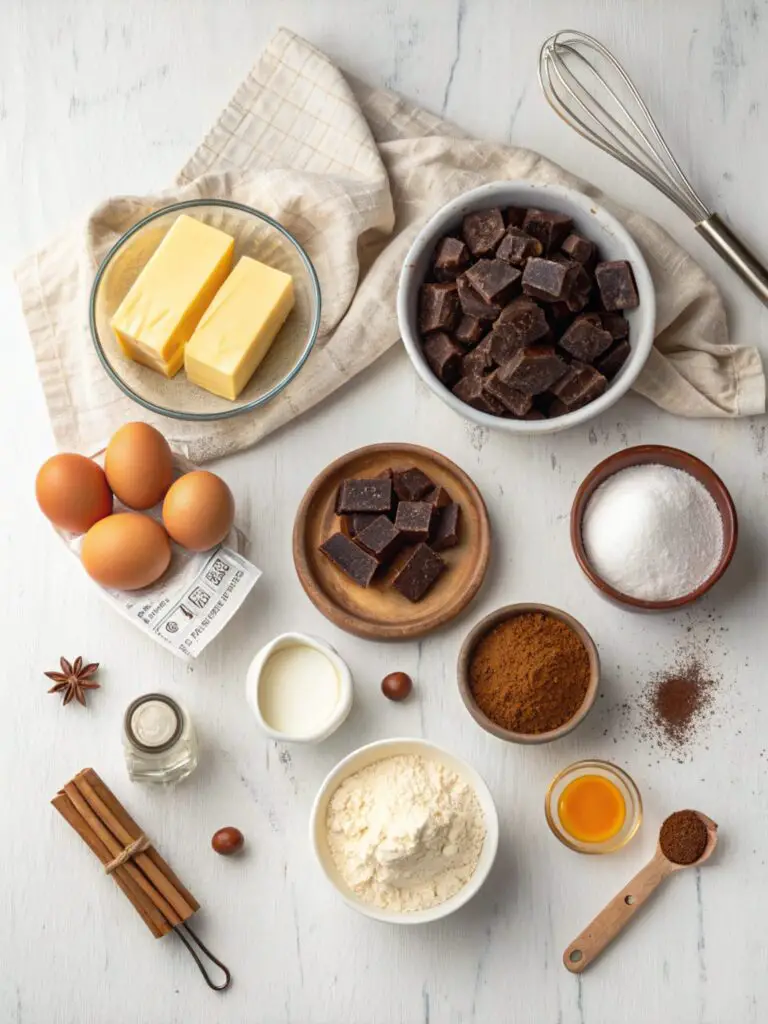
→ For the Crunchy Biscuit Base
- 150g digestive biscuits, crushed to crumbs: The base for our delicious, buttery crust.
- 2 tbsp milk powder: Adds a lovely richness and helps bind the base.
- 2 tbsp maple syrup: For sweetness and a sticky binder.
- A large pinch salt flakes: To enhance the flavor of the base.
- 50g butter, melted: Our binding agent for a firm, flavorful crust.
- 2 tbsp double cream: Adds extra richness and helps bring the base together.
→ For the Gooey Salted Maple Brownie Batter
- 50g butter: For melting with the chocolate.
- 100g dark chocolate, chopped: Use good quality dark chocolate for best flavor!
- 2 eggs: Binds the batter and adds richness.
- 100g golden caster sugar: Sweetens the brownies and helps with that cracked top.
- 50g plain flour: The structure for our fudgy brownies.
- ½ tsp baking powder: For a little lift.
- 15g cocoa: For intense chocolate flavor and dark color.
- 2 tbsp maple syrup: Infused into the batter for warmth and subtle sweetness.
- Salt flakes: For sprinkling on top, adding that irresistible sweet-and-salty finish.
Let’s Bake! Crafting Your Perfect Salted Maple Brownies, Step-by-Step
This recipe is designed to be straightforward and incredibly rewarding. Have your ingredients prepped, and you’ll be enjoying these decadent brownies in no time!
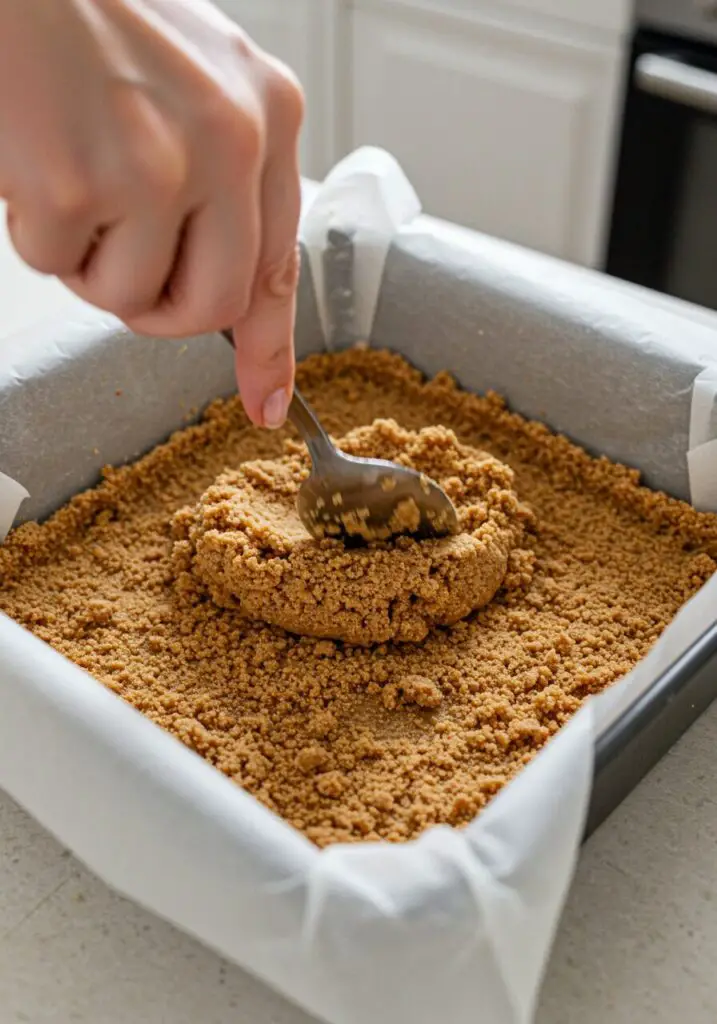
Part 1: Making the Crunchy Biscuit Base
- Preheat Oven & Prep Tin: First things first! Heat your oven to 180°C / 160°C fan / gas 4 (or 350°F / 325°F convection). Line a 22cm (8.5-inch) square tin with baking parchment, making sure to leave some overhang. These overhangs will be your “slings” to easily lift the whole brownie out once it’s baked and cooled!
- Mix Base Ingredients: In a medium bowl, combine the 150g crushed digestive biscuit crumbs, 2 tablespoons milk powder, 2 tablespoons maple syrup, a large pinch of salt flakes, 50g melted butter, and 2 tablespoons double cream. Mix everything together until well combined. The mixture should feel moist enough to stick together when squeezed in your hand.
- Press the Base: Press this biscuit mixture firmly and evenly into the base of your prepared tin. Use the back of a spoon or your knuckles to get a nice, compact layer.
Part 2: Preparing & Baking the Gooey Brownie Layer
- Melt Chocolate & Butter: In a microwave-safe bowl (or a bowl set over a pan of simmering water), melt the 50g butter and 100g chopped dark chocolate together. Stir until smooth and completely melted. Let this mixture cool slightly to room temperature.
- Whisk Eggs & Sugar: In a separate large bowl, whisk together the 2 eggs and 100g golden caster sugar. Use an electric whisk if you have one, and beat until the mixture is pale, thick, and greatly increased in volume – it should leave a visible trail when you lift the whisk.
- Fold in Chocolate Mixture: Gently fold the cooled chocolate mixture into the egg and sugar mixture using a spatula. Mix until just combined.
- Sift & Fold in Dry Ingredients: Sift over the 50g plain flour, ½ teaspoon baking powder, and 15g cocoa powder into the bowl. Gently fold everything together until you have a thick, glossy brownie batter. Be careful not to over-mix!
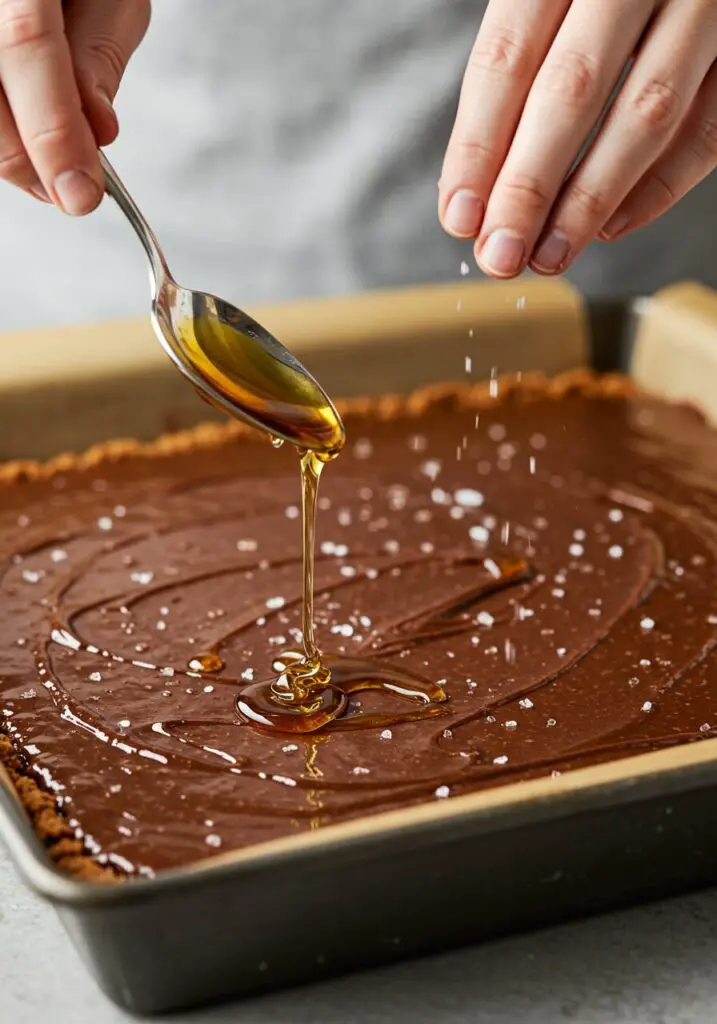
- Pour & Drizzle: Carefully pour this rich brownie batter onto the prepared biscuit base in the tin, spreading it evenly. Drizzle an extra 2 tablespoons of maple syrup over the top of the batter, creating lovely swirls (you can use a knife tip to swirl it in gently!).
- Sprinkle Salt: Finally, sprinkle some salt flakes (to your liking!) evenly over the top of the brownie batter. This will create that gorgeous sweet-and-salty crust.
- Bake to Perfection: Bake for 15-20 minutes, or until the top is beautifully cracked, but the middle still feels just set (a little wobbly is perfect for fudgy brownies!). Don’t overbake!
- Cool Completely: Once baked, remove the tin from the oven and let the brownies cool completely in the tin. This is crucial for fudgy, sliceable brownies.
Part 3: Slicing & Serving Our Decadent Brownies
- Lift & Slice: Once the brownies are completely cool, use the overhanging baking parchment to carefully lift the entire slab out of the tin. Transfer it to a cutting board.
- Cut into Squares: With a sharp knife, cut the cooled brownies into 16 perfect squares.
- Serve & Enjoy! Arrange the squares on a serving plate and enjoy every rich, fudgy, sweet-and-salty bite!
WiseRecipes’ Top Tips for Salted Maple Brownie Perfection
These incredible brownies are surprisingly easy to make, but these WiseRecipes tips will help you achieve perfection every single time!
- Good Quality Chocolate Matters: Since chocolate is a star ingredient here, use a good quality dark chocolate (around 70% cocoa solids) that you enjoy eating on its own. It will make a huge difference in the flavor of your brownies!
- Don’t Overbake! This is the golden rule for fudgy brownies. Brownies continue to cook slightly as they cool in the pan. You want a cracked top and a center that is just set, maybe with a slight wobble. A skewer inserted should come out with moist crumbs, not wet batter. Overbaking leads to dry, cakey brownies.
- Cool Completely: Patience is key! Letting the brownies cool completely in the tin is crucial for achieving that dense, fudgy texture and clean, neat squares when cutting. Warm brownies will be too gooey and fall apart.
- The Salt Flakes are Magic: Don’t skip the salt flakes! They provide that essential pop of savory crunch that beautifully contrasts with the sweetness of the chocolate and maple, elevating the entire brownie experience.
- Sift Your Dry Ingredients: Sifting the flour and cocoa powder helps prevent lumps and ensures a smoother, more even brownie batter, leading to a lighter texture.
Creative Twists: Delicious Ways to Customize Your Salted Maple Brownies
These Salted Maple Brownies are already pure perfection, but they’re also a fantastic canvas for your culinary creativity! Here are some ideas I love to play with:
- Nutty Crunch: Fold in a handful of chopped walnuts, pecans, or even toasted slivered almonds into the brownie batter for extra texture and a lovely nutty flavor.
- Espresso Boost: Add ½ teaspoon of instant espresso powder to the melted chocolate mixture. It won’t make the brownies taste like coffee, but it will intensely deepen the chocolate flavor!
- Different Biscuit Base: Experiment with other crushed biscuits for the base! Graham crackers (digestive biscuit equivalent), chocolate wafers, or even shortbread would be delicious.
- Swirl it Up: Instead of just maple syrup, drizzle a little melted dulce de leche or a spoonful of cream cheese frosting over the brownie batter before baking for an extra swirl of flavor.
- Spice it Up! Add ½ teaspoon of ground cinnamon or a pinch of cayenne pepper to the brownie batter for a subtle warmth and kick.
- Blonde Brownie Version: For a fun twist, omit the cocoa powder and use white chocolate in place of dark, creating a salted maple “blondie” with the same delicious base!
Salted Maple Brownies (Pure Indulgence! Gooey Perfection!)
Ingredients
Equipment
Method
- Heat the oven to 180C/fan 160C/gas 4. Line a 22cm square tin with baking parchment, leaving some overhanging to easily lift the brownies out.
- Mix the biscuit crumbs with the milk powder, 2 tbsp maple syrup, a large pinch of salt flakes, 50g melted butter, and 2 tbsp double cream until it sticks together.
- Press the mixture firmly into the base of the tin.
- Melt 50g butter and 100g chopped dark chocolate in a microwave or in a bowl over simmering water. Cool to room temperature.
- Whisk the eggs and 100g golden caster sugar until pale and thick.
- Fold the chocolate mixture into the eggs. Sift over the plain flour, baking powder, and cocoa, then fold to make a thick batter.
- Pour the batter onto the biscuit base. Drizzle over 2 tbsp maple syrup and sprinkle on some salt flakes.
- Bake for 15-20 minutes, or until the top is cracked but the middle is just set (slightly wobbly).
- Cool completely in the tin.
- Lift the cooled brownies out of the tin using the baking parchment and cut into 16 squares. Serve and enjoy!
Notes
Keep It Delicious! Storing Your Salted Maple Brownies
You’ve created something truly special, so let’s make sure it stays fresh and delicious!
- Room Temperature Storage: Once completely cooled, store your Salted Maple Brownies in an airtight container at room temperature for up to 3-4 days. They actually taste even better the day after baking, as the flavors meld and deepen!
- Refrigerator Storage: If you prefer a firmer, chewier brownie (or if your kitchen is very warm), you can store them in an airtight container in the refrigerator for up to 1 week. Bring to room temperature for about 30 minutes before serving for the best texture.
- Freezing for Later: These brownies freeze beautifully! Once completely cooled and cut into squares, arrange them in a single layer on a baking sheet and freeze until solid. Then, transfer them to a freezer-safe bag or container, layered with parchment paper to prevent sticking. Freeze for up to 2-3 months.
- Defrosting Tips: To defrost, simply take out the desired number of squares and let them thaw at room temperature for 30-60 minutes. They’ll be wonderfully fudgy and delicious!
FAQs: Your Top Salted Maple Brownie Questions, Answered!
Q: What are salt flakes? Can I use regular salt?
A: Salt flakes (like Maldon sea salt flakes) are larger, flatter crystals of sea salt that provide a lovely crunch and burst of salty flavor when sprinkled on top of baked goods. You can use a tiny pinch of regular coarse sea salt as a substitute, but avoid fine table salt, which can make it too salty.
Q: My brownies came out cakey, not fudgy. What went wrong?
A: Cakey brownies are usually a sign of over-baking. You want to pull them from the oven when the top is cracked and the edges are set, but the middle is still slightly wobbly. They will continue to set as they cool. Over-mixing the batter can also contribute to a cakey texture.
Q: Can I use different types of chocolate?
A: Yes, you can experiment! While dark chocolate (around 70% cocoa) provides the best depth of flavor, you could use a slightly less dark chocolate (e.g., 50-60% cocoa) for a sweeter brownie, or even a mix of dark and milk chocolate for a milder flavor.
Q: What are digestive biscuits? Can I substitute them?
A: Digestive biscuits are a type of semi-sweet biscuit (cookie) that are very popular in the UK and Ireland. They have a slightly crumbly, wheaty texture. You can absolutely substitute them with graham crackers, Biscoff biscuits, or even plain shortbread cookies, crushed to fine crumbs.
Q: How do I get that perfect cracked top on my brownies?
A: A combination of factors contributes to a cracked top: beating the eggs and sugar until pale and thick, the fat content of the butter and chocolate, and baking at the correct temperature. The quick expansion of the batter and then setting creates that beautiful cracked surface!
And there you have it, my friends—your guide to crafting the most delightful, impressive, and truly satisfying Salted Maple Brownies! This WiseRecipes creation is more than just a dessert; it’s a testament to how simple ingredients, when treated with a little love and smart steps, can come together to create something truly extraordinary. It’s a vibrant, exciting meal that you’ll genuinely look forward to eating, day after day.
I am genuinely so excited for you to try these and experience the delicious magic yourself. Please, please come back and let me know in the comments below what your favorite part of these fudgy brownies was, or any fun twists you tried! Happy cooking from WiseRecipes!