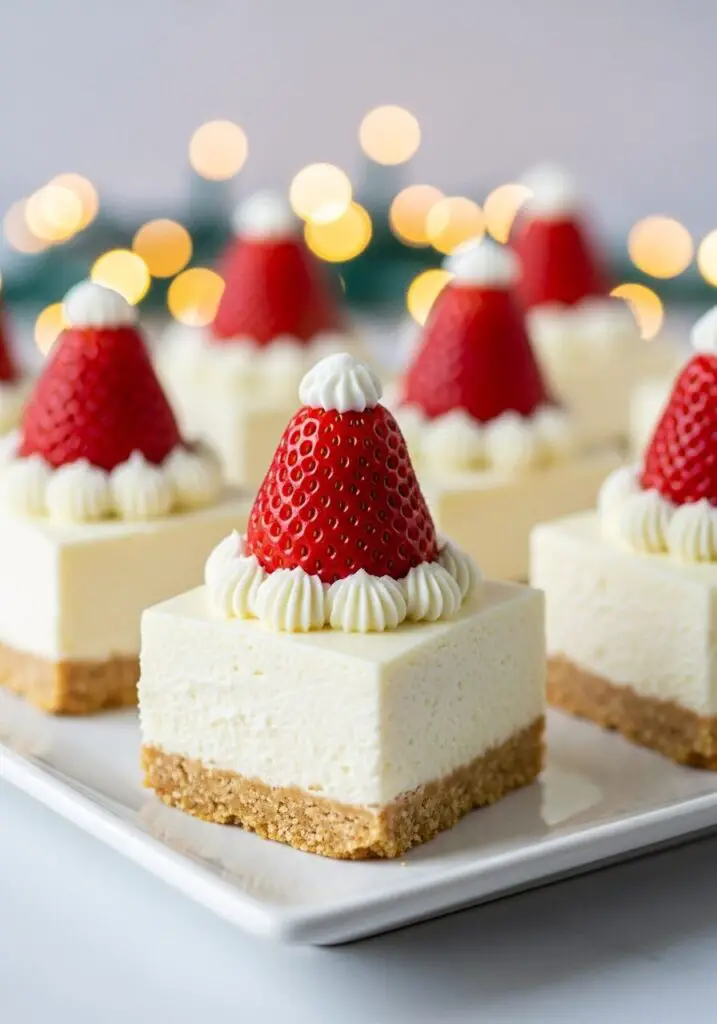
The Ultimate Santa Hat Crispy-Treat Cheesecake Squares (Festive & Fun!)
Imagine the perfect holiday treat: a chewy, crunchy, gooey crispy-treat base, topped with a thick layer of creamy, tangy no-bake cheesecake, and finished with an adorable Santa hat made from a fresh strawberry and a fluffy pom-pom of frosting. That, my friends, is the pure, festive joy of these Santa Hat Cheesecake Squares. They are,…
Imagine the perfect holiday treat: a chewy, crunchy, gooey crispy-treat base, topped with a thick layer of creamy, tangy no-bake cheesecake, and finished with an adorable Santa hat made from a fresh strawberry and a fluffy pom-pom of frosting. That, my friends, is the pure, festive joy of these Santa Hat Cheesecake Squares. They are, without a doubt, the most creative and crowd-pleasing dessert you will make this season.
Here’s the thing about holiday desserts: we want them to be show-stoppers, but we don’t want to spend all day baking. This recipe is my secret weapon for exactly that. It’s a brilliant mashup of two beloved classics—crispy treats and cheesecake—that requires no oven time for the main event. It’s a fun, whimsical project that delivers a truly impressive result.
I promise you, there is no greater delight than watching faces light up when you bring out a platter of these adorable Santa hats. The combination of textures is simply divine, with the crunchy base perfectly balancing the smooth cheesecake, and the fresh strawberry cutting through the richness with a burst of bright, juicy flavor. They are the whole holiday package in one perfect square.
Get ready to create the cutest, most delicious, and most talked-about treat at your holiday gathering!
Why These Santa Hat Squares Are a Holiday Triumph!
You are going to have so much fun making these, and even more fun watching them disappear! This recipe is a guaranteed winner. Here’s why:
- The Ultimate Texture Combo: You get the crunchy, chewy, gooey goodness of a crispy treat crust paired with the rich, smooth creaminess of a cheesecake topping. It’s absolutely divine!
- No-Bake Cheesecake Layer: This recipe frees up precious oven space during the busy holiday season. The cheesecake layer sets up perfectly in the fridge.
- Incredibly Festive and Cute: The fresh strawberry Santa hats are surprisingly easy to make and turn these simple squares into a true holiday show-stopper.
- Perfectly Make-Ahead: You can prepare the entire pan of cheesecake squares a day in advance, leaving just the fun decorating part for the day of your party.
- A Total Crowd-Pleaser: Combining two classic desserts into one easy-to-eat bar is a guaranteed hit with both kids and adults.
Recipe Snapshot
| Active Time | 1 hour 5 minutes |
| Chilling Time | 2 hours 20 minutes |
| Total Time | 3 hours 25 minutes |
| Yield | 25 pieces |
| Calories | ~210 kcal per square |
| Course | Dessert |
| Cuisine | American |
| Difficulty/Method | Easy / No-Bake |
Your Shopping List for This Festive Treat
This recipe uses simple, accessible ingredients to create its impressive layers and adorable topping. Here’s what you’ll need:

→ For the Crispy-Treat Crust
- 3 tbsp unsalted butter → The rich, gooey foundation of our crust.
- 5 oz mini marshmallows → (About 1 cup tightly packed). These provide the sweet, sticky glue.
- 2 tsp honey & 1 tsp vanilla extract → For extra depth of flavor.
- 4 cups crispy rice cereal → The classic crunch!
- Kosher salt → Just a pinch to balance the sweetness.
→ For the No-Bake Cheesecake Layer
- One 1/4-oz package unflavored powdered gelatin → This is the secret to a perfectly set, sliceable no-bake cheesecake.
- Two 8-oz packages cream cheese → Must be at room temperature for a smooth, lump-free filling.
- 1 cup sour cream → Adds a wonderful tangy flavor that balances the richness.
- 1 cup confectioners’ sugar → For sweetness and a smooth texture.
- 1 tbsp fresh lemon juice → Brightens up the cheesecake flavor.
→ For the Santa Hat Frosting & Topping
- 2 tbsp unsalted butter & 2 tbsp cream cheese → Both at room temperature, for a simple and delicious cream cheese frosting.
- ½ cup confectioners’ sugar → Sifted, to ensure the frosting is silky smooth.
- ¼ tsp vanilla extract → For flavor.
- 25 medium strawberries → Hulled. Look for ones that have a nice cone shape.
Let’s Make Some Holiday Magic! Your Step-by-Step Guide
This recipe is all about building layers. Let’s start from the crunchy bottom up!
Part 1: The Crispy-Treat Crust
- Prep Your Pan: Line a 9-inch square pan with foil, leaving a 2-inch overhang on two opposite sides to use as “handles” later. Lightly coat the foil and a wooden spoon with cooking spray.
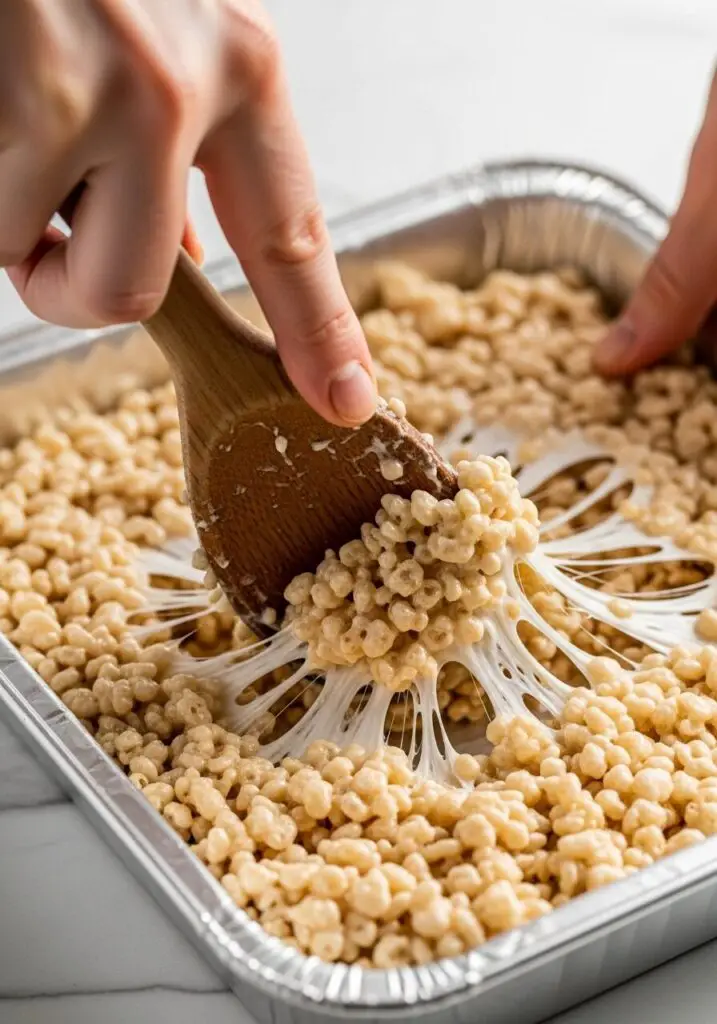
- Melt the Marshmallows: In a medium saucepan over medium heat, melt the butter. Add the mini marshmallows, honey, ½ teaspoon of vanilla, and a pinch of salt. Stir with your greased spoon until the marshmallows are completely melted and smooth, about 4-5 minutes.
- Combine and Press: Remove from the heat and add the crispy rice cereal. Stir until everything is fully combined. Transfer the warm mixture to your prepared pan and use the back of your greased spoon or a piece of greased wax paper to press it into a firm, even layer. Let it sit at room temperature for about 20 minutes to firm up.
Part 2: The Creamy Cheesecake Layer
- Bloom the Gelatin: In a small microwave-safe bowl, combine the powdered gelatin with 2 tablespoons of water. Set it aside for about 5 minutes to soften or “bloom.”
- Beat the Cheeses: In a large bowl, use an electric mixer to beat the room-temperature cream cheese on medium-high speed for 1 minute until completely smooth and free of lumps. Scrape down the bowl, then add the sour cream, confectioners’ sugar, lemon juice, the remaining ½ teaspoon of vanilla, and a pinch of salt. Beat again on medium-high for 1 minute until smooth.
- Incorporate the Gelatin: Microwave the softened gelatin in 10-second bursts, stirring in between, until it’s fully dissolved (30-50 seconds total). With the mixer on medium-high speed, pour the warm gelatin into the cream cheese mixture and beat for 30 seconds until it’s fully incorporated.
- Pour and Chill: Pour the cheesecake mixture over the cooled crispy treat crust. Use an offset spatula to spread it into a smooth, even layer. Cover the pan loosely with plastic wrap and refrigerate for at least 2 hours, or until the cheesecake is firm.
Part 3: Assemble the Adorable Santa Hats
- Make the Frosting: In a medium bowl, whisk together the room-temperature butter and cream cheese until smooth. Add the sifted confectioners’ sugar and vanilla and continue to whisk until you have a smooth, creamy frosting. Transfer it to a piping bag or a resealable plastic bag.
- Cut the Squares: Use the foil overhangs to lift the entire block out of the pan. Cut it into twenty-five 1 ¾-inch squares.
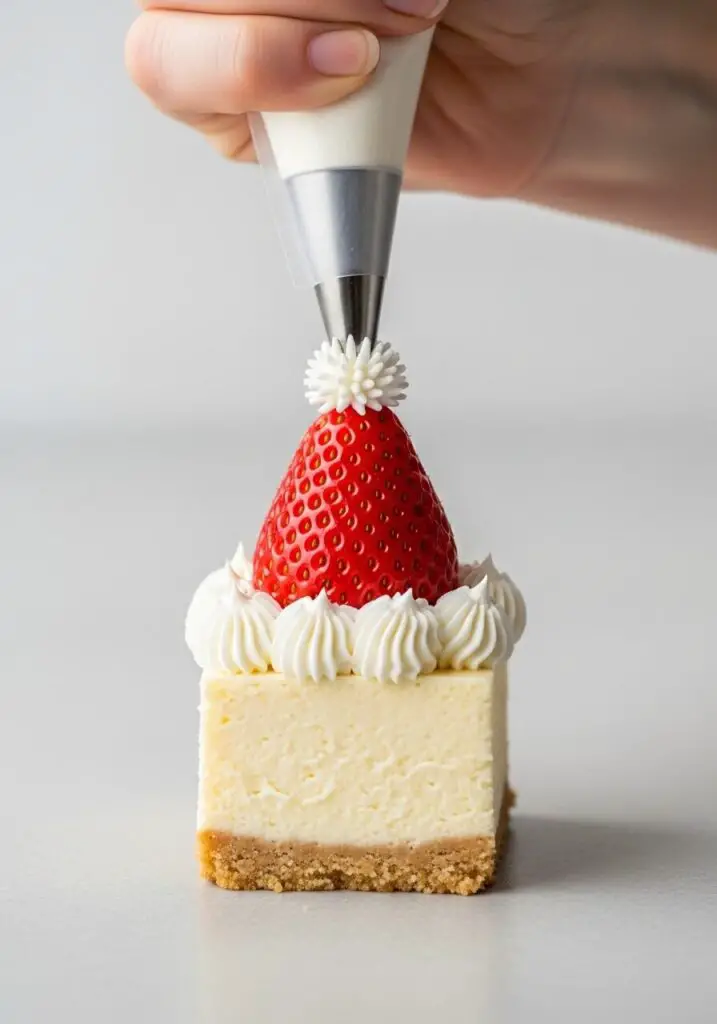
- Decorate!: Snip a ¼-inch corner off your piping bag. Pipe a circle of frosting onto each square. Place a hulled strawberry, cut-side down, onto the frosting circle, pressing gently so the frosting peeks out around the bottom like the fur trim on Santa’s hat. Pipe a small ball of frosting on the tip of each strawberry for the pom-pom.
WiseRecipes’ Top Tips for Perfect Cheesecake Squares
These simple secrets will ensure your festive treats are a stunning success.
- Grease Everything! The marshmallow mixture is incredibly sticky. Greasing your pan, foil, and the spoon you use to stir and press will make your life so much easier and prevent a sticky mess.
- Use Room Temperature “Wet” Ingredients. For the smoothest, lump-free cheesecake filling, your cream cheese, sour cream, and butter (for the frosting) absolutely must be at room temperature before you start mixing.
- Don’t Overheat the Gelatin. When you microwave the gelatin, do it in short bursts. You only need to warm it enough to dissolve it into a liquid. Overheating can weaken its setting power.
- Sift Your Confectioners’ Sugar. For the smoothest possible frosting, always sift your confectioners’ sugar to remove any tiny lumps before you mix it with the butter and cream cheese.
- Chill Thoroughly Before Cutting. Make sure the cheesecake layer is completely firm before you try to lift it from the pan and cut it. A well-chilled block will give you clean, sharp cuts and perfect squares.
Santa Hat Crispy-Treat Cheesecake Squares
Ingredients
Equipment
Method
- Line a 9-inch square pan with foil, leaving a 2-inch overhang on two sides. Lightly coat the foil with cooking spray.
- Melt the butter in a medium saucepan over medium heat. Add the marshmallows, honey, 1/2 tsp vanilla and a pinch of salt. Stir until the marshmallows have completely melted. Add the rice cereal and stir until fully combined.
- Transfer the mixture to the prepared pan and press into an even layer while warm. Let sit at room temperature until firm, about 20 minutes.
- Combine the gelatin with 2 tablespoons water in a small microwave-safe bowl and set aside to soften for 5 minutes.
- Beat the cream cheese on medium-high speed until completely smooth. Add the sour cream, sugar, lemon juice, remaining 1/2 tsp vanilla and a pinch of salt, and beat until smooth.
- Microwave the gelatin in 10-second increments until it dissolves. Pour the gelatin into the cream cheese mixture and beat on medium-high speed until incorporated.
- Pour the cream cheese mixture over the cooled crispy treat layer and spread evenly. Refrigerate until the cheesecake layer is set, about 2 hours.
- For the frosting: Whisk together the butter and cream cheese. Add the sugar and vanilla and whisk until smooth. Transfer to a piping bag.
- Lift the cheesecake from the pan and cut into 25 squares. Pipe a circle of frosting on top of each square. Place a strawberry cut side-down on the frosting. Pipe a ball of frosting on the tip of each strawberry.
Notes
Keep Them Fresh! Storing Your Santa Hats
Due to the fresh fruit and dairy, these treats need to be kept refrigerated.
- Refrigerator: Store the finished squares in a single layer in an airtight container in the refrigerator for up to 3 days. The crispy treat base will soften over time, so they are at their crunchiest on day one.
- Make-Ahead: You can make the cheesecake squares (through step 7) a day ahead. Keep the block uncut and covered in the fridge. Prepare the frosting and store it in an airtight container in the fridge as well. Let the frosting soften slightly at room temperature before piping and decorating on the day you plan to serve.
FAQs: Your Santa Hat Squares Questions, Answered!
Do I have to use gelatin in the cheesecake?
Yes, for this specific no-bake recipe, the gelatin is essential. It’s what gives the cheesecake filling its structure and allows it to be cut into clean squares that hold their shape. Without it, the filling would be too soft.
My crispy treat crust is too hard. What went wrong?
A rock-hard crust is usually caused by one of two things: pressing the mixture into the pan too firmly, or overheating the marshmallows. Press the mixture just until it’s firm and even, and melt the marshmallows over gentle, medium heat only until they are just smooth.
Can I make these in a different sized pan?
You can! An 8×8-inch pan will work, but your layers will be thicker, and you may need to adjust the chilling time slightly. You could also use a 9×13-inch pan, but the layers will be much thinner, and you’ll likely need to double the frosting recipe to have enough for more squares.
Can I use something other than strawberries?
While the strawberries are key to the “Santa hat” theme, you could absolutely top these cheesecake squares with other things! A swirl of raspberry jam, a sprinkle of festive sprinkles, or a dollop of whipped cream would also be delicious.
Final Thoughts: Your Most Festive Creation Yet
There is such joy in creating a dessert that is not only delicious but also brings a sense of fun and wonder to the holiday season. These Santa Hat Crispy-Treat Cheesecake Squares are a celebration of everything we love about this time of year—they’re sweet, creative, and meant to be shared. I hope you have a blast making them. Happy Holidays!