The Ultimate Santa Hat Crispy-Treat Cheesecake Squares (No-Bake Christmas Dessert!)
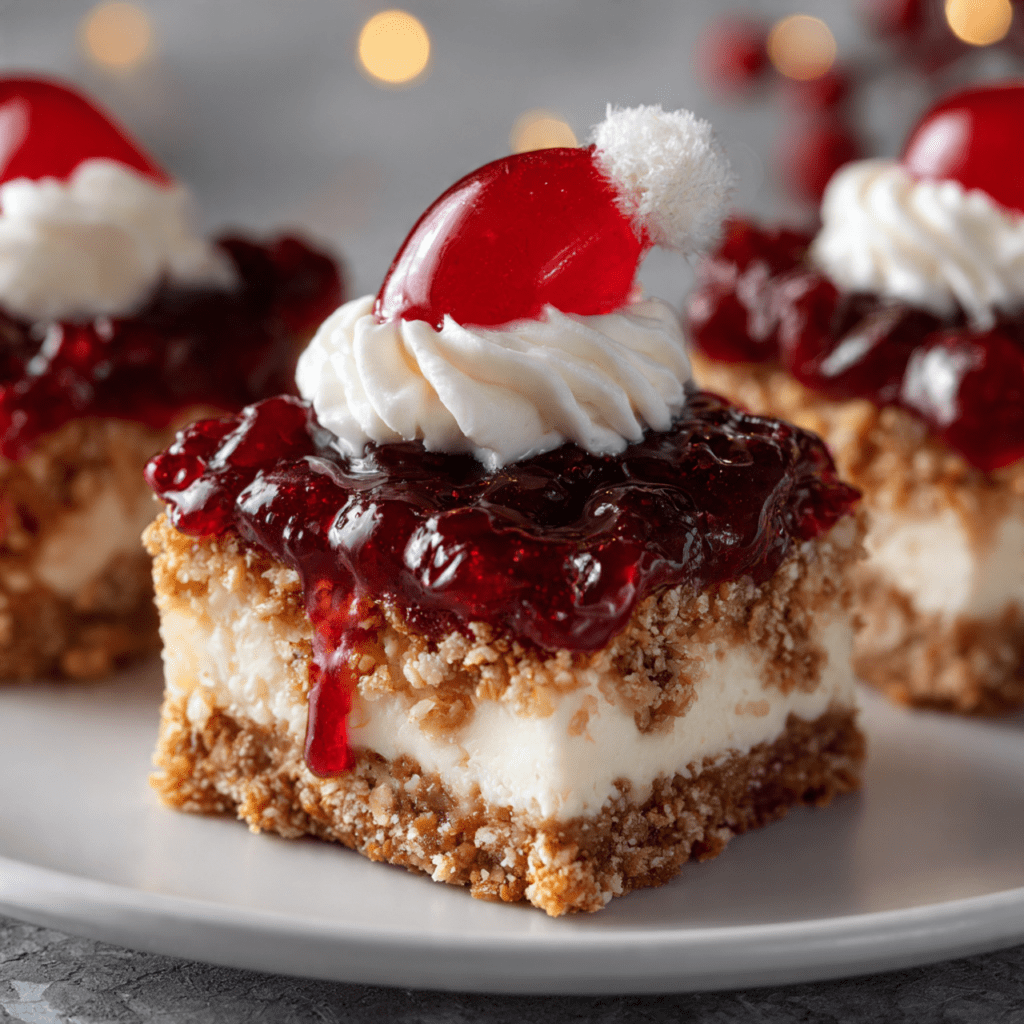
Imagine the most whimsical, adorable, and completely irresistible Christmas dessert, a perfect hybrid of three beloved treats. Picture a chewy, crispy rice cereal base, topped with a thick, tangy layer of no-bake cheesecake, and finished with a charming “Santa hat” made from a fresh strawberry and a dollop of cream cheese frosting. That, my friends,…
Imagine the most whimsical, adorable, and completely irresistible Christmas dessert, a perfect hybrid of three beloved treats. Picture a chewy, crispy rice cereal base, topped with a thick, tangy layer of no-bake cheesecake, and finished with a charming “Santa hat” made from a fresh strawberry and a dollop of cream cheese frosting. That, my friends, is the pure, joyful magic of these Santa Hat Crispy-Treat Cheesecake Squares. This is, without a doubt, the most fun and festive no-bake dessert you will make all season.
I promise you, there is no greater delight than seeing a platter of these festive little squares. The process of creating each tiny Santa hat is a wonderfully creative and satisfying activity, perfect for getting the whole family in on the holiday fun. Each bite is a perfect symphony of textures—chewy, creamy, and fresh—that is guaranteed to be a massive hit at any Christmas party.
Get ready to create the cutest, most talked-about treat of the season, a no-bake wonder that’s as much fun to assemble as it is to eat.
Why These Santa Hat Squares are a Holiday Must-Make
You are going to be completely charmed by this creative and delicious no-bake dessert. It’s a true holiday show-stopper. Here’s why:
- Three Amazing Treats in One: It’s the ultimate dessert mash-up, combining a chewy crispy-treat base, a creamy no-bake cheesecake layer, and an adorable strawberry Santa hat on top!
- Completely No-Bake & Stress-Free: This stunning dessert comes together without ever turning on your oven, freeing it up for your main Christmas dinner.
- Incredibly Adorable and Festive: The little strawberry and frosting Santa hats are a simple, genius touch that makes these squares look incredibly festive and full of Christmas spirit.
Recipe Snapshot
| Prep Time | 1 hour 5 minutes (active) |
| Chill Time | 2 hours 20 minutes |
| Total Time | 3 hours 25 minutes |
| Servings | 25 squares |
| Calories | 185 kcal per square (estimated) |
| Course | Dessert |
| Cuisine | American |
| Difficulty/Method | Easy / No-Bake |
Your Shopping List for These Festive Squares
This impressive dessert comes together with a fun mix of simple, easy-to-find ingredients
→ For the Crispy Cheesecake Squares
- Cooking spray
- 3 Tbsp unsalted butter
- 5 oz mini marshmallows → About 1 cup tightly packed, the gooey glue for our base.
- 2 tsp honey & 1 tsp pure vanilla extract → For flavor in the base and filling.
- Kosher salt
- 4 cups crispy rice cereal
- One ¼-oz package unflavored powdered gelatin → The secret to a firm, sliceable no-bake cheesecake layer.
- Two 8-oz packages cream cheese → Must be at room temperature for a smooth filling.
- 1 cup sour cream → For a classic, tangy cheesecake flavor.
- 1 cup confectioners’ sugar
- 1 Tbsp fresh lemon juice → Brightens up the cheesecake filling.
- 25 medium strawberries → Washed, dried, and hulled.
→ For the Frosting “Fur”
- 2 Tbsp unsalted butter & 2 Tbsp cream cheese → Both at room temperature.
- ½ cup confectioners’ sugar → Sifted, for a perfectly smooth frosting.
- ¼ tsp vanilla extract
Let’s Get Assembling! Your No-Bake Guide
Ready to create the cutest dessert of the Christmas season? Let’s break it down.
Part 1: The Chewy Crispy-Treat Base
- Prep Your Pan: Line a 9-inch square pan with foil, leaving a 2-inch overhang on two sides to act as a “sling.” Lightly coat the foil with cooking spray.
- Melt the Marshmallows: In a medium saucepan over medium heat, melt the 3 tablespoons of butter. Add the mini marshmallows, honey, ½ tsp vanilla, and a pinch of salt. Stir with a greased wooden spoon until the marshmallows have completely melted.
- Combine and Press: Add the crispy rice cereal to the pot and stir until it’s fully combined. Transfer the warm mixture to your prepared pan and, using the greased spoon or your greased hands, press it into an even, flat layer. Let it sit at room temperature to firm up, about 20 minutes.
Part 2: The Creamy No-Bake Cheesecake
- Bloom the Gelatin: In a small microwave-safe bowl, combine the powdered gelatin with 2 tablespoons of water. Let it sit for 5 minutes to soften or “bloom.”
- Make the Filling: In a large bowl with an electric mixer, beat the room temperature cream cheese on medium-high speed until completely smooth. Add the sour cream, 1 cup of confectioners’ sugar, lemon juice, remaining ½ tsp vanilla, and a pinch of salt. Beat again until smooth.
- Incorporate the Gelatin: Microwave the softened gelatin in 10-second bursts until it’s fully dissolved. Pour the liquid gelatin into the cream cheese mixture and beat on medium-high for 30 seconds until fully incorporated.
- Layer and Chill: Pour the cheesecake mixture over the cooled crispy-treat base and spread it into a smooth, even layer. Loosely cover the pan with plastic wrap and refrigerate for at least 2 hours (or up to overnight) until the cheesecake is firm and set.
Part 3: The Santa Hat Decoration
- Make the Frosting: In a medium bowl, whisk together the room temperature butter and cream cheese until smooth. Add the sifted confectioners’ sugar and vanilla and whisk until smooth and creamy.
- Cut the Squares: Use the foil sling to lift the entire chilled block out of the pan. Cut it into twenty-five 1 ¾-inch squares.
- Decorate the Hats: Transfer the frosting to a piping bag (or a zip-top bag with a corner snipped off). Pipe a circle of frosting on top of each square. Place a hulled strawberry, cut-side down, onto the frosting circle, pressing gently so the frosting squishes out to form the white “fur” base of the hat.
- Add the Pom-Pom: Pipe a small ball of frosting on the very tip of each strawberry to create the pom-pom. Your adorable Santa hats are complete!
No-Bake Santa Hat Crispy-Treat Cheesecake Squares
Ingredients
Equipment
Method
- Line a 9-inch square pan with foil, leaving a 2-inch overhang. Lightly coat with cooking spray.
- Make the base: Melt butter in a medium saucepan over medium heat. Add marshmallows, honey, 1/2 tsp vanilla, and a pinch of salt. Stir until marshmallows have completely melted. Add rice cereal and stir until combined. Press into the prepared pan in an even layer. Let sit to firm up, about 20 minutes.
- Make the cheesecake: Combine gelatin with 2 tablespoons water in a small bowl and let soften for 5 minutes. In a large bowl, beat room temperature cream cheese until smooth. Beat in the sour cream, sugar, lemon juice, remaining 1/2 tsp vanilla, and a pinch of salt until smooth.
- Microwave the gelatin in 10-second increments until dissolved. Pour into the cream cheese mixture and beat on medium-high until incorporated, about 30 seconds.
- Pour the cheesecake mixture over the cooled crispy treat layer and spread evenly. Cover loosely and refrigerate until set, at least 2 hours.
- Make the frosting: Whisk together the room temperature butter and cream cheese. Add the sifted sugar and vanilla and whisk until smooth and creamy.
- Use the foil overhangs to lift the set cheesecake from the pan. Cut into 25 squares. Transfer frosting to a piping bag.
- Pipe a circle of frosting on top of each square. Place a hulled strawberry, cut-side down, on the frosting, pressing gently to create the hat’s ‘fur’. Pipe a small ball of frosting on the tip of each strawberry for a ‘pom-pom’.
Notes
WiseRecipes’ Top Tips for Perfect Santa Hat Squares
These simple secrets will help make your festive project a huge success.
- Grease Everything! The crispy treat mixture is famously sticky. Lightly coating your pan, your spoon, and even your hands with cooking spray will make pressing the base into the pan a frustration-free experience.
- Use Room Temperature Cream Cheese. This is the absolute key to a smooth, luscious, lump-free cheesecake filling. Let your cream cheese sit on the counter for at least an hour before you begin.
- Don’t Overheat the Gelatin. When you’re dissolving the bloomed gelatin in the microwave, use very short bursts of heat. You just want it to turn back into a liquid; you don’t want to boil it.
- Use a Foil Sling. The foil overhangs are a game-changer. They allow you to lift the entire chilled dessert out of the pan in one piece, which makes for perfectly clean, neat cuts.
- Dry Your Strawberries Well. After hulling and washing your strawberries, make sure they are completely dry before you place them on the frosting. Any water can make the frosting runny and cause the hats to slide.
Keep Them Fresh! Storing Your Holiday Squares
These adorable treats are a perfect make-ahead dessert for your Christmas party.
- Make-Ahead: You can make the entire cheesecake base (crispy layer and cheesecake layer) up to a day in advance. Keep it covered in the fridge. Cut the squares and add the fresh strawberry Santa hats closer to serving time for the best results.
- Refrigerator: Because of the cheesecake and fresh fruit, these must be stored in the refrigerator. Keep them in an airtight container in a single layer. They are best enjoyed within 2 days.
FAQs: Your Santa Hat Square Questions, Answered!
Can I use a different fruit for the hats?
Medium-sized strawberries have the most iconic “Santa hat” shape, but you could get creative! A large raspberry could also work for a smaller, different-looking hat.
My cheesecake layer isn’t firm. What went wrong?
This is most likely due to either not using enough gelatin or not letting it chill for long enough. The 2-hour minimum chill time is essential for the gelatin to fully set the cheesecake layer so you can get clean slices.
Can I make this in a different sized pan?
You can! An 8-inch square pan will work, but your layers will be slightly thicker, and you may need a little extra chilling time for the cheesecake to set. You could also press it into a 9-inch round springform pan.
Can I make the frosting ahead of time?
Yes, you can make the cream cheese frosting up to 2 days in advance and store it in an airtight container in the refrigerator. Just let it soften slightly at room temperature and give it a quick whisk before transferring it to your piping bag.
Final Thoughts: Your Cutest Christmas Creation
There is nothing more fun than a holiday dessert that is a true conversation starter. These Santa Hat Crispy-Treat Cheesecake Squares are the perfect combination of whimsical, delicious, and nostalgic. They are a joyful project to create and an even more joyful treat to share with the people you love. I hope they bring a little extra “Ho Ho Ho” to your holiday celebration. Happy Holidays!