The Ultimate Sheet Pan Cauliflower Tacos (Easy & Healthy!)
Imagine tender, caramelized cauliflower florets and crispy, spiced chickpeas, roasted to perfection with a smoky blend of chili and cumin, all tucked into warm corn tortillas and piled high with your favorite fresh toppings. That, my friends, is the incredible magic of these Sheet Pan Cauliflower Tacos. This isn’t just a meatless meal; it’s a…
Imagine tender, caramelized cauliflower florets and crispy, spiced chickpeas, roasted to perfection with a smoky blend of chili and cumin, all tucked into warm corn tortillas and piled high with your favorite fresh toppings. That, my friends, is the incredible magic of these Sheet Pan Cauliflower Tacos. This isn’t just a meatless meal; it’s a vibrant, flavor-packed fiesta that happens to be ridiculously easy to make. This is, without a doubt, the best and simplest taco night you’ll have.
I promise you, the moment you pull this golden, aromatic pan from the oven, you’ll be hooked. The cauliflower becomes tender and sweet, the chickpeas get a delightful crunch, and every bite is infused with smoky spices. It’s a healthy, satisfying meal that’s endlessly customizable with fresh toppings like creamy avocado, zesty lime, and crunchy red cabbage.
Get ready to discover your new favorite vegetarian taco, and to fall in love with the sheer brilliance of a one-pan dinner that delivers on every single level.
Why This Will Be Your New Taco Tuesday Staple!
You are going to be blown away by how much flavor comes from such a simple, wholesome recipe. It’s a keeper for so many reasons. Here’s why you have to try it:
- Effortless One-Pan Cleanup: The entire filling roasts together on a single sheet pan. This means you get a spectacular meal without a sink full of dishes.
- Healthy, Hearty, and Meatless: Packed with fiber and nutrients from cauliflower and chickpeas, these tacos are incredibly satisfying and a fantastic vegetarian option.
- Bold, Smoky Flavor: The simple, homemade spice blend of chili powder, cumin, and paprika creates a deep, smoky, and absolutely addictive flavor that perfectly seasons the veggies.
- Ready in 40 Minutes: With just 10 minutes of active prep time, this is a perfect, fast, and flavorful meal for any busy weeknight.
- Completely Customizable: The roasted filling is a perfect canvas for your favorite toppings. Load them up with avocado, salsa, cilantro, cheese, and more!
Recipe Snapshot
| Prep Time | 10 minutes |
| Cook Time | 30 minutes |
| Total Time | 40 minutes |
| Servings | 4 servings |
| Calories | 300 kcal per serving (filling only) |
| Course | Main Course |
| Cuisine | Vegetarian / Tex-Mex |
| Difficulty/Method | Easy / Sheet Pan |
Your Shopping List for This Taco Fiesta
This recipe uses simple pantry staples and fresh ingredients to create its incredible flavor. Here’s what you’ll need:
→ For the Taco Filling
- 1 large head of cauliflower → Cut into bite-sized florets. This is our hearty, delicious base.
- 1 (15-oz) can chickpeas → Drained, rinsed, and patted dry. They get delightfully crispy in the oven!
- 3 tbsp olive oil → To help everything roast and get golden brown.
- 2 tsp chili powder → The foundation of our smoky flavor.
- 1 tsp ground cumin → Adds a warm, earthy depth.
- 1 tsp garlic powder → For a savory, aromatic kick.
- 1 tsp paprika → Adds beautiful color and a mild, sweet pepper flavor. Smoked paprika would also be amazing here!
- 1/2 tsp salt & 1/4 tsp black pepper → To make all the flavors pop.
→ For Serving & Optional Toppings
- Tortillas → Corn or flour, your choice!
- Fresh cilantro → For a burst of freshness.
- 1 lime → Cut into wedges for a final squeeze of zesty juice.
- 1 avocado → Thinly sliced for creamy texture.
- Cotija cheese → A crumbly, salty Mexican cheese that is the perfect finishing touch.
- Shredded red cabbage → For a vibrant color and a fantastic crunch.
- 1 red bell pepper → Diced, for a fresh, sweet crunch.
- Avocado cream sauce → For a cool, creamy drizzle.
Let’s Get Cooking! Your Step-by-Step Guide
Ready for the easiest, most delicious taco night ever? Let’s get that sheet pan ready to roast!
Part 1: Season and Roast the Filling
- Preheat the Oven: Get your oven preheating to 400°F (200°C). Line a large, rimmed baking sheet with foil for even easier cleanup.
- Mix the Spices: In a small bowl, whisk together the chili powder, cumin, garlic powder, paprika, salt, and pepper. Mixing them first ensures everything is seasoned evenly.
- Season the Cauliflower: In a large bowl, add the cauliflower florets and drizzle with the olive oil. Toss well until every piece is lightly coated. Sprinkle the seasoning blend over the top and toss again until the cauliflower is thoroughly coated in the spices.
- Add the Chickpeas: Add the drained and dried chickpeas to the bowl and give them a quick toss to lightly coat them. You don’t need them as heavily coated as the cauliflower.
- Roast to Perfection: Pour the cauliflower and chickpea mixture onto your prepared baking sheet and spread it out into a single, even layer. Roast for 25-30 minutes, or until the cauliflower is tender and has delicious, golden-brown roasted edges.
Part 2: Warm the Tortillas & Assemble
- Warm the Tortillas: While the filling roasts, warm your tortillas. You can wrap a stack in foil and place them in the oven for the last 5 minutes of cooking. For a slight char, you can also heat them one by one for a few seconds per side in a dry skillet or directly over a gas flame.
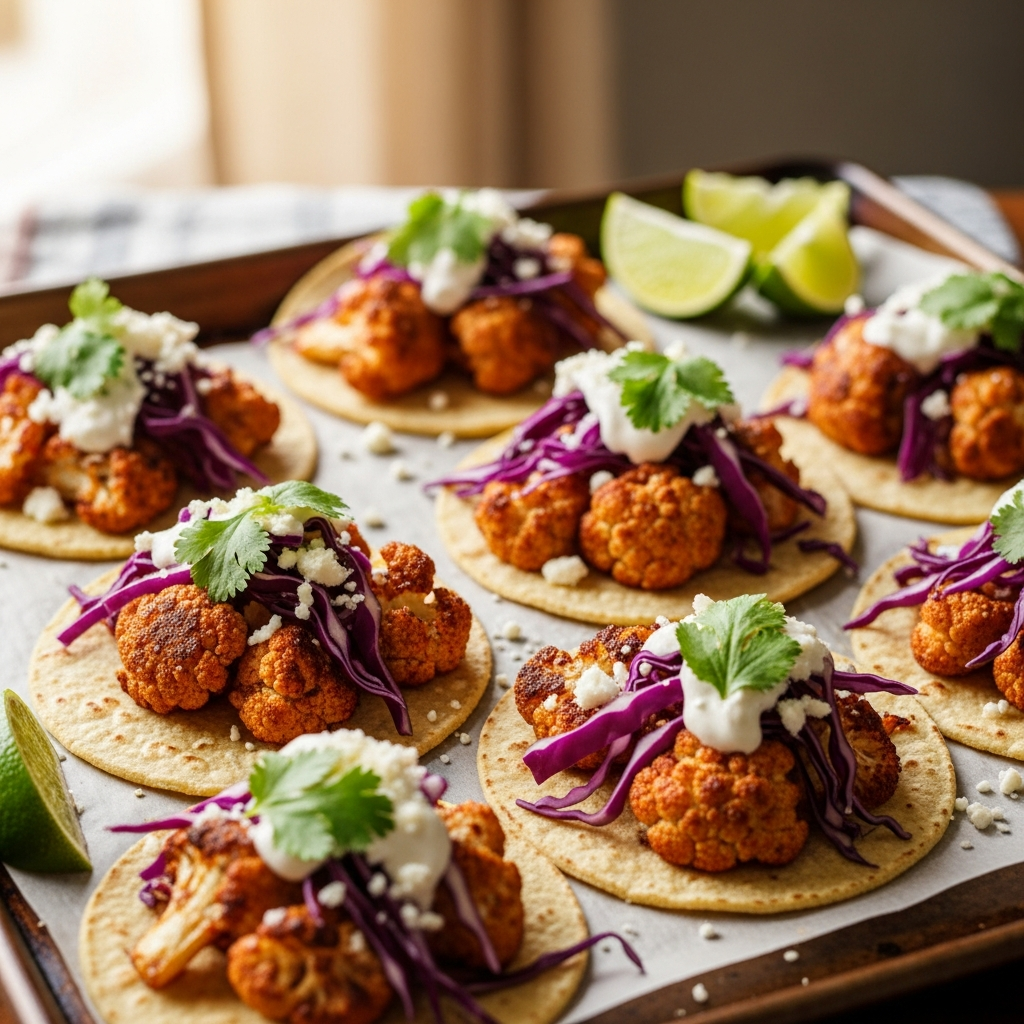
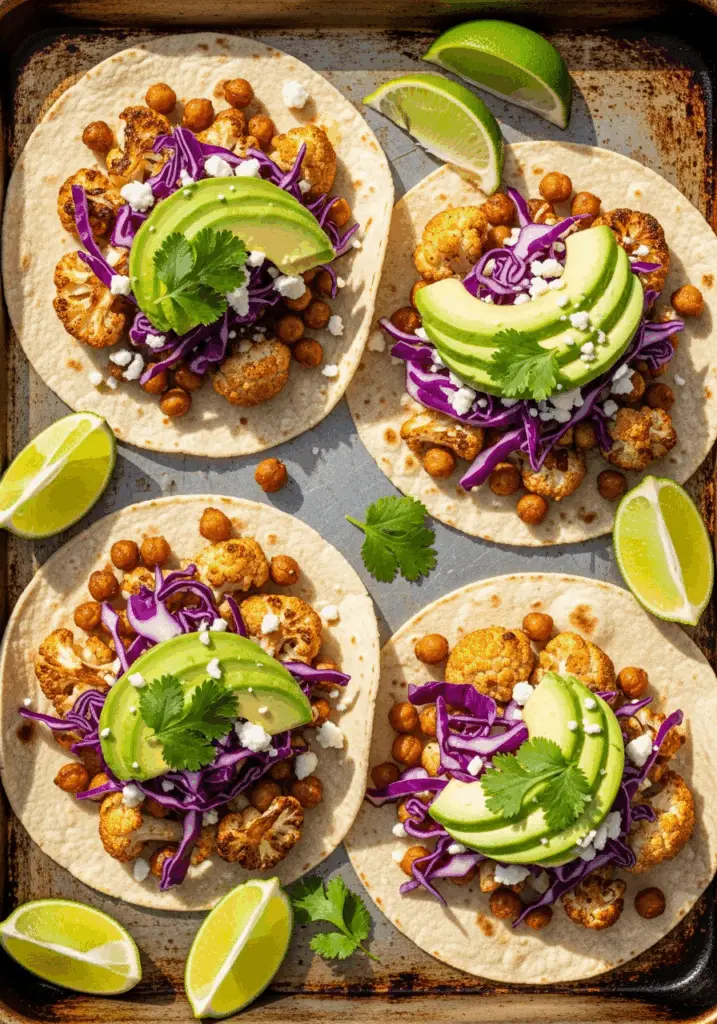
- Assemble Your Tacos: Once the filling is ready, it’s time to build your masterpiece! Spoon a generous amount of the roasted cauliflower and chickpea filling into a warm tortilla.
- Add Toppings and Enjoy: Pile on your favorite toppings! I love a combination of creamy avocado slices, crunchy red cabbage, salty cotija cheese, a squeeze of fresh lime juice, and a sprinkle of cilantro. Serve immediately!
Easy Sheet Pan Cauliflower Tacos
Ingredients
Equipment
Method
- Preheat oven to 400°F. Line a large baking sheet with foil.
- In a small bowl, whisk together chili powder, cumin, garlic powder, paprika, salt, and pepper.
- In a large bowl, add cauliflower florets and drizzle with olive oil, tossing to coat. Sprinkle the seasoning over the cauliflower and toss until evenly coated.
- Add in the dried chickpeas and give them a quick mix to lightly coat them in the seasoning.
- Pour the cauliflower and chickpea mixture onto the prepared sheet pan and spread into a single layer. Roast for 25-30 minutes, until cauliflower is tender and golden brown.
- Warm your tortillas using your preferred method (oven, skillet, or open flame) during the last 5 minutes of roasting.
- When the filling is ready, assemble the tacos by adding a few spoonfuls to each tortilla and finishing with your choice of toppings. Serve immediately.
Notes
WiseRecipes’ Top Tips for Perfect Cauliflower Tacos
These simple tricks will take your sheet pan tacos from great to absolutely unforgettable.
- Don’t Crowd the Pan. This is the most important rule for roasting! Give your cauliflower and chickpeas plenty of space on the baking sheet. If they are crowded, they will steam instead of roast, and you’ll miss out on those delicious crispy, caramelized bits. Use two pans if you need to!
- Pat Your Chickpeas Dry. For the best texture, make sure your chickpeas are very dry before they go into the bowl. After rinsing, pat them thoroughly with a paper towel. This helps them get wonderfully crispy and roasty in the oven instead of soft.
- Cut Cauliflower into Even, Bite-Sized Pieces. Try to cut your florets into similar-sized pieces. This ensures that everything cooks evenly and you don’t end up with some pieces that are mushy and others that are still raw.
- High Heat is Your Friend. The 400°F oven temperature is crucial. It’s hot enough to create that beautiful browning and caramelization on the cauliflower, which is where all the deep, roasted flavor comes from.
- The Toppings Make the Taco. The warm, spicy filling is the star, but the toppings are what make it a true fiesta. The contrast of creamy avocado, crunchy cabbage, salty cheese, and a zesty squeeze of lime is what completes the experience. Don’t be shy!
Keep It Fresh! Storing Your Leftovers
The taco filling makes for fantastic leftovers for salads or bowls the next day!
- Refrigerator: Store any leftover cauliflower and chickpea filling in an airtight container in the refrigerator for up to 4 days. Store any fresh toppings separately.
- Reheating: For the best texture, reheat the filling on a sheet pan in a 400°F oven for 5-10 minutes until warmed through and slightly re-crisped. You can also reheat it in a skillet or in the microwave.
FAQs: Your Cauliflower Taco Questions, Answered!
Are these tacos spicy?
The flavor is more smoky and savory than overtly spicy. Standard chili powder has a very mild heat level. If you’d like to increase the spice, you can add 1/4 teaspoon of cayenne pepper to your spice blend or top the finished tacos with your favorite hot sauce.
Can I make these tacos vegan?
Absolutely! This recipe is very easy to make vegan. The filling itself is already vegan. Simply omit the optional cotija cheese (or use a vegan substitute) and ensure your avocado cream sauce is dairy-free to make the entire meal vegan-friendly.
Can I use frozen cauliflower?
You can, but fresh is highly recommended for the best texture. If using frozen cauliflower, do not thaw it first. Roast it directly from frozen, but be aware that it will release more water, so it won’t get as crispy and caramelized as fresh cauliflower. You may also need to add 5-10 minutes to the roasting time.
Can I add other vegetables to the sheet pan?
Of course! Sliced onions and bell peppers would be a classic and delicious addition. You could add them to the pan along with the cauliflower. Just be sure not to overcrowd the pan.
Final Thoughts: A Taco Night Revolution
There is nothing quite like a meal that is incredibly delicious, wonderfully healthy, and ridiculously easy to clean up. These Sheet Pan Cauliflower Tacos are proof that you don’t need meat to have a hearty, satisfying, and flavor-packed taco night. It’s a vibrant, fun, and endlessly versatile meal that I know you’re going to love. Happy cooking from all of us at WiseRecipes!