The Easiest Sheet Pan Ice Cream Cake (A Fun & Impressive Treat!)
Hello, friends, and welcome to one of the most fun and impressive dessert projects you will ever tackle! I want you to think about the pure joy of a classic ice cream cake those distinct layers of cake and creamy ice cream, all covered in a delicious topping. It’s the centerpiece of so many childhood…
Hello, friends, and welcome to one of the most fun and impressive dessert projects you will ever tackle! I want you to think about the pure joy of a classic ice cream cake those distinct layers of cake and creamy ice cream, all covered in a delicious topping. It’s the centerpiece of so many childhood birthday memories. But making one at home can seem incredibly daunting. Well, today, we are going to change all of that with this brilliant and surprisingly Easy Sheet Pan Ice Cream Cake recipe.
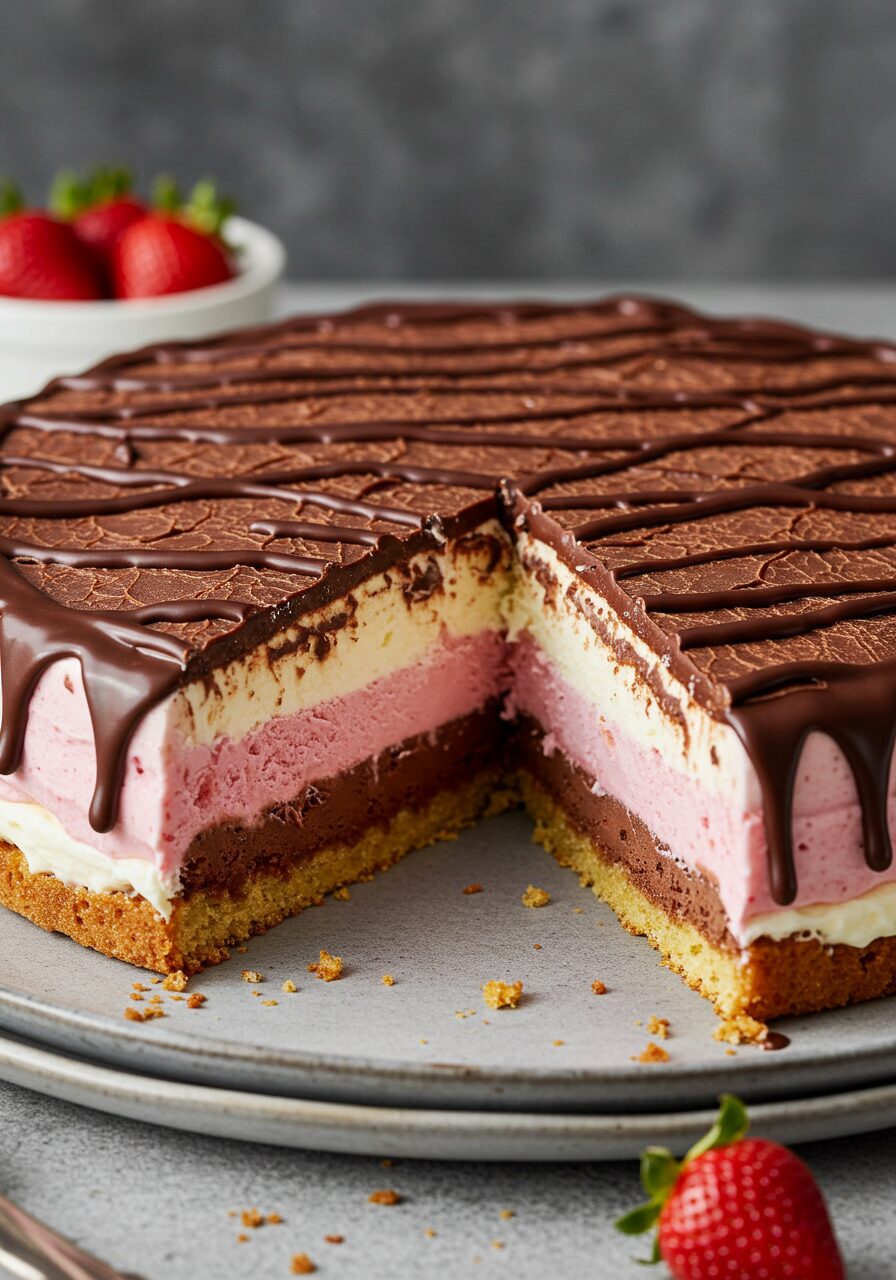
The genius of this method is that we bake one single, thin, light-as-air sheet cake. This one simple cake becomes all of our layers! We slice it and stack it with Neapolitan-style layers of chocolate, vanilla, and strawberry ice cream in a standard loaf pan. To finish it all off, we pour a magical, homemade chocolate shell over the top that hardens on contact. It’s a showstopping, nostalgic, and absolutely delicious dessert that is so much simpler than it looks.

Why This Ice Cream Cake Method is a Game-Changer
This recipe is a true testament to working smarter, not harder, in the kitchen. Here’s why it’s so fantastic.
- One Simple Cake, Many Layers: Baking one thin sheet pan cake and cutting it into rectangles is so much easier than baking multiple cake layers. It’s a brilliant time-saving hack.
- The Perfect Cake Texture: The cake itself is incredibly light, airy, and stable, thanks to the special technique of whipping the eggs. It’s the perfect, delicate complement to the rich, creamy ice cream.
- A Classic Neapolitan Dream: The iconic trio of chocolate, vanilla, and strawberry is a flavor combination that is universally loved by kids and adults alike.
- A “Magic” Chocolate Shell: The simple, two-ingredient chocolate and coconut oil topping creates that amazing, crackly chocolate shell that hardens instantly on the cold cake.
- A Fun and Rewarding Project: There is something so satisfying about building this beautiful layered cake. It’s a perfect project for a special occasion or a fun weekend.
Gather Your Simple Ingredients: What You’ll Need
Let’s get our ingredients ready for this impressive dessert.

For the Light & Airy Sheet Cake:
- 4 Large Eggs, cold: It’s important that they are cold for this recipe!
- 1 cup Sugar
- 1 teaspoon Baking Powder & 1 teaspoon Kosher Salt
- 1 stick (1/2 cup) Unsalted Butter, melted and cooled
- 1 tablespoon Pure Vanilla Extract
- 1 1/2 cups All-Purpose Flour, sifted
- Nonstick Baking Spray
For the Layers & Topping:
- 1 pint Chocolate Ice Cream
- 1 pint Vanilla Ice Cream
- 1 pint Strawberry Ice Cream
- 1 cup Finely Chopped Semi-Sweet Chocolate (about 4 ounces)
- 2 tablespoons Coconut Oil
Crafting Your Ice Cream Cake: Step-by-Step Guide
Let’s build this beautiful layered masterpiece together.
Part 1: The Sheet Pan Cake
- Prep and Whip the Eggs: Preheat your oven to 375°F with a rack in the center. Lightly spray an 18×13-inch sheet pan and line the bottom with parchment paper. Now for the most important step: in a stand mixer with the whisk attachment, beat the cold eggs, sugar, baking powder, and salt on high speed. Let it go for a full 10 minutes. The mixture will become very pale, thick, and voluminous—it should be thick enough to hold a ribbon-like “wake” from the whisk. This step is what gives the cake its light structure.
- Finish the Batter: Reduce the mixer speed to medium-high and slowly drizzle in the cooled melted butter and vanilla until just combined (about 10 seconds). Reduce the speed to low and add the sifted flour all at once. Mix for just 5 seconds—literally! You want to mix as little as possible here.
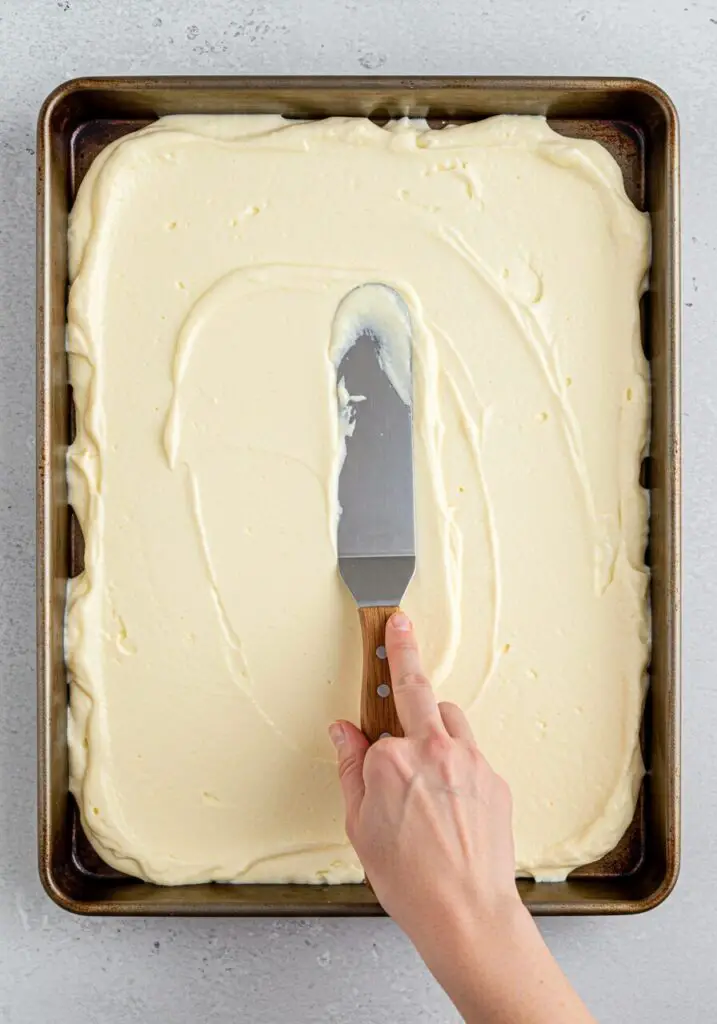
- Spread and Bake: Gently fold the batter once or twice with a rubber spatula to ensure it’s combined, then scrape it into your prepared sheet pan. Spread it into an even layer using broad, gentle strokes to keep it as airy as possible. Bake for 15 to 18 minutes, rotating the pan halfway through, until the top is lightly golden. Let the cake cool completely in the pan on a wire rack.
Part 2: The Assembly
- Soften the Ice Cream & Prep the Pan: About 15 minutes before you plan to assemble, take your three pints of ice cream out of the freezer to soften slightly. Line a 10×5-inch loaf pan with plastic wrap, leaving plenty of overhang on the sides.
- Cut the Cake: Use a sharp paring knife to cut the cooled sheet cake into three rectangles that are approximately 9.5×4.5 inches each. Don’t throw away the leftover cake trimmings! We’ll use them for the top layer.
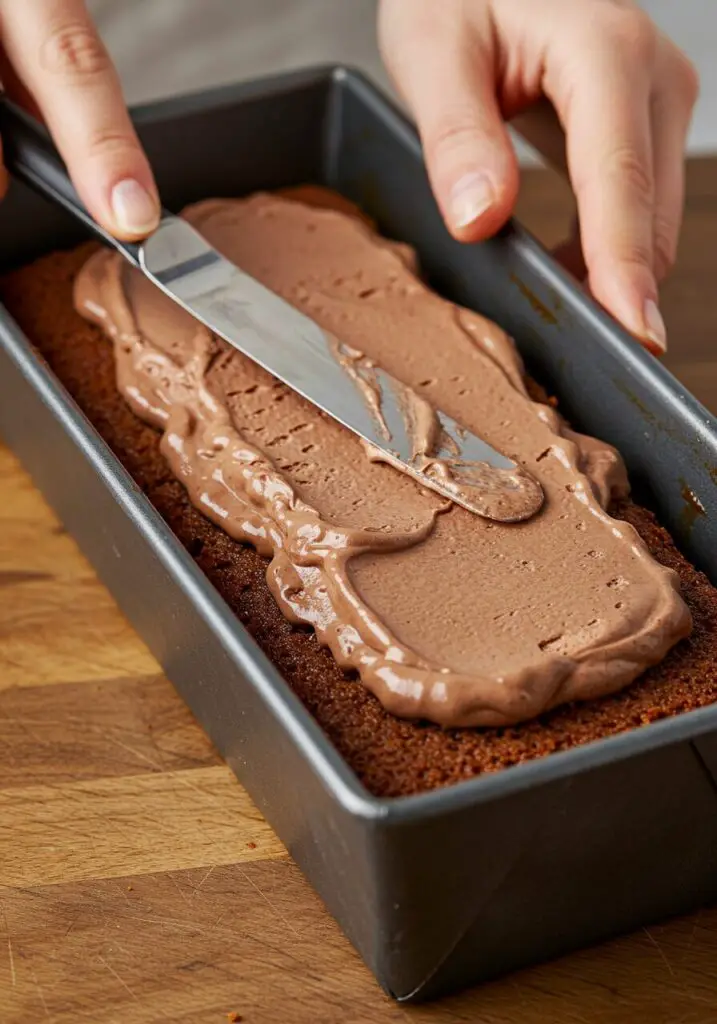
- Layer it Up! Place one cake rectangle in the bottom of your plastic-wrap-lined loaf pan, gently pressing it down. Spread the softened chocolate ice cream evenly over the cake. Continue layering with another cake rectangle, the vanilla ice cream, the third cake rectangle, and finally, the strawberry ice cream. Use the reserved cake trimmings to create the final top layer, cutting them to fit like a puzzle.
- Freeze Until Firm: Gently press down on the top layer to compact everything. Cover the top of the cake with the overhanging plastic wrap and freeze until it’s very firm, at least 4 hours or up to 12.
Part 3: The Grand Finale
- Make the Magic Chocolate Shell: When you’re ready to serve, place the chopped chocolate and coconut oil in a small, microwave-safe glass bowl. Microwave in 20-second intervals, stirring in between, until it’s completely melted and smooth.
- Unmold and Glaze: Remove the plastic wrap from the top of the loaf pan. Flip the pan over onto a serving platter. Gently lift the pan off, then carefully peel away the plastic wrap from the cake. Pour the melted chocolate shell over the top of the frozen cake, allowing it to drip beautifully down the sides. It will harden almost instantly!
- Slice and Serve: Slice the cake and serve immediately. Enjoy the fruits of your labor!
Wise Tips for Cake Success
- The Cold Egg Technique: The note in the recipe is key! Using very cold eggs and whipping them for the full 10 minutes creates a very stable foam. This is what gives our cake structure without it being dense.
- Don’t Overmix the Flour! This is so important for keeping the cake light and airy. Mix the flour in for just a few seconds on low speed, then finish with a gentle fold.
- Work Quickly During Assembly: Once your ice cream is softened, it’s a race against the clock! Have your cake layers cut and your pan lined and ready to go before you start spreading the ice cream.
Easy Sheet Pan Ice Cream Cake
Ingredients
Method
- Preheat oven to 375°F. Line an 18×13-inch sheet pan. In a stand mixer, beat cold eggs, sugar, baking powder, and salt on high speed for 10 minutes until very thick. Reduce speed and drizzle in butter and vanilla. Reduce to low, add flour, and beat for 5 seconds. Gently fold once, then spread evenly in prepared pan.
- Bake for 15 to 18 minutes until lightly golden. Let cool completely in the pan.
- Soften ice cream for 15 minutes. Cut cake into 3 rectangles (approx. 9.5×4.5 inches), reserving trimmings. Line a 10×5-inch loaf pan with plastic wrap. Layer one cake rectangle, then chocolate ice cream. Repeat with another cake layer and vanilla ice cream, then the final cake layer and strawberry ice cream. Top with cake trimmings, cutting to fit.
- Cover with plastic wrap and freeze until firm, at least 4 hours.
- When ready to serve, melt chocolate and coconut oil together. Unmold the frozen cake onto a platter and peel off the plastic wrap. Pour the chocolate shell over the top, allowing it to drip down the sides. Slice and serve immediately.
Frequently Asked Questions (FAQ) – Sheet Pan Ice Cream Cake
- Do I have to use a stand mixer?
A stand mixer is highly recommended for whipping the eggs for the full 10 minutes, as it would be a very long and tiring process with a hand mixer. However, it is possible if you have patience! - Can I use different flavors of ice cream?
Absolutely! This is the best part. You can use any of your favorite flavors. A mint chip, chocolate, and chocolate chip cookie dough version would be amazing! - What if my cake won’t release from the pan?
Don’t panic! As the recipe notes, if it’s stuck, just let the pan sit (right side up) for about 5 minutes at room temperature. This will soften the very outer layer of ice cream just enough to let it release when you gently tug on the plastic wrap. - Can I make this cake further in advance?
Yes! Once the cake is fully assembled and frozen (before adding the chocolate shell), you can wrap it very well in another layer of plastic wrap and then foil, and it will keep in the freezer for up to a week. Make and pour the chocolate shell just before serving.
Conclusion
This Sheet Pan Ice Cream Cake is such a fun and impressive dessert that is secretly so simple. It’s a wonderful project that results in a classic, nostalgic treat that everyone loves. The light, airy cake, the creamy layers of ice cream, and that magic chocolate shell come together to create a truly perfect dessert. I hope you have a blast making this showstopper!