The Perfect Birthday Cake for Your Husband (So Easy & Foolproof!)
There is something so incredibly special about baking a birthday cake from scratch for someone you love. It’s more than just a dessert; it’s a gesture, a tradition, a big, edible hug. And this, my friends, is the perfect recipe for the job—a classic, heartfelt, and unbelievably delicious vanilla birthday cake that is guaranteed to…
There is something so incredibly special about baking a birthday cake from scratch for someone you love. It’s more than just a dessert; it’s a gesture, a tradition, a big, edible hug. And this, my friends, is the perfect recipe for the job—a classic, heartfelt, and unbelievably delicious vanilla birthday cake that is guaranteed to make him feel celebrated.
I’m the first to admit, I am not a professional cake decorator. Intricate piping and flawless fondant stress me out! My goal is always to create something that looks beautiful and tastes even better, without any of the fuss. This is that cake. It’s my go-to, never-fail recipe for a wonderfully moist, tender vanilla sponge, layered with sweet raspberry jam and piled high with a simple, glorious buttercream frosting.
I promise you, this is a cake that focuses on pure, simple, delicious flavor. It’s not about perfection; it’s about creating a homemade masterpiece that is bursting with love. The combination of the soft vanilla cake, the tangy jam, and the fresh berries is a classic for a reason—it’s simply irresistible.
Get ready to bake a wonderfully rustic and heartfelt cake that looks stunning without any fancy skills required, a cake he is absolutely going to love.
Why This is the Perfect Cake to Bake for Him!
You are going to be so proud of this cake, and he is going to be so impressed! It’s my go-to celebration cake for a few very good reasons:
- Unbelievably Simple & Forgiving: This is a straightforward, classic creaming-method cake. No weird steps, no complicated techniques. It’s a wonderfully reliable recipe, even for beginners.
- Classic, Crowd-Pleasing Flavor: You simply cannot go wrong with a perfect vanilla sponge, tangy raspberry jam, and fresh berries. It’s a flavor combination that everyone adores.
- Looks Impressive Without the Stress: The beauty of this cake is in its rustic charm. A simple swirl of frosting and a pile of fresh berries on top looks effortlessly elegant. No fancy decorating skills needed!
- Perfectly Moist & Tender Sponge: This cake has a wonderfully soft, moist crumb that stays fresh for days, making it perfect for making a day ahead.
- Generous, Fluffy Buttercream: The recipe makes plenty of frosting, so you don’t have to worry about running out. It’s perfect for creating those beautiful, generous swirls!
Recipe Snapshot
| Prep Time | 25 minutes |
| Cook Time | 30 minutes |
| Total Time | 2 hours 55 minutes (includes cooling) |
| Servings | 12-16 servings |
| Calories | Varies |
| Course | Dessert |
| Cuisine | American / British |
| Difficulty/Method | Easy / Baking |
Your Shopping List for His Birthday Cake
This recipe uses simple, classic baking staples to create a truly special celebration cake.

→ For the Foolproof Vanilla Sponge
- 340g salted butter or margarine, softened → Make sure it’s properly softened to room temperature!
- 340g caster sugar → Superfine sugar is great here, but granulated works too.
- 6 large eggs → The key to a rich, stable cake. And yes, room temperature is a must!
- 340g self-raising flour → If you don’t have self-raising, see my tips below!
- 1.5 tsp baking powder → For that extra bit of lift and a tender crumb.
- 1 tbsp vanilla extract → Use the good stuff! It makes all the difference.
→ For the Simple Buttercream & Filling
- 600g unsalted or salted butter, softened → Yes, it’s a lot! This makes a generous amount for a stress-free frosting experience.
- 880g icing sugar → Also known as confectioners’ or powdered sugar.
- 1 tbsp vanilla extract → For that classic, delicious buttercream flavor.
- Raspberry jam → Use your favorite! As much or as little as your heart desires.
- Fresh strawberries & raspberries → For that beautiful, rustic, and fruity topping.
Let’s Bake a Cake! Your Step-by-Step Guide
Ready to create some birthday magic? This process is so rewarding. We’ll break it down into the cake, the frosting, and the final, fun assembly!
Part 1: The Foolproof Vanilla Sponge
- Prep Your Oven and Pans: First, preheat your oven to 170°C (150°C fan). Grease and line the bottoms of three 8-inch round cake pans with parchment paper.
- Cream the Butter and Sugar: In a large bowl using an electric mixer, beat the softened butter and caster sugar together on high speed until the mixture is very light, pale, and fluffy. This step is crucial and takes about 5 minutes!
- Add the Eggs: Add your room-temperature eggs one at a time, beating well after each addition and scraping down the sides of the bowl as you go.
- Combine Dry and Add Vanilla: In a separate bowl, whisk together the self-raising flour and baking powder. Add the vanilla extract to your butter mixture. Now, add the flour mixture and mix on low speed until it is just combined. Do not overmix!
- Bake the Layers: Divide the batter evenly among your three prepared pans. Bake for 14-15 minutes, or until a skewer inserted into the center comes out clean. Let the cakes cool in their pans for 10 minutes before turning them out onto a wire rack to cool completely.
Part 2: The Simple, Glorious Buttercream
- Beat the Butter: In a large bowl using an electric mixer, beat the softened butter on high speed for a good 5-7 minutes until it is very pale, creamy, and fluffy. This is the secret to a non-greasy buttercream!
- Add the Sugar and Vanilla: Add the icing sugar and vanilla extract. Start the mixer on the lowest possible speed (or you’ll have a sugar storm!) until the sugar is incorporated, then crank it up to high speed and beat for another full 5 minutes until the buttercream is incredibly light and fluffy.

Part 3: The Fun Assembly!
- Level and Layer: Once your cakes are completely cool, use a large serrated knife to level the tops if they’ve domed. Place your first cake layer on your serving plate or cake stand.
- Create a Jam Dam: Pipe or spread a ring of buttercream around the outer edge of the first layer. This “dam” will hold in your jam. Fill the center with a generous layer of raspberry jam.
- Stack it Up: Place the second cake layer on top and repeat the process. Place the final cake layer on top, upside down, for a perfectly flat top surface.
- Crumb Coat and Chill: Apply a thin layer of buttercream all over the entire cake. This is your “crumb coat,” and it traps in any loose crumbs. Pop the cake in the fridge for 20-30 minutes to firm up.
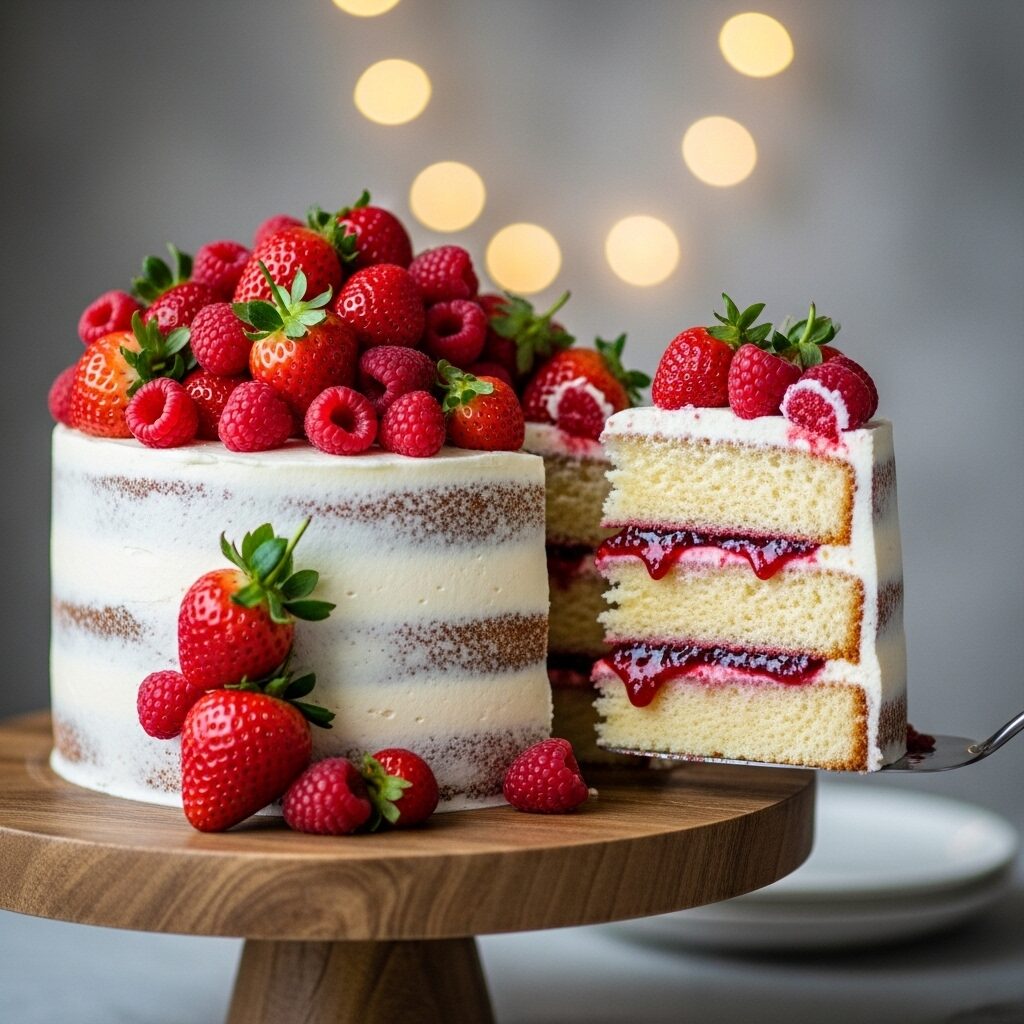
- Final Frosting and Decorating: Cover the cake with the remaining glorious buttercream, creating beautiful, rustic swirls with an offset spatula. Now for the best part! Pile the fresh strawberries and raspberries artfully on top of the cake. Stand back and admire your beautiful, heartfelt creation!

WiseRecipes’ Top Tips for a Perfect Birthday Cake
Baking a cake is a joy, and these little secrets will ensure it’s a stress-free one!
- Room Temperature is NOT a Suggestion! For a light, fluffy cake and a smooth buttercream, your butter and eggs absolutely must be at room temperature. It allows them to emulsify properly, creating the perfect texture.
- Don’t Skimp on the Creaming. Beating the butter and sugar for a full 5 minutes until it’s light and fluffy is the most important step for a tender cake crumb. It whips air into the mixture, which is what makes the cake light.
- Never Frost a Warm Cake. I know it’s tempting, but please wait! The cakes must be completely, 100% cool before you even think about frosting them. Otherwise, you’ll have a sad, melted, soupy mess.
- The Buttercream Dam is a Game-Changer. That little ring of frosting you pipe around the edge of each layer is the secret to preventing your jam filling from squishing out the sides and staining your beautiful white frosting.
- The Crumb Coat is a Professional Secret. That thin, “ugly” layer of frosting that you chill is the key to a perfectly clean, crumb-free final coat of frosting. It’s a simple step that makes a world of difference.
Keep It Fresh! Storing Your Masterpiece
This cake is a perfect make-ahead project! Here’s how to store it for the big day.
- Make-Ahead Plan: You can bake the cake layers a day or two in advance. Let them cool completely, then wrap them tightly in plastic wrap and store them at room temperature. You can also make the buttercream a day ahead and store it in an airtight container in the fridge (just let it come to room temperature and re-whip it before using).
- Refrigerator: Once assembled and decorated with fresh fruit, the cake should be stored in the refrigerator. It will keep beautifully for up to 4 days.
- Serving: For the best flavor and texture, I highly recommend taking the cake out of the fridge about 1-2 hours before you plan to serve it. This allows the cake and buttercream to soften up perfectly.
Simple Birthday Cake with Jam & Berries
Ingredients
Method
- Preheat oven to 170°C (150°C fan). Grease and line three 8-inch round cake pans.
- In a large bowl, use an electric mixer to beat the softened butter and caster sugar for 5 minutes until very light and fluffy.
- Add the room-temperature eggs one at a time, beating well after each addition.
- In a separate bowl, whisk the self-raising flour and baking powder. Add the vanilla to the butter mixture, then add the flour mixture and mix on low speed until just combined. Do not overmix.
- Divide the batter evenly among the prepared pans. Bake for 14-15 minutes, or until a skewer comes out clean. Let cool in the pans for 10 minutes before inverting onto a wire rack to cool completely.
- In a large bowl, beat the softened butter on high speed for 5-7 minutes until very pale and fluffy.
- Add the icing sugar and vanilla. Mix on low speed to combine, then beat on high speed for 5 more minutes until very light and fluffy.
- Place one cooled cake layer on your serving plate. Pipe a ring of buttercream around the edge. Fill the center with raspberry jam. Top with the second cake layer and repeat. Place the third layer on top.
- Apply a thin ‘crumb coat’ of buttercream over the entire cake and chill for 20-30 minutes.
- Frost the chilled cake with the remaining buttercream, creating rustic swirls. Pile the fresh berries on top to decorate.
Notes
FAQs: Your Birthday Cake Questions, Answered!
Can I make this in two layers instead of three?
Yes, absolutely! Just divide the batter between two 8-inch or 9-inch round cake pans. You will need to increase the baking time, likely to around 25-30 minutes. Just keep an eye on it and use a skewer to test for doneness.
What if I don’t have self-raising flour?
That’s an easy fix! To make your own, for every 1 cup of all-purpose flour, just whisk in 1.5 teaspoons of baking powder and 1/4 teaspoon of salt. For this recipe, you would use 340g of all-purpose flour, and then add a total of about 3.5 teaspoons of baking powder and 3/4 teaspoon of salt to the recipe (in addition to what’s already called for).
Is that a lot of frosting? Can I really halve it?
It is a very generous amount of frosting! The original baker notes this, and it’s actually a good thing. Having more frosting than you need is much less stressful than trying to skimp and stretch a small amount. It allows for a thick filling, a good crumb coat, and a beautiful final layer. But yes, if you prefer a less-frosted “naked” cake style, you can definitely halve the frosting recipe.
My buttercream seems greasy or curdled. What did I do wrong?
This usually happens if your butter was either too cold or too warm. It needs to be the perfect “room temperature” soft. But don’t worry, it’s often fixable! If it seems curdled, it’s likely too cold—just keep beating, and the friction should warm it up and bring it together. If it seems greasy or soupy, it’s too warm—pop the whole bowl in the fridge for 15-20 minutes to firm up, then try beating it again.
My Final Thoughts: A Cake Made with Love
This birthday cake is more than just a recipe; it’s a celebration on a plate. It’s a warm, heartfelt, and delicious way to show someone you care. Don’t worry about making it look perfect—the beauty of a homemade cake is in its rustic charm and the love that you bake right into it. I hope you have the most wonderful time creating this special treat for his special day!