Smash Burger
How I Stumbled Into My Favorite Burger There’s a sound that always gets me — that violent, satisfying sizzle when a flattened beef ball kisses a hot pan. I first fell in love with the Smash Burger on a cramped weekday evening when I wanted something faster than the classic formed patty but way more…
How I Stumbled Into My Favorite Burger
There’s a sound that always gets me — that violent, satisfying sizzle when a flattened beef ball kisses a hot pan. I first fell in love with the Smash Burger on a cramped weekday evening when I wanted something faster than the classic formed patty but way more indulgent than a freezer burger. If you’re thinking about trying this recipe, let me tell you up front: you only need a few things and a little patience. All you’ll need is 1 lb ground beef, salt and pepper to taste, cheddar cheese slices, burger buns, lettuce, tomato slices, pickles, and a secret sauce made from mayonnaise, ketchup, mustard, and spices. If you want to riff on proteins later, I once adapted the method into a leaner turkey version inspired by a BBQ ranch turkey smash burger I saved online that turned out surprisingly tasty; you can read a similar twist here BBQ ranch turkey smash burger twist.
The Secret Behind Perfect Smash Burger
The real trick is that you don’t form patties at first. I take the 1 lb ground beef and divide it into roughly 4 oz balls — that little parenthetical step, “about 4 oz each,” matters because a smaller ball gives you more edge to crust ratio once smashed. Before you even touch a spatula, preheat a cast iron skillet or grill over medium-high heat. That high, steady heat is what creates that dark, caramelized crust I crave. When the surface is smoking faintly and your kitchen starts to smell like dinner, place the beef balls onto the skillet and use a sturdy spatula to smash them down into thin, flat patties. Season them with salt and pepper right after smashing so the seasoning clings to the meat.
I once tried this on a cold pan and learned the hard way that you’ll miss the Maillard magic — the patties were pale and floppy. So tip number one: don’t rush the preheat. Tip number two: use a metal spatula and press hard for a second or two to get that immediate contact. Tip number three: if you like a little more fat, use an 80/20 mix; if you prefer leaner, go 85/15 but know the crust will be slightly less pronounced.
Getting That Golden Crust and Melty Cheese
Cooking is fast. Once the balls are smashed, the first side needs about 2 to 3 minutes. You’ll hear the patty snap, then after flipping, give it another 2 to 3 minutes. During the last minute of cooking, lay a slice of cheddar cheese on top so it melts into those crispy edges. That moment — when the cheese starts to sag and steam — is why I often talk about making this recipe on repeat. While the burgers are cooking, I pop the buns face down on the skillet for just a minute or so until they’re lightly toasted; the toasting keeps them from turning soggy when you add the secret sauce.
I like to explain doneness not just by time but by feel and look. The edges should be deeply browned and crisp, almost frilly, while the center will still glisten with juices. If you cut into one and the meat bleeds clear, it’s cooked through. When the edges lift easily from the pan and the patties wobble slightly when nudged, they’re ready for their cheese crown. And if you want to hear the sound again — that loud crisp whisper — you’ll know you nailed it.
What I Put on Mine (and Why)
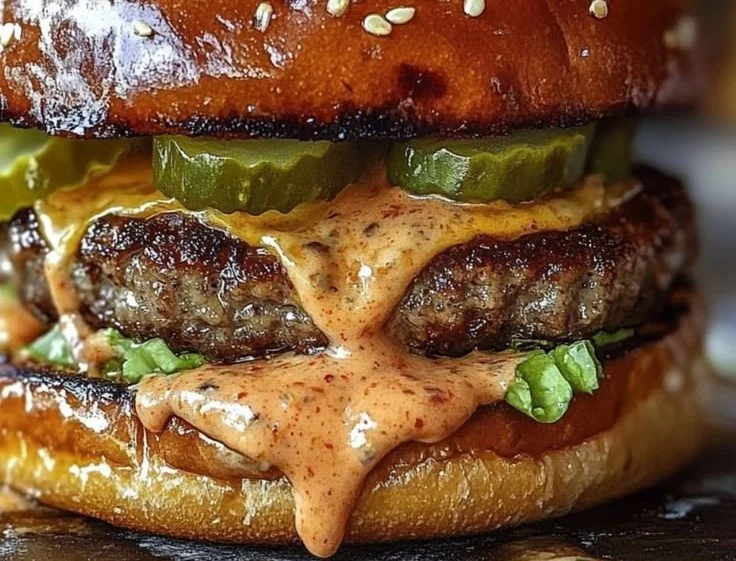
Assembling a smash burger is gratifying in a tactile way. I smear a generous dollop of my secret sauce — mayonnaise, ketchup, mustard, and spices — on the bottom bun, then set a hot patty down so the sauce melts into the meat. I layer lettuce, a couple of bright tomato slices, and crunchy pickles on top. The contrast is what makes it sing: the warm, umami-rich patty with molten cheddar against the cool, acidic pickles and the soft toasted bun. If you’re curious about serving styles, I sometimes break tradition and serve the components bowl-style for a lighter meal, borrowing the idea from some great burger bowls recipes I keep on hand burger bowls for a lighter dinner.
A small personal trick: add the pickles last so they don’t steam and go limp, and always toast the buns while the burgers are cooking to save a minute. When friends come over, I set up a little assembly line and let people dress their own — it keeps the buns crisp and the patties as hot as possible.
Little Tricks, Variations, and Leftovers
I like to experiment with variations depending on my mood. Sometimes I’ll fold in a tablespoon of bourbon BBQ sauce into the ground beef for a smoky-sweet undertone and think about recipes like bourbon BBQ bacon cheeseburger meatballs for inspiration a bacon cheeseburger twist. Another night I’ll skip the bun and turn the same technique into burger bowls, pairing the smashed patties with roasted veggies or even crispy potatoes — and yes, those crispy potatoes are my favorite side when I want something addictive crispy potatoes to serve alongside.
If you plan ahead, smashed patties store well. I cool them quickly on a rack, then refrigerate in an airtight container for up to three days. Reheat briefly in a skillet to revive the crust and add a fresh slice of cheese to melt. If you want to keep things longer, freeze the cooked patties separated by parchment paper and thaw in the fridge before reheating. A note on texture: reheated smash burgers won’t be quite as crisp as freshly made, but they still have that deep flavor that makes them worth saving.
Two more variations I enjoy are swapping the cheddar for a sharp blue for a bolder bite, or turning the whole thing into a lighter meal by serving a single smashed patty over greens and veggies; those fun takes echo some of the comforting burger bowls I bookmarked for busy nights fun burger bowls to try.
How I Know I Did It Right
There’s a small ritual I follow to judge success. First, did the pan make that satisfying sizzle and the edges get almost lace-like? Second, did the cheese melt into the patty instead of sliding off? Third, when I bite in, do the textures contrast — crisp edges, juicy center, soft bun, crunchy pickle? If the answer to all three is yes, I call it a win. Serve it with fries, a simple salad, or those crispy potatoes and you’re in business.
Conclusion
If you want a restaurant-style experience at home, I recommend trying the official Smashburger menu for inspiration on flavors and combinations, especially if you’re curious about how stores stack their toppings and sauces Smashburger’s official menu. And if you’d like another homestyle take on this technique, there’s a lovely, thorough homemade smash burger write-up by Leigh Anne Wilkes that complements the method I use at home a homemade smash burger recipe by Leigh Anne Wilkes.
Smash Burger
Ingredients
Method
- Divide the ground beef into four 4 oz balls.
- Preheat a cast iron skillet or grill over medium-high heat.
- Once the skillet is hot, place the beef balls onto it.
- Use a sturdy spatula to smash the balls down into thin, flat patties.
- Season with salt and pepper immediately after smashing.
- Cook the first side for 2 to 3 minutes before flipping.
- After flipping, cook for another 2 to 3 minutes, adding a slice of cheese during the last minute of cooking.
- Toast the burger buns face down on the skillet for about a minute.
- Spread the secret sauce on the bottom bun.
- Place the hot patty on top to allow the sauce to melt into the meat.
- Layer lettuce, tomato slices, and pickles.
- Serve immediately for best texture and flavor.