Smashburger Quesadillas
A Late-Night Discovery I remember the first time I made Smashburger Quesadillas was after a long, lazy Saturday when I wanted something indulgent but quick. I’d been scrolling through recipes and landed on a version that nudged me to try smashing the meat right into the tortilla, and that small, impulsive change changed everything for…
A Late-Night Discovery
I remember the first time I made Smashburger Quesadillas was after a long, lazy Saturday when I wanted something indulgent but quick. I’d been scrolling through recipes and landed on a version that nudged me to try smashing the meat right into the tortilla, and that small, impulsive change changed everything for me. If you want the original inspiration I looked at before riffing, I noted that that Smashburger Quesadillas post was a good jumping-off point. But after a few experiments in my own kitchen, the version I keep coming back to became a fast favorite for weeknights and for feeding a crowd.
What I like about this is that the ingredient list is honest and unpretentious: 1 lb ground beef, Salt, pepper, garlic powder (to season), 4 large flour tortillas, 1 cup shredded cheddar or American cheese, Optional: pickles, diced onions, burger sauce for serving. Those are the bones, and from there you can play with textures and flavors. The smell of browned beef mingling with melting cheese is the sort of thing that makes you hang around the stove, fork in hand.
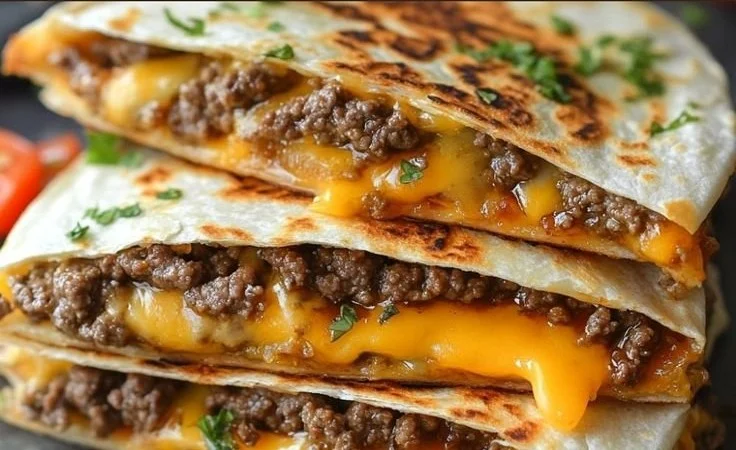
The Secret Behind Perfect Smashburger Quesadillas
The trick that makes these different from a regular quesadilla is what you do with the meat. Heat a skillet or griddle over medium-high heat. I use my cast iron for this because it holds heat and gives you that satisfying sizzle, but a nonstick pan works too if you prefer less sticking. I like to divide the pound of ground beef into four small handfuls, because you want just enough meat to form a thin patty on one half of each tortilla. Press a small handful of ground beef directly onto one half of each tortilla. Season well. A simple sprinkle of salt, pepper, and a little garlic powder is perfect; it keeps the beef tasting like a burger rather than a taco.
Here is where the sensory payoff starts: when the beef hits the hot surface inside the tortilla, it hisses softly and the edges begin to brown. Cook beef side down for 2–3 minutes until browned. You want that caramelized crust because it brings a little crunchy texture and deep flavor. When you flip it, you will smell the toasted tortilla and the promise of melted cheese. Flip, sprinkle with cheese, fold in half, and grill both sides until crispy and melty. I press lightly with a spatula as it grills to encourage contact and ensure even melting.
A couple of small tricks I learned the hard way: one, don’t overfill the tortilla or it will be impossible to fold and crisp; two, if the pan is not hot enough you won’t get that quick browning and the meat will steam instead. I usually wait until the pan is smoking just a touch before bringing the tortillas in, but be mindful of smoke alarms. Also, if you like a little extra tang, add a few diced pickles on top of the cheese before folding.
Getting the Texture Just Right
For me, texture is everything. I love when the tortilla is crisp enough to make a pleasant crack when you bite into it but not so dark that it tastes burnt. When the cheese strings and the little bits of beef are held together in a tight pocket, that’s when you know it’s done right. One way I tell is by touch: when the quesadilla gives a slight resistance and your spatula slides easily under it, the bottom is crispy. Another sign is sound; you should hear a consistent light sizzle as it grills.
If you ever end up with under-melted cheese, cover the pan briefly with a lid for 30 seconds to a minute; the trapped heat completes the melt without over-browning the tortilla. I also find that using either cheddar or American cheese works beautifully—cheddar gives a sharper flavor and a nice color, while American melts into a gooier, silkier texture. Mixing the two is something I do when I want both flavor and melt. And remember the practical step: Slice and serve with your favorite burger toppings or dipping sauce. I usually serve mine with a little burger sauce on the side and extra pickles for anyone who wants that sharp contrast.
A Few Ways I Tweak It (and What to Serve With)
I experiment constantly. Sometimes I add diced onions right into the beef before pressing it, which gives sweet pops of flavor when caramelized against the hot pan. Other times I chop cornichons or use diced pickles for crunch. Two variations I return to often are using a spicy cheddar and adding a smear of mustard inside before folding, and substituting ground turkey with a smoky paprika for a lighter take.
These quesadillas pair well with simple sides: a crisp green salad, oven-roasted fries, or even a bowl of tomato soup when the weather is gray. If I’m feeding a group, I’ll make a batch and set out bowls of toppings—diced onions, pickles, and a quick burger sauce so everyone can customize. If you want a big-batch option for a party, I’ve sometimes adapted the idea into a tray method inspired by other quesadilla recipes; you can see one approach for scaling up in this sheet pan quesadillas write-up I found helpful when hosting.
A couple more personal tips: let the cooked quesadillas rest for a minute before slicing so the cheese doesn’t run everywhere, and keep a paper towel nearby to blot excess grease after the first cooking if your beef is particularly fatty. These small moves keep the final plate tidy and the flavors bright.
The Ingredient That Changes Everything
People often ask what really elevates this from a burger-in-a-tortilla to something memorable. For me, it’s the direct contact of the meat with the hot pan while on the tortilla, creating crisp edges that contrast with melty cheese. I sometimes compare it to other stuffed quesadillas I’ve made, like a cheesy chicken and veggie quesadilla I love when I want a lighter meal, or a Mediterranean version if I am in the mood for something Mediterranean. But this beef version, with optional pickles and burger sauce, hits that specific comfort-food nostalgia I crave.
Storing leftovers is easy. If I end up with extras, I let them cool slightly, wrap them in foil, and store them in an airtight container in the refrigerator for up to three days. To reheat, I use a skillet over medium heat to bring back the crispness, flipping once until the cheese is gooey again. A quick oven reheat at 350 degrees for 8 to 10 minutes also works if you’re warming several at once. I find microwaving will take away the crisp, which is why I avoid it unless I’m in a real rush.
When things don’t go as planned, like soggy tortillas or cheese that refuses to melt, I troubleshoot by checking pan temperature, reducing the filling, or adding a lid to trap heat briefly. Food is forgiving when you tinker a little.
Conclusion
If you want to compare notes or see another take on the concept, try the version on the Red Gold Tomatoes site for a slightly different flavor profile: Smash Burger Quesadilla | Red Gold Tomatoes. And if you enjoy reading kitchen experiments and step-by-step tests, this write-up from Keeping On Point offers another perspective on the same idea: Smash Burger Quesadilla – Keeping On Point.
Give it a try the next time you want something that tastes like a burger but comes together as fast as a quesadilla. It feels like cheating in the best possible way.
Smashburger Quesadillas
Ingredients
Method
- Heat a skillet or griddle over medium-high heat.
- Divide the pound of ground beef into four small handfuls.
- Press a small handful of ground beef directly onto one half of each tortilla and season with salt, pepper, and garlic powder.
- Cook beef side down for 2–3 minutes until browned.
- Flip the tortilla, sprinkle with cheese, fold in half, and grill both sides until crispy and cheesy.
- Press lightly with a spatula while grilling to ensure even melting.
- Let the cooked quesadillas rest for a minute before slicing.
- Serve with your favorite burger toppings and dipping sauce.