Strawberry Kiss Cookies
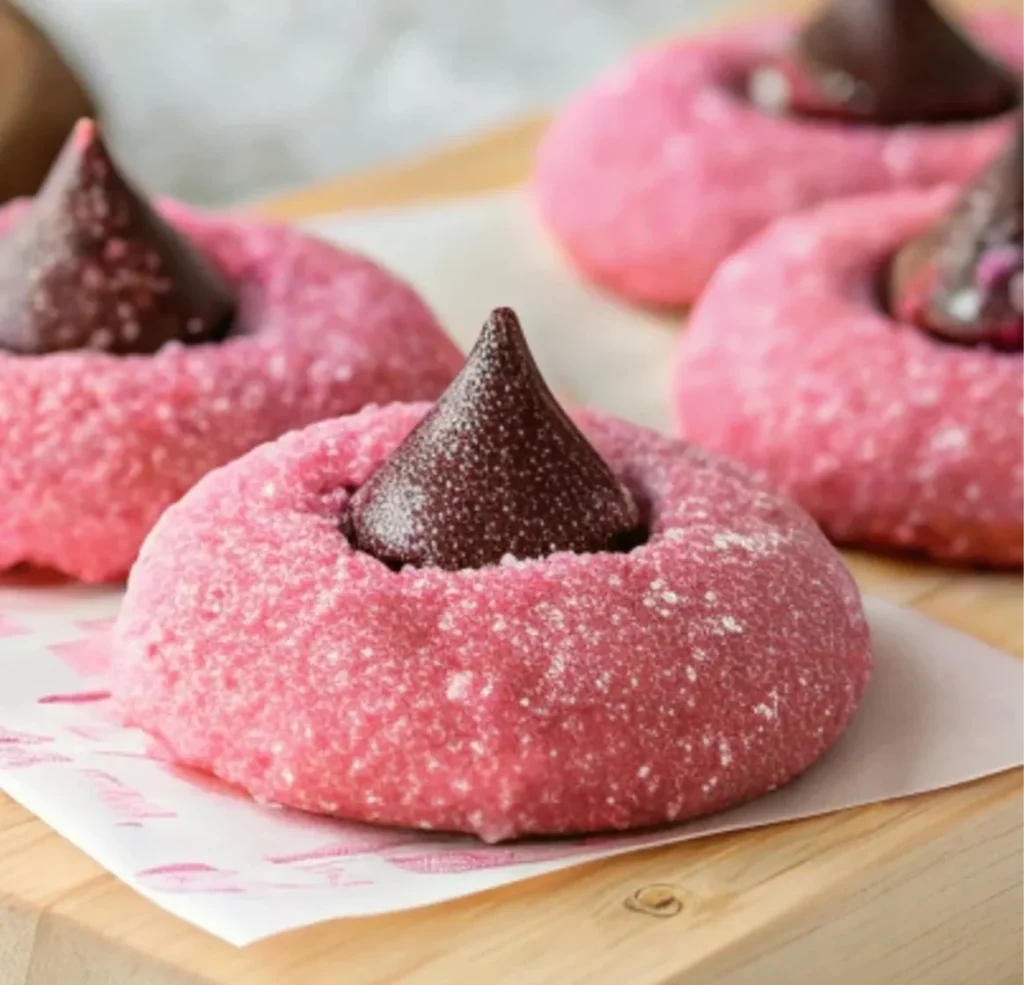
There’s something utterly delightful about cookies that not only deliver on taste but also on sheer joy. When it comes to Strawberry Kiss Cookies, we’re talking about little morsels of happiness that are both sweet and visually enchanting. Imagine biting into a soft, pink cookie kissed by a rich and creamy chocolate surprise, and you’ll…
There’s something utterly delightful about cookies that not only deliver on taste but also on sheer joy. When it comes to Strawberry Kiss Cookies, we’re talking about little morsels of happiness that are both sweet and visually enchanting. Imagine biting into a soft, pink cookie kissed by a rich and creamy chocolate surprise, and you’ll see why these cookies deserve a special spot in your baking repertoire. The moment they come out of the oven, your kitchen will fill with an inviting aroma that beckons everyone to gather around and enjoy.
Why Strawberry Kiss Cookies are a Must-Bake Delight
- Perfect Balance of Flavors: The combination of strawberry and chocolate is a classic duo that satisfies cravings for sweetness and richness in every bite.
- Colorful and Festive: The pretty pink hue of these cookies adds a cheerful touch to any gathering, making them ideal for celebrations or simply for brightening up a regular day.
- Easy to Make: With just a few straightforward steps, even beginner bakers can whip up these cookies with ease, making it a perfect recipe for family cooking sessions.
- Customizable: Feel free to experiment with flavors and additions, which can make each batch unique and exciting.
- Chocolate Kiss Surprise: Each cookie is topped with a chocolate kiss, creating a delicious surprise that delights both kids and adults alike.
Gathering Your Ingredients
To create these delightful Strawberry Kiss Cookies, you’ll need the following ingredients. Each one plays a crucial role in making these cookies soft, flavorful, and oh-so-tasty:
- 1 cup (226g) unsalted butter, softened: This is the foundation of your cookie dough, adding richness and helping create that melt-in-your-mouth texture.
- 1 cup (200g) granulated sugar: Essential for sweetness and contributing to the cookie’s soft texture.
- 1 large egg, at room temperature: Acts as a binder, helping to hold everything together while adding moisture.
- 1 tsp vanilla extract: A beloved flavor enhancer that brings warmth and depth to the cookie.
- 1/2 tsp almond extract (optional): A subtle hint of nuttiness that elevates the flavor profile; totally worth trying if you love almond!
- 2 cups + 2 tbsp (280g) all-purpose flour: The backbone of your cookie. It gives structure while balancing the softness.
- 1 tsp baking powder: This leavening agent ensures your cookies rise and stay fluffy.
- 1/4 tsp salt: A crucial ingredient that enhances the sweetness and overall flavor.
- 1 package (3 oz) strawberry-flavored gelatin mix: This magical ingredient gives the cookies their pink color and delicious strawberry essence.
- 1/4 cup powdered sugar, for dusting: Adds a touch of sweetness and elegance to your cookies.
- 24-30 chocolate kiss candies, unwrapped: The cherry on top, or rather, the kiss in the center—these create a gooey, melty experience that is simply irresistible.
Crafting Your Perfect Strawberry Kiss Cookies
Let’s dive into the heart of the baking experience! Follow these steps to create your Strawberry Kiss Cookies:
- Prepare the Dough: In a large mixing bowl, beat the softened butter and granulated sugar until light and fluffy, about 2-3 minutes. Don’t rush this step—it’s important to incorporate air into the mix for a tender cookie. Add the egg, vanilla extract, and almond extract (if using), beating until well combined. Then, mix in the strawberry-flavored gelatin powder until fully integrated.
- Whisk Dry Ingredients: In a separate bowl, whisk together the flour, baking powder, and salt. This helps ensure that those dry ingredients are evenly distributed and prevents any clumps.
- Combine Wet and Dry Ingredients: Gradually add the dry ingredients to the wet mixture, mixing on low speed until a soft, pink dough forms. If the dough feels too soft or sticky, don’t panic! Just add 1-2 extra tablespoons of flour until it’s manageable.
- Shape & Chill the Cookies: Scoop about 1 tablespoon of dough and roll it between your palms to form smooth balls. Place the dough balls on a lined baking sheet and chill in the refrigerator for at least 1 hour (or even overnight for best results). Chilling helps prevent spreading, giving you that perfectly cute, round cookie shape.
- Bake: Preheat the oven to 350°F (175°C). Arrange your chilled dough balls on a parchment-lined baking sheet, spacing them about 2 inches apart. Remember, do NOT press an indentation into the dough before baking—this will cause excess spreading!
- Monitor Baking Time: Bake for 11-13 minutes, or until the edges look set and slightly firm. It’s okay if the center appears soft; they will continue to firm up as they cool.
- Add the Chocolate Kisses: After removing the cookies from the oven, let them sit on the baking sheet for 2 minutes before adding the kisses. While they’re still warm, gently press a chocolate kiss into the center of each cookie. The residual heat will help the chocolate stick without melting too much.
- Cool Completely: Transfer the cookies to a wire rack and let them cool completely. This allows the chocolate to set properly.
- Dust with Powdered Sugar: To add a finishing touch, dust the cookies with powdered sugar FIRST, then press in the kisses to avoid getting sugar on the chocolate.
My Favorite Tricks for Baking Success
- Butter Temperature: Make sure your butter is at room temperature to ensure good creaming with the sugar. If it’s too cold, the texture will suffer; if too melted, the cookies will spread too much.
- Room Temperature Egg: Using an egg at room temperature integrates better into the dough, leading to softer cookies. You can easily warm an egg by placing it in a bowl of warm water for about 10-15 minutes.
- Chilling Matters: Don’t skip the chilling step! This is crucial for achieving the right texture and preventing the cookies from spreading too much while baking.
- Don’t Overmix: Once you combine the wet and dry ingredients, mix just until the flour is incorporated. Overmixing can lead to tough cookies.
Make It Your Own
Feeling adventurous? Here are a few creative variations to try with your Strawberry Kiss Cookies:
- Chocolate Chip Twist: Add half a cup of mini chocolate chips to the dough for an extra dose of chocolate flavor.
- Nutty Surprise: Incorporate chopped nuts like almonds or walnuts for some crunchy texture.
- Different Flavors: Try substituting the strawberry gelatin with raspberry or cherry for a different fruit flavor profile while still keeping the delightful pink color.
- Glaze Options: Drizzle a simple glaze made from powdered sugar and milk over the top for an added sweet finish.
- Dried Fruit: Fold in some chopped dried strawberries or cranberries for a chewy texture.
How to Enjoy Your Scrumptious Treats
These strawberry-kissed gems are perfect for any occasion! Serve them on a beautiful platter at your next gathering, and watch as guests are drawn to their vibrant color. Pair them with a scoop of vanilla ice cream for an indulgent dessert, or enjoy them with a warm cup of tea or coffee for an afternoon treat. Picture yourself sinking into the flavors of a soft, buttery cookie with the chocolate kiss melting ever so slightly into the dough—pure bliss!
Keep It Fresh
To keep your Strawberry Kiss Cookies fresh and delicious, follow these storage tips:
- Room Temperature: Store them in an airtight container at room temperature for up to 5 days. This will help retain their soft texture.
- Refrigeration: You can also store them in the fridge, although the texture may change slightly, becoming a bit firmer.
- Freezing: For longer storage, freeze the unbaked cookie dough balls. Place them on a baking sheet until frozen, then transfer to a zip-top bag. When you’re ready to bake, simply preheat the oven and bake directly from the freezer, adding a minute or two to the baking time.
Your Questions Answered
Can I make these cookies without gelatin?
Yes, you can substitute gelatin with strawberry flavoring or extract. Just keep in mind the cookies may not have that vibrant color.
What if my dough is too sticky even after adding more flour?
Don’t worry; just chill it for a bit longer. The time in the refrigerator will help firm up the dough, making it easier to handle.
Can I add other types of chocolates instead of kisses?
Absolutely! Feel free to use mini chocolate chips or any other chocolate candy you prefer since the idea is to create a delicious surprise.
Baking these Strawberry Kiss Cookies is more than just about creating a dessert; it’s about stirring up memories and making connections. I can already envision the smiles of family and friends as they take that first delightful bite. So grab your ingredients, preheat that oven, and let’s bake something special that will fill your home with warmth and happiness!
Strawberry Kiss Cookies
Ingredients
Method
- In a large mixing bowl, beat the softened butter and granulated sugar until light and fluffy, about 2-3 minutes.
- Add the egg, vanilla extract, and almond extract (if using), beating until well combined.
- Mix in the strawberry-flavored gelatin powder until fully integrated.
- In a separate bowl, whisk together the flour, baking powder, and salt.
- Gradually add the dry ingredients to the wet mixture, mixing on low speed until a soft, pink dough forms.
- If the dough feels too soft or sticky, add 1-2 extra tablespoons of flour.
- Scoop about 1 tablespoon of dough and roll it into balls.
- Chill the dough balls in the refrigerator for at least 1 hour on a lined baking sheet.
- Preheat the oven to 350°F (175°C).
- Arrange chilled dough balls on a parchment-lined baking sheet, spacing them 2 inches apart.
- Bake for 11-13 minutes, until the edges look set.
- After removing from the oven, let cookies sit for 2 minutes before adding kisses.
- Press a chocolate kiss into the center of each warm cookie.
- Cool cookies on a wire rack completely.
- Dust with powdered sugar before serving.