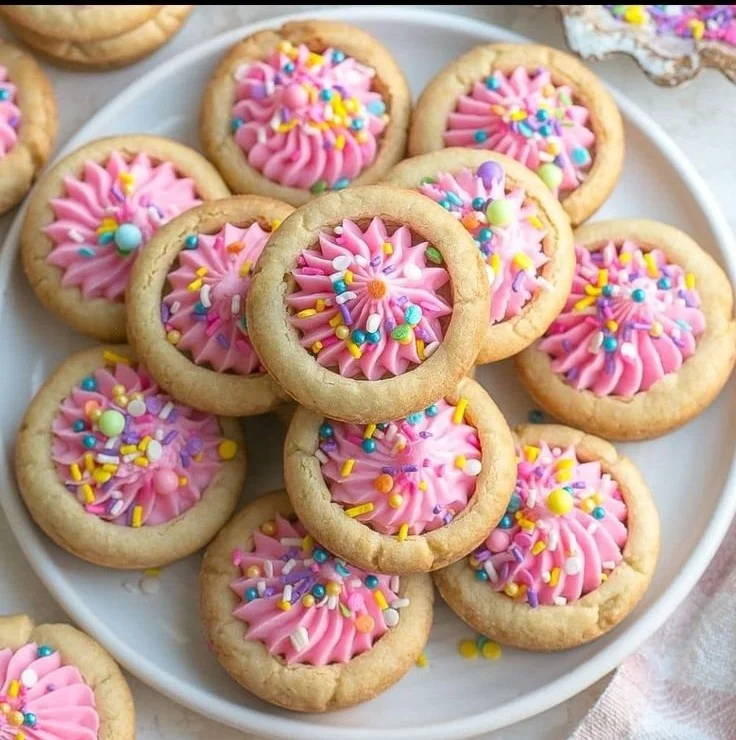
Sugar Cookie Cups
How I Found This Little Treat The first time I made Sugar Cookie Cups I was chasing nostalgia more than anything else. I wanted something that tasted like the sugar cookies my aunt used to make, but with a little surprise in the middle — a soft swirl of cream cheese frosting and a pop…
How I Found This Little Treat
The first time I made Sugar Cookie Cups I was chasing nostalgia more than anything else. I wanted something that tasted like the sugar cookies my aunt used to make, but with a little surprise in the middle — a soft swirl of cream cheese frosting and a pop of color on top. Once I had the basic idea down I experimented with different fillings (I even tried strawberry sugar cookie cups for a summer party), and now I make a batch whenever I want something a little festive and totally comforting.
The Secret Behind the Dough
What you need for the cookie base is simple pantry stuff: 3/4 cup salted butter (softened), 3/4 cup granulated sugar, 1 large egg, 1 1/2 teaspoons vanilla extract, 1/2 teaspoon almond extract, 2 cups all-purpose flour, 1 teaspoon baking powder, and 1/2 teaspoon baking soda. I always measure the flour by spooning it into the cup and leveling it off so the texture stays tender and not cakey. To start the recipe, Preheat oven to 350 degree F and grease 2 regular muffin pans with nonstick cooking spray. In a large bowl with an electric mixer or stand mixer, cream together the butter and sugar until light and fluffy for a few minutes. Be sure to scrape down the sides of the bowl with a rubber spatula.
A Few Things I’ve Learned About Mixing
After creaming, Add in egg and extracts and beat again until smooth. I do this step slowly so the mixture stays silky and glossy. In a medium bowl, whisk together the flour, baking powder and baking soda. When I add the flour mixture to the wet mixture I mix just until dough has formed. Be sure not to over-mix. Over-mixing is the quickest way to end up with tough cookie cups, and you want them soft enough to bite into but sturdy enough to hold the frosting.
Shaping and Baking: the Moment of Truth
Once the dough is ready I press 2 tablespoons of cookie dough into the bottom of the cupcake pan and press half way up the sides with your fingers. This is where the recipe gets happily hands-on; I love the warm, slightly floury feel on my fingers as I make tiny bowls for frosting. Bake cookie cups for 12 minutes and then let cool for at least 15 minutes. When they come out the edges are lightly golden and you can smell butter and vanilla in a way that pulls everyone into the kitchen. Press the back of a tablespoon or the top of a round spice jar down the center to form the cup shape. Let cool completely. If you try to form the cup while the dough is hot, it will spread and lose shape, so be patient here — it really pays off.
The Best Part About This Dish: The Frosting
For the filling you’ll need 2 ounces cream cheese (softened ), 3 cups powdered sugar, 1/4 cup butter, 2 tablespoons milk, 1/4 teaspoon vanilla extract, and pink or red food coloring gel (optional). In the meantime, in a medium bowl beat together the cream cheese and butter with an electric hand mixer or stand mixer until smooth. Add in powdered sugar, vanilla extract and milk. Continue to mix together, then add food coloring gel (optional) until desired frosting consistency is achieved. Add more milk if its too thick and more powdered sugar if its too thin. The frosting should be able to form stiff peaks. That phrase always makes me smile because I think of recipes as little mountains; you want the frosting to hold shape so your swirls look intentional. Add frosting to a piping bag with a star tip and swirl into each cookie cup. You could also add the frosting in with a spoon. Top with sprinkles (optional). Enjoy!
How to Know When It’s Done Right
You’ll know the cookie cups are done when the edges are a touch golden and the centers are set but not hard. They should give slightly when you press them before forming the cups. The frosting should hold peaks and not be runny, otherwise it will pool out of the cups instead of staying pretty on top. If you press a finger lightly into the dough before it bakes and it springs back at least a little, you’re on the right track.
When Things Don’t Go As Planned
If your cookie cups flatten in the oven, chances are the butter was too soft or you over-mixed. If the frosting seems too soft after you pipe it, pop the tray into the fridge for 10 to 15 minutes to let the butter and cream cheese firm up. If color is too intense, you can always fold in a little white frosting to soften it. One trick I learned from my grandmother is to chill the dough for 15 minutes if your kitchen is warm; it helps the cups keep their shape.
A Few Simple Variations You’ll Love
I often switch things up depending on the season. Fold a tablespoon of lemon zest into the dough for a bright spring version, or toss in a few mini chocolate chips before pressing the dough into the muffin pans for a chocolate-nutty edge. If you want to go indulgent, swap some of the powdered sugar in the frosting for cocoa and add a dash more milk until it reaches the right consistency. For a different nostalgic twist I bookmarked this brown sugar pop tart cookies idea and adapted a few fillings from it when feeding a crowd.
What to Serve and How to Store Leftovers
These are lovely with coffee or a glass of cold milk, and they balance out a heavier dinner when you need a sweet finish. If you’re bringing them to a picnic, place them in a single layer in a container with wax paper between layers so frosting doesn’t smear. For leftovers, store in an airtight container. If you plan to make them ahead, you can keep the baked, unfilled cookie cups at room temperature for a day, but for anything longer I refrigerate them. If you’ve filled them with cream cheese frosting, they keep best in the fridge for up to four days. When taking them out of the fridge, let them sit for 20 minutes so the frosting softens slightly before serving.
Three Small Tricks I Always Use
- I always scrape down the sides of the bowl when creaming the butter and sugar so everything is evenly mixed.
- I press the dough into the pan with slightly floured fingers so it does not stick.
- If the frosting is on the thin side, a short chill in the fridge helps it tighten up and pipe beautifully.
Little Memories
When I make these I think of holiday cookie exchanges and the laughter of friends trading tins. Once, when I was teaching a teenager in my life to bake, we accidentally swapped the baking soda for baking powder in one cup of dough and spent the afternoon experimenting and laughing at the tiny extra puffs. Those imperfect moments are the best part of baking for me.
Conclusion
If you want a clear reference for another version of these cookie cups, I sometimes compare notes against the original and find inspiration from recipes like Sugar Cookie Cups – Dance Around the Kitchen.
Sugar Cookie Cups
Ingredients
Method
- Preheat oven to 350°F and grease 2 regular muffin pans with nonstick cooking spray.
- In a large bowl, cream together the butter and sugar until light and fluffy.
- Add egg and extracts, and beat until smooth.
- In a medium bowl, whisk together the flour, baking powder, and baking soda.
- Gradually mix the flour mixture into the wet mixture until a dough forms.
- Press 2 tablespoons of cookie dough into the bottom of each cupcake pan, pressing halfway up the sides.
- Bake cookie cups for 12 minutes and let cool for at least 15 minutes.
- Press the back of a tablespoon or the top of a round spice jar down the center to form the cup shape.
- Let cool completely before decorating.
- In a medium bowl, beat together the cream cheese and butter until smooth.
- Add powdered sugar, vanilla extract, and milk. Mix until well combined.
- Add food coloring gel, if using, to achieve desired frosting consistency.
- Transfer frosting to a piping bag and swirl into each cookie cup.