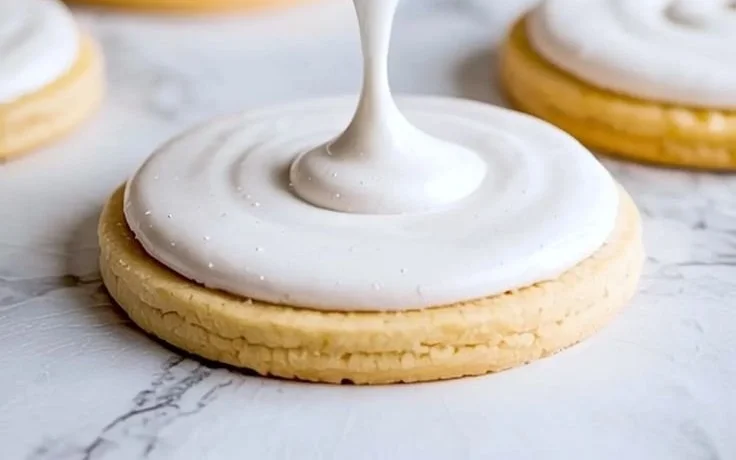
Sugar Cookie Icing
The first time I tried this I knew I had to write it down Recipe title: Sugar Cookie Icing. It was a rainy afternoon, the house smelling faintly of vanilla and butter from the cookies cooling on the rack, when I mixed a tiny bowl of icing just to see. Within moments the kitchen looked…
The first time I tried this I knew I had to write it down
Recipe title: Sugar Cookie Icing. It was a rainy afternoon, the house smelling faintly of vanilla and butter from the cookies cooling on the rack, when I mixed a tiny bowl of icing just to see. Within moments the kitchen looked happier; the glossy surface caught the light and the cookies suddenly felt finished. I have a soft spot for things that transform in two minutes with three simple pantry ingredients, which is exactly what this is: 2 cups powdered sugar, 2 tablespoons milk, 1 tablespoon corn syrup. If you like playing with cookie designs, you might also enjoy the playful twist I found in those brown sugar pop tart cookies, which are another one of my go-to weekend projects.
The Secret Behind Perfect Sugar Cookie Icing
There is a small magic trick here and it is the corn syrup. That tablespoon gives the icing a sheen and keeps it from cracking as it dries. I always tell people that the mouthfeel is the thing: this icing is sweet and smooth without being heavy. In a bowl, mix the powdered sugar, milk, and corn syrup together until smooth. Adjust the consistency with more milk for flooding or more powdered sugar for piping. Color the icing as desired. Use immediately to ice cookies, or let it sit until it hardens. Saying that sentence out loud is like the recipe’s spell; those are the exact moves and, honestly, they never steer me wrong.
When I stir, I listen for the slight whisper of powdered sugar combining with the milk, and I look for a texture like thick cream. If the surface reflects light and moves slowly when nudged with a spoon, you are in the sweet spot. If it puddles and spreads like water, you have added too much milk; if it is stiff and claggy, it needs a splash more milk or a very tiny bit of corn syrup. My grandmother used to say: the bowl will tell you what it needs, and I have found that to be true.
Getting the Texture Just Right
I admit I fiddle. For piping, I make the icing thick enough to hold a ridge when I draw a line, which usually means adding a tablespoon or two of powdered sugar beyond the base 2 cups. For flooding—when I want to fill an outlined shape—I thin it with a few more drops of milk until it flows but doesn’t run off the cookie edges. One of my tips: use a toothpick to test the consistency in small amounts so you do not over-thin everything at once. Another tip: when coloring, use gel food coloring rather than liquid; it gives vivid color without changing the balance of wet and dry.
I also like to keep a tiny squeeze bottle or a piping bag on hand for different tasks. If you want glossy, smooth surfaces, pipe a thin flood layer and let it settle; if you prefer texture, drag a fork gently across the wet icing to make ridges that catch the light. For delicate detail work, I press a small amount into a piping bag fitted with a round tip and steady my wrist against the counter, breathing between lines. It sounds fussy, but after a cup of coffee I find it meditative.
A Few Variations I Love
This basic formula is so forgiving it invites improvisation. Sometimes I swap the milk for a teaspoon of vanilla and a teaspoon of water for a more aromatic finish. Once, around the holidays, I folded in a pinch of ground nutmeg for warmth and everyone asked what bakery made them. Another favorite is adding a teaspoon of lemon zest and a drop of lemon juice to brighten the flavor for spring cookies. If you want a tangy spin, stir in a spoonful of cream cheese that has been smoothed first; it changes the texture a touch but gives a lovely depth, which pairs exceptionally well with the cookies in this cream cheese sugar cookies with strawberry buttercream post I often revisit for party inspiration.
When I need a rustic look, I skip the flooding and spread the icing with the back of a spoon so that a few cookie edges peek through. For shiny professional-looking finishes, I gently warm the corn syrup so it mixes more readily, but be careful—too warm and it will make the icing thin.
When Things Don’t Go As Planned
One winter I made a big batch ahead of a bake sale and discovered that stored icing can become grainy. Now I always write myself a note: if you make it ahead, cover it tightly and refrigerate. To use again, bring it to room temperature and whisk vigorously; a splash of milk usually revives the texture. I store leftovers in an airtight container in the refrigerator for up to one week, which covers most of my leftover scenarios. If I am traveling with decorated cookies, I pack them in a single layer between sheets of parchment and keep them cool so the icing does not sweat.
How to know when it is done right? When it dries to a matte but slightly glossy finish and your finger leaves no sticky residue—only a soft, set surface—you can stack cookies carefully. Also, a properly made batch will re-smooth if you tap the surface and it will hold piped edges without sagging. Those small sensory cues are the ones that tell me I got a batch right.
The Best Part About This Dish
The best part is how fast it makes ordinary cookies feel thoughtful. I have memories of sitting at the kitchen table with my neighbor’s little girl, both of us dotted in tiny flecks of pastel color as she carefully named every hue we used. We iced cookies while the radio played an old song and that simple act of decorating opened a doorway to easy conversation. This is also the go-to for last-minute gifting; a dozen iced cookies wrapped in wax paper and tied with twine looks like you spent all afternoon crafting when really the icing took two minutes.
If you are wondering what to serve these with, coffee is my usual answer. A nutty espresso or a milky latte balances the sweetness. For an afternoon treat, pair them with tea that has citrus notes to cut through the sugar.
When I Make Too Much
I will confess to overproducing on occasion. When that happens I spoon the leftover icing into stacked freezer bags, press out the air, and freeze flat for up to a month. Thaw in the refrigerator overnight, then bring to room temperature and stir. It will never be quite as silky as freshly mixed, but if you keep it slightly looser by adding a teaspoon of milk after thawing, it behaves very well. One last tip: if you want ultra-shiny cookies for a centerpiece, brush a whisper of warmed corn syrup over the dried icing and let it set for a glossy finish.
Conclusion
If you want a reference with photos and another take on proportions, I find this Your Homebased Mom sugar cookie frosting recipe helpful for visual learners and inspiration.
Sugar Cookie Icing
Ingredients
Method
- In a bowl, combine the powdered sugar, milk, and corn syrup until smooth.
- Adjust the consistency with more milk for flooding, or more powdered sugar for piping.
- Color the icing as desired and use immediately.
- For piping, ensure the icing holds a ridge when drawn with a line.
- For flooding, thin it until it flows but doesn’t run off the cookie edges.
- Cover tightly and refrigerate any leftover icing for up to a week.
- To reuse, bring to room temperature and whisk vigorously.