The Best Blackberry Pie Recipe (With No Soggy Bottoms!)
Hello, my pie-loving friends! Let’s talk about the magic of a truly perfect homemade pie. Specifically, let’s talk about this show-stopping Blackberry Pie Recipe. Imagine a flaky, all-butter crust, so golden and crisp it shatters when you press it with your fork. Then, imagine that perfect crust giving way to a warm, luscious filling of…
Hello, my pie-loving friends! Let’s talk about the magic of a truly perfect homemade pie. Specifically, let’s talk about this show-stopping Blackberry Pie Recipe. Imagine a flaky, all-butter crust, so golden and crisp it shatters when you press it with your fork. Then, imagine that perfect crust giving way to a warm, luscious filling of jammy, sweet-tart blackberries, all held together in a beautiful, glossy syrup. This, my friends, is pie nirvana. But I know the fear that holds many of us back from baking fruit pies: the dreaded soggy bottom. We’ve all been there—a beautifully decorated pie that collapses into a watery mess the moment you slice it.
Well, today, that fear ends. I am sharing my foolproof method that guarantees a crisp bottom crust every single time. The secret is a simple but brilliant technique where we pre-thicken the blackberry juices before they go into the pie shell. It creates a perfect, jammy filling that won’t weep all over your beautiful pastry. This is the recipe that will give you the confidence to bake with fresh, juicy summer berries and achieve pie-baking glory.

Why This is the Only Blackberry Pie Recipe You’ll Need
This isn’t just a recipe; it’s a masterclass in pie perfection. Here’s why it’s so incredibly special.
- The No-Soggy-Bottom Guarantee: This is the game-changer. By cooking the juices with cornstarch separately, we create a stable, delicious filling that bakes up beautifully without making the crust wet. It works every time.
- The Flakiest All-Butter Crust: We’re using a classic all-butter pie crust, which delivers unparalleled rich flavor and incredibly flaky layers. It’s the perfect savory complement to the sweet berry filling.
- Lets the Blackberries Shine: The filling is simple by design. It uses just enough sugar and a hint of lemon to enhance the natural, vibrant flavor of the fresh blackberries, not mask it.
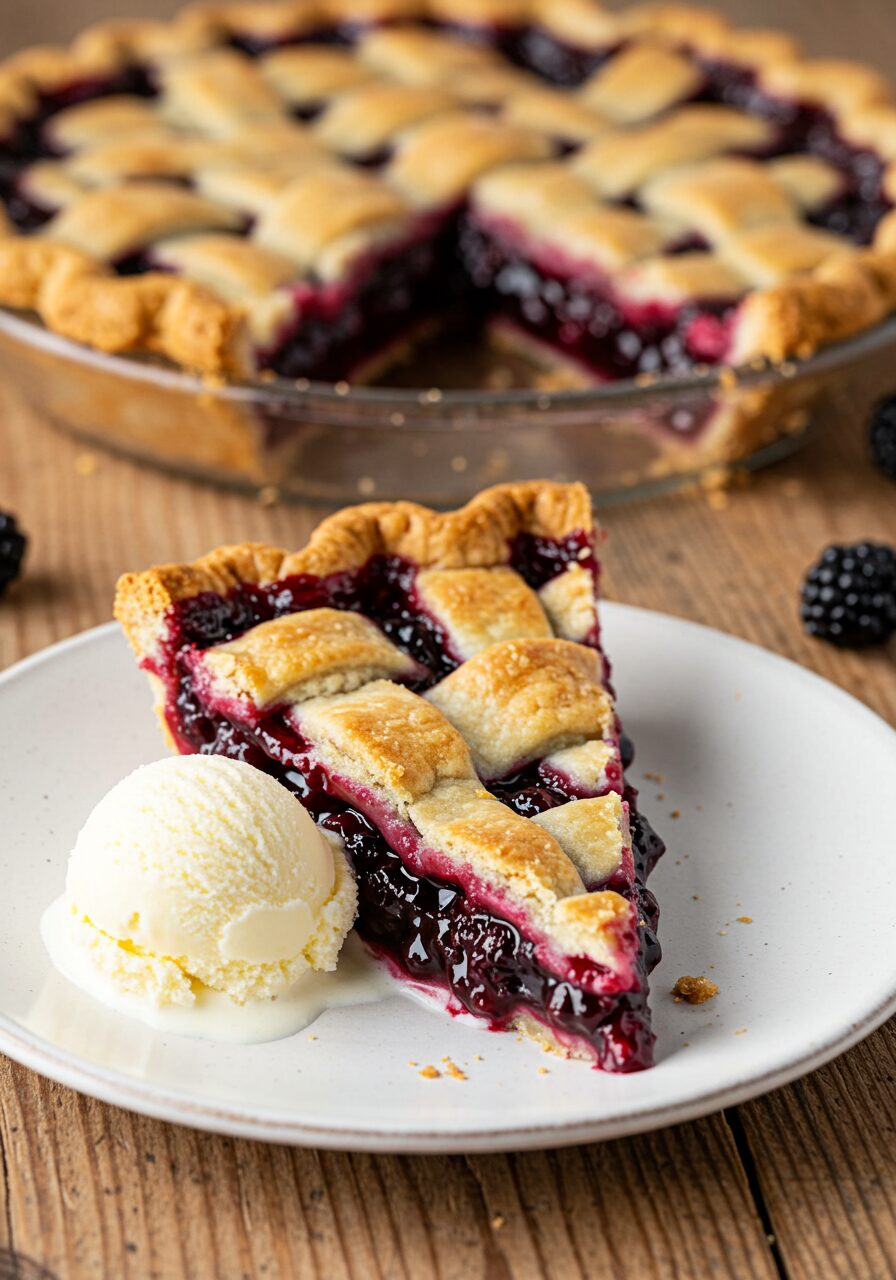
- A True Showstopper: With its golden, glistening crust and deep purple, bubbly filling peeking through the vents, this pie is a work of art. It’s the perfect centerpiece for any summer gathering.
- That Perfect “Bakery” Finish: The final brush of egg wash and sprinkle of turbinado sugar creates a professional-looking, shiny, and delightfully crunchy crust that will make everyone think you bought it from a fancy bakery.
Gather Your Simple, High-Quality Ingredients
A truly great pie starts with beautiful ingredients. Here’s what you’ll need for this summer masterpiece.

- 1 recipe All-Butter Pie Crust: Enough for a double-crust 9-inch pie. Your favorite homemade recipe or a high-quality store-bought version will work.
- 6 cups Fresh Blackberries: Look for berries that are plump, dark, and sweet.
- 3/4 cup Granulated Sugar
- 2 tsp. Lemon Zest plus 1 Tbsp. Lemon Juice: This brightens up the flavor of the berries beautifully.
- 1/4 cup Cornstarch: Our secret weapon for thickening the filling.
- 1/4 tsp. Kosher Salt: Balances the sweetness and enhances all the flavors.
- 2 Tbsp. Salted Butter: Adds a final touch of richness and gloss to the filling.
- 1 large Egg, lightly beaten: For the egg wash that gives the crust its golden shine.
- 2 Tbsp. Turbinado Sugar: Also known as sugar in the raw, for that irresistible crunchy topping.
Crafting Your Blackberry Pie: Step-by-Step Guide
Let’s walk through this process together. It’s broken down into simple, manageable steps.
- Macerate the Berries: In a large bowl, gently combine the fresh blackberries, granulated sugar, lemon zest, and lemon juice. Cover the bowl and let it sit at room temperature for about 1 hour, stirring occasionally. This process, called macerating, draws the natural juices out from the berries and softens them slightly.
- Prep the Oven and Crusts: While the berries are sitting, position an oven rack in the lower third of your oven and place a foil-lined, rimmed baking sheet on it. Preheat the oven to 425°F. On a lightly floured surface, roll out one of your pie crusts into a 12-inch round. Carefully place it into a 9-inch pie dish, gently pressing it into the bottom and up the sides. Trim the overhang to about 1 inch. Pop this into the fridge to stay cold. Roll out your second pie crust into a 10-inch round, place it on a plate or small baking sheet, cover, and also refrigerate. Keeping the crust cold is key!
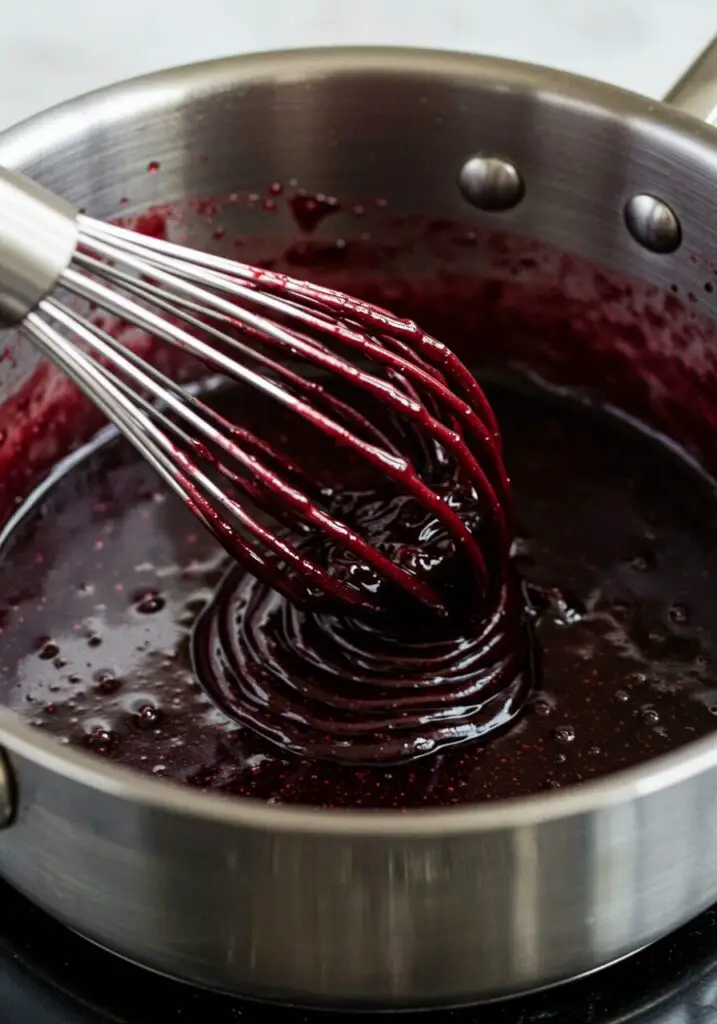
- The No-Soggy-Bottom Secret: Drain the blackberries through a colander set over a saucepan, reserving all of that beautiful purple juice. Set the drained berries aside. You should have about ½ cup of liquid. Add the cornstarch and salt to the saucepan with the juice and whisk until smooth. Bring this mixture to a boil over medium heat, whisking constantly to prevent lumps. The mixture will thicken into a beautiful, glossy sauce in about 2-3 minutes. Reduce the heat to low, whisk in the butter until it’s melted and combined, then remove from the heat.
- Fill the Pie: Pour the thickened juice mixture over your reserved drained blackberries and gently fold to combine. Scoop this gorgeous, jammy filling into your chilled bottom pie crust.
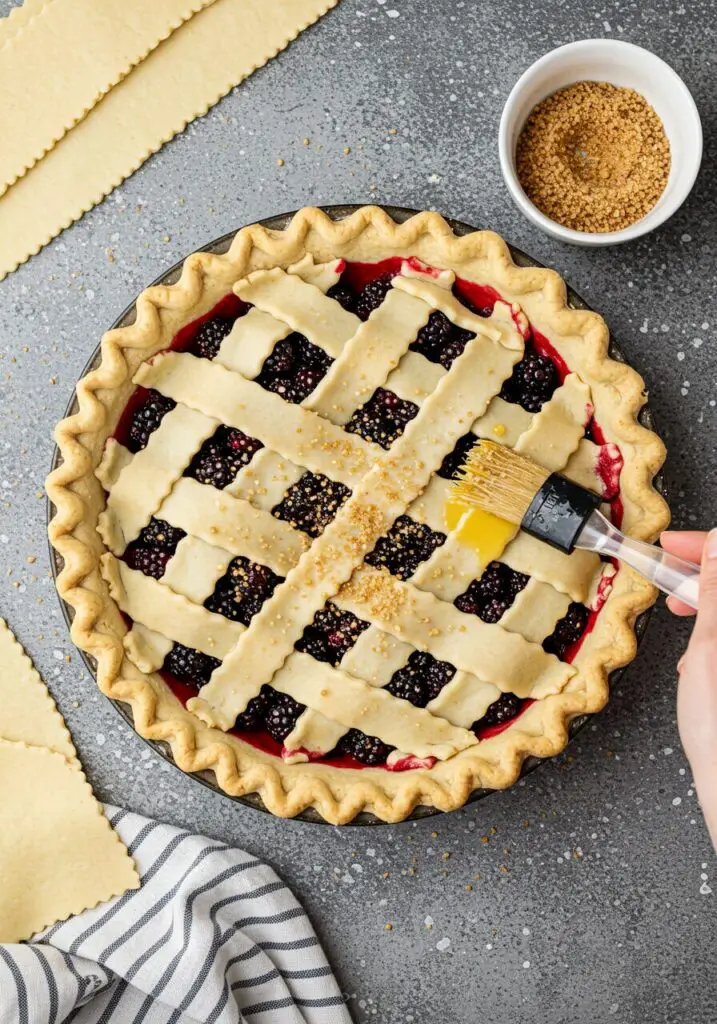
- Top and Finish the Pie: Place the second rolled-out pie crust over the top of the filling. Trim the excess dough from the top and bottom crusts, leaving about a ½-inch overhang. Fold the overhang under and crimp the edges together to seal. Cut a few slits in the top crust to act as vents for steam to escape. Brush the entire top crust with the beaten egg and sprinkle generously with the turbinado sugar.
- Bake to Perfection: Carefully place the pie on the preheated baking sheet in the oven. Bake for 50 minutes to 1 hour. The crust should be a deep, rich golden brown, and the filling should be thick and bubbling through the vents. If the edges of the crust start to get too dark after about 40 minutes, you can cover them loosely with strips of foil.
- Cool Completely (The Hardest Part!): This is crucial! Let the pie cool completely on a wire rack for at least 4 hours before slicing. I know it’s torture to wait, but this allows the filling to fully set up, ensuring you get beautiful, clean slices.
Wise Tips for the Perfect Pie
- Keep Everything Cold: When working with an all-butter crust, cold is your best friend. Cold butter creates steam as it bakes, which results in those incredibly flaky layers. If your dough ever feels warm or sticky, don’t hesitate to pop it back in the fridge for 15 minutes.
- Preheat that Baking Sheet: Placing your cold pie onto a preheated baking sheet helps to immediately start cooking and crisping the bottom crust, which is another great defense against a soggy bottom.
- Embrace the Spices: The note in the recipe is a great one! Feel free to add ¼ to ½ teaspoon of cinnamon, cardamom, or ginger to the cornstarch mixture to add a lovely warm spice note to your pie
The Best Blackberry Pie Recipe (No Soggy Bottoms!)
Ingredients
Method
- In a large bowl, combine blackberries, granulated sugar, lemon zest, and juice. Cover and let sit at room temperature for 1 hour, stirring occasionally.
- Preheat oven to 425°F with a foil-lined baking sheet on the lower third rack. Roll out bottom crust and fit into a 9-inch pie dish. Roll out top crust. Refrigerate both.
- Drain the blackberries, reserving the juice in a medium saucepan. Whisk cornstarch and salt into the juice. Bring to a boil over medium heat, stirring constantly, until thickened (2-3 mins). Reduce heat to low, whisk in butter. Pour this mixture over the drained blackberries and fold to combine.
- Scoop the filling into the bottom crust. Place the top crust over the berries. Trim and crimp the edges to seal. Cut vent holes. Brush with beaten egg and sprinkle with turbinado sugar.
- Bake on the preheated sheet for 50-60 minutes, until bubbly and deeply golden. Let cool COMPLETELY on a wire rack for at least 4 hours before slicing.
Frequently Asked Questions (FAQ) – Blackberry Pie Recipe
- Can I use frozen blackberries?
Yes, you can! Do not thaw them first. Toss the frozen berries with the sugar and lemon just as you would with fresh ones, but you may need to let them sit a bit longer to release their juices. Proceed with the recipe as written. - Can I make a lattice top for this pie?
Absolutely! A lattice top is beautiful on a blackberry pie. Simply cut your top crust into strips and weave them over the filling. It also provides excellent ventilation. - How do I know when my pie is truly done?
Look for two key signs: the crust should be a confident, deep golden-brown (not pale!), and the filling should be actively bubbling up through the vents in the center of the pie, not just around the edges. This indicates the cornstarch has been activated and the filling is set. - How do I store leftover pie?
Cover the cooled pie loosely and store it at room temperature for up to 2 days. For longer storage, you can refrigerate it for up to 4 days, though the crust may lose some of its crispness.
Conclusion
There is a special kind of pride that comes from pulling a perfect, homemade pie from the oven. This Blackberry Pie Recipe, with its flaky, buttery crust and rich, jammy filling, is a true taste of summer. It’s a celebration of fresh fruit and simple, time-honored techniques. I hope this guide gives you the confidence to tackle a fruit pie and that you feel immense joy when you slice into it and see that beautiful, perfectly crisp bottom crust. Happy baking!