The Cutest Owl Cupcakes (So Easy with Oreos!)
Imagine a platter of rich chocolate cupcakes, each one staring back at you with big, wide, adorable Oreo eyes. That, my friends, is the pure, whimsical fun of these incredible Owl Cupcakes. They are, without a doubt, the cutest, most charming, and easiest decorated treat you will make all season, and they’re guaranteed to get…
Imagine a platter of rich chocolate cupcakes, each one staring back at you with big, wide, adorable Oreo eyes. That, my friends, is the pure, whimsical fun of these incredible Owl Cupcakes. They are, without a doubt, the cutest, most charming, and easiest decorated treat you will make all season, and they’re guaranteed to get a “Hoot!” of approval.
This is my go-to recipe for classroom parties, fall festivals, and any time I want a baking project that’s more about creative joy than technical perfection. I’ve always believed the best treats are the ones that are fun to make, not just to eat. These little owls are a perfect edible art project for kids and adults alike. There’s no fancy piping required—just twisting, frosting, and placing candies!
I promise you, this is one of the most foolproof and rewarding decorating projects you’ll ever tackle, thanks to a brilliant cake mix and frosting shortcut. We’re focusing on the fun part: bringing these adorable little creatures to life. The best part? The slightly crooked eyes or lopsided noses just give them more personality!
Get ready to create a whole parliament of the most adorable, edible owls that will be the absolute star of any dessert table.
Why These Owl Cupcakes Are a Hoot to Make!
You are going to have an absolute blast with this recipe. It’s a guaranteed good time with a delicious result! Here’s why these cupcakes are a must-make:
- Unbelievably Easy to Decorate: There are no complicated techniques here. If you can twist an Oreo and place an M&M, you can make these adorable owls.
- The Ultimate Shortcut Recipe: We’re using a box of cake mix and a tub of frosting, which means you get to skip the hard part and jump straight to the fun of decorating!
- Perfect for Kids: This is a fantastic recipe to get little hands involved in the kitchen. They’ll love creating their own unique owl faces.
- A Total Party Show-Stopper: A platter of these little guys is guaranteed to bring smiles to everyone’s faces. They’re the cutest dessert for any Halloween or fall-themed party.
- No Special Equipment Needed: You don’t need any fancy piping bags or tips. A simple butter knife or small spatula for frosting is all it takes.
Recipe Snapshot
| Prep Time | 25 minutes (decorating) |
| Cook Time | 25 minutes |
| Total Time | 1 hour 20 minutes (includes cooling) |
| Servings | 24 cupcakes |
| Calories | Approx. 280 kcal per cupcake |
| Course | Dessert |
| Cuisine | American |
| Difficulty/Method | Easy / Baking & Decorating |
Your Shopping List for a Parliament of Owls
The beauty of this recipe is its super simple and fun shopping list. Let’s gather your owl-making supplies!
→ For the Cupcake Base
- 1 box chocolate cake mix → Plus the oil, eggs, and water called for on the box.
- 1 (16-oz.) tub chocolate frosting → The perfect “feathery” base for our owls.
- Black cupcake liners → These make the owls look extra sharp and spooky!
→ For the Adorable Owl Decorations
- 24 Oreos → The all-important, wide-open eyes!
- 48 chocolate mini M&Ms → For the cute little pupils. Brown ones work best.
- 24 orange mini M&Ms → The perfect little beak.
Let’s Get Baking! Your Step-by-Step Owl Guide
Ready to create the cutest dessert table ever? Let’s break this down into a few super simple and fun steps.
Part 1: Bake Your Cupcake Canvas
- Prep Your Oven and Tins: First, preheat your oven to 350°F (175°C). Line two 12-cup muffin tins with your cupcake liners.
- Bake the Cupcakes: Prepare your chocolate cake batter according to the package directions. Fill each cupcake liner about two-thirds full and bake for 22 to 25 minutes, or until a toothpick inserted into the center comes out clean.
- Cool Completely: This is a super important step! Let the cupcakes cool in the pans for a few minutes before transferring them to a wire rack to cool COMPLETELY. Frosting warm cupcakes leads to a melty mess.
Part 2: The Owl Transformation!
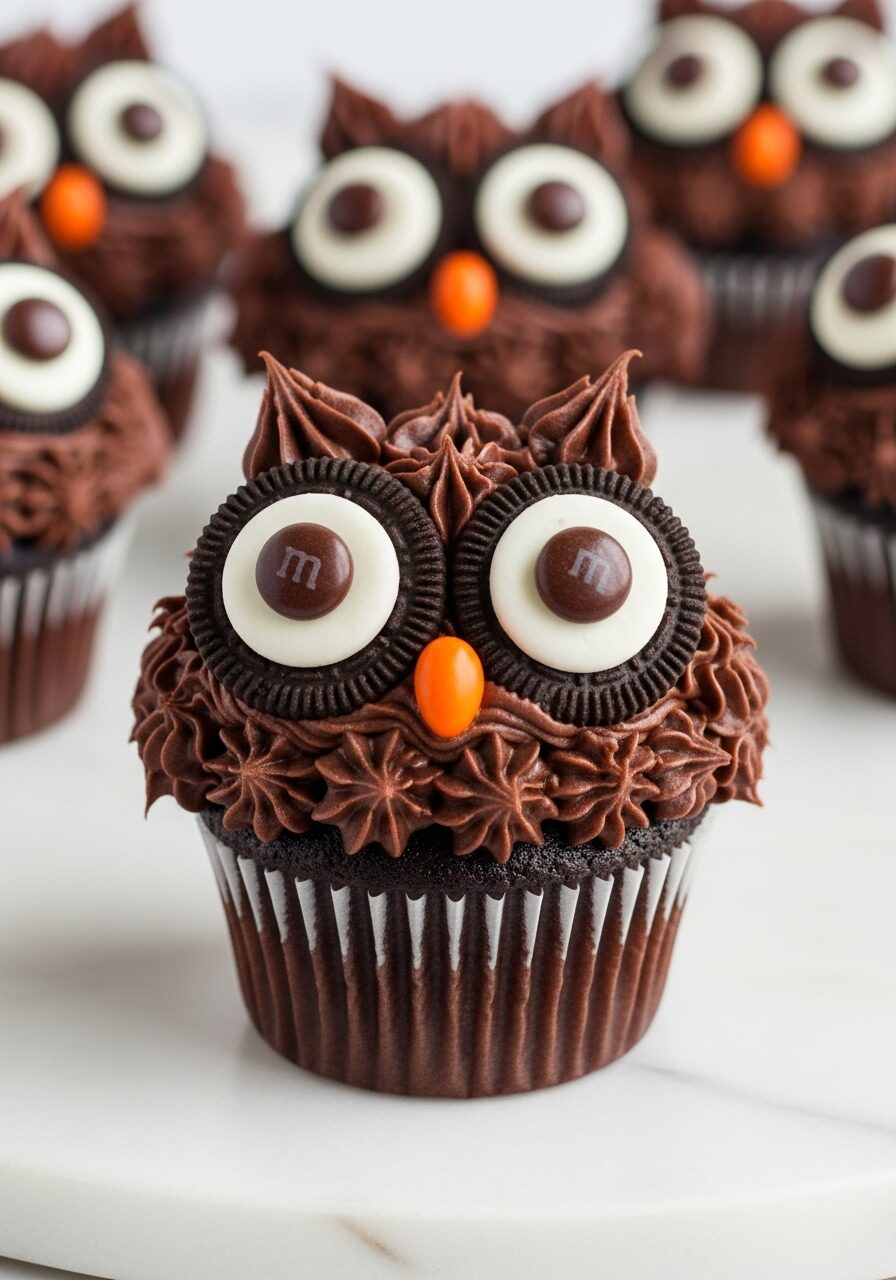
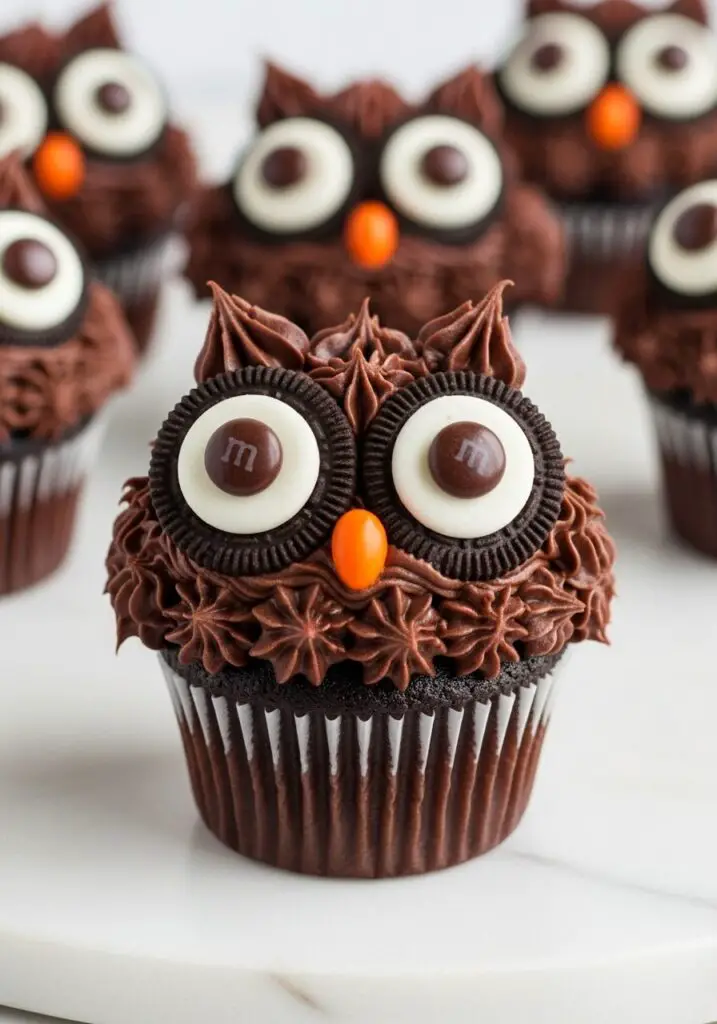
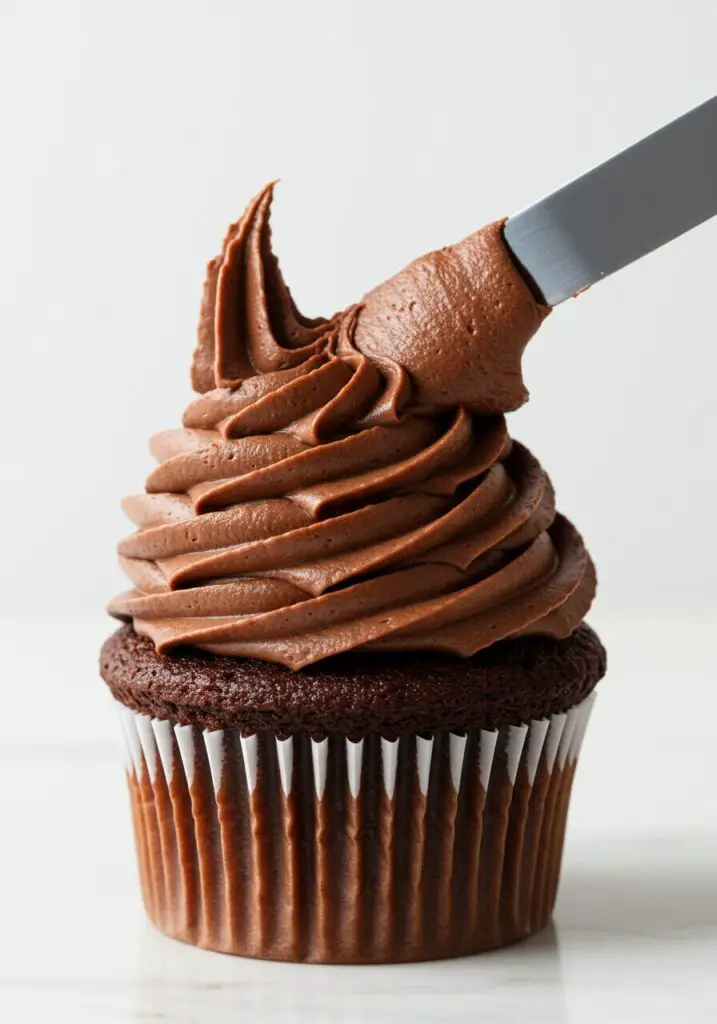
- Frost the Cupcakes: Once the cupcakes are totally cool, spread a generous layer of chocolate frosting on top of each one. Now for the fun part: using your knife or spatula, make two little upward “swooshes” on the top edge of the frosting to create the owl’s feathery ear tufts!
- Create the Eyes: Carefully twist apart 24 Oreos so that you have 48 halves, with the white icing on one side. (The plain cookie sides are a great snack for the baker!). Press two of the icing-sided halves onto each cupcake for the big, wide eyes.
- Add the Pupils and Beak: Dab a tiny bit of leftover frosting onto the back of a chocolate mini M&M to act as “glue,” and press one onto the center of each Oreo eye for the pupils. Finally, place an orange mini M&M on its side, right between the Oreo eyes, for the perfect little beak. That’s it!

WiseRecipes’ Top Tips for the Cutest Owls
I’ve made hundreds of these little guys for parties. These are my essential secrets for success.
- Cool Cupcakes are Happy Cupcakes. I can’t say it enough! Make sure your cupcakes are 100% at room temperature before you even think about frosting them. Any warmth will cause the frosting to melt and slide right off.
- The Oreo Twist is Key. To separate your Oreos cleanly, use a gentle twisting motion rather than just trying to pull them apart. Some will inevitably break, so it’s always good to have a few extra cookies on hand just in case!
- Frosting is Your Best Friend (and Glue). Don’t just place the M&M pupils on the Oreo cream; use a tiny dot of chocolate frosting on the back of each one. It ensures they won’t fall off, especially if you’re transporting the cupcakes.
- The “Ear” Swoosh Technique. This is such a simple detail that makes them look so much better! After you frost the cupcake, just take the tip of your butter knife or small spatula and make two small upward flicks on the top edge of the frosting. Instant ear tufts!
- Embrace the Goofiness! The absolute best part of this recipe is that perfection is not the goal. A slightly crooked eye or a lopsided beak just gives your owl more character. Have fun with it!
Creative Twists: A Whole Parliament of Ideas!
Once you’ve mastered the classic owl, the sky is the limit! Here are some fun variations:
- Snowy Owls: Use a white or vanilla cake mix with vanilla frosting and regular Oreos for a beautiful snowy owl.
- Peanut Butter Owls: Use chocolate cupcakes with peanut butter frosting. Use Nutter Butter cookies for the eyes for a different shape!
- Mint Chocolate Owls: Use a mint-flavored Oreo (like the green ones!) for the eyes for a fun color and flavor twist.
- Sleepy Owls: Place the chocolate M&M pupils near the bottom edge of the white Oreo cream. Then, use a little bit of frosting to pipe a small line over the top half of the pupil to look like a sleepy eyelid.
- Rainbow Owls: Use a white cake mix and divide the batter, coloring each portion with a different food coloring to create rainbow cupcakes inside!
- Different Beaks: An orange or yellow candy-coated sunflower seed or a piece of a candy corn also makes a perfect little beak.
- Add Wings: Gently press a pointed chocolate chip into each side of the cupcake frosting to look like little wings.
- Gluten-Free Owls: Simply use your favorite gluten-free chocolate cake mix and gluten-free chocolate sandwich cookies.
Keep Them Fresh! Storing Your Owl Cupcakes
These cupcakes are a great make-ahead treat for any party. Here’s how to store them.
- Room Temperature: If you’ll be serving them within a day, you can store the finished cupcakes in an airtight container at room temperature.
- Refrigerator: For longer storage, they’ll keep well in an airtight container in the refrigerator for up to 3-4 days. Just let them sit at room temperature for about 30 minutes before serving for the best texture.
- Freezing: You can freeze the unfrosted cupcakes for up to 3 months. Just thaw them completely before you start the fun decorating process!
Easy Oreo Owl Cupcakes
Ingredients
Method
- Preheat oven to 350°F (175°C). Line two 12-cup muffin tins with cupcake liners. Prepare and bake cupcake batter according to package directions.
- Let cupcakes cool completely on a wire rack.
- Frost the cooled cupcakes with chocolate frosting. Using your knife or spatula, make two small upward swooshes on the top edge of the frosting to create ‘ear’ tufts.
- Carefully twist apart the Oreos. Place two of the icing-sided halves on each cupcake for the eyes.
- Use a small dab of frosting to ‘glue’ a chocolate mini M&M onto the center of each Oreo half for the pupils.
- Place an orange mini M&M on its side between the Oreo eyes for the beak.
Notes
FAQs: Your Owl Cupcake Questions, Answered!
Help! My Oreos keep breaking when I try to separate them.
This is a classic Oreo struggle! A gentle, slow twisting motion is much more effective than trying to pull them straight apart. Sometimes, popping them in the fridge for 10 minutes can help the cream firm up, making for a cleaner split. But honestly, it’s always a good idea to buy an extra sleeve of cookies for the inevitable casualties (which make a great snack for the baker!).
Can I make these with homemade cake and frosting?
Absolutely! If you have a favorite chocolate cupcake recipe and a go-to chocolate buttercream, they will work perfectly here. A sturdy, slightly dense cupcake is actually ideal, as it will hold up well to the frosting and decorations.
My frosting is too soft and the Oreos are sliding off!
This usually means the frosting is a bit too warm, or your kitchen is warm. Try popping the tub of frosting in the refrigerator for 15-20 minutes to help it firm up a bit before you start. This will give it more structure to hold the Oreo “eyes” in place.
Can I make these ahead of a party?
Yes, they are perfect for making ahead! You can bake the cupcakes the day before. Then, you can either frost and decorate them the night before and store them in the fridge, or just do the fun decorating part on the day of the party.
My Final Thoughts: The Cutest Treat on the Block
These Owl Cupcakes are more than just a dessert; they are a fun, edible craft project that brings so much joy and creativity into the kitchen. They are a delightful, stress-free way to make a celebration feel extra special. I hope you and your family have an absolute hoot making (and eating!) these adorable treats!