The Ultimate Chocolate Explosion Birthday Cake (A Candy Lover’s Dream!)
Imagine a birthday cake that is a pure, unapologetic celebration of all things chocolate. We’re talking three layers of a rich, deeply chocolatey, and unbelievably moist cake, wrapped in a wall of crispy KitKats and topped with a glorious, chaotic explosion of all their favorite candy bars. This, my friends, is not just a cake;…
Imagine a birthday cake that is a pure, unapologetic celebration of all things chocolate. We’re talking three layers of a rich, deeply chocolatey, and unbelievably moist cake, wrapped in a wall of crispy KitKats and topped with a glorious, chaotic explosion of all their favorite candy bars. This, my friends, is not just a cake; it’s a chocolate lover’s fantasy come to life.
Here’s the thing about milestone birthdays: they deserve a cake that’s as fun and epic as the celebration itself. I’ve always believed that the best birthday cake is one that reflects the person, and if that person loves chocolate, then this is the cake. It’s less about delicate, fussy decorating and all about the joyful, abundant, more-is-more philosophy of candy.
I promise you, while this cake looks incredibly impressive and elaborate, it’s secretly one of the most fun and forgiving cakes you will ever assemble. There are no rules, just your favorite chocolate bars and a little bit of creative chaos. It’s the perfect way to create a personalized, show-stopping centerpiece that will have everyone’s eyes wide with delight.
Get ready to build the most spectacular, candy-covered, and completely unforgettable birthday cake that will be the absolute star of the party.
Why This Is the Most Fun Birthday Cake Ever!
You are going to have an absolute blast making this cake, and the birthday person is going to be ecstatic! It’s a guaranteed hit, and here’s why:
- A True Chocolate Lover’s Dream: This cake is a celebration of chocolate in every form—a rich chocolate cake, fluffy chocolate frosting, and an explosion of their favorite candy bars.
- Looks Incredibly Impressive, But It’s SO Easy: The KitKat “wall” is a brilliant and simple trick that makes the cake look professionally made, and the “explosion” on top is all about creative, fun placement!
- Completely Customizable: The best part! You can tailor the candy topping to include all of the birthday person’s absolute favorite chocolate bars, making it a truly personal and special cake.
- Rich & Incredibly Moist Chocolate Cake: This isn’t just a vehicle for candy. The chocolate cake recipe itself is a show-stopper—deeply flavorful and unbelievably moist.
- The Ultimate “Wow” Factor: Placing this magnificent, candy-covered creation on the table is a true “wow” moment that will kick off any celebration in style.
Recipe Snapshot
| Prep Time | 45 minutes |
| Cook Time | 28 minutes |
| Total Time | 3 hours (includes cooling & assembly) |
| Servings | 12-16 servings |
| Calories | 488 kcal (cake & frosting only) |
| Course | Dessert |
| Cuisine | American |
| Difficulty/Method | Intermediate / Baking |
Your Shopping List for a Chocolate Explosion
Get ready for the most fun trip down the candy aisle! This recipe is broken down into the cake, the frosting, and the epic decorations.
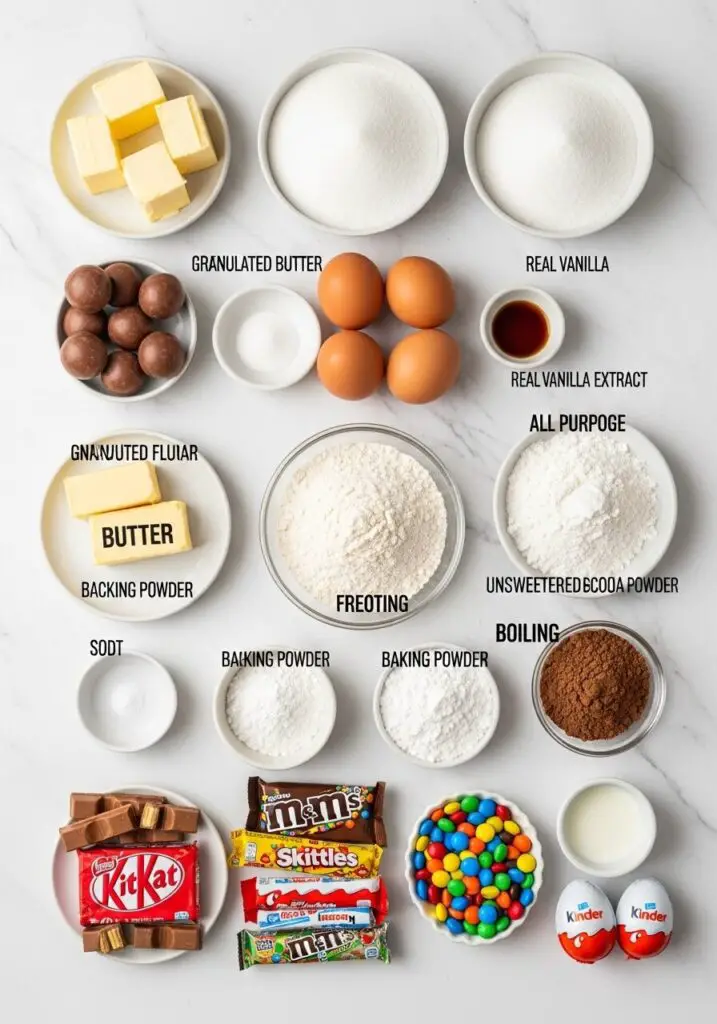
→ For the Rich Chocolate Cake
- 1 cup unsalted butter, softened
- 2 ½ cups granulated sugar
- 4 large eggs, room temperature
- 2 tsp real vanilla extract
- 3 cups all-purpose flour
- 2 tsp baking soda & 1 tsp baking powder
- ½ tsp salt
- 1 cup unsweetened cocoa powder
- 2 ¼ cup boiling water
→ For the Fluffy Chocolate Frosting
- 2 cups (4 sticks) unsalted butter, room temperature
- 1 cup unsweetened cocoa powder
- 7 cups powdered sugar
- 2-4 Tbsp whole milk or heavy cream
- 2 tsp real vanilla extract
→ For the Epic Decorations
- KitKat Bars: About 10-12 standard (4-finger) packs to build the outer wall.
- Round Chocolates: Maltesers (or Whoppers) and Cadbury Buttons to create a border.
- An assortment of their favorite candy bars: Kinder Bueno, Snickers, Cadbury Flake, Milky Bar (or white chocolate), Reese’s Peanut Butter Cups, etc.
- Colorful Candy: M&M’s or Skittles to fill in the gaps and add a pop of color.
- A Surprise Element: A Kinder Egg is perfect for splitting open and filling with more candies!
Let’s Bake! Crafting Your Chocolate Masterpiece
Ready to build the birthday cake of their dreams? Let’s take it one delicious, chocolatey step at a time.
Part 1: The Rich & Moist Chocolate Cake
- Prep Your Oven and Pans: First, preheat your oven to 350°F (180°C). Grease and flour three 8-inch round cake pans and line the bottoms with parchment paper.
- Cream the Base: In a large bowl with an electric mixer, cream the softened butter and sugar. Add the eggs and vanilla and mix until well blended.
- Combine Dry & Wet: In a separate large bowl, whisk together the flour, baking soda, baking powder, and salt. In a medium bowl, whisk the cocoa powder with the boiling water until smooth (this “blooms” the cocoa for a richer flavor!).
- Alternate and Mix: On low speed, alternate adding the dry ingredients and the hot cocoa mixture to your creamed butter mixture, beginning and ending with the dry ingredients. Mix only until just combined.
- Bake the Layers: Divide the batter evenly among your three prepared pans. Bake for 22-28 minutes, or until a toothpick inserted into the center comes out clean. Let the cakes cool in the pans for 10 minutes before turning them out onto a wire rack to cool completely.
Part 2: Assembly & The Grand Decoration
- Make the Frosting: While the cakes cool, beat the softened butter until creamy. Sift in the cocoa powder and powdered sugar, and mix on low to combine. Add the vanilla and 2 tablespoons of milk, then beat on high speed until light and fluffy, adding more milk if needed to reach a smooth, spreadable consistency.
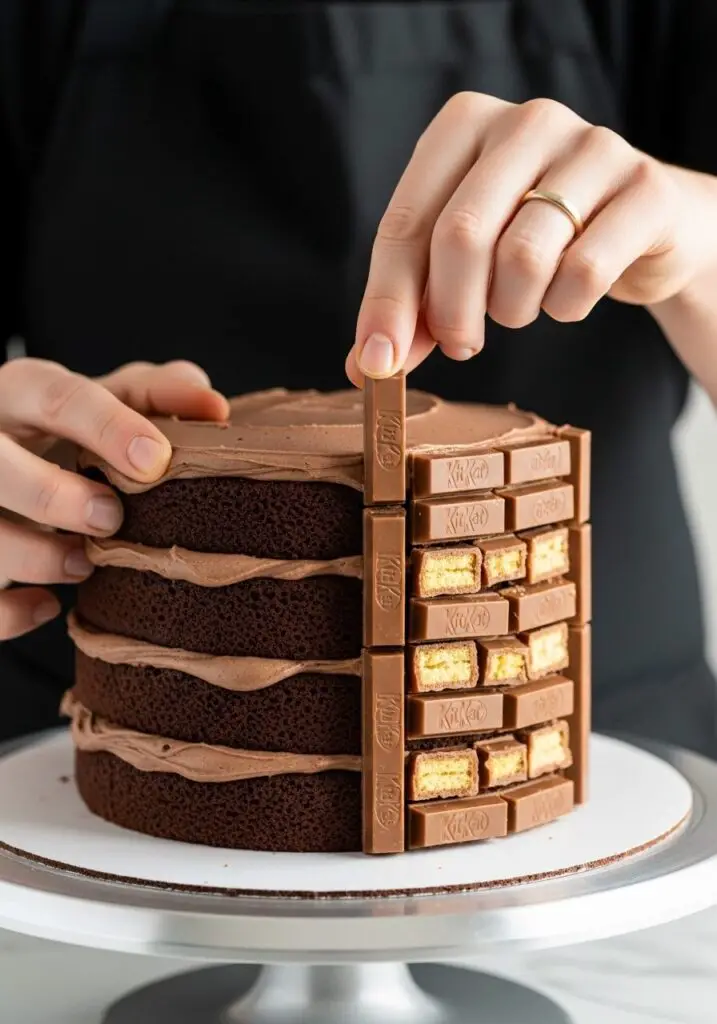
- Stack and Frost: Level the cooled cake layers if needed. Place the first layer on your cake stand and top with a generous layer of frosting. Repeat with the second and third layers. Then, apply a smooth, even coat of frosting to the top and sides of the entire cake.
- Build the KitKat Wall: This is the magic trick! Break your KitKats into two-finger pieces. Gently press them, one by one, vertically into the frosting around the entire side of the cake to create a “wall.”
- Create a Candy Border: To hide the top edge of the cake and create a “bowl” for your candy, pipe a border of frosting around the top edge of the KitKat wall and stick on Maltesers or Chocolate Buttons.
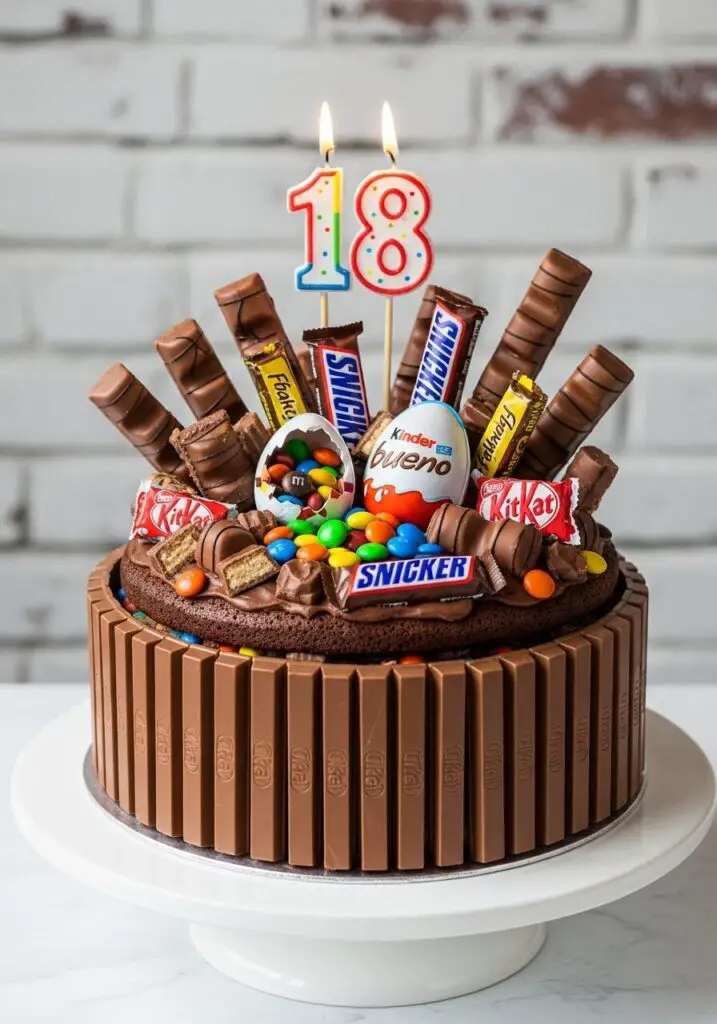
- The Chocolate Explosion!: Now for the best part. Get creative! Start by placing a focal point, like a large birthday candle or a Kinder Egg, slightly off-center. Arrange taller candy bars (like Flakes or Buenos) towards the back, and shorter ones towards the front. Fill in all the gaps with M&M’s, Reese’s Cups, and other smaller candies until the top is an abundant, chaotic, and glorious explosion of chocolate!
WiseRecipes’ Top Tips for an Epic Cake
A show-stopper like this is all about the assembly. These simple tips will make it a breeze.
- Use a Store-Bought Cake to Save Time! Don’t have time to bake from scratch? No problem! The original creator notes that you can buy a plain, frosted or unfrosted chocolate cake from a bakery and jump right into the fun decorating part.
- The KitKat Wall Trick. For the cleanest look, make sure all the KitKats are facing the same way and are pressed firmly against the cake stand. The frosting is your glue! If your cake is slightly taller than the KitKats, the candy border on top is the perfect way to hide the gap.
- Create a Focal Point. The key to making the “explosion” on top look artfully chaotic instead of just messy is to start with a focal point—like a big candle or a Kinder Egg—and build the other candies out from there, placing taller items in the back.
- Use Frosting as Your Royal Glue. Keep a little extra frosting in a piping bag (or a ziplock bag with the corner snipped off). It’s the perfect edible “glue” for securing candy bars that won’t stand up on their own.
- Chill if Needed. If your frosting seems too soft or your kitchen is warm, don’t be afraid to pop the cake in the fridge for 15-20 minutes after applying the KitKat wall. This will help everything firm up before you add the heavy candy on top.
Keep It Fresh! Storing Your Masterpiece
Here’s how to handle your incredible creation before and after the big celebration.
- Assembly: This cake is best assembled on the day of the party to ensure all the candy bars are at their freshest. You can bake the cake layers a day or two in advance and store them, well-wrapped, at room temperature.
- Refrigerator: Once assembled, the cake can be stored in the refrigerator (if you have space!). This will keep the frosting and candy bars firm.
- Serving: For the best flavor and texture, I recommend taking the cake out of the refrigerator about 1-2 hours before serving to let it come to room temperature. A cold cake can taste dense. Leftovers can be stored, covered, in the fridge for up to 5 days.
Chocolate Explosion Birthday Cake
Ingredients
Method
- Preheat oven to 350°F (180°C). Grease, flour, and line three 8-inch round cake pans.
- Cream the butter and sugar. Beat in the eggs and vanilla. In a separate bowl, whisk the dry flour ingredients. In another bowl, whisk the cocoa and boiling water.
- On low speed, alternate adding the dry ingredients and the chocolate mixture to the creamed butter, beginning and ending with the dry ingredients. Mix until just combined.
- Divide batter among the pans. Bake for 22-28 minutes, until a toothpick comes out clean. Cool completely.
- Beat butter until creamy. Sift in cocoa and powdered sugar, mix on low. Add vanilla and 2 Tbsp milk, then beat on high until fluffy, adding more milk as needed.
- Assemble the cake by layering the cooled cakes with frosting. Apply a smooth coat of frosting to the top and sides.
- Break KitKats into two-finger pieces. Press them vertically into the frosting around the entire side of the cake to create a ‘wall’.
- Optional: Pipe a border of frosting on top of the KitKat wall and decorate with round candies like Maltesers or Buttons.
- Create the ‘explosion’ on top by arranging taller candy bars in the back and shorter ones in the front. Fill all the gaps with smaller candies like M&Ms until the top is completely covered.
Notes
FAQs: Your Chocolate Explosion Cake Questions, Answered!
How many KitKats will I actually need?
This depends on the exact diameter of your frosted cake, but a good estimate for a standard 8-inch, three-layer cake is about 10-12 full-size (4-finger) packs of KitKats. It’s always a good idea to buy one or two extra just in case of breakage!
What if I don’t have a piping bag for the candy border?
No problem at all! A heavy-duty zip-top plastic bag is the perfect substitute. Just spoon a good amount of frosting into the bag, squeeze it all down into one corner, twist the top, and snip a tiny bit off the corner. Voila—a DIY piping bag!
Can I use a different kind of cake?
Absolutely! While this rich chocolate cake is the perfect base, you could use your favorite vanilla, yellow, or even a Funfetti cake recipe. The beauty of this cake is all in the epic decoration!
How do I get the candy bars to stand up?
The key is to gently but firmly press the base of the candy bar down into the soft frosting on top of the cake. For taller or heavier pieces, a little extra blob of frosting “glued” to the back of the candy bar where it meets the cake will provide all the support it needs.
My Final Thoughts: A Birthday Wish Come True
This Chocolate Explosion Cake is more than just a dessert; it’s a statement. It’s a joyful, over-the-top, and incredibly fun way to celebrate a true chocolate lover. Don’t worry about making it look perfect—the beauty is in its abundant, chaotic charm. I hope you have the most amazing time creating this unforgettable birthday centerpiece!