The Ultimate Halloween Cake Recipe: Spooktacularly Delicious & Fun for Everyone!
Oh, friends, get ready to unleash your inner Halloween enthusiast, because today at WiseRecipes, we’re baking up something truly spectacular! If you’re planning a ghoulish gathering, a family fright-night, or just want to make this spooky season extra special, then this Halloween Cake Recipe is your ticket to a truly memorable celebration. Forget bland store-bought…
Oh, friends, get ready to unleash your inner Halloween enthusiast, because today at WiseRecipes, we’re baking up something truly spectacular! If you’re planning a ghoulish gathering, a family fright-night, or just want to make this spooky season extra special, then this Halloween Cake Recipe is your ticket to a truly memorable celebration. Forget bland store-bought treats; this is a show-stopping centerpiece that’s guaranteed to make your party spooktacular from the very first glance!
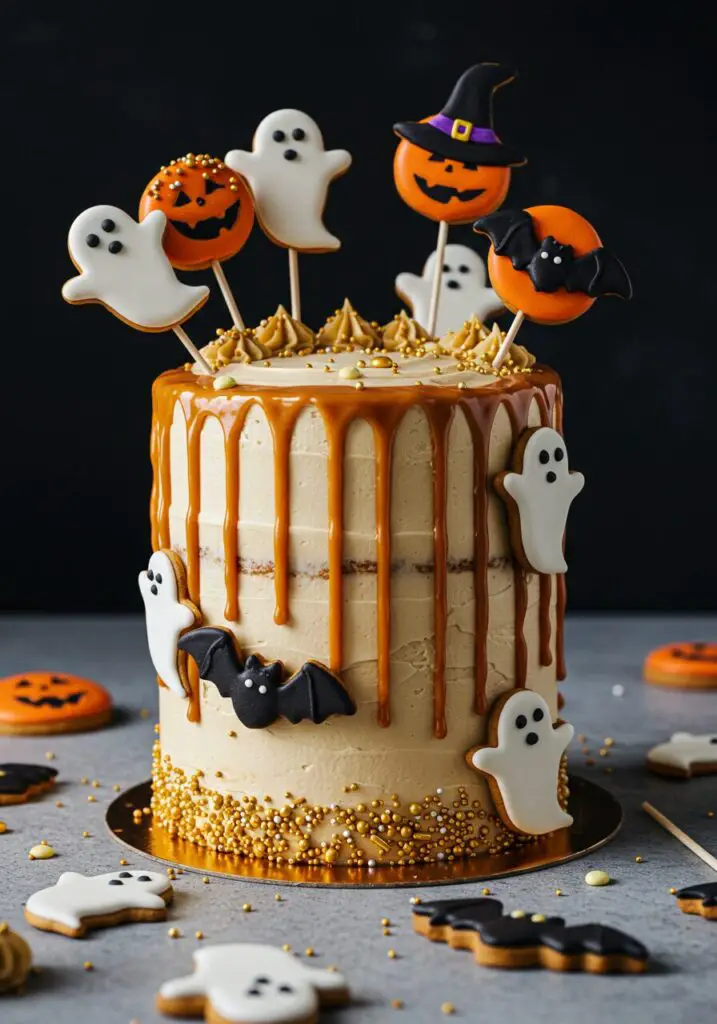
I’ve always loved Halloween, not just for the costumes and candy, but for the sheer fun of getting creative in the kitchen. And this cake? It’s everything I dream of for a festive dessert. We’re talking rich, moist layers of both buttery butterscotch and decadent chocolate cake, sandwiched with a luscious caramel icing, and adorned with the cutest (or creepiest!) chocolate bat biscuits and ghoulish white chocolate ghosts. It’s a project, yes, but it’s such a joyful one, especially if you have little helpers in the kitchen. Every year, my family asks for this Halloween Cake, and I promise, once you make it, you’ll want to make it every single year too! Get ready to cast a delicious spell!
Why This Halloween Cake Will Be the Star of Your Spooktacular Party!
This isn’t just another dessert; it’s a centerpiece that brings joy, fright, and flavor to your table. Here’s why I’m absolutely obsessed with it:
- A True Show-Stopper: This cake is designed to impress! With its vibrant layers, creamy icing, and adorable (yet spooky!) homemade decorations, it’s a guaranteed conversation starter and the perfect focal point for your Halloween spread.
- Double the Deliciousness: Why choose between butterscotch and chocolate when you can have both? We’re baking two distinct, moist cake layers, ensuring a delightful flavor surprise in every bite.
- Homemade Spooky Decorations: Forget fiddly fondant! Our charming chocolate bat biscuits and ghoulish white chocolate ghosts are surprisingly easy to make and add that perfect, whimsical Halloween touch that kids (and adults!) will adore.
- Perfectly Creamy Caramel Icing: The generous, velvety caramel icing pulls all those delicious flavors together. It’s rich, sweet, and provides the perfect canvas for our spooky decorations.
- A Fun Family Baking Project: This recipe is ideal for getting the whole family involved! From mixing the cake batters to stamping out biscuit shapes and decorating the ghosts, there’s a task for every little monster.
Your Enchanted Shopping List: What You’ll Need for This Halloween Cake
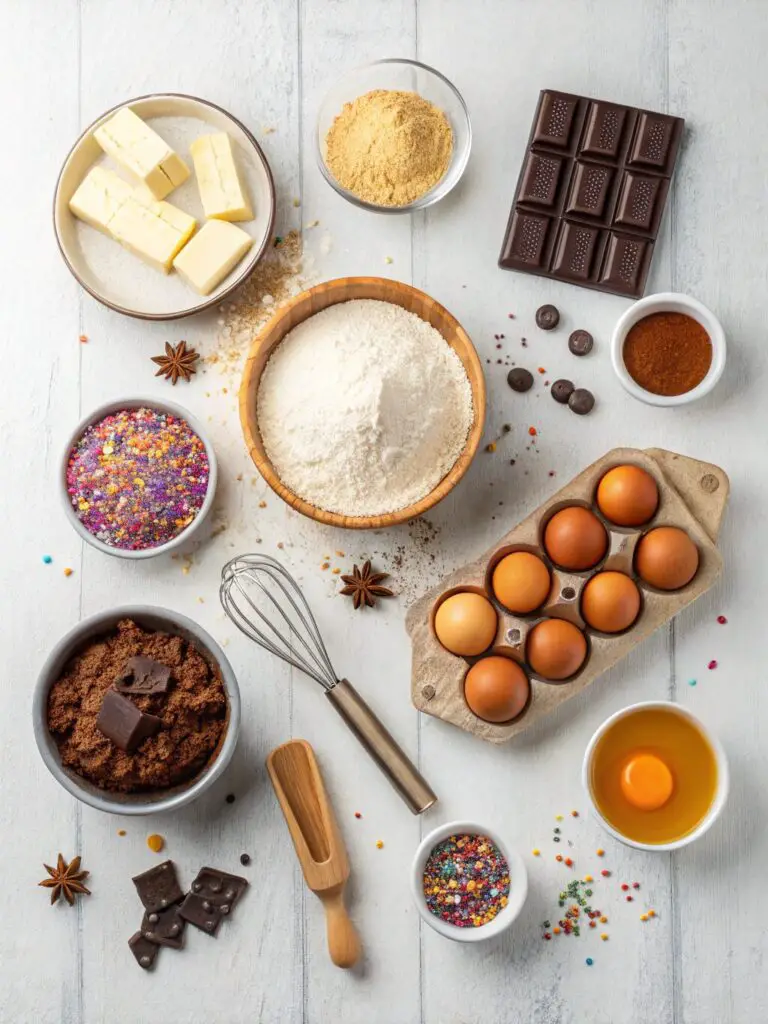
Creating this show-stopping Halloween cake uses a blend of pantry staples and a few fun extras. Here’s what you’ll want to grab to get started!
→ For the Spooky Bat & Ghost Biscuits
- 50g butter, softened: The base for our tender, flavorful biscuits.
- 30g (1oz) icing sugar: Sweetens the biscuit dough.
- 1 egg yolk: Binds the dough and adds richness.
- 90g plain flour: The structure for our biscuits.
- 10g (1/2oz) cocoa powder: Gives our bat biscuits their dark, mysterious color.
- 25g (1oz) ground almonds: Adds a lovely texture and nutty flavor.
- 25g (1oz) plain chocolate, melted: For coating the bat biscuits.
- Purple sprinkles: For a festive, spooky sparkle on the bats.
- 50g (2oz) white chocolate, melted: For creating our ghoulish ghost shapes.
→ For the Dreamy Butterscotch Cake Layers
- 225g butter, softened: For a rich, tender crumb.
- 125g light muscovado sugar: Adds a lovely caramelly, molasses note.
- 100g golden syrup sugar or golden caster sugar: For that distinct butterscotch sweetness.
- 4 eggs: Binds the cake and adds moisture.
- 225g (7 1/2oz) self-raising flour: Our leavening agent for a light, fluffy cake. (See note below if you don’t have it!)
- 2 tbsp milk: For extra moisture and tenderness.
→ For the Decadent Chocolate Cake Layers
- 225g butter, softened: For a rich, tender crumb.
- 225g (7 1/2oz) dark muscovado sugar: Deepens the chocolate flavor with its molasses notes.
- 4 eggs: Binds the cake and adds moisture.
- 225g (7 1/2oz) self-raising flour: For a light, fluffy chocolate cake. (See note below if you don’t have it!)
- 75g cocoa powder: For that intense chocolate flavor and dark color.
- 2 tbsp milk: For moisture and tenderness.
→ For the Luscious Caramel Icing
- 300g (10oz) butter, softened: The rich, creamy base for our icing.
- 1/2 x 397g tin Carnation Caramel or 200g Dulce de Leche: This is the magic ingredient for that incredible caramel flavor!
- 650g (1 1/4lb) icing sugar, sieved: For sweetness and smooth consistency.
- Gold sprinkles: For a final touch of sparkle and elegance.
Let’s Get Spooky! Crafting Your Show-Stopping Halloween Cake, Step-by-Step
This recipe has a few components, but they are all very manageable. Take your time, enjoy the process, and soon you’ll have a Halloween masterpiece!
Part 1: Baking Our Spooky Bat & Ghost Biscuits
- Make Biscuit Dough: In a bowl, cream together the 50g softened butter and 30g icing sugar until light and fluffy. Mix in the 1 egg yolk. Gradually work in the 90g plain flour, 10g cocoa powder, and 25g ground almonds until a soft dough forms. Wrap and chill the dough for 15 minutes.
- Preheat Oven & Roll Dough: Preheat your oven to gas 4, 180°C, fan 160°C. Lightly flour your work surface and roll out the chilled dough to just under 5mm (¼ inch) thick.
- Cut & Bake Biscuits: Using cookie cutters, stamp out 5 bat shapes. From the remaining dough, cut out your ghost shapes (you can freehand cut these with a knife too!). Place the biscuits well apart on a baking tray. For the bats, gently push a cake pop stick (or lollipop stick) into the bottom of each bat shape – this will help them stand up on the cake. Bake for about 10 minutes. Remove from the oven and transfer to a wire rack to cool completely.
- Decorate Bats: Once the bats are cool, brush the melted 25g plain chocolate over them. Immediately scatter over the purple sprinkles while the chocolate is still wet.
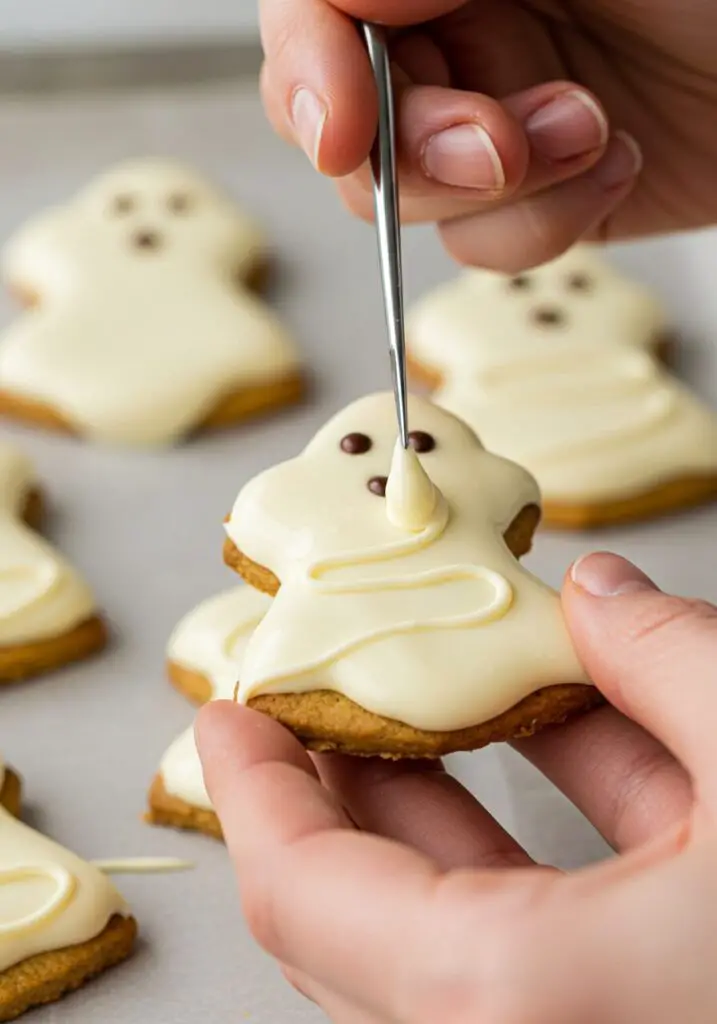
- Decorate Ghosts: For the ghosts, spread the melted 50g white chocolate over each biscuit. Before the chocolate sets, use the handle of a teaspoon (or a toothpick) to gently swirl the white chocolate, creating a flowing, ghoulish gown effect. Let all biscuits set completely.
Part 2: Baking Our Butterscotch & Chocolate Cake Layers
- Prep Tins: Grease and base line two 20cm (8-inch) round sandwich tins with baking paper.
- Make Butterscotch Cake: In a large bowl, combine 225g softened butter, 125g light muscovado sugar, 100g golden syrup sugar, 4 eggs, 225g self-raising flour, and 2 tbsp milk. Beat well together until smooth and fully combined.
- Bake Butterscotch Cake: Divide the butterscotch mixture evenly between the two prepared tins. Bake in the preheated oven (gas 4, 180°C, fan 160°C) for 20-25 minutes, or until a skewer inserted into the center comes out clean. Remove from the oven and let cool in the tins for a few minutes before turning out onto a wire rack to cool completely.
- Make Chocolate Cake: To make the chocolate cake, repeat the exact same instructions as for the butterscotch cake, using 225g softened butter, 225g dark muscovado sugar, 4 eggs, 225g self-raising flour, 75g cocoa powder, and 2 tbsp milk. You’ll end up with two delicious chocolate cake layers.
Part 3: Making Icing & Assembling Our Halloween Masterpiece
- Make the Caramel Icing: In a large bowl, put 300g softened butter and beat until it’s very soft and pale. Then, beat in the ½ x 397g tin of Carnation Caramel or 200g Dulce de Leche until smooth and creamy. Add the 650g sieved icing sugar, one third at a time, beating well between each addition until the icing is smooth, thick, and fluffy.
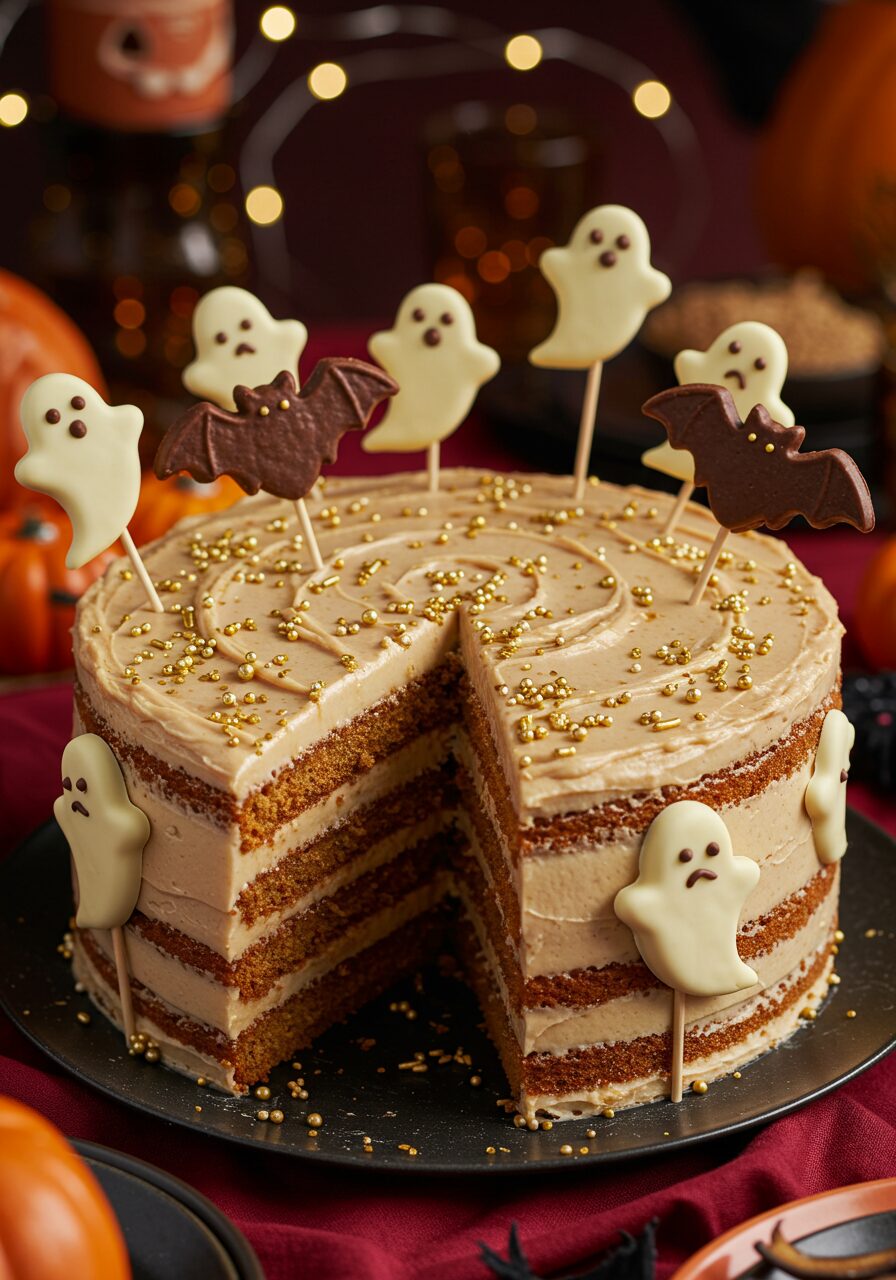
- Stack & Crumb Coat: Place one butterscotch cake layer on your serving plate or cake stand. Spread a little of the caramel icing over it. Top with a chocolate cake layer, then more icing. Continue alternating flavors and icing until all four cake layers are stacked. Now, spread a very thin layer of icing over the entire sides and top of the stacked cake – this is called a “crumb coat” and it traps any loose crumbs. Chill the cake in the refrigerator for about 15-20 minutes, or until the crumb coat is firm.
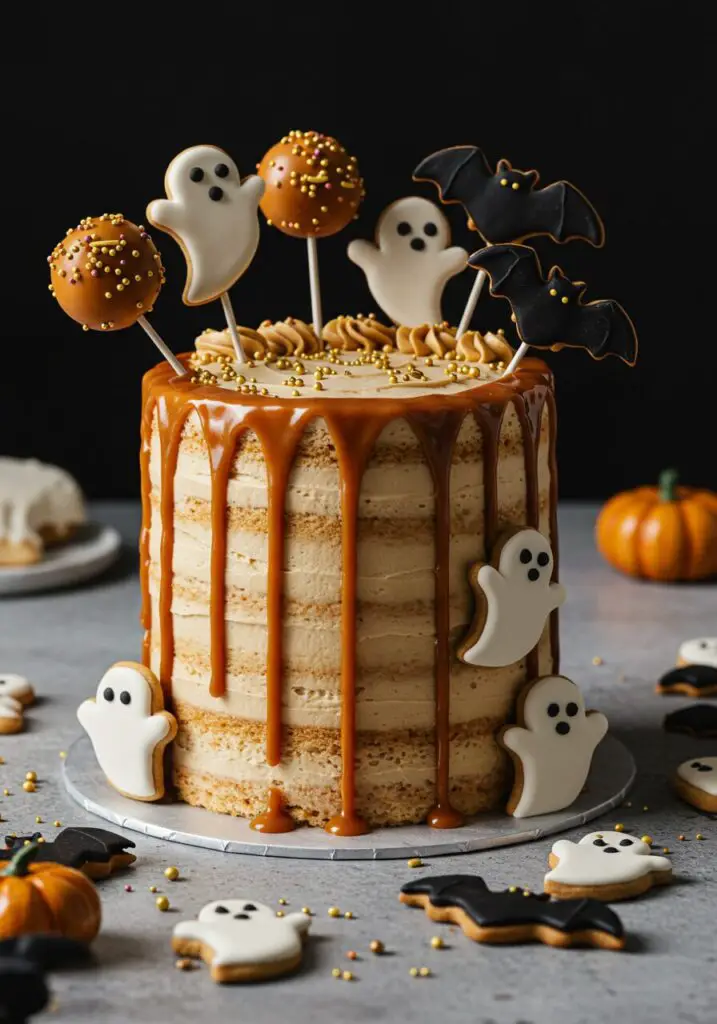
- Final Icing & Decorate: Once the crumb coat is firm, spread the remaining caramel icing generously and smoothly over the top and sides of the cake. Gently stick your white chocolate ghosts around the sides of the cake. Push the cake pop sticks of your chocolate bat biscuits into the top of the cake, arranging them spookily. Scatter over the gold sprinkles, allowing a few to elegantly fall down the sides of the cake.
- Serve & Enjoy! Present your stunning Halloween cake to your delighted guests. It’s guaranteed to be the star of the show!
WiseRecipes’ Wicked Tips for Halloween Cake Magic
Creating this impressive cake is simpler than you think, but these WiseRecipes tips will ensure your Halloween masterpiece is absolutely perfect every time!
- Room Temperature Ingredients are Key: For both the cake batters and the icing, ensure your butter and eggs are at room temperature. This helps them combine smoothly, creating light, airy cakes and a lump-free, creamy icing.
- Don’t Over-Mix Cake Batters: Once you’ve added the flour and milk, mix just until combined. Over-mixing can develop the gluten too much, leading to a tougher cake.
- Chill Your Biscuit Dough: Don’t skip chilling the biscuit dough! It makes it much easier to roll out and cut neat shapes, preventing them from spreading too much in the oven.
- The Power of the Crumb Coat: A crumb coat is your best friend for a smooth, professional-looking cake! It locks in any loose crumbs, so your final layer of icing is perfectly pristine. Don’t rush this step.
- Sieve Icing Sugar: Always sieve your icing sugar for the butterscotch icing. This prevents lumps and ensures a silky-smooth, easy-to-spread icing.
- No Self-Raising Flour? No Problem! If you only have plain flour, simply add 2 teaspoons of baking powder for every 150g of plain flour. Easy swap!
Spooky Swaps & Ghastly Guests: Creative Twists for Your Halloween Cake
This Halloween Cake is fantastic as is, but it’s also a fantastic canvas for your ghoulish creativity! Here are a few ideas I love to play with:
- Different Spooky Toppers: Get creative with your biscuit cutters! Skeletons, pumpkins, witches’ hats, or even simple circles with ghostly faces drawn on would be fantastic.
- Color Swaps: Use food coloring to tint your butterscotch icing an eerie green or orange for an extra spooky touch!
- Frightening Fillings: Between your cake layers, you could add a thin layer of cherry jam for a “bloody” surprise, or a sprinkle of mini chocolate chips for extra texture.
- Grave-Digging Garnish: Instead of gold sprinkles, you could crush some chocolate cookies (like Oreos) and sprinkle them around the base or top of the cake to look like “dirt,” then add gummy worms!
- Non-Dairy Alternative: For a non-dairy cake, you could substitute butter with a good quality vegan butter alternative in the cakes and icing, and use a plant-based milk. Ensure your caramel/dulce de leche is also dairy-free.
Halloween Cake Recipe (Spooktacularly Delicious & Fun for Everyone!)
Ingredients
Equipment
Method
- Cream together 50g softened butter and 30g icing sugar. Mix in 1 egg yolk. Gradually work in 90g plain flour, 10g cocoa, and 25g ground almonds. Chill for 15 minutes.
- Heat the oven to gas 4, 180°C, fan 160°C. Roll out dough to just under 5mm (1/4in) thick.
- Using cutters, stamp out 5 bat shapes and cut out ghosts from remaining dough. Place on a baking tray, push a cake pop stick into each bat. Bake for about 10 minutes. Remove and cool.
- Brush melted plain chocolate over bat biscuits and scatter purple sprinkles. Spread melted white chocolate over ghosts, swirl with a teaspoon handle to create a flowing gown. Let all biscuits set.
- Grease and base line two 20cm (8in) round sandwich tins.
- For the butterscotch cake: Put 225g softened butter, 125g light muscovado sugar, 100g golden syrup sugar, 4 eggs, 225g self-raising flour, and 2 tbsp milk into a bowl and beat well.
- Divide mixture between two tins and bake in the oven at gas 4, 180°C, fan 160°C for 20-25 minutes. Remove and cool.
- For the chocolate cake: Repeat the above instructions using 225g softened butter, 225g dark muscovado sugar, 4 eggs, 225g self-raising flour, 75g cocoa powder, and 2 tbsp milk. Remove and cool.
- For the icing: Put 300g softened butter in a bowl and beat until very soft. Beat in ½ tin Carnation Caramel or 200g Dulce de Leche. Add 650g sieved icing sugar, one third at a time, beating well between additions.
- Stack the cakes in alternate flavors, sandwiching each with a little icing. Spread a thin layer of icing over the sides (crumb coat) and chill until firm.
- Spread remaining icing over the top and sides of the cake. Stick the ghosts around the sides and push the bats into the top. Scatter gold sprinkles, allowing a few to fall down the sides. Serve.
Notes
Keep It Spooktacular: Storing Your Halloween Cake
You’ve put so much love into this cake, so let’s make sure it stays fresh and delicious!
- Room Temperature Storage: This Halloween cake, once assembled and decorated, is best stored covered in a cool, dry place at room temperature for up to 2-3 days. If your kitchen is very warm, consider chilling it.
- Refrigerator Storage: If you need to keep it longer, or if your kitchen is warm, you can store the cake in an airtight container in the refrigerator for up to 4-5 days. Allow it to come to room temperature for about 30 minutes before serving for the best flavor and texture.
- Freezing Cake Layers: You can freeze the baked and cooled cake layers before icing! Wrap each cooled layer tightly in plastic wrap, then in foil. Freeze for up to 1 month. Thaw at room temperature before icing. I don’t recommend freezing the fully iced and decorated cake or the individual biscuits.
- Biscuit Storage: Store the finished chocolate bat biscuits and white chocolate ghosts in an airtight container at room temperature for up to 1 week.
FAQs: Your Top Halloween Cake Questions, Answered!
Q: Can I make the cake layers ahead of time?
A: Yes, absolutely! This is a fantastic make-ahead tip. You can bake and cool the cake layers up to 2 days in advance. Once completely cool, wrap them tightly in plastic wrap and store at room temperature. You can even freeze them (see storage tips above!).
Q: What if I don’t have self-raising flour?
A: No problem at all! If you only have plain flour, simply add 2 teaspoons of baking powder for every 150g of plain flour. So, for each cake batch (225g flour), you’ll add 3 teaspoons of baking powder.
Q: Can I use pre-made icing?
A: You can, for a shortcut! If using pre-made caramel frosting, ensure it’s a good quality one. You might need to add a little extra sifted icing sugar if it’s too thin, or a splash of milk if it’s too thick, to get a good spreading consistency for decorating.
Q: How can I transport this cake to a party?
A: For easy transport, assemble and decorate the cake on a sturdy cake board. Use a tall cake carrier to protect the decorations. If it’s a long journey or a warm day, you might want to chill the cake well beforehand to firm up the icing and decorations.
Q: My icing seems too runny/too stiff. How can I fix it?
A: If your icing is too runny, gradually beat in more sifted icing sugar, a tablespoon at a time, until it thickens. If it’s too stiff, add a tiny splash of milk (or even water), a teaspoon at a time, beating well until it reaches your desired creamy, spreadable consistency.
And there you have it, my friends—your guide to crafting the most delightful, impressive, and truly unforgettable Halloween Cake! This WiseRecipes creation is more than just a dessert; it’s a testament to how simple ingredients, when treated with a little love and smart steps, can come together to create something truly extraordinary. It’s a vibrant, exciting centerpiece that you’ll genuinely look forward to making every year!
I am genuinely so excited for you to try these and experience the delicious magic yourself. Please, please come back and let me know in the comments below what your favorite part of this spooktacular cake was, or any fun twists you tried! Happy cooking from WiseRecipes!