The Ultimate Mini Pumpkin Cheesecake Bites (So Easy & Cute!)
When it comes to Thanksgiving desserts, we all love the classics. But what if you could serve a treat that was not only packed with all the warm, spiced flavors of fall but was also the most adorable thing on the dessert table? Meet your new holiday showstopper: these incredible Mini Pumpkin Cheesecake Bites. This…
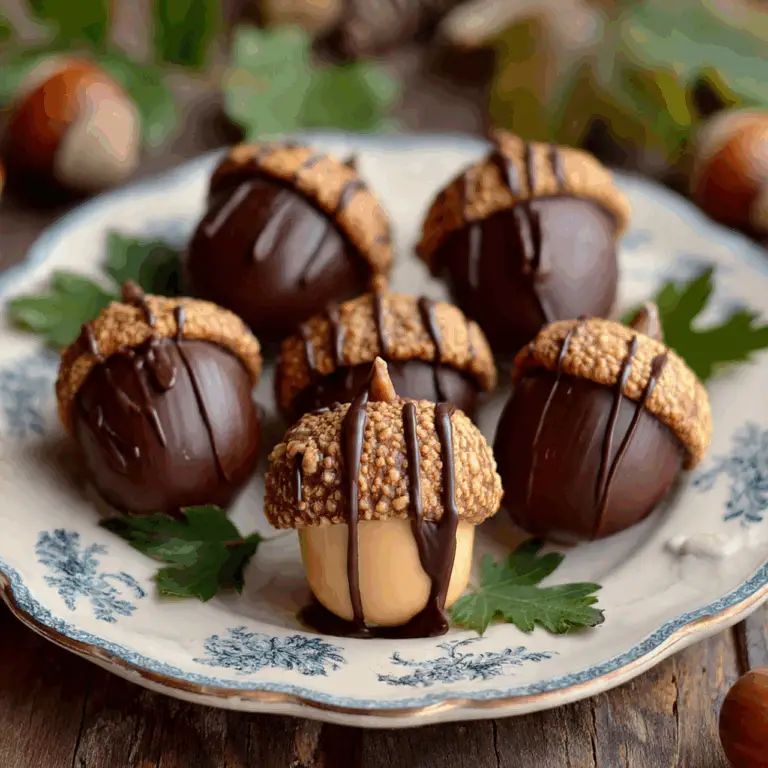
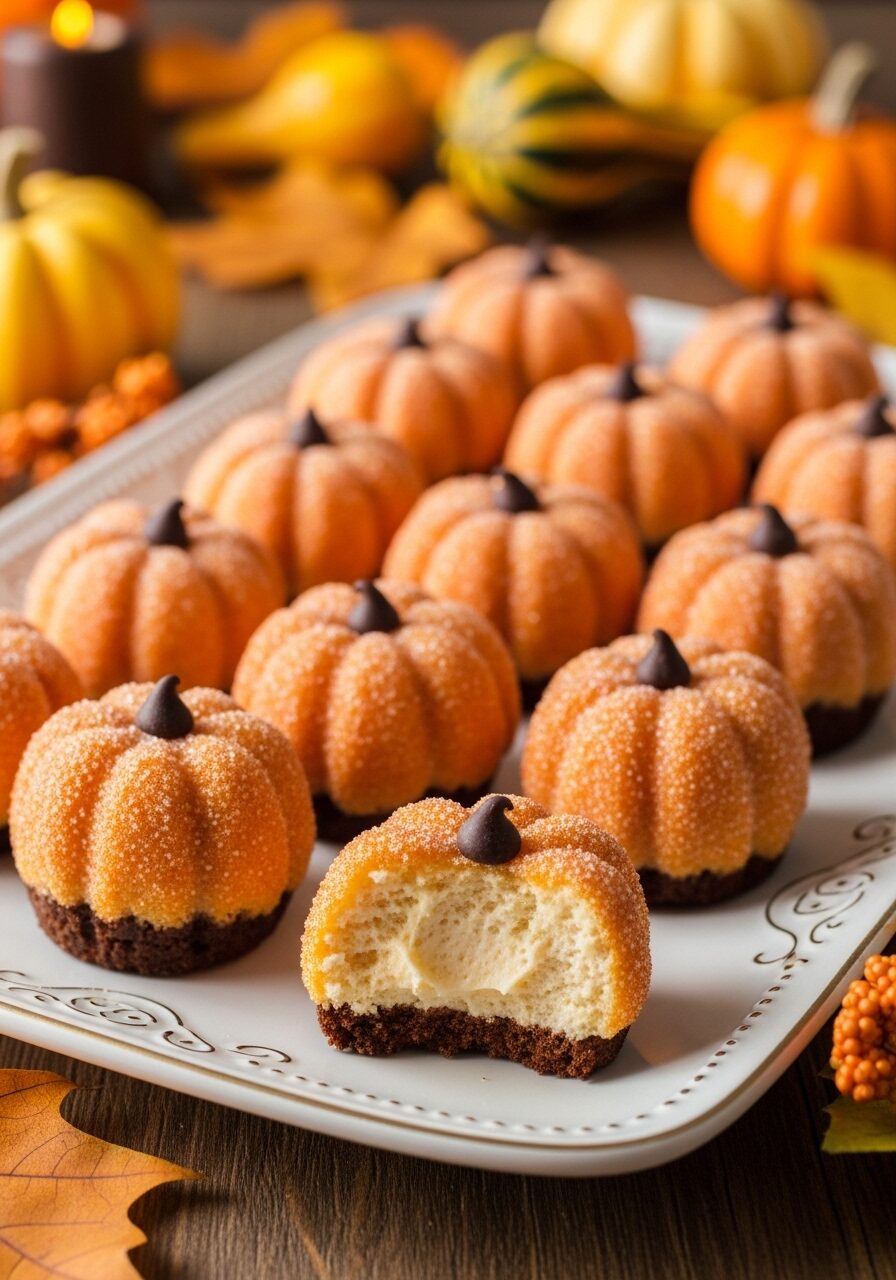
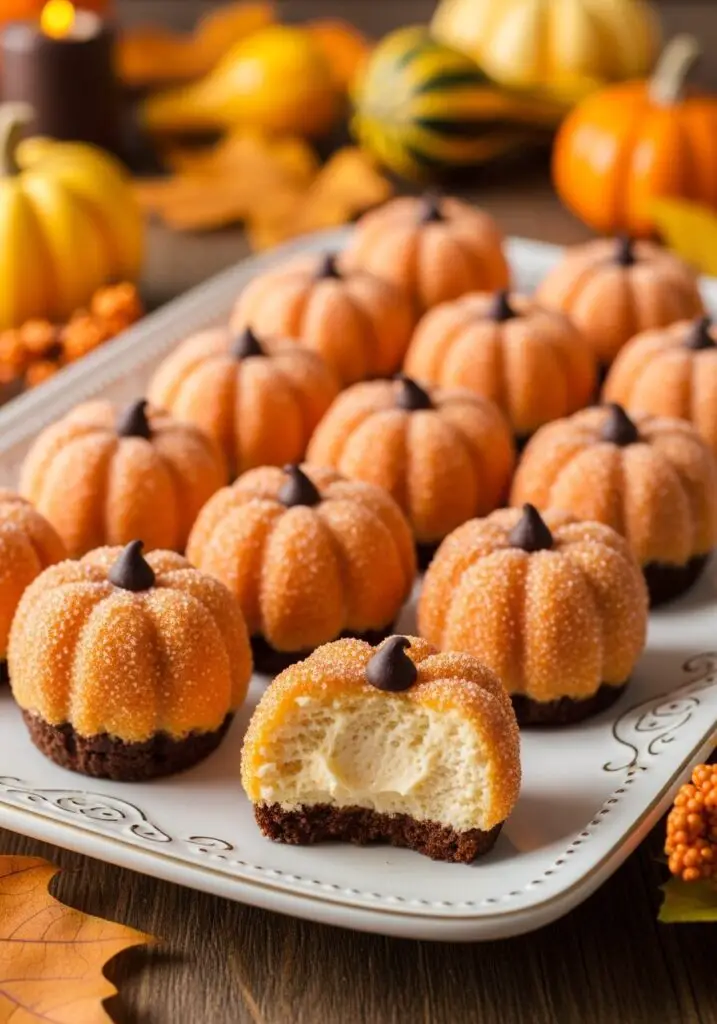
When it comes to Thanksgiving desserts, we all love the classics. But what if you could serve a treat that was not only packed with all the warm, spiced flavors of fall but was also the most adorable thing on the dessert table? Meet your new holiday showstopper: these incredible Mini Pumpkin Cheesecake Bites. This is a no-bake wonder that transforms a creamy, dreamy pumpkin cheesecake filling into perfect, two-bite treasures that look just like tiny pumpkins. Imagine a rich, smooth, and decadent mixture of pumpkin puree, cream cheese, and warm spices, all cooked down into a firm, rollable “dough.” Each ball is then coated in sparkling orange sugar and finished with a little chocolate chip “stem.” They are pure, edible art! I made a platter of these for a Thanksgiving gathering, and people couldn’t stop talking about how cute and delicious they were. They’re the perfect, easy-to-make, no-fuss dessert that delivers a huge “wow” factor, leaving you more time to enjoy the holiday.
Why These Pumpkin Cheesecake Bites Are a Holiday Must-Have!
- Incredibly Cute and Festive: Let’s be honest, they’re adorable! Shaped like tiny pumpkins, they are the perfect, eye-catching addition to any Thanksgiving or fall-themed dessert spread.
- No-Bake & So Easy: After a quick cook on the stovetop, this recipe requires no oven time. It’s a simple process of cooking, chilling, and rolling.
- The Perfect Party Treat: These bite-sized morsels are easy for guests to grab and enjoy while mingling. No plates or forks required!
- Fantastic for Making Ahead: The cheesecake mixture needs to chill and set, making this the ideal dessert to prepare a day or two in advance, freeing up your time on the holiday.
- All the Flavors of Fall: Every bite is packed with the classic, comforting flavors of pumpkin pie spice, creamy cheesecake, and a hint of graham cracker crust.
Recipe Snapshot
| Prep Time | 20 minutes |
| Cook Time | 15 minutes |
| Chill Time | 3+ hours |
| Total Time | 2 hours 45 minutes |
| Servings | 30 bites |
| Calories | 104 kcal per serving |
| Course | Dessert |
| Cuisine | American |
| Method | Stovetop, No-Bake |
Your Shopping List for the Cutest Dessert on the Table
This delightful treat comes together with a handful of simple, easy-to-find ingredients.

→ For the Creamy Pumpkin Cheesecake Base
- Unsalted Butter: 1 tablespoon, for toasting the spices.
- Pumpkin Pie Spice: 1 1/2 teaspoons. This gives us all those warm, classic fall flavors in one go.
- Sweetened Condensed Milk: One 14-oz. can. The secret to a rich, sweet, and smooth base that sets up perfectly.
- Cream Cheese: 4 oz, at room temperature. For that essential tangy cheesecake flavor.
- Canned Pumpkin Puree: 1/2 cup. Make sure it’s pure pumpkin, not pumpkin pie filling!
- Graham Crackers: 4 crackers, crushed into fine crumbs. This adds flavor and a wonderful texture, reminiscent of a cheesecake crust.
- White Chocolate Chips: 1/3 cup. These melt into the mixture, adding creaminess and a lovely vanilla flavor.
→ For Decorating the Pumpkins
- Cooking Spray: For greasing the pan and your hands.
- Orange Sanding Sugar: 1/2 cup. This gives our pumpkins their beautiful, vibrant, and sparkly orange coating.
- Dark Chocolate Chips: 1/4 cup. These make the most perfect, adorable little pumpkin stems!
Let’s Get Rolling! Your Step-by-Step Guide to Pumpkin Perfection
This is a fun and easy process of cooking, chilling, and then getting creative with the decorating. Let’s make some edible art!
Phase 1: Cook the Cheesecake Base (Time: ~15 minutes)
This quick stovetop step brings all our delicious flavors together into a thick, cohesive mixture.

- Toast the Spices. In a medium skillet over medium heat, melt the butter. Add the pumpkin pie spice and cook, stirring constantly, for about 30 seconds until it’s wonderfully fragrant.
- Combine and Thicken. Add the sweetened condensed milk, room temperature cream cheese, and pumpkin puree to the skillet. Cook, stirring constantly with a spatula, for about 5 minutes until the mixture has thickened.
- Add Final Ingredients. Stir in the crushed graham crackers and the white chocolate chips. Continue to cook, stirring, until the chips are melted and the mixture is smooth. Keep cooking for another 8 to 10 minutes.
Visual Cue: You’ll know it’s ready when the mixture is very thick and starts to pull away from the sides and bottom of the pan as you stir.
Phase 2: Chill Until Firm (Time: 2+ hours)
This hands-off step is crucial for getting the mixture to a rollable consistency.
- Spread and Chill. Lightly grease a quarter sheet pan (or a similar-sized baking dish) with cooking spray. Transfer the hot pumpkin mixture to the pan and spread it out in an even layer.
- Let it Set. Let the mixture cool completely to room temperature on the counter. Then, cover it and refrigerate for at least 2 hours, or up to overnight, until it’s completely firm and set.
Phase 3: Shape and Decorate the Pumpkins (Time: ~15 minutes)
Now for the most fun part! Let’s turn our cheesecake mixture into adorable little pumpkins.

- Prep Your Station. Place the orange sanding sugar in a small, shallow bowl. Spray your hands lightly with cooking spray—this is the secret to preventing the mixture from sticking to you!
- Roll the Balls. Scoop out portions of the chilled cheesecake mixture and roll them between your palms to form 1 1/2-inch balls. Roll each ball in the orange sanding sugar until it’s completely coated.
- Create the Pumpkin Ridges. Using the side of a toothpick, gently press vertical lines or ridges into the sides of each ball to resemble the lines on a real pumpkin.
- Add the Stem. Press a single dark chocolate chip, point-side down, into the top of each pumpkin to create the most adorable little stem.
- Final Chill. Place the finished pumpkin cheesecake bites back in the refrigerator to chill until you’re ready to serve.
WiseRecipes’ Top Tips for Perfect Pumpkin Bites
- Stir Constantly: When cooking the cheesecake base, especially after adding the sweetened condensed milk, it’s important to stir constantly to prevent it from scorching on the bottom of the pan.
- The “Pull-Away” Test: The visual cue of the mixture pulling away from the sides of the pan is your best indicator that it’s thick enough and ready to be chilled.
- Thorough Chilling is Key: Don’t rush the chilling step! The mixture must be completely cold and firm to be able to roll it into balls without it being a sticky mess.
- Grease Your Hands: A light coating of cooking spray on your hands is the ultimate trick for rolling these easily and cleanly. Re-apply as needed.
- Gentle Pressure with the Toothpick: When making the ridges, use a gentle touch. You just want to create an indentation, not cut through the cheesecake ball.
Creative Twists: Delicious Ways to Customize!
- Try a Different Coating: Instead of sanding sugar, try rolling the balls in finely crushed graham crackers, gingersnap cookies, or toasted pecans mixed with a little cinnamon sugar.
- Different “Stems”: A small piece of a pretzel stick, a whole clove, or a toasted pecan half would also make a cute pumpkin stem.
- Spice it Up: Add a pinch of cayenne pepper or ground ginger to the pumpkin mixture for a spicier kick.
- Dip Them in Chocolate: For an extra layer of decadence, dip the chilled (undecorated) balls in melted white or dark chocolate and let them set before serving.
- Use Different Crackers: Swap the graham crackers for crushed Biscoff cookies or shortbread cookies for a different flavor profile in the base.
Easy Mini Pumpkin Cheesecake Bites
Ingredients
Equipment
Method
- In a medium skillet over medium heat, melt butter. Add pumpkin pie spice and cook until fragrant, about 30 seconds.
- Add condensed milk, cream cheese, and pumpkin puree. Cook, stirring constantly, until thickened, about 5 minutes.
- Stir in the graham cracker crumbs and white chocolate chips until melted and smooth. Continue to cook, stirring, until the mixture is very thick and releases from the sides of the pan, 8 to 10 minutes.
- Grease a quarter sheet pan with cooking spray. Transfer the pumpkin mixture to the pan and spread in an even layer. Let cool to room temperature.
- Refrigerate until set and very firm, at least 2 hours or up to overnight.
- Place orange sanding sugar in a small bowl. Spray your hands with cooking spray. Roll the chilled cheesecake mixture into 1 1/2″ balls.
- Roll each ball in the sanding sugar until fully coated.
- Using the side of a toothpick, gently press ridges into the sides of the balls to resemble a pumpkin. Press a dark chocolate chip, point-side down, into the top for a stem.
- Refrigerate the finished bites until ready to serve. Store in an airtight container in the fridge for up to 5 days.
Notes
Storing Your Adorable Thanksgiving Treats
These are the perfect make-ahead dessert, as they need to be stored in the fridge anyway!
Refrigerator Storage
Store the finished Mini Pumpkin Cheesecake Bites in a single layer in an airtight container in the refrigerator. They will keep beautifully for up to 5 days, making them an ideal stress-free holiday dessert.
Freezing
You can also freeze these bites. Place them in a single layer on a baking sheet to flash-freeze until solid, then transfer them to a freezer-safe container or bag. They can be frozen for up to 3 months. Let them thaw in the refrigerator for an hour or so before serving.
FAQs: Your Pumpkin Cheesecake Bite Questions, Answered!
Can I make these without a stovetop?
The stovetop cooking step is pretty crucial for melting the ingredients together and thickening the mixture so it becomes firm enough to roll. Unfortunately, a no-cook version would likely not set up properly.
Where do I find orange sanding sugar?
You can typically find sanding sugar in the baking or cake decorating aisle of most major grocery stores, craft stores, or online. It has larger crystals than regular sugar, which gives the pumpkins a wonderful sparkle.
My mixture is too sticky to roll. What did I do wrong?
If the mixture is too sticky, it almost always means it needs to be chilled for longer. Pop it back in the refrigerator (or even the freezer for 15-20 minutes) until it’s very firm. Making sure you cooked it long enough on the stove until it pulled away from the sides of the pan is also key.
What’s a “quarter sheet pan”?
A quarter sheet pan is a small, rimmed baking sheet, typically measuring about 9×13 inches. If you don’t have one, any similar-sized baking dish or pan will work just fine for chilling the mixture.
These Mini Pumpkin Cheesecake Bites are more than just a dessert; they’re a fun, festive activity that results in the most charming treat on your holiday table. They are a guaranteed conversation starter and a delicious way to celebrate the flavors of the season. I hope they bring a little bit of joy and a whole lot of deliciousness to your Thanksgiving gathering. Let me know if they’re the star of your dessert spread in the comments below!