The Ultimate Pumpkin Cheese Ball: Easy, Savory & So Festive!
There are certain recipes that just define a season, and for me, this is the official taste of fall. Forget pumpkin spice for a moment and let’s talk about the ultimate savory centerpiece: The Pumpkin Cheese Ball. When this makes an appearance at a party, it literally stops people in their tracks. First, there’s the…
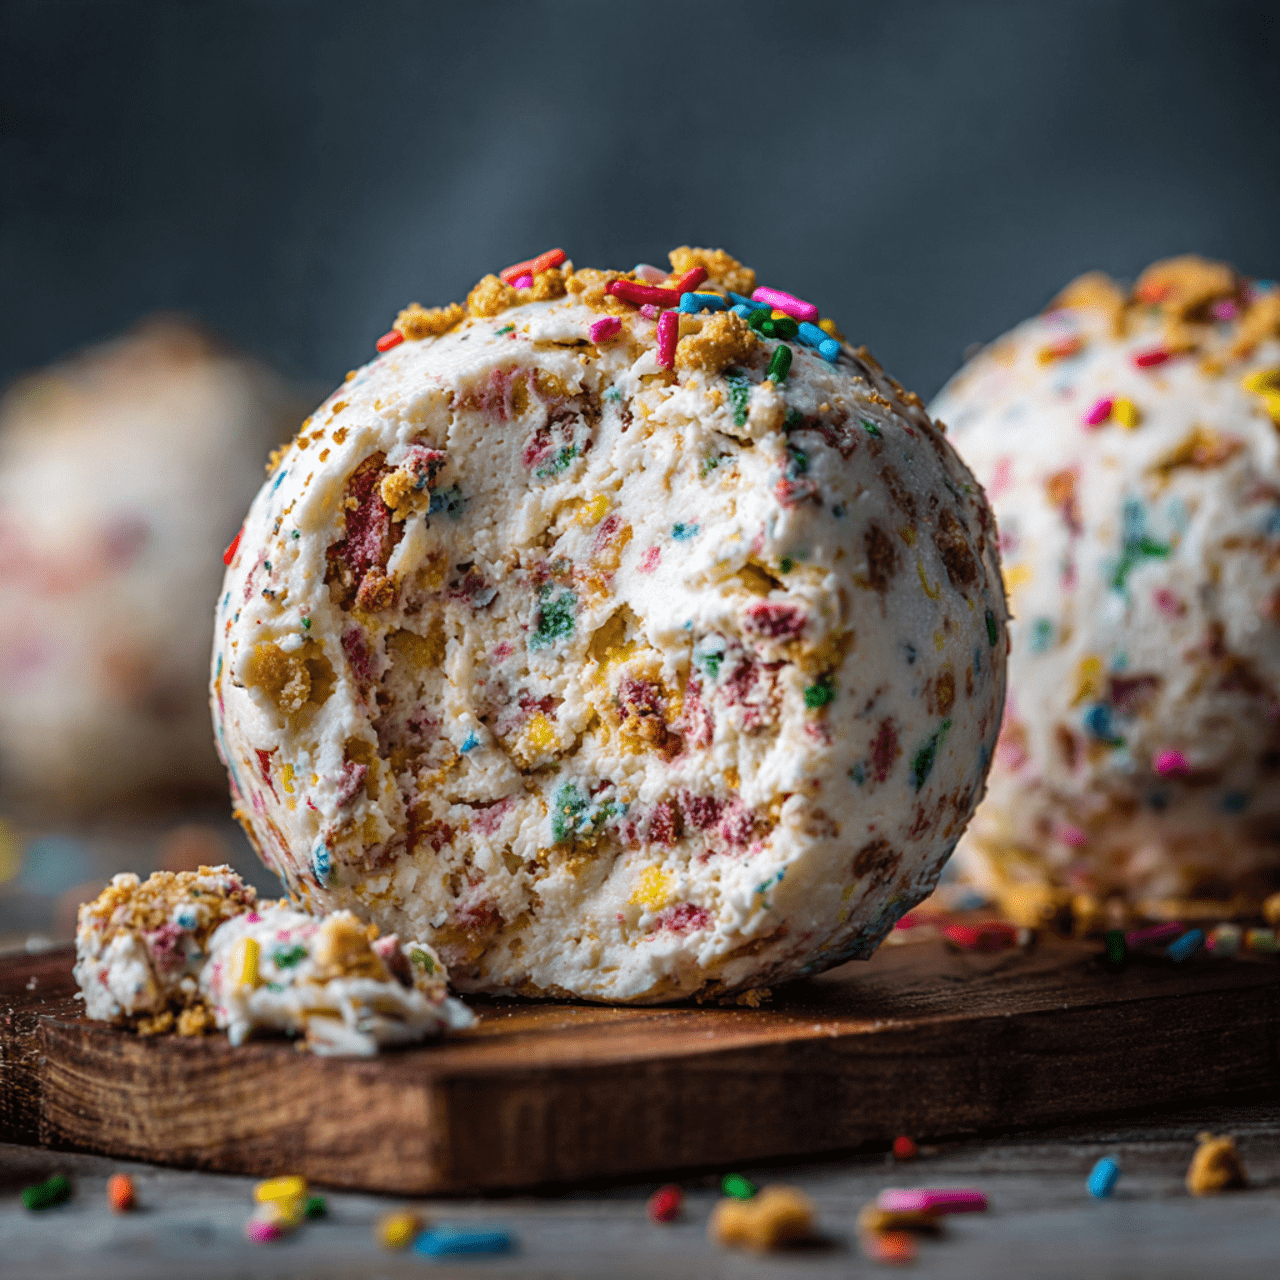
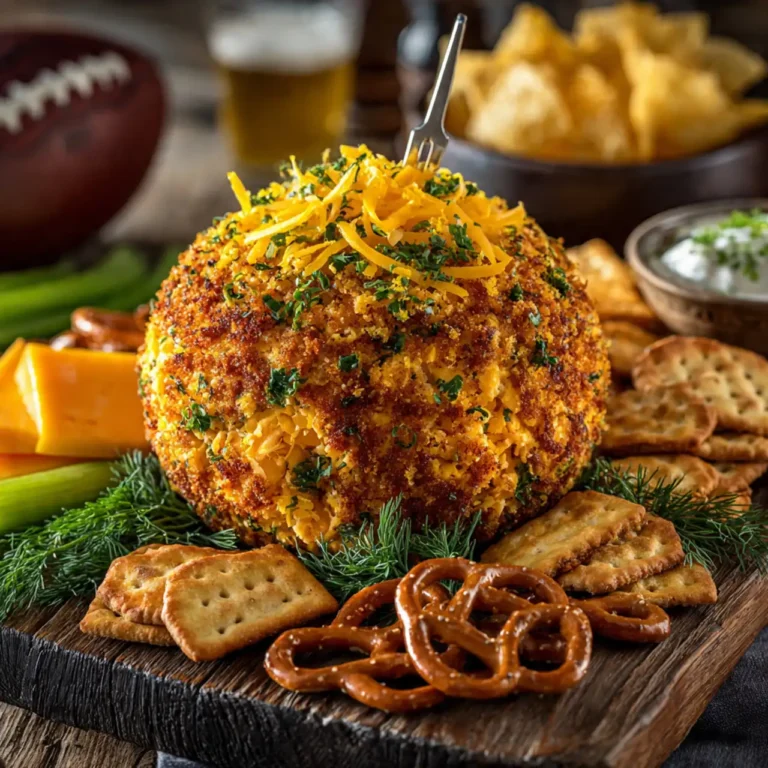
There are certain recipes that just define a season, and for me, this is the official taste of fall. Forget pumpkin spice for a moment and let’s talk about the ultimate savory centerpiece: The Pumpkin Cheese Ball. When this makes an appearance at a party, it literally stops people in their tracks. First, there’s the visual magic. It looks just like a perfect little pumpkin, right down to the clever bell pepper stem and vibrant orange coating. But the real surprise is when people take their first bite. This isn’t a sweet dessert; it’s a gloriously savory, creamy, and completely addictive cheese spread. It’s a masterful blend of tangy goat cheese, sharp cheddar, and smooth cream cheese, packed with the fresh bite of chives, scallions, and a tiny kick of jalapeño. It’s everything you want in a cheese ball, but with a festive, show-stopping presentation that is shockingly easy to pull off. I brought this to a Halloween party once, and it was gone in 30 minutes flat. It’s the appetizer that will make you famous among your friends.

Why This Pumpkin Cheese Ball Will Be the Star of Your Party!
- A Stunning Edible Centerpiece: This appetizer has an incredible “wow” factor. The pumpkin shape is so fun and festive, making it perfect for any fall gathering from Halloween to Thanksgiving.
- Incredibly Savory & Delicious: The flavor combination of sharp cheddar, tangy goat cheese, fresh herbs, and a hint of spice is perfectly balanced and absolutely irresistible.
- Perfect Make-Ahead Appetizer: You can (and should!) make this well in advance. It needs to chill for at least 4 hours, which means less stress on the day of your party.
- Surprisingly Easy to Shape: The impressive pumpkin shape isn’t the work of a professional food stylist. It’s a brilliant and simple trick using plastic wrap and rubber bands!
- A Guaranteed Crowd-Pleaser: It’s a fun, interactive, and completely delicious spread that everyone will gather around. Just add crackers and watch it disappear.
Recipe Snapshot
| Prep Time | 15 minutes |
| Chill Time | 4+ hours |
| Total Time | 5 hours |
| Servings | 8 servings |
| Calories | See recipe card for details |
| Course | Appetizer |
| Cuisine | American |
| Method | No-Bake, Chilling |
Your Patch-Perfect Shopping List
Creating this festive centerpiece requires a handful of simple, high-impact ingredients. Here’s what you’ll need.
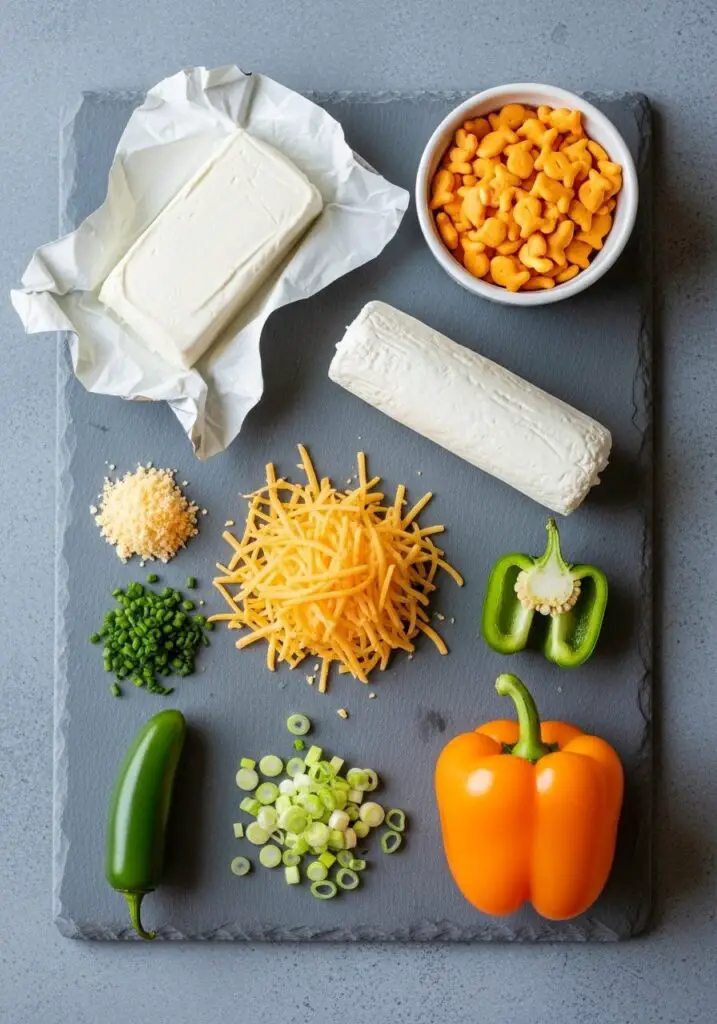
→ For the Cheese Mixture
- Cream Cheese: 8 oz. Make sure it’s softened to room temperature for a smooth, lump-free base.
- Fresh Goat Cheese: 4 oz. Also softened to room temperature. This adds a wonderful, tangy complexity to the flavor.
- Shredded Sharp Cheddar: 2 cups. The classic cheese ball flavor! Sharp cheddar provides a great punch.
- Scallions: 2 of them. You’ll thinly slice the white and light green parts for the cheese mixture.
- Jalapeño: 1 medium. Cored, seeded, and finely chopped for a little bit of warmth without too much heat.
- Fresh Chives: 3 tablespoons, finely chopped. For a mild, fresh oniony flavor.
- Worcestershire Sauce: 1 1/2 teaspoons. Adds a fantastic savory, umami depth.
- Kosher Salt & Freshly Ground Black Pepper: To taste.
→ For the Pumpkin Shape & Serving
- Bell Pepper: 1 of any color. You only need the stem for this recipe! It makes the most realistic-looking pumpkin stem.
- Cheddar Goldfish Crackers: 2/3 cup, finely crushed. This is our secret weapon for the perfect pumpkin-orange color and a delicious, crunchy coating.
- Reserved Scallion Greens: One 6-inch dark green piece from your scallions, for the curly tendrils.
- Crackers and Veggies: For serving with your amazing cheese ball.
Let’s Build a Pumpkin! Crafting Your Cheese Ball, Step-by-Step
Ready for some kitchen magic? This is where we turn a bowl of cheese into a work of art. It’s all in the technique!
Phase 1: Mix the Cheese Base (Time: ~5 minutes)
The foundation of our pumpkin is a perfectly blended, flavorful cheese mixture.
- Combine the Cheeses. In a large bowl, use a sturdy spatula or a hand mixer to stir the softened cream cheese and softened goat cheese together until smooth and fully combined.
- Add Flavorings. Add the shredded cheddar, the sliced white and light green parts of the scallions, the finely chopped jalapeño, chives, and Worcestershire sauce. Stir everything together until it’s evenly incorporated. Give it a taste and season with kosher salt and freshly ground black pepper.
Phase 2: Shape and Chill the Pumpkin (Prep Time: ~10 minutes | Chill Time: 4+ hours)
This is the brilliant trick that creates the iconic pumpkin shape. Don’t skip the long chill time!
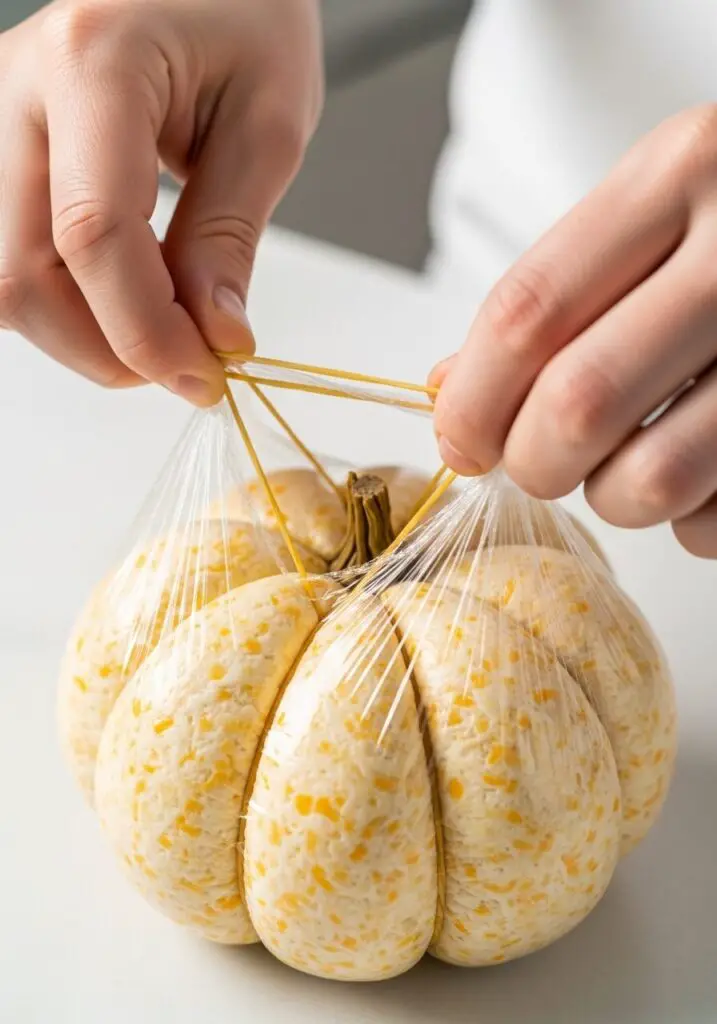
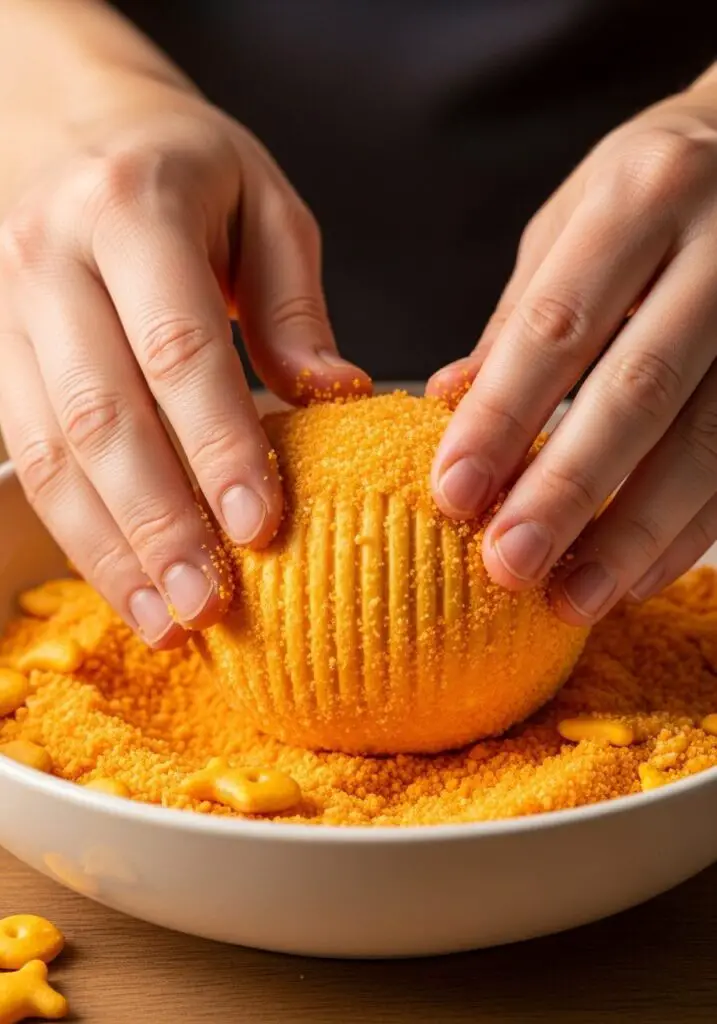
- Form the Ball. Lay one or two large pieces of plastic wrap on your counter. Scrape the cheese mixture into the center. Gather the edges of the plastic wrap and twist them together, forming the cheese into a tight, round ball.
- Create the Ridges. Now for the magic. Take 4 long rubber bands and wrap them around the plastic-covered cheese ball to create 8 evenly spaced sections, just like the ridges on a real pumpkin. You may need to double-wrap the rubber bands if they are too large. They should be snug enough to create deep indents.
- Chill Thoroughly. Place the wrapped and banded cheese ball on a plate and refrigerate for at least 4 hours, or even up to 3 days.
Why it matters: This long chill time is essential. It allows the flavors to meld and, more importantly, makes the cheese ball very firm so it holds its pumpkin shape perfectly.
Phase 3: The Finishing Touches (Time: ~10 minutes)
Once chilled, it’s time for the final, festive transformation.
- Prep the Garnishes. While the cheese ball chills, prepare your stem and tendrils. Carefully cut the stem out of the top of the bell pepper. Cut the reserved dark green scallion part into very thin, long strips and place them in a bowl of ice water in the fridge. The ice water will make them curl up beautifully.
- Crush the Coating. Place the Cheddar Goldfish in a zip-top bag and use a rolling pin or the bottom of a glass to crush them into fine crumbs. Pour the crumbs onto a plate.
- Unwrap and Coat. When the cheese ball is firm, remove it from the refrigerator. Carefully snip and remove the rubber bands and unwrap the plastic. Roll the cheese ball in the crushed Goldfish crumbs until it is completely coated on all sides.
- Add the Stem and Tendrils. Transfer the coated cheese ball to your serving platter. Gently press the bell pepper stem into the indentation at the top. You can remove it, place the curled scallion tendrils inside, and then press the stem back in to secure them.
- Soften and Serve. Let the finished cheese ball sit at room temperature for about 30 minutes to soften slightly, making it easier for your guests to spread. Serve with plenty of crackers and sliced vegetables.
WiseRecipes’ Top Tricks for a Perfect Pumpkin Cheese Ball
- Room Temperature is a Must: Your cream cheese and goat cheese must be fully softened to room temperature. This is the only way to get a perfectly smooth, lump-free mixture without a struggle.
- Don’t Skimp on the Chill Time: I know it’s tempting to rush, but the 4-hour (or longer) chill time is non-negotiable for a firm cheese ball that holds its pumpkin shape after you remove the rubber bands.
- Choose the Right Stem: Look for a bell pepper with a sturdy, shapely green stem. A fresh, thick stem makes for a much more realistic and impressive-looking pumpkin.
- Coat Just Before Serving: For the best texture, coat the cheese ball in the crushed Goldfish crumbs on the day you plan to serve it. This keeps the coating from getting soft in the refrigerator.
- The Ice Water Trick: Don’t skip the ice water bath for the scallion greens! It’s a simple, magical trick that transforms straight strips into beautiful, curly tendrils for that extra-special finishing touch.
The Ultimate Pumpkin Cheese Ball
Ingredients
Equipment
Method
- In a large bowl, stir together the softened cream cheese and goat cheese until smooth. Add the shredded cheddar, white and light green scallion parts, jalapeño, chives, and Worcestershire sauce. Stir until fully incorporated and season with salt and pepper.
- Transfer the cheese mixture to a large piece of plastic wrap. Cover and form into a large, tight ball.
- Using 4 rubber bands, create ridges by wrapping them around the ball, dividing it into 8 sections to resemble a pumpkin. Refrigerate for at least 4 hours or up to 3 days.
- Carefully remove the stem from the bell pepper. Slice the reserved dark green scallion part into long, thin strips and place them in a bowl of ice water to curl.
- When ready to serve, remove the rubber bands and plastic wrap from the cheese ball. Roll the firm cheese ball in the finely crushed Goldfish crumbs until fully coated.
- Transfer the cheese ball to a platter. Press the bell pepper stem into the top. Place the curled scallion tendrils in the indentation around the stem.
- Let the cheese ball soften at room temperature for about 30 minutes before serving with crackers and vegetables.
Notes
Creative & Festive Customizations
Feel free to play with the flavors and colors of your pumpkin cheese ball!
- Use Different Cheeses: Swap the sharp cheddar for a smoked Gouda, a spicy pepper jack, or a sharp white cheddar.
- Try a Different Coating: If you don’t have Goldfish, crushed Cheez-Its or Doritos work great for an orange color. For a more rustic look, you can use finely chopped pecans mixed with a little smoked paprika.
- Add Some Bacon: Crispy, crumbled bacon is a fantastic addition to the cheese mixture for a smoky, salty flavor boost.
- Make it Spicier: For those who like more heat, leave a few seeds in your jalapeño or add a dash of your favorite hot sauce to the cheese mixture.
- Mini Pumpkin Patch: Divide the cheese mixture into 3 or 4 smaller balls and shape them into mini pumpkins. Use smaller bell pepper stems or even a pretzel stick piece for the stems.
- Herbaceous Variation: Add other fresh herbs like dill or parsley to the cheese mixture for a different flavor profile.
- Everything Bagel Pumpkin: Coat the cheese ball in everything bagel seasoning for a completely different but equally delicious flavor.
- Use a Real Pumpkin Stem: If you’re carving pumpkins, wash and dry a small, real pumpkin stem and use that instead of the bell pepper stem for an authentic look!
Make-Ahead Magic: Storing Your Cheese Ball
This appetizer is a host’s best friend because it’s designed to be made ahead of time.
Refrigerator Storage
You can make and shape the cheese ball (wrapped in plastic with rubber bands) up to 3 days in advance and keep it in the refrigerator. On the day of your party, simply unwrap, coat, garnish, and serve. Leftover coated cheese ball can be wrapped tightly in plastic wrap and stored in the fridge for up to 5 days, though the cracker coating may soften over time.
Freezing
You can freeze the cheese ball before coating it. Wrap the uncoated ball tightly in plastic wrap and then in a layer of foil. It can be frozen for up to 1 month. Thaw it in the refrigerator overnight before coating and serving.
FAQs: Your Pumpkin Cheese Ball Questions, Answered!
Can I make this without the goat cheese?
Yes, if you’re not a fan of goat cheese, you can substitute it with an additional 4 ounces of softened cream cheese or even a Boursin-style garlic and herb cheese spread for a different flavor profile.
What if I don’t have rubber bands?
The rubber bands are the easiest method, but you can also use kitchen twine. Wrap the twine around the plastic-wrapped ball in the same way to create the ridges. Alternatively, after the ball is chilled, you can use the back of a butter knife to gently press indentations into the firm cheese before coating it.
Why does my cheese ball need to soften before serving?
A cheese ball straight from the refrigerator will be very firm and difficult to spread, which can lead to a lot of broken crackers! Letting it sit at room temperature for about 30 minutes softens it just enough to become perfectly creamy and spreadable.
What’s the best way to crush the Goldfish crackers?
A food processor will give you the finest, most uniform crumbs in seconds. If you don’t have one, placing them in a sturdy zip-top bag and crushing them with a rolling pin, meat mallet, or the bottom of a heavy glass works perfectly well.
This Pumpkin Cheese Ball is so much more than a simple appetizer; it’s a festive activity, a delicious treat, and a guaranteed conversation starter all in one. It’s the perfect, playful way to kick off any fall celebration, from a spooky Halloween bash to an elegant Thanksgiving dinner. I hope you have a blast making this edible work of art for your friends and family. Let me know how your pumpkin turns out in the comments below!