Tuna Melt Wrap
How I Found My Favorite Tuna Melt Wrap I stumbled on the idea for this Tuna Melt Wrap on a frantic Tuesday evening when I had nothing more than a can of tuna and a stubborn craving for something warm and cheesy. That first version was sloppy and glorious at the same time, and since…
How I Found My Favorite Tuna Melt Wrap
I stumbled on the idea for this Tuna Melt Wrap on a frantic Tuesday evening when I had nothing more than a can of tuna and a stubborn craving for something warm and cheesy. That first version was sloppy and glorious at the same time, and since then I have refined it into something I reach for when I want comfort food that comes together in literally ten minutes. If you ever liked an easy classic tuna melt, this wrap is the handheld, fresher cousin that travels well.
What’s In My Kitchen for This Wrap
I always keep a few pantry heroes ready: a can of tuna, drained; a couple of tablespoons of mayonnaise; a single tablespoon of Dijon mustard; a cup of shredded cheese, usually cheddar or mozzarella depending on the mood; and one whole wheat wrap or tortilla. If I have some lettuce or spinach and a ripe tomato, I add them for color and crunch. Salt and pepper are, of course, there to finish things off. I like to talk through the ingredients as I pull them together because the smell of the tuna hitting the bowl is oddly comforting. Sometimes I think of this as a riff on other wraps I adore, like the Mediterranean tuna wrap I bookmarked once, but simplified for weeknight life.
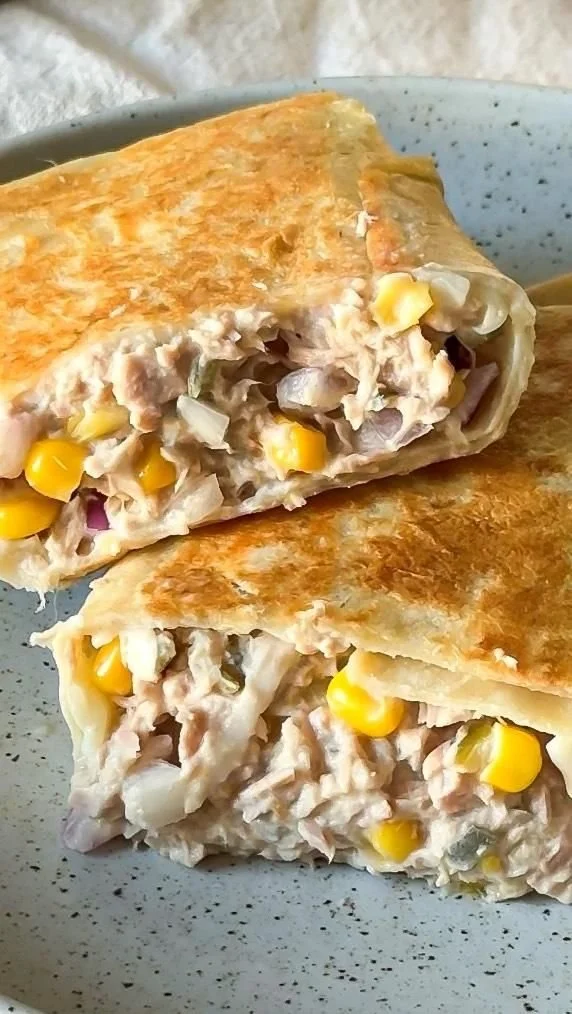
Making the Tuna Filling and Building the Wrap
I start with the tuna: in a bowl, combine the drained tuna, mayonnaise, Dijon mustard, salt, and pepper. Mix until well combined. The texture should be a little chunky so you get those bite-sized pieces in every mouthful. Lay the whole wheat wrap flat on a plate so you can see what you are doing. Spread the tuna mixture evenly over the wrap, keeping the edges clear so it rolls neatly. Top with shredded cheese and then decide whether to add lettuce or spinach and tomato slices if desired. The bright red of the tomato against the melted cheese is so satisfying. Roll the wrap tightly, then slice in half. I usually make a little spiral of foil and parchment if I am taking one to go, but if I am staying home I serve it immediately so the cheese is still melty.
When I first started making this I used more mayo than necessary and the wrap became soggy. Now I stick to about 2 tablespoons of mayonnaise and 1 tablespoon of Dijon mustard; that ratio keeps the filling creamy without drowning the tortilla. If I want a lightly warmed wrap I will briefly sear it seam-side down in a nonstick pan so the cheese melts and the exterior is slightly toasty. Doing that makes a satisfying faint sizzle and a golden color that means it is done right.
A Few Tricks I Swear By
There are a few tricks I offer to friends who ask how I can possibly make such a simple thing taste like more. First, always drain the tuna well; excess liquid is the enemy of a solid roll. Second, spread the tuna toward the center of the wrap and leave space at the ends to avoid filling spillover. Third, if you plan to eat it later, skip the tomato slices until you are ready to eat because they add moisture. I also find that a cup of shredded cheese distributed evenly is perfect; use sharper cheddar if you want more punch, or mozzarella for stretch and mildness. If you like ideas from other quick salads, I sometimes riff on flavors from a 10-minute Mediterranean tuna salad I used to make, adding chopped olives or capers for brine.
These little tips come from trial and error. I remember once packing three wraps for a hike and discovering at the summit that the ends had leaked because I had been generous with mayonnaise. Since then I always do a quick taste check and wipe the edges before rolling.
Getting the Texture Just Right and Knowing When It’s Done
The moment you bite into a good tuna melt wrap you can tell if it was assembled with care. The filling should be creamy but not soupy, the tuna still a little chunky, and the cheese either fully melted if you heated it, or nicely gooey if warmed just a touch. If you press the seam and it holds without bursting, that is another sign it is done right. When I warm the wrap in a pan, I listen for the faint crackle as the moisture escapes and watch the cheese begin to ooze; that’s my cue to flip or take it off the heat. If you are packing these for lunch, I recommend tolerating a snug firmness rather than a loose wrap; it holds together better.
Quick Variations and What I Like to Serve With It
There are a couple of easy variations I return to depending on what’s in the fridge. Sometimes I stir chopped pickles or a spoonful of relish into the tuna for a tangy lift. Other times I add a sprinkle of smoked paprika or a dash of hot sauce for warmth. If I want to switch proteins, I borrow techniques from my favorite cheesy garlic chicken wrap recipe and swap the tuna for shredded rotisserie chicken. A lighter take is to mix in a heap of spinach and a squeeze of lemon for brightness, echoing flavors from a cheesy garlic chicken wrap I make when entertaining.
As for what I serve with it, a simple green salad or a handful of kettle chips makes for a nice contrast. On colder days I pair the wrap with a bowl of tomato soup; the classic tuna melt-plus-soup feeling always makes me feel like a kid again.
When I Make It Ahead and How to Store Leftovers
If I am making these for meal prep, I assemble them but leave the tomato slices out, and then I wrap each one tightly in parchment and foil. They keep well in the fridge for up to two days; if you plan further ahead, freeze them for up to a month and reheat straight from frozen in a low-temperature oven until warmed through. To store leftovers in the fridge, put them in an airtight container or wrap them tightly to prevent the tortilla from drying out. When reheating, I use a skillet over low heat and cover it briefly so the cheese melts without the wrap becoming tough.
Conclusion
If you want a version that inspired me early on, I sometimes compare notes with other cooks and find charming takes like the one on Tuna Melt Wrap – The Food Hussy, and I also enjoy seeing alternative builds at Tuna Melt Wrap – Nibble and Dine. Both gave me small ideas that I folded into my routine, but at the end of the day this simple mix of tuna, two tablespoons mayonnaise, one tablespoon Dijon mustard, a cup of shredded cheese, and a whole wheat wrap with optional lettuce or spinach and tomato slices is the recipe I keep coming back to. Serve it immediately or wrap it up for a ready-to-go lunch, and remember that a little attention to drainage and proportion is what turns a humble sandwich into something satisfying.
Tuna Melt Wrap
Ingredients
Method
- In a bowl, combine the drained tuna, mayonnaise, Dijon mustard, salt, and pepper. Mix until well combined, keeping a chunky texture.
- Lay the whole wheat wrap flat on a plate.
- Spread the tuna mixture evenly over the wrap, leaving space at the edges.
- Top with shredded cheese and optional lettuce or spinach and tomato slices.
- Roll the wrap tightly and slice in half.
- For a warm wrap, briefly sear it seam-side down in a nonstick pan until the cheese melts.