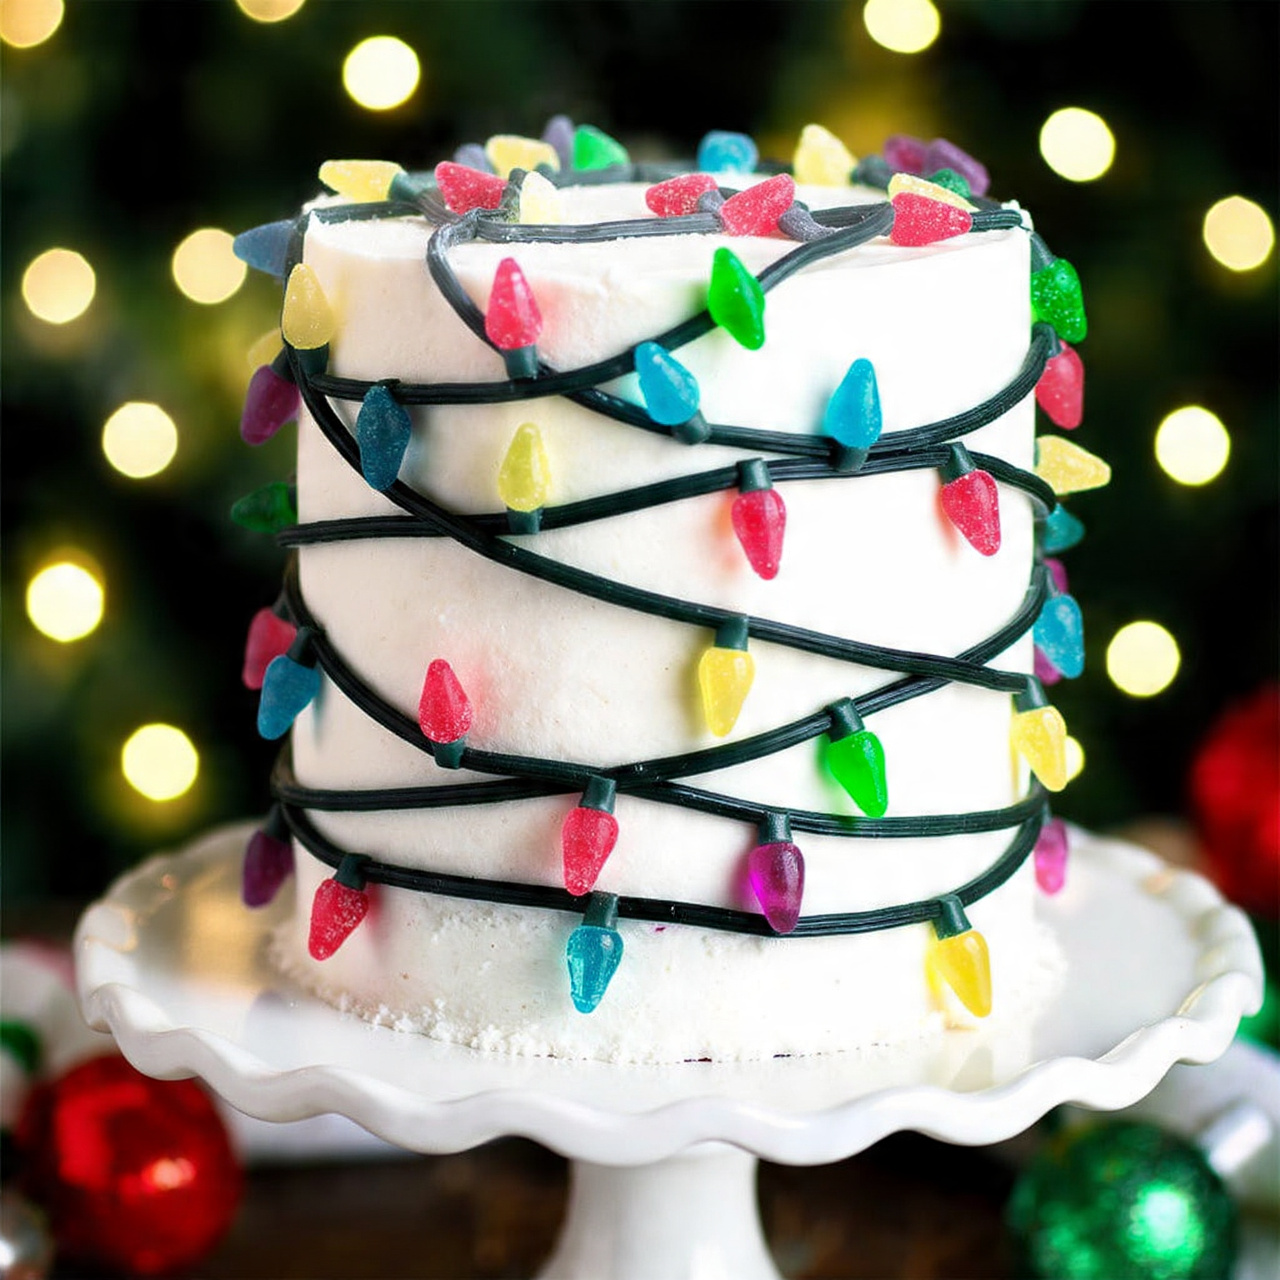
The Ultimate Twinkling Christmas Tree Lights Cake (Easy Holiday Treat!)
Imagine a stunning, festive Christmas cake that looks like it’s covered in glowing, old-fashioned tree lights, ready to light up your holiday table. Now, imagine you created this masterpiece in just 20 minutes, with no baking required. That, my friends, is the pure, genius magic of this Twinkling Christmas Tree Lights Cake. This is, without…
Imagine a stunning, festive Christmas cake that looks like it’s covered in glowing, old-fashioned tree lights, ready to light up your holiday table. Now, imagine you created this masterpiece in just 20 minutes, with no baking required. That, my friends, is the pure, genius magic of this Twinkling Christmas Tree Lights Cake. This is, without a doubt, the most impactful and easiest holiday dessert hack you will ever find.
I promise you, there is no greater holiday delight than watching this cake come to life. The black sparkle gel creates the perfect “wire,” and the sour candies, when snipped in half, look exactly like oversized, colorful Christmas light bulbs. It’s a wonderfully creative activity that results in a truly impressive centerpiece for your dessert table.
Get ready to transform a humble grocery store cake into a work of art, a festive treat so fun and clever that everyone will think you’re a cake decorating genius.

Why This Cake Hack is a Holiday Game-Changer
You are going to be completely amazed by how simple and stunning this project is. It’s the perfect way to add a personal touch to a store-bought dessert. Here’s why:
- A 20-Minute Masterpiece: This entire decorating project takes just 20 minutes from start to finish, making it the ultimate stress-free holiday dessert.
- Absolutely No Baking Required: Let the grocery store bakery do the hard work! This is all about the fun of decorating, not the stress of baking.
- Incredibly Fun and Creative: Piping the “wires” and placing the candy “lights” is a wonderfully artistic and satisfying process. It’s a perfect holiday activity to do with kids!
- A Total Show-Stopper: The finished cake looks so clever and festive. It’s a guaranteed centerpiece that will have all your guests talking.
- Deliciously Fun to Eat: It’s a classic white cake with vanilla frosting, elevated with the fun, chewy, sour-then-sweet surprise of the candy lights!
Recipe Snapshot
| Prep Time | 20 minutes |
| Cook Time | 0 minutes |
| Total Time | 20 minutes |
| Servings | 12 servings |
| Calories | 520 kcal per serving (estimated) |
| Course | Dessert |
| Cuisine | American |
| Difficulty/Method | Easy / No-Bake |
Your 3-Ingredient Shopping List
This impressive dessert comes together with just three simple, store-bought items!

→ For the Christmas Lights Cake
- One double-layer 9-inch white cake with vanilla frosting → The blank canvas for your masterpiece! Pick up a plain, smooth-frosted one from your local bakery or grocery store.
- One 3.5-ounce tube black sparkle gel → This is the perfect edible “wire” for your string of lights.
- One 14-ounce bag sour candies (like Sour Patch Kids) → Their shape, when cut, is perfect for old-fashioned Christmas light bulbs!
Let’s Decorate! Your Step-by-Step Guide
Ready to create the most festive cake of the season? It’s all in the decorating details.
Part 1: Decorate the Top of the Cake
- Pipe the “Wires”: Using the tube of black sparkle gel, carefully pipe three curved arcs across the top of the cake to create the main wires for your lights.
- Pipe the “Sockets”: Along each arc, pipe tiny little rectangles hanging down, spaced about a half-inch apart. These will be the sockets for your candy light bulbs.
- Prepare the “Lights”: Using a pair of clean kitchen shears, snip your sour candies in half. You’ll be using the rounded ends, which look just like vintage light bulbs!
- Add the Lights: Gently press the flat, cut side of each candy half onto the frosting, right beneath one of the black rectangle “sockets.” Alternate the colors to create a festive, twinkling string of lights
Part 2: Decorate the Sides of the Cake
- Pipe the Swags: Now, let’s decorate the sides! Pipe the black sparkle gel in wide, looping swags around the entire circumference of the cake, connecting the ends of each swag.
- Add More Sockets and Lights: Just like you did on top, pipe the small rectangle sockets hanging down from the swagged wire. Then, press your candy “light bulbs” underneath each socket.
- Serve Your Masterpiece: That’s it! Your beautiful, festive cake is ready to be the star of the dessert table.
Christmas Tree Lights Cake with Sour Candy Bulbs
Ingredients
Equipment
Method
- With the black sparkle gel, pipe three arcs across the top of the cake to create ‘wires.’
- Draw tiny rectangles hanging off each arc, spaced about 1/2 inch apart, to create ‘sockets.’
- Snip the sour candies in half with kitchen shears, using only the rounded ends for the ‘lights.’
- Place each rounded candy end beneath a piped rectangle, attaching the flat, cut side to the frosting.
- Next, decorate the sides of the cake. Pipe wide, looping swags of black gel around the circumference.
- Pipe rectangle sockets hanging off the swags and place candy lights under each one, just as you did on top of the cake. Serve and enjoy!
Notes
WiseRecipes’ Top Tips for a Perfect Lights Cake
These simple secrets will help make your cake decorating project a huge success.
- Start with a Cold Cake. For the cleanest piping, make sure your store-bought cake is well-chilled. This firms up the frosting and makes it much easier to pipe the sparkle gel without smudging.
- Do a Practice Pipe. Before you start on the cake, squeeze a little of the black sparkle gel onto a plate to get a feel for the pressure and flow. This will help you create confident, smooth lines on the cake itself.
- Prep Your Candies First. Snip all the sour candies you think you’ll need before you start decorating. Having a pile of colorful “bulbs” ready to go makes the assembly process fast, fun, and efficient.
- Get the Kids Involved! This is the ultimate kid-friendly decorating project. Let them be in charge of placing the colorful candy lights onto the cake after you’ve piped the wires. They will be so proud of the final result!
- Embrace Imperfection! Don’t worry if your lines aren’t perfectly straight or your sockets aren’t all the same size. The charm of this cake is in its whimsical, homemade feel. It’s supposed to look fun and festive!
Keep It Fresh! Storing Your Decorated Cake
Here’s how to store your beautiful creation until you’re ready to serve it.
- Storage: The decorated cake should be stored in the refrigerator. You can keep it in the box it came in or in a dedicated cake carrier. It will stay fresh for up to 3 days.
- Serving: For the best flavor and texture, let the cake sit at room temperature for about 20-30 minutes before slicing and serving.
FAQs: Your Christmas Lights Cake Questions, Answered!
What if I can’t find black sparkle gel?
No problem! You can use any black decorating icing in a tube with a small round tip. If you’re really in a pinch, you can even make your own by mixing a little black food coloring into some of the vanilla frosting from the cake (if there’s extra) or by making a simple black icing with powdered sugar and a drop of milk.
Can I use a homemade cake?
Absolutely! This decorating technique will work beautifully on any homemade cake with a smooth, light-colored frosting, like vanilla or cream cheese buttercream.
What other candies would work as “lights”?
Gumdrops would be a fantastic substitute! You could use them whole or snip them in half. Small, colorful jelly beans would also work well. Get creative with what you can find in the candy aisle!
What’s the best way to cut the sour candies?
A clean pair of kitchen shears is definitely the easiest tool for the job. They will snip right through the gummy candy. If they get a little sticky, you can lightly coat the blades with nonstick cooking spray.
Final Thoughts: Your Easiest Holiday Show-Stopper
There is nothing more rewarding than creating a dessert that brings an instant smile to everyone’s face. This Twinkling Christmas Tree Lights Cake is all about pure, simple holiday fun. It proves that you don’t need to be a professional baker to make a truly magical and memorable centerpiece for your Christmas celebration. I hope this easy project brings a little extra sparkle to your holiday table. Happy Decorating!