The Ultimate Juicy Lucy (Perfect Cheese-Stuffed Burgers!)
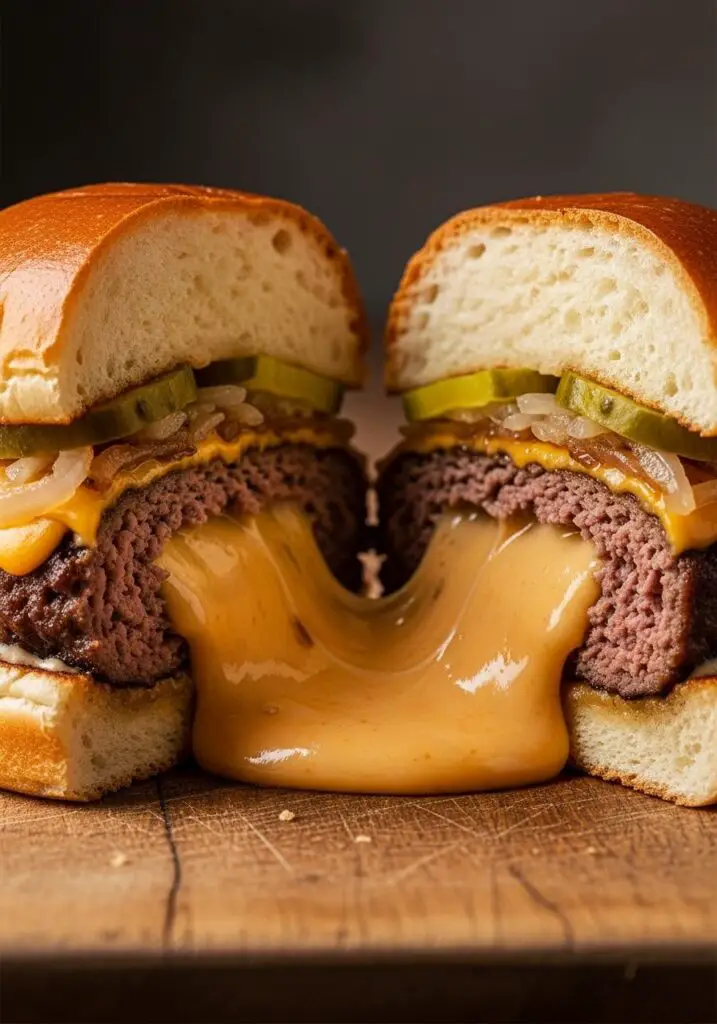
Imagine the perfect cheeseburger. Now, what if instead of a slice of cheese on top, there was a molten, gooey, lava-like core of melted cheese hidden inside the patty, just waiting to erupt with the first bite? That, my friends, is the legendary, jaw-dropping magic of the Juicy Lucy, and today, we are going to…
Imagine the perfect cheeseburger. Now, what if instead of a slice of cheese on top, there was a molten, gooey, lava-like core of melted cheese hidden inside the patty, just waiting to erupt with the first bite? That, my friends, is the legendary, jaw-dropping magic of the Juicy Lucy, and today, we are going to master this icon of American comfort food.
Here’s the thing about a Juicy Lucy: it seems like a high-risk, high-reward endeavor. We’ve all heard the horror stories of cheese blowouts and burgers bursting on the grill. I used to be intimidated, too! But I’ve learned that the secret to a perfect, leak-proof Juicy Lucy isn’t about luck; it’s about a few key techniques in forming and sealing the patty. This recipe is my foolproof guide to achieving that glorious, cheese-filled center every single time.
I promise you, there is no greater burger triumph than cutting into one of these patties and witnessing that spectacular flow of melted cheese. Topped with a pile of deeply sweet, jammy caramelized onions, this isn’t just a burger; it’s an event. It’s a show-stopper that will make your backyard barbecue or Sunday dinner legendary.
Get ready to create the most decadent, delicious, and talked-about burger you have ever made from scratch.
Why This Is the Best Juicy Lucy Recipe Ever!
You are going to be so incredibly proud of these burgers. They are a true labor of love that is easier than you think and worth every single step. Here’s why this recipe is a keeper:
- The Epic Molten Cheese Center: This recipe provides the foolproof method for creating a perfect, lava-like core of melted cheese that stays inside the burger until you cut into it.
- Incredibly Juicy & Flavorful Patties: The blend of ground beef and sirloin creates the perfect fat ratio for a burger that’s rich in flavor and unbelievably juicy.
- Perfectly Sweet Caramelized Onions: The slow-cooked, jammy onions are the perfect sweet and savory topping to balance the rich, cheesy burger.
- That Perfect Cast-Iron Crust: Searing the burgers in a screaming-hot cast-iron skillet creates a deep brown, unbelievably delicious crust that you just can’t get on a grill.
- The Ultimate Burger Experience: This is more than just a burger; it’s a decadent, memorable meal that is guaranteed to impress your family and friends.
Recipe Snapshot
| Prep Time | 10 minutes |
| Cook Time | 1 hour (includes onions) |
| Total Time | 1 hour 10 minutes |
| Servings | 6 servings |
| Calories | 797 kcal per serving |
| Course | Main Course |
| Cuisine | American |
| Difficulty/Method | Intermediate / Stovetop |
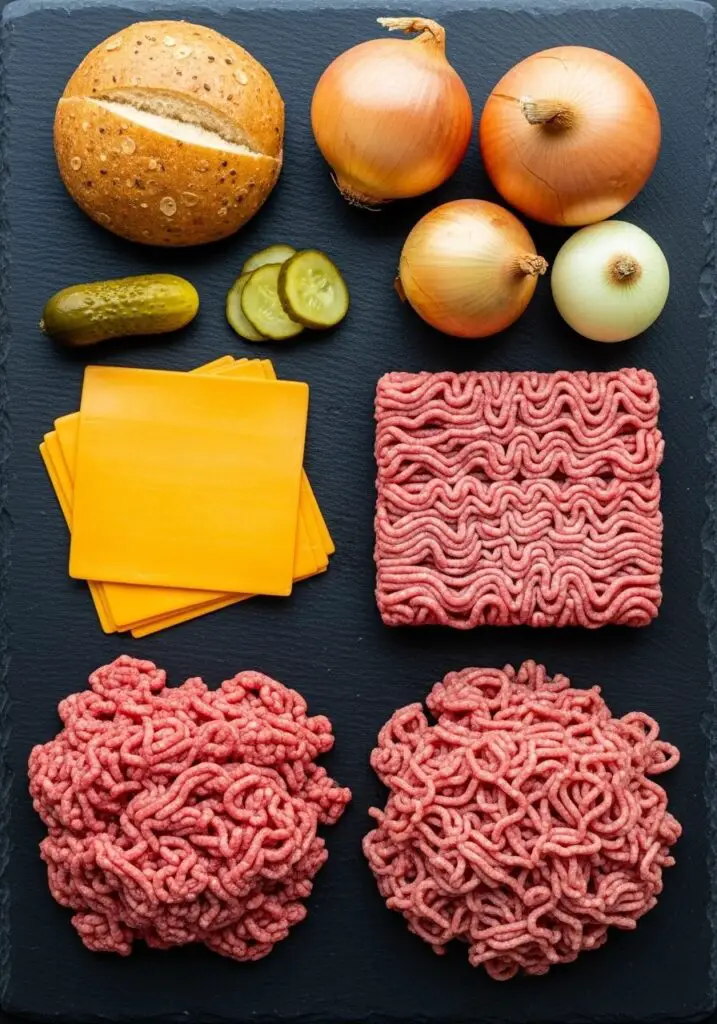
Your Shopping List for This Epic Burger
This recipe uses simple, classic ingredients to create something truly spectacular.
→ For the Caramelized Onions
- 1/4 cup salted butter → The rich base for slow-cooking our onions.
- 3 lb. yellow onions, thinly sliced → They cook down into a sweet, jammy condiment.
- 2 Tbsp. balsamic vinegar → Adds a perfect tangy depth to finish the onions.
→ For the Juicy Lucy Patties
- 1 lb. ground beef (80/20) & 1 lb. ground sirloin (90/10) → This specific blend creates the ideal flavor and fat content for a juicy burger.
- 1 Tbsp. Worcestershire sauce → A secret weapon for a deep, savory, umami flavor in the meat.
- 1 tsp. kosher salt & 1 tsp. ground black pepper → For perfectly seasoning the patties.
- 9 slices American Cheese → The non-negotiable secret to a perfect, molten, non-greasy cheese pull.
- 1 Tbsp. vegetable oil → For getting that perfect sear in the skillet.
→ For Assembly
- 6 potato buns → Their soft, sturdy texture is perfect for holding up to this juicy burger.
- Dill pickle slices → For a classic, tangy crunch.
Let’s Get Cooking! Your Step-by-Step Guide
Ready to create a burger masterpiece? It starts with a little patience for those amazing onions.
Part 1: The Jammy Caramelized Onions
- Melt the Butter: In a 12-inch cast-iron skillet or other heavy-bottomed pan, melt the butter over medium heat.
- Slow Cook the Onions: Once the butter is bubbling, add the mountain of thinly sliced onions. Cook, stirring frequently, for 2 minutes, then reduce the heat to low. Continue to cook, stirring occasionally, for 45 to 50 minutes. This slow process is crucial! The onions will slowly transform into a deep golden brown, sweet, and jammy delight.
- Deglaze with Vinegar: Add the balsamic vinegar, stir to combine, and cook for 2 more minutes, scraping up any delicious browned bits from the bottom of the pan. Transfer the finished onions to a plate and set aside.
Part 2: Form the Cheese-Stuffed Patties
- Mix the Meat: In a large bowl, combine the ground beef, ground sirloin, Worcestershire sauce, salt, and pepper. Use your hands to gently mix until just combined. Do not overwork the meat!
- Form the Disks: Divide the meat mixture into 6 equal portions. Then, divide each of those portions in half again, giving you 12 smaller portions. Gently pat each of these into a thin, 4-inch disk.
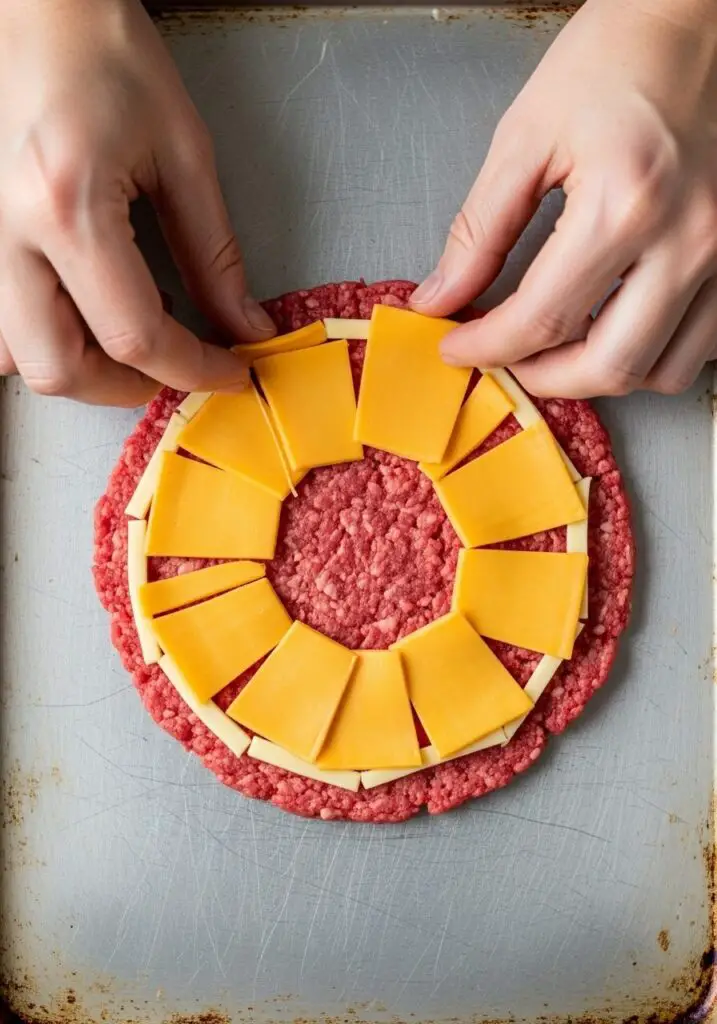
- Stuff with Cheese: On 6 of the patties, fan 6 quarters of American cheese (1.5 slices total) in a circle, making sure to leave a clean ½-inch border all the way around.
- Seal the Deal: Place one of the remaining meat patties on top of the cheese. Firmly pinch and press the edges of the top and bottom patties together to create a tight, complete seal all the way around. Gently pat the sealed patty to ensure it’s a uniform disk. This seal is the most important step!
Part 3: The Perfect Sear
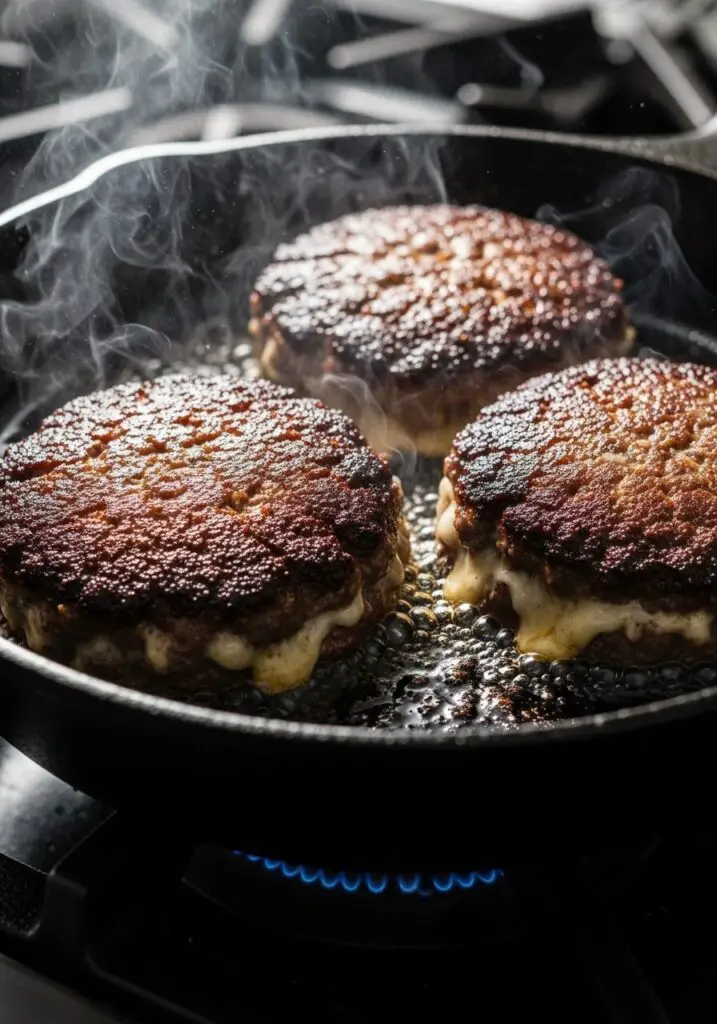
- Heat the Skillet: Heat the same (now empty) cast-iron skillet over high heat. Add the vegetable oil and swirl to coat the pan. The pan should be screaming hot.
- Sear the Patties: Carefully place the patties in the hot skillet (work in batches if needed). Cook for 2 to 3 minutes on the first side, undisturbed, until a deep golden-brown crust forms.
- Flip and Finish: Flip the burgers and cook for another 2-3 minutes on the other side for a medium-rare to medium burger.
- Rest the Burgers!: This is crucial! Transfer the cooked burgers to a cutting board or plate and let them rest for at least 5 minutes. This allows the juices to redistribute and the molten cheese inside to set up slightly.
Part 4: Assemble Your Masterpiece
- Warm the Onions: While the burgers rest, place the caramelized onions back in the warm skillet over low heat to gently rewarm them.
- Build Your Burger: Place a few dill pickle slices on the bottom bun. Top with a hot Juicy Lucy patty, a generous pile of the warm caramelized onions, and finally, the top bun. Serve immediately and prepare for amazement!
WiseRecipes’ Top Tips for Juicy Lucy Mastery
These are the non-negotiable rules for achieving a perfect, leak-proof Juicy Lucy with an incredible crust.
- American Cheese is the Law. This is not the time for fancy, artisanal cheese. Classic, processed American cheese is the undisputed champion for a Juicy Lucy because it melts into a perfectly smooth, gooey, liquid-gold consistency without breaking or becoming greasy.
- The Seal is Everything. Take your time when pinching the edges of the two patties together. You need to create a complete, airtight seal around the entire circumference to keep that molten cheese treasure inside.
- Don’t Overwork the Meat. When you mix your ground beef and seasonings, do it gently and only until everything is just combined. Overworking the meat will result in a tough, dense burger.
- A Screaming-Hot Cast-Iron Pan is Your Best Friend. For that signature, deep-brown, delicious crust (the Maillard reaction!), you need a heavy-bottomed pan and high heat. A cast-iron skillet is the perfect tool for the job.
- Let the Burgers Rest! I know it’s torture to wait, but resting the cooked patties for at least 5 minutes is absolutely essential. It allows the meat juices to redistribute (making the burger juicier) and gives the molten cheese a moment to cool down just enough so it doesn’t all gush out at once.
The Ultimate Juicy Lucy Burger
Ingredients
Method
- Melt butter in a 12-inch cast-iron skillet over medium heat. Add onions and cook for 2 minutes. Reduce heat to low and cook, stirring occasionally, for 45 to 50 minutes until deep golden brown. Add balsamic vinegar, cook 2 more minutes, then transfer onions to a plate.
- In a large bowl, gently combine the ground beef, ground sirloin, Worcestershire sauce, salt, and pepper.
- Divide the mixture into 6 portions, then divide each of those in half (12 total small portions). Pat each into a 4-inch disk.
- In the center of 6 patties, arrange 6 cheese quarters in a circle, leaving a ½-inch border. Top with the remaining 6 patties. Pinch the sides firmly to create a complete seal.
- Heat the same cast-iron skillet over high heat. Add vegetable oil. Place the patties in the skillet and cook for 2 to 3 minutes until a golden crust forms.
- Flip and cook the other side until seared, about 2-3 minutes for medium-rare.
- Remove patties to a cutting board and let rest for at least 5 minutes.
- Gently warm the caramelized onions in the pan over low heat.
- Assemble the burgers by placing pickles on the bottom bun, then the patty, then onions, and finally the top bun.
Notes
Keep It Fresh! Storing and Reheating
While a Juicy Lucy is at its absolute peak fresh off the skillet, here’s how to handle any potential leftovers.
- Refrigerator: Store leftover cooked patties and caramelized onions in separate airtight containers in the refrigerator for up to 3 days.
- Reheating: For the best result, reheat the burger patty in a hot skillet for a minute or two per side to re-crisp the exterior, or in an oven/air fryer. The cheese center may not be as molten as when it was fresh. Reheat the onions gently in a pan. Avoid the microwave, as it will make the burger tough.
FAQs: Your Juicy Lucy Questions, Answered!
Why did all the cheese leak out of my burger?
This is the classic Juicy Lucy tragedy! It’s almost always because the seal around the edges of the two patties wasn’t completely airtight. You really have to firmly pinch and press the meat together all the way around to create a solid wall to hold in that delicious cheese.
Can I grill these burgers?
You can, but it’s much riskier. The direct flame of a grill makes it easier for a small hole to form and a cheese blowout to occur. The flat, even surface of a cast-iron skillet provides a much safer and more reliable cooking method for a cheese-stuffed burger, and it also gives you a better crust!
Can I use a different type of cheese?
You can experiment, but be warned! Most other cheeses (like cheddar, Swiss, or provolone) have a higher melting point and will “break” when they get very hot, separating into oil and solids. This can lead to a greasy, clumpy texture inside. American cheese is chemically designed to melt perfectly, which is why it’s the classic choice.
What’s the ideal meat blend for burgers?
The 80/20 (80% lean, 20% fat) and 90/10 (90% lean, 10% fat) blend used here is fantastic. The fatter 80/20 ground beef brings the juice and flavor, while the leaner 90/10 ground sirloin adds a rich, beefy texture. This combination creates a burger that is both juicy and structurally sound.
Final Thoughts: Your Ultimate Burger Victory
There is nothing quite like the experience of biting into a perfect Juicy Lucy for the first time. It’s a true celebration of all things delicious: juicy beef, a killer crust, sweet onions, and of course, that incredible, unforgettable molten cheese center. It’s a burger that creates memories, and I hope this guide gives you the confidence to make this legendary masterpiece in your own kitchen. Happy cooking!