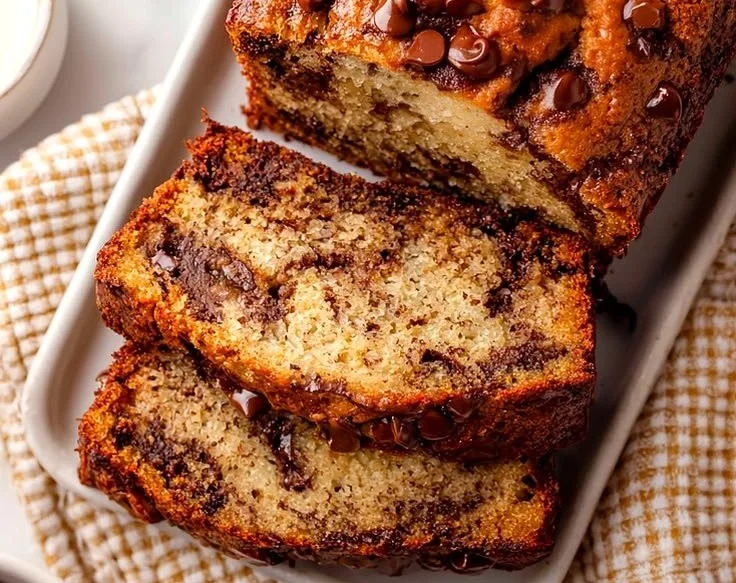
Ultimate Moist Banana Bread
The Banana on the Windowsill When I was ten, my parents kept a row of bananas on the kitchen windowsill until they looked like little brown moons. One afternoon I stole one, mashed it in a bowl with a spoon and fed the mash to the oven like it was a tiny, domestic offering. That…
The Banana on the Windowsill
When I was ten, my parents kept a row of bananas on the kitchen windowsill until they looked like little brown moons. One afternoon I stole one, mashed it in a bowl with a spoon and fed the mash to the oven like it was a tiny, domestic offering. That first loaf—uneven, slightly sunken, impossibly fragrant—felt like stealing a moment of joy. Years later I still make the same simple recipe when I want comfort that smells like childhood. If you like a bit of chocolate with your nostalgia, try this chocolate-espresso banana bread for a more grown-up kick.
Why I Mash and Melt Together
This bread succeeds because it’s honest: ripe bananas, melted butter, a few pantry staples, and a forgiving method. Here is the complete ingredients list I reach for every time: 3 pieces ripe bananas, mashed (The riper your bananas, the sweeter and moister your bread will be.), 1/3 cup melted butter, 1 teaspoon baking soda, 1 pinch salt, 3/4 cup sugar (Can reduce to 1/2 cup for less sweetness.), 1 large egg, beaten, 1 teaspoon vanilla extract, 1 cup all-purpose flour, 1/2 cup walnuts or chocolate chips (Optional add-ins for extra flavor.)
Why each one matters: the bananas are the flavor and moisture engine; butter softens crumb and carries flavor; baking soda gives lift; sugar balances acidity and deepens color; the egg binds and gives structure; vanilla brightens; flour is the skeleton; nuts or chips add texture. If you want a chocolate-studded twist that’s slightly different, you can compare notes with this chocolate chip version I sometimes make when company is coming.
A small lesson learned early: mash the bananas until mostly smooth but leave a few small lumps—they give the bread a pleasing, rustic texture.
The Fifteen-Minute Stir and the Oven’s Role
My approach is straightforward and intentionally gentle. There’s a rhythm to it: melt, mash, mix, pour, wait. Here’s how that looks in practice, woven into the little ritual I’ve followed since the windowsill experiment.
- Preheat the oven to 350°F (175°C). Grease a 9×5-inch loaf pan or line it with parchment.
- In a mixing bowl, mash the 3 ripe bananas until mostly smooth. Stir in the 1/3 cup melted butter right away so the butter cools slightly and integrates with the bananas.
- Add 1 teaspoon baking soda and 1 pinch salt; stir. Then mix in 3/4 cup sugar (or 1/2 cup if you prefer it less sweet). Fold in the 1 large beaten egg and 1 teaspoon vanilla extract.
- Gently fold in 1 cup all-purpose flour until just combined—overmixing will make the loaf tough. If you’re adding 1/2 cup walnuts or chocolate chips, fold them in at the very end.
- Pour the batter into your prepared pan and smooth the top. Slide it into the oven.
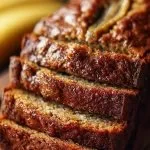
Baking: the oven is where things transform. Bake at 350°F for about 50–60 minutes. Start checking at 50 minutes: a toothpick inserted in the center should come out with a few moist crumbs, not raw batter. The loaf should be golden and slightly domed, and the edges will begin to pull away from the pan. If the top browns too quickly but the center is underdone, tent loosely with foil.
How to know when it’s done right: look for bounce. Press the top lightly—if it springs back and the interior passes the toothpick test, you’re there. The aroma is another guide: a deep, toasty banana scent means the sugars have caramelized nicely.
Tip: if your bananas are perfectly yellow and not spotted, pop them in a 300°F oven on a sheet for 15–20 minutes until blackened and sweetened; it’s a shortcut to concentrated banana flavor.
When the Butter Starts to Brown (and Other Small Things)
There’s a dangerous pleasure in watching butter go from melted to browned. For this loaf I don’t brown the butter—melted is fine—but if you want a nuttier, richer note, brown the 1/3 cup and cool slightly before mixing into the bananas. Small changes like that change the mood of the bread.
Practical tips I rely on:
- Use very ripe bananas. The riper the bananas, the sweeter and moister your bread will be.
- Don’t overmix after adding flour—streaks of flour are okay.
- If using chocolate chips, toss them in a teaspoon of flour first to prevent sinking.
Variations and substitutions (try one at a time):
- Swap 1/2 cup of the flour for whole-wheat for a nuttier flavor and denser crumb.
- Replace butter with 1/3 cup coconut oil or mild olive oil for dairy-free bread.
- Add a teaspoon of cinnamon and a pinch of nutmeg for a spiced version, or fold in 1/2 cup mashed pumpkin for autumnal warmth.
For another chocolate-forward take that keeps the crumb moist but flips the flavor profile, I sometimes consult a different alternate chocolate chip recipe before tweaking my own batter.
Slices, Storage and Leftovers
I love this loaf warm from the pan with a smear of butter, but it’s equally good toasted the next day. Serve it alongside coffee or a simple yogurt for breakfast, or as a late-afternoon pick-me-up. Slices pair beautifully with nut butter, a smear of cream cheese, or a drizzle of honey.
Storage: wrap the cooled loaf tightly in plastic or place in an airtight container. It will keep at room temperature for up to three days, refrigerated for up to a week (bring to room temp before serving for best flavor), or frozen for up to three months—slice first and freeze between layers of parchment.
Leftover idea: turn thick slices into French toast for a decadent weekend brunch—the banana sugars caramelize in the pan and feel like a celebration.
Personal touch: I always save one top slice for myself—the first post-bake bite is a small ritual. Sometimes I hide the slice to make sure no one else steals it.
Conclusion
If you want a tested variation to compare textures and moisture levels, I like to read through The Ultimate Moist Banana Bread – Design Eat Repeat for inspiration and technique ideas before I experiment with my loaf.
Banana Bread
Ingredients
Method
- Preheat the oven to 350°F (175°C) and grease a 9x5-inch loaf pan or line it with parchment.
- In a mixing bowl, mash the 3 ripe bananas until mostly smooth.
- Stir in the 1/3 cup melted butter and let it cool slightly.
- Add the 1 teaspoon baking soda and 1 pinch salt; stir.
- Mix in the 3/4 cup sugar (or 1/2 cup if you prefer it less sweet).
- Fold in the 1 large beaten egg and 1 teaspoon vanilla extract.
- Gently fold in the 1 cup all-purpose flour until just combined—do not overmix.
- If using, fold in the 1/2 cup walnuts or chocolate chips.
- Pour the batter into the prepared pan and smooth the top.
- Bake at 350°F for about 50–60 minutes. Start checking at 50 minutes.
- A toothpick inserted in the center should come out with a few moist crumbs.
- The loaf should be golden and slightly domed, and edges will begin to pull away from the pan.
- If the top browns too quickly but the center is underdone, tent loosely with foil.
- Let cool, slice, and enjoy with butter or as a toasted snack the next day.