Adorable Easter Strawberries Recipe Tutorial
The spring afternoon that started with one strawberry I remember the first time I dipped a strawberry and felt unexpectedly giddy. It was the sort of small kitchen experiment that turns an ordinary afternoon into a celebration. That day I was thinking of colors, not recipes, and by the time I finished I had a…
The spring afternoon that started with one strawberry
I remember the first time I dipped a strawberry and felt unexpectedly giddy. It was the sort of small kitchen experiment that turns an ordinary afternoon into a celebration. That day I was thinking of colors, not recipes, and by the time I finished I had a platter that looked like a basket of tiny Easter eggs. If you like seasonal kitchen projects that stretch into party decorations, I once paired these with a savory main that used similar playful plating ideas, inspired by a chicken shawarma crispy rice salad I’d tried last year.
This piece is less of a rigid recipe card and more of a guided exploration. I’ll walk you through what I learned while experimenting with colors, textures, and simple techniques so your strawberries look intentional, not messy.
What you should have on the counter
I like to gather everything first and treat the process like an art project.
- 15-20 Strawberries
- 1 Cup Wilton’s White Chocolate Discs
- 1/3 Cup Wilton’s Chocolate Discs (Pink, Yellow, Teal, Orange)
- Assorted Easter Sprinkles
A few extra tools I recommend: a microwave-safe bowl for each color, parchment paper, a fork or dipping tool, and a baking sheet. Having a small glass of warm water and paper towels handy is useful too.
The Chocolate Experiments — and the exact method I ended up following
At first I tried melting everything together and layering in the same bowl. That was a mistake. Separating colors is better. Here is the method I ultimately used, which works every time when you follow the order:
, 1. Place each chocolate color in separate microwavable bowls. Melt Chocolate according to package directions.
, 2. Make sure strawberries are completely dried, the chocolate will seize up if they are wet.
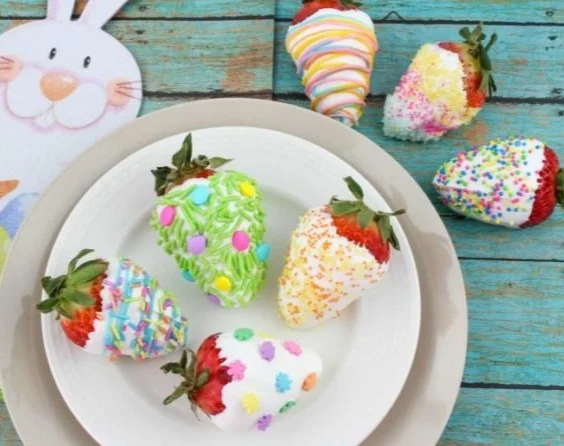
, 3. Dip one strawberry into the white chocolate and place on a parchment lined cookie sheet. Let dry completely before drizzling with other colors of chocolate. Dip another strawberry and immediately add Easter sprinkles.
Any combination works, you can just have sprinkles, or just colored chocolate drizzle or both. Have fun creating different designs!
Serve and Enjoy!!
I left that block exactly as it reads because it contains the small but crucial reminders that saved several rounds of ruined chocolate. The sequence matters: white base, drying, then colored drizzle or sprinkles.
Little discoveries that changed the way I drizzle
Discovery 1: Temperature is everything. If the chocolate is too hot the fruit wilts slightly and loses its sheen. If the chocolate is cool it clumps. Aim for a glossy, slightly runny consistency when you stir. I microwave in 20-second bursts, stirring in between.
Discovery 2: Dry strawberries are a must. Water + chocolate equals sudden grainy disaster. Pat each berry completely dry and let them sit for five minutes before dipping.
Discovery 3: Parchment beats wax. Wax can bond with chocolate; parchment peels away cleanly. Let dipped berries set on parchment on a rimmed sheet to catch drips.
Discovery 4: Drizzle tools matter. A small spoon or a squeeze bag with a tiny corner snipped produces different patterns. Use a fork for rustic splatters, or a piping bag for stripes.
How to tell when you’ve done it right
A finished strawberry should feel firm to the touch after setting and look glossy where chocolate is smooth. The white base should be opaque without streaks. Drizzles should be fine enough to show color contrast without overwhelming the berry shape. If sprinkles settle into wet chocolate and stay on top, that’s a good sign you applied them at the right moment.
If the chocolate looks grainy or separated, it likely overheated or seized because of moisture. If colors smear when you touch them, they didn’t set fully. Move the tray to a cool spot and wait longer before stacking.
My favorite variations and easy swaps
- Swap the white base for milk chocolate if you want a richer flavor. It changes the look but keeps the technique the same.
- Replace Wilton color discs with candy melts in similar shades if you can’t find the exact discs. They behave the same when melted but may be softer when set.
- For a nutty twist, press a sliver of almond or pistachio into the wet white chocolate before it dries.
I like to list a few variations so you can make these suit your pantry and mood. Try using crushed graham crackers for an "eggshell" texture or add tiny edible pearls for a delicate finish.
Four practical tips I always use
- Work in small batches. Melt only what you need so the chocolate doesn’t thicken on the counter.
- Use room-temperature fruit. Cold strawberries are more likely to cause condensation when dipped.
- Hold each strawberry by the leaves to keep fingers chocolate-free.
- If a drizzle clogs, reheat briefly in the microwave for 5 to 10 seconds and stir.
These tips come from repeated, messy practice. They help you stay calm and get consistent results.
What to serve them with and how to store leftovers
These adorable strawberries make a charming dessert on their own, but they also pair beautifully with light whipped cream, panna cotta, or a simple lemon tart. They work as centerpieces on brunch boards alongside mini muffins and deviled eggs.
Storage: Place any leftovers in a single layer in an airtight container lined with parchment. Refrigerate for up to 48 hours. Chocolate may dull slightly in the fridge, so bring to room temperature before serving. Try to avoid stacking them; stacked berries can stick together.
If you’re preparing them ahead, do the white base and set them, then keep the colored drizzle and sprinkles to finish the day of the event for the freshest look.
Why I keep making them
Every time I make these I experiment with a tiny twist, and friends smile like it’s magic. It’s a simple recipe that rewards creativity: different colors, different sprinkle mixes, different drizzles. Once you start, you’ll find your own favorite patterns.
If you enjoy assembling seasonal sweets and want to pair them with hearty comfort dishes for a casual celebration, I’ve also rounded up a few slow cooker ideas that make hosting easier, like these best beef slow cooker recipes that I turn to when feeding a crowd.
Conclusion
For more playful takes on chocolate-covered strawberry decorations, see this guide to Nutella Stuffed Chocolate Covered Strawberry Easter Chicks, and if you want a tutorial focused on egg-shaped designs, this Easter Egg Chocolate Covered Strawberries Recipe offers another colorful approach.
Happy dipping, and remember that the best results come from a relaxed hand and a willingness to try a few drizzles until you find the one that feels right.
Chocolate-Covered Strawberries
Ingredients
Method
- Gather all ingredients and tools: separate microwave-safe bowls for each chocolate color, parchment paper, a fork or dipping tool, and a baking sheet.
- Melt each chocolate color in its separate bowl according to package directions.
- Ensure strawberries are completely dried before dipping to avoid chocolate seizing.
- Dip a strawberry into the melted white chocolate, then place it on a parchment-lined cookie sheet.
- Let the chocolate dry completely before drizzling with other colors or adding sprinkles.
- Repeat the dipping process with other strawberries, adding colorful drizzles or sprinkles as desired.
- Serve immediately or store leftovers in an airtight container in the refrigerator for up to 48 hours.