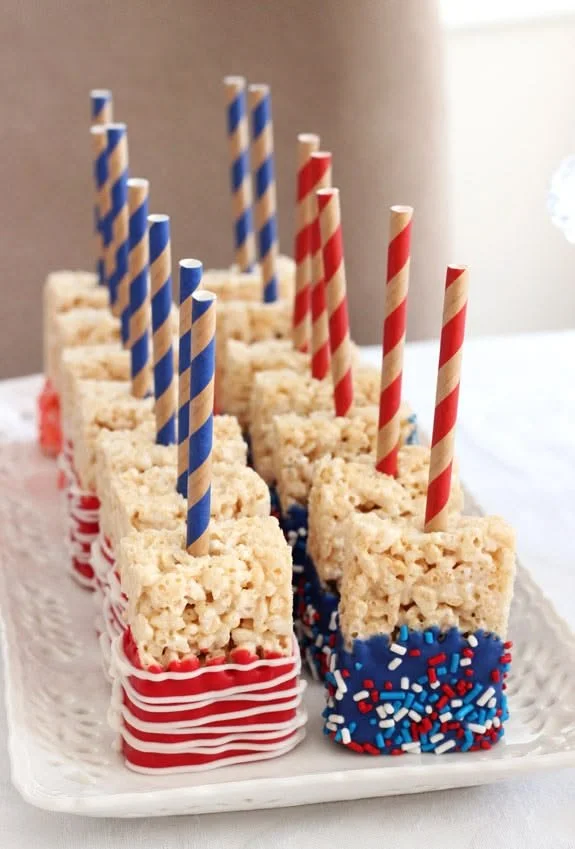
American Flag Rice Krispie Treats
The Joy of Making American Flag Rice Krispie Treats When the 4th of July rolls around, there’s something uniquely exciting about creating festive treats. One of my personal favorites is the American Flag Rice Krispie Treats. It’s not just the delightful combination of flavors or the visual appeal; it’s the nostalgia of gathering with family…
The Joy of Making American Flag Rice Krispie Treats
When the 4th of July rolls around, there’s something uniquely exciting about creating festive treats. One of my personal favorites is the American Flag Rice Krispie Treats. It’s not just the delightful combination of flavors or the visual appeal; it’s the nostalgia of gathering with family and friends, cards in hand, sipping lemonade while watching fireworks illuminate the sky. This recipe is perfect for celebrating our nation while indulging in a fun and delicious dessert. Plus, it’s incredibly simple to make! You may also find American Flag Rice Krispie Treats useful.
To whip up these patriotic delights, here’s what you’ll need: 4 paper straws (cut in half), 2 oz of white candy melts, 8 pre-packaged rice krispie treats (unwrapped), 5 oz of red candy melts, 5 oz of blue candy melts, and some red, white, and blue sprinkles. Each of these ingredients plays a crucial role in creating the visually striking dessert, and you’ll find that everything complements each other seamlessly.
Getting Started with the Candy Melts
First things first, you’ll want to melt the white candy melts in the microwave. Follow the package instructions here; it’s as simple as placing the candy melts in a microwave-safe bowl and heating them in short bursts until smooth. This step is vital, as the melted candy acts as a glue to anchor the paper straws into the Rice Krispie treats. After the white candy is ready, dip each paper straw into the melted mixture and stick it into the smaller end of each rice krispie treat, ensuring it stays upright. I always place the treats on parchment paper to dry while I move on to the next steps, as it prevents sticking.
As a tip, when you are melting candy melts, make sure not to overheat them; a few seconds at a time allows you to monitor their consistency, ensuring a perfect texture for dipping.
Summertime Flavors and Colors
Once your white candy coating has set, it’s time to bring in the vibrant red candy melts. Melt them in the same way as the white ones—this is a straightforward process that yields fantastic results. Take each rice krispie treat, hold it by the straw, and dip it into the melted red candy. Coat half of the treat, gently tapping the straw against the bowl to remove excess candy. Then, set the treats back on parchment paper. The vibrant red creates a stunning patriotic appeal, making them a visual centerpiece for any gathering.
After that, you’ll want to pop the blue candy melts into the microwave. The process is the same: melt, dip, and then sprinkle! As you hold the straw, dip the rice krispie treat into the blue candy melts carefully. Don’t forget to sprinkle those red, white, and blue sprinkles immediately before the candy hardens. This step adds a delightful crunch and decoration—definitely an aspect that kids love to help with!
I often find myself reminiscing about more complex dessert recipes, but these treats remind me of simpler times and offer a refreshing change without losing the spirit of creativity. For anyone looking for more fun dessert ideas, check out these monster Rice Krispies treats—they’re just as fun and delicious!
The Finishing Touch
After allowing everything to dry, I take the melted white candy once again and reheat it if needed. This time, I transfer it to a ziplock bag, trim a corner, and drizzle the sweet melted candy over the red and blue portions of the treats. This step is optional but adds that extra flair. Finally, let everything set completely before serving, and you’ll have a beautiful array of American Flag Rice Krispie Treats that are not only tasty but also a visual treat.
These Rice Krispie treats can be stored in an airtight container and are perfect for preparation ahead of time. They maintain their freshness, and you can make them a day in advance, ensuring you’re ready for your celebration without the last-minute rush.
Making It Your Own
One of the best parts of this recipe is its versatility. You can easily switch up the colors for different holidays or celebrations. Imagine using orange and black for Halloween or pastel colors for Easter. The same simple process applies, and you can let your creativity shine through. Additionally, if you want to add a hint of flavor, consider incorporating different extracts into the melted candy; a splash of vanilla or almond can take the flavor to the next level.
Being a part of special moments and sharing beloved recipes is what makes gatherings truly memorable. My children thoroughly enjoy helping me with this recipe, and it’s one I plan to pass down for generations.
Conclusion
In conclusion, these American Flag Rice Krispie Treats offer a delightful way to celebrate the 4th of July with friends and family. They are fun to make and taste delicious, representing the essence of summer festivities. If you’re looking for more inspiration for festive treats, visit this fantastic site for a variety of ideas that will spark your creativity and make your holiday celebrations even more special. Happy baking!
American Flag Rice Krispie Treats
Ingredients
Method
- Melt the white candy melts in a microwave-safe bowl according to package instructions.
- Dip each paper straw into the melted white candy and stick it into the smaller end of each rice krispie treat, placing them on parchment paper to dry.
- Melt the red candy melts in the microwave as you did with the white candy.
- Hold each treat by the straw and dip into the melted red candy, coating half. Tap off excess and return to parchment paper.
- Repeat the process for the blue candy melts, dipping carefully and immediately adding sprinkles.
- Reheat the melted white candy if needed, transfer it to a ziplock bag, trim a corner, and drizzle it over the red and blue portions of the treats.
- Let the treats set completely before serving.