The Best Baked Salmon Sushi Cups (A Viral Sensation!)
Hello, my friends, and get ready to meet the most fun, creative, and utterly delicious way to enjoy the flavors of sushi at home! If you’ve been seeing those amazing little salmon bites all over your social media feed, you are in the right place. We are making these incredible, viral Baked Salmon Sushi Cups,…
Hello, my friends, and get ready to meet the most fun, creative, and utterly delicious way to enjoy the flavors of sushi at home! If you’ve been seeing those amazing little salmon bites all over your social media feed, you are in the right place. We are making these incredible, viral Baked Salmon Sushi Cups, and I promise, they are even more delicious than they look.
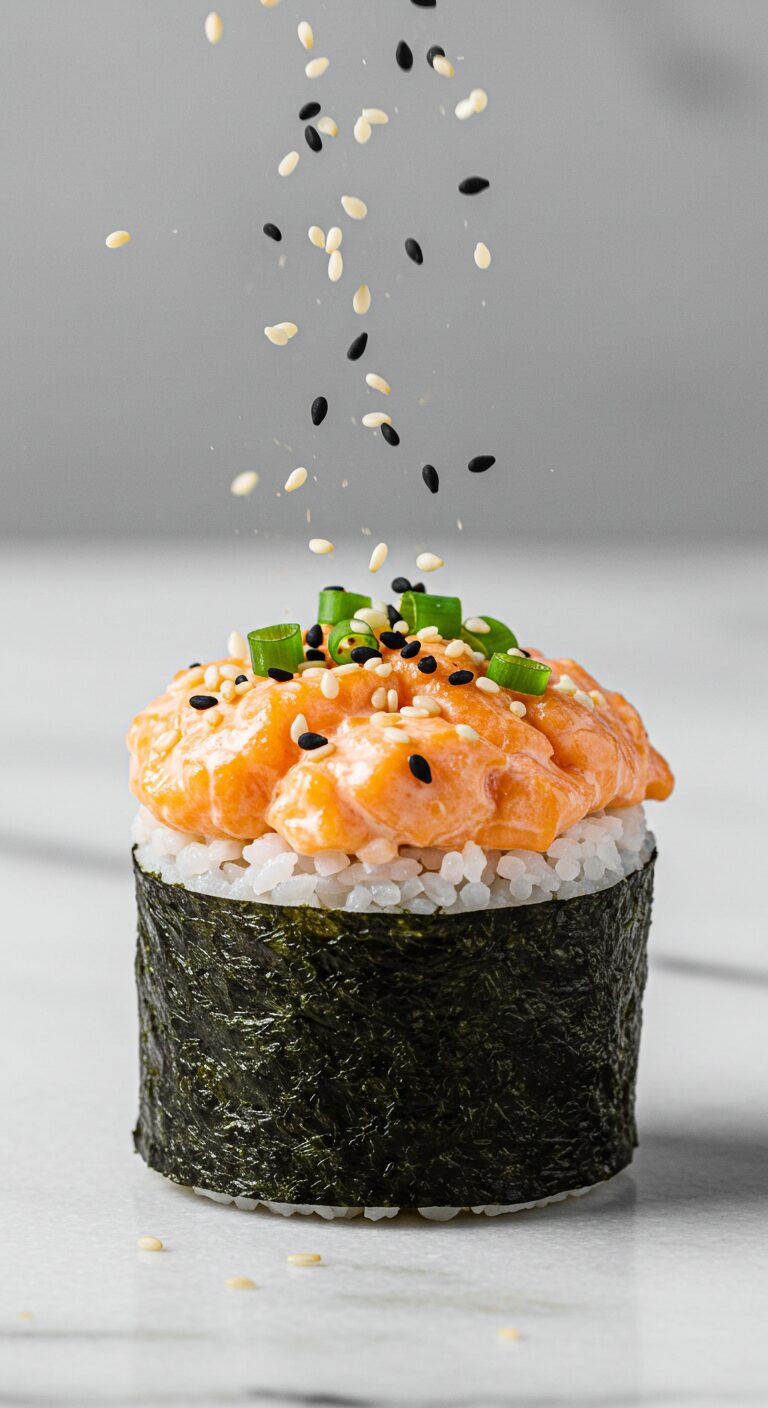
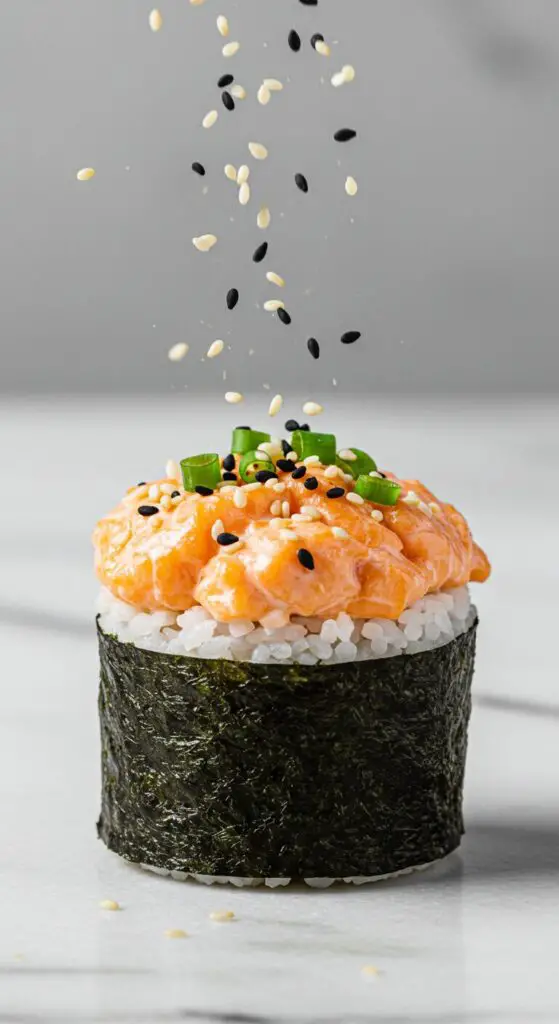
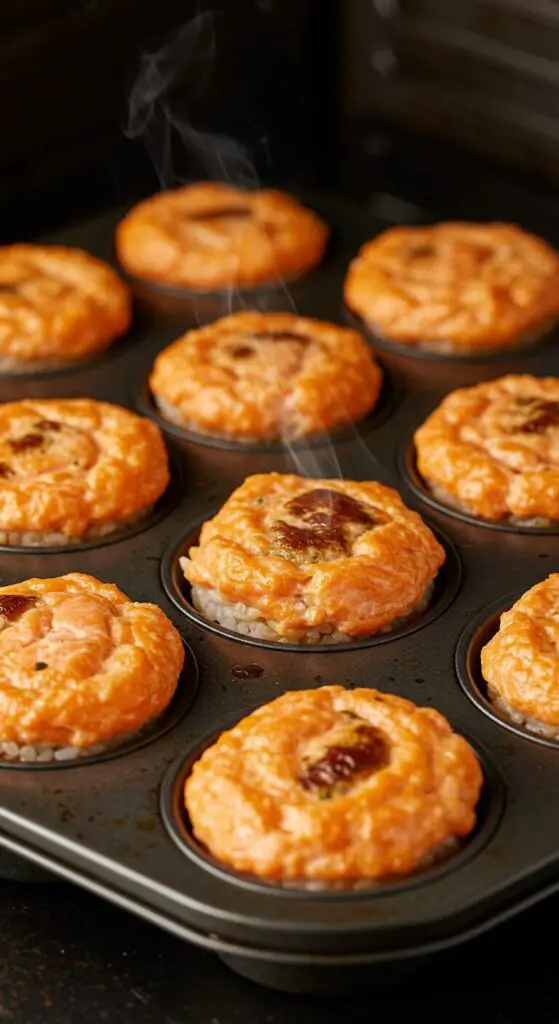
This recipe is pure genius. We create a crispy, savory little cup using nori (seaweed) sheets right in a muffin tin, fill it with a layer of seasoned sushi rice, and top it with a creamy, spicy salmon mixture. They’re then baked and broiled to perfection, creating a bite-sized masterpiece that’s crispy on the outside, with warm rice and tender, creamy salmon on the inside. It’s the perfect, impressive appetizer, fun party snack, or light and healthy meal.
Why You’ll Be Absolutely Obsessed With These Sushi Cups
This is more than just a viral trend; it’s a truly fantastic recipe you’ll make again and again.
- All the Flavors of a Sushi Roll: You get the perfect combination of seasoned rice, savory nori, creamy spicy salmon, and classic garnishes, all in one perfect bite.
- Incredibly Fun & Easy to Make: The muffin tin method is a brilliant and foolproof way to assemble these beautiful little cups. It’s a fun project with a huge flavor payoff.
- A True Showstopping Appetizer: A platter of these beautiful sushi cups is a guaranteed conversation starter and will be the first thing to disappear at any party.
- Crispy, Creamy, and Cooked Through: This is the perfect recipe for people who love the idea of sushi but prefer their fish cooked. The broiling step creates a wonderfully charred, delicious top.
Gather Your Fresh Ingredients: What You’ll Need
This impressive appetizer comes together with a handful of classic sushi-inspired ingredients.
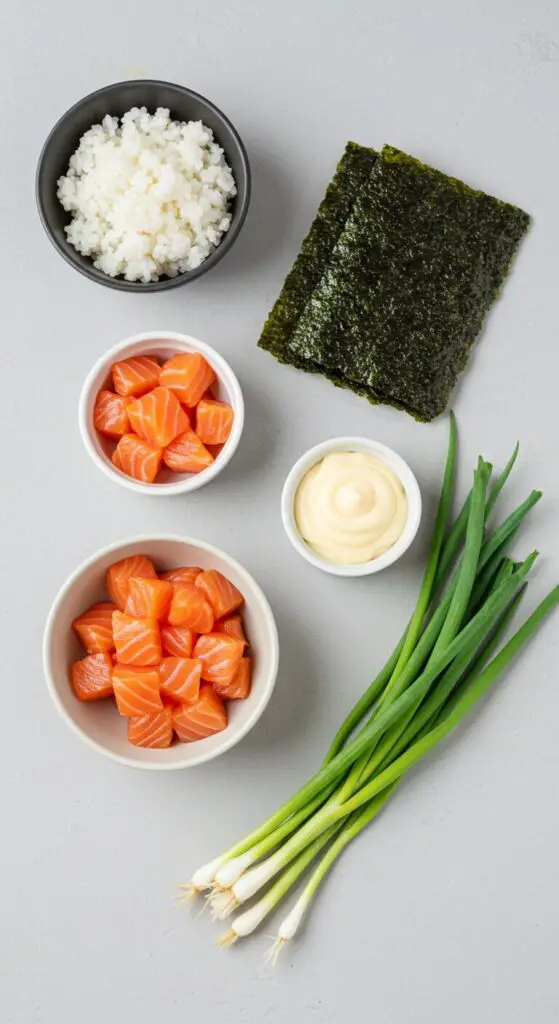
- Cooking spray
- 2 cups cooked sushi rice
- 3 nori sheets, quartered
- 1 (1 1/2-lb.) skinless salmon fillet, cut into 1/2″ cubes
- 2 scallions, thinly sliced, plus more for serving
- 1 tsp. toasted sesame oil
- 4 Tbsp. Japanese mayonnaise (such as Kewpie), divided
- 2 1/4 tsp. sriracha, divided
- Kosher salt
- 2 tsp. black and white sesame seeds
Crafting Your Baked Salmon Sushi Cups: Step-by-Step Guide
Let’s build these adorable and delicious bites. The muffin tin makes it so simple!
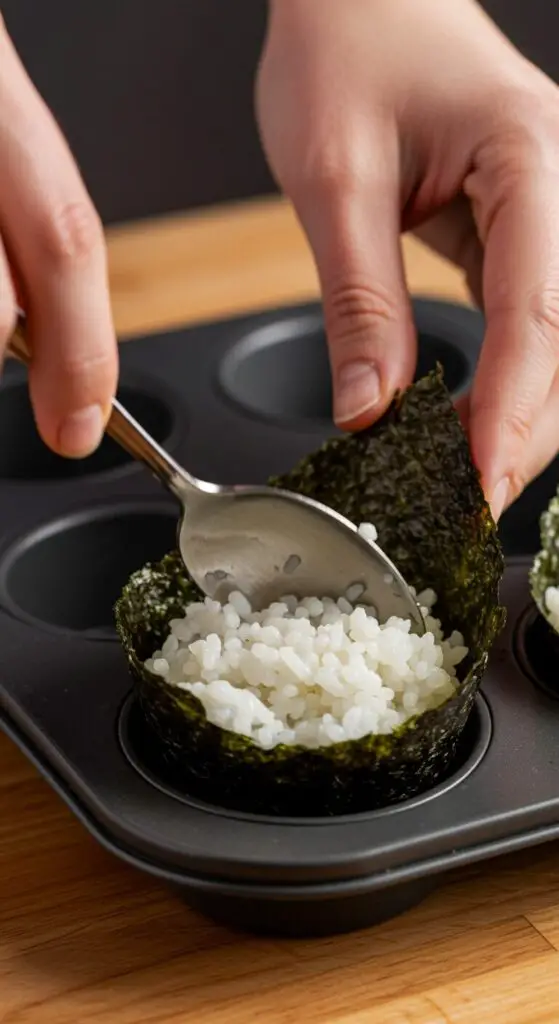
- Prep the Oven and Muffin Tin: First, arrange a rack in the upper third of your oven and preheat it to 400°F (200°C). Lightly coat a standard 12-cup muffin tin with cooking spray.
- Form the Nori Cups: Take your quartered nori sheets and place one in each of the 12 muffin cups. Scoop a heaping tablespoon of cooked sushi rice into the center of each nori sheet. Use the back of a wetted spoon to gently pack the rice into a flat, even layer at the bottom of each cup.
- Mix the Spicy Salmon Filling: In a large bowl, combine the salmon cubes, sliced scallions, toasted sesame oil, 2 tablespoons of the mayonnaise, 2 teaspoons of the sriracha, and 1/4 teaspoon of kosher salt. Gently toss everything together until the salmon is evenly coated in the creamy, spicy mixture.
- Fill and Bake: Divide the salmon mixture evenly among the 12 muffin cups (it will be about 1/4 cup each), spooning it right on top of the rice layer. Bake for about 11 minutes, or until the salmon is almost cooked through.
- Broil to Perfection: Now, turn on your oven’s broiler. Place the muffin tin back in the oven and broil, watching very carefully, for 2 to 4 minutes. You want the tops of the salmon to get nicely charred in a few spots and for the fish to be fully cooked through. Let the cups cool in the tin for 5 minutes.
- Garnish and Serve: While the cups cool slightly, make the final drizzle. In a small bowl, combine the remaining 2 tablespoons of mayonnaise and 1/4 teaspoon of sriracha. Carefully arrange the warm sushi cups on a platter. Drizzle them with the sriracha-mayo mixture and finish with a sprinkle of sesame seeds and more sliced scallions. Serve immediately!
Wise Tips for the Best Sushi Cups
- Use Sushi Rice: For the best authentic texture, use proper short-grain sushi rice and season it with a bit of rice vinegar and sugar after cooking, just as you would for sushi.
- Don’t Skip the Broil: The final broiling step is what gives these cups their incredible texture, creating those delicious, slightly crispy, charred bits on top of the creamy salmon. Watch it like a hawk, as it can go from perfect to burnt in seconds!
- Kewpie Mayo is Key: If you can find it, Japanese Kewpie mayonnaise has a richer, tangier flavor than American mayo and makes a real difference in the creamy salmon filling.
- Gentle Hands: Be gentle when mixing the salmon filling to keep the cubes of fish intact.
Baked Salmon Sushi Cups
Ingredients
Equipment
Method
- Arrange a rack in upper third of oven; preheat to 400°F. Lightly coat a standard 12-cup muffin tin with cooking spray.
- Place a quartered nori sheet into each muffin cup. Scoop 1 heaping Tbsp. sushi rice on top and use a spoon to gently pack it into an even layer.
- In a large bowl, toss salmon cubes, scallions, sesame oil, 2 Tbsp. mayonnaise, 2 tsp. sriracha, and 1/4 tsp. salt until combined.
- Divide the salmon mixture among the muffin cups, spooning it on top of the rice. Bake until salmon is almost cooked through, about 11 minutes.
- Turn on the broiler. Broil, watching carefully, until the tops are charred in places and salmon is cooked through, 2 to 4 minutes. Let cool for 5 minutes in the tin.
- Meanwhile, in a small bowl, combine the remaining 2 Tbsp. mayonnaise and 1/4 tsp. sriracha. Arrange sushi cups on a platter, drizzle with the mayo mixture, and sprinkle with sesame seeds and more scallions.
Notes
Delicious Variations & Creative Twists
- Add Avocado: Mix some finely diced avocado into the salmon mixture right before spooning it into the cups for extra creaminess.
- Make it Crunchy: Add some panko breadcrumbs or finely diced tempura bits to the salmon filling for a delicious crunch.
- Switch the Fish: This method would also be fantastic with finely chopped shrimp or even canned crab meat.
- Extra Toppings: Serve with other sushi favorites like pickled ginger, wasabi, or a drizzle of eel sauce.
Frequently Asked Questions (FAQ) – Baked Salmon Sushi Cups
Can I make these ahead of time?
These are definitely best enjoyed fresh and warm from the oven to get the full crispy nori and warm salmon experience. You can, however, cook the rice and mix the salmon filling a few hours in advance and store them separately in the fridge. Then, just assemble and bake when you’re ready to serve.
What if my nori sheets break?
Nori can be a bit brittle. If a sheet cracks as you’re pressing it into the muffin tin, don’t worry! Just use the rice to help “glue” it against the sides. Once baked, it will hold its shape.
Are these very spicy?
They have a mild, pleasant heat from the sriracha. You can easily adjust the amount in both the filling and the final drizzle to match your personal spice preference.
Conclusion
These Baked Salmon Sushi Cups are such a fun, creative, and ridiculously delicious way to enjoy the flavors you love. They are the perfect party starter, a fantastic light lunch, and a recipe that is sure to wow anyone you share them with. Enjoy!