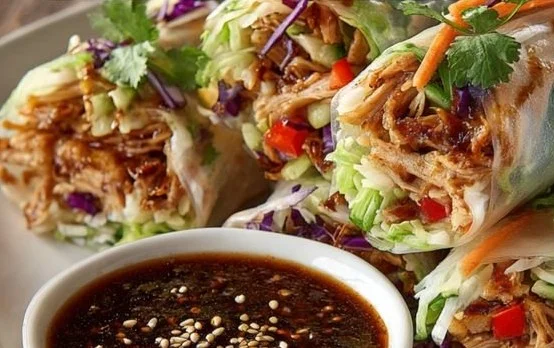
Crispy Rice Paper Spring Rolls
The Secret Behind Perfect Crispy Rice Paper Spring Rolls There’s something utterly delightful about biting into a Crispy Rice Paper Spring Roll. The contrast of the crunchy exterior and the fresh, vibrant fillings is the kind of experience that can transport you back to warm, breezy evenings spent enjoying Vietnamese street food. I vividly remember…
The Secret Behind Perfect Crispy Rice Paper Spring Rolls
There’s something utterly delightful about biting into a Crispy Rice Paper Spring Roll. The contrast of the crunchy exterior and the fresh, vibrant fillings is the kind of experience that can transport you back to warm, breezy evenings spent enjoying Vietnamese street food. I vividly remember trying my first spring roll at a bustling market, the sweet and savory sauces drizzling over the crispy edges. It inspired me to recreate that magic at home, and now I want to share my favorite recipe with you. You may also find Best Crispy Rice Paper Spring Rolls Easy Delicious Recipe useful.
Let’s dive into what you’ll need for these irresistible spring rolls. Start with 8 pieces of rice paper wrappers as the foundation. Then gather 1 cup of shredded lettuce, 1 cup of julienned carrots, 1 cup of julienned cucumbers, and 1 cup of sliced bell peppers. Fresh herbs are a must, so have on hand 1/2 cup of chopped fresh mint leaves and 1/2 cup of chopped fresh cilantro. To make the rolls heartier, you can choose 1/2 cup of any cooked protein like shrimp, chicken, or tofu. For dipping, don’t forget to have 1/4 cup each of hoisin sauce, peanut sauce, and soy sauce ready – they truly elevate the flavors. You may also find Crispy Rice Paper Spring Rolls 2 useful.
Getting the Texture Just Right
The key to perfect spring rolls lies in the rice paper wrappers. They should be soft and flexible but not too soggy. Here’s a little tip I learned: when preparing the wrappers, fill a shallow dish with warm water. Quickly dip each rice paper wrapper in the water, letting it soak for about 10 seconds. You want them pliable but not mushy. Once you have your wrappers ready, place one on a clean surface.
Now for the fun part! In the center of the wrapper, line up a small amount of each filling ingredient, ensuring you leave enough space around the edges to fold them later. Here’s a quick note: avoiding overstuffing is crucial to prevent tearing. After placing your fillings, fold the sides of the wrapper over the top and then roll tightly from the bottom up, securing everything inside. Repeat this process until you’ve filled all your wrappers, and admire your handiwork!
A Few Things I’ve Learned
Cooking methods can be tailored to your preference. For a delightful golden, blistered exterior, I love to pan-sear the finished rolls in a tablespoon of oil until they get that perfect color. If you’re in the mood for a lighter option, air-frying at 400°F for about 6 to 8 minutes can achieve that desirable crispiness without all the extra oil. You might want to try both and see which method you prefer!
It’s always a joy to experiment with flavors. If you decide to make a more filling version, you could consider adding a bit of avocado or switching up the protein for something like crispy tofu. The flexibility of this recipe allows for endless variations. For example, you can stick to the traditional ingredients or explore options like using shredded cabbage or colorful bell peppers to brighten things up.
What to Serve It With
Now that your spring rolls are ready, it’s time to serve them with some delicious dipping sauces. Personally, I recommend a mix of the hoisin and peanut sauces—they complement each other beautifully. You can even add a sprinkle of crushed peanuts or sesame seeds on the top for an extra crunch!
If you have any leftovers (which is rare—trust me!), store them in an airtight container in the refrigerator for up to two days. While the wrappers may lose their crispiness over time, they’ll still taste fresh. Just reheat them lightly in a pan for a delightful snack!
My Grandmother’s Trick
One of my grandmother’s tricks was to get the dipping sauce just right. She’d mix the soy sauce with a splash of lime juice and a hint of chili paste for a zingy kick. I always felt that little touch made the spring rolls even more irresistible, and it’s a practice I’ve kept ever since. Feel free to experiment with your favorite elements or traditional dips!
These Crispy Rice Paper Spring Rolls truly serve as a canvas for your culinary creativity. Whenever I prepare them, I find the kitchen turning into a vibrant space filled with aroma and laughter. It’s almost ritualistic now—gathering friends or family to take part in the assembly, sharing stories while we roll, and enjoying the scrumptious outcome together.
Conclusion
As you dive into making these delightful Crispy Rice Paper Spring Rolls, I hope your kitchen becomes a joyous spot where flavors come alive. Don’t hesitate to explore variations and make this dish your own. And if you’re curious about another delicious way to use rice paper, check out this Rice Paper Dumplings Recipe for a wonderful twist!