The Ultimate Christmas Cookie Hack: Adorable Reindeer & Pudding Treats!
The holiday season is filled with the magical pressure to create beautiful, homemade treats. But let’s be honest, between the shopping, wrapping, and planning, who has time for a multi-day baking marathon? What if I told you that you could create the most adorable, festive, and delicious Christmas cookies with absolutely no baking required? This,…
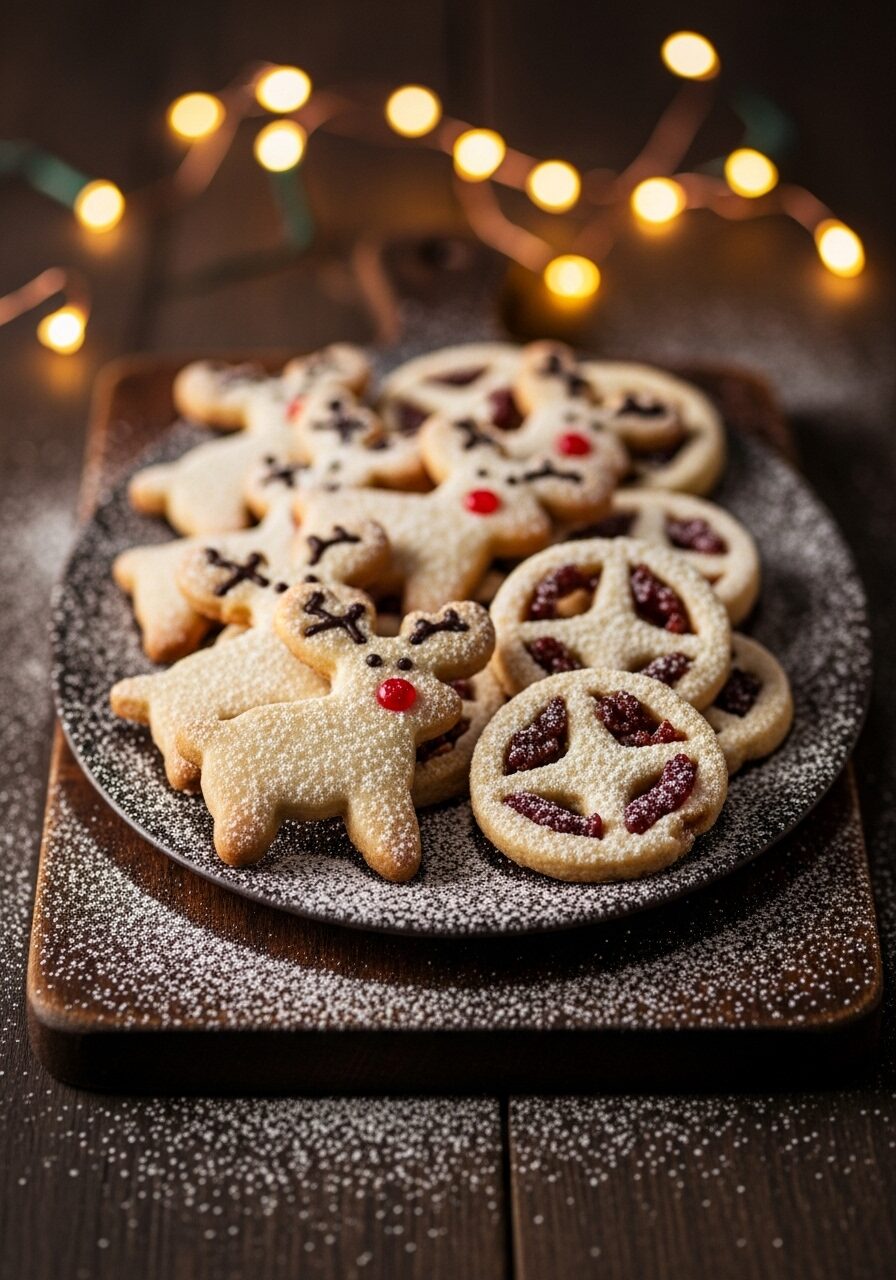
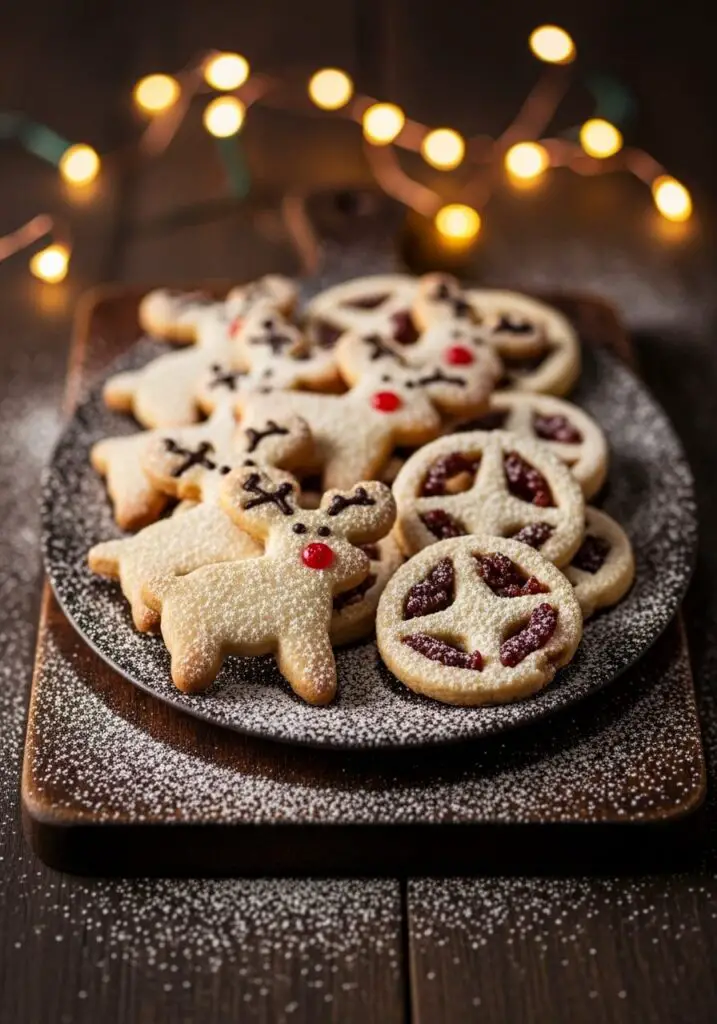
The holiday season is filled with the magical pressure to create beautiful, homemade treats. But let’s be honest, between the shopping, wrapping, and planning, who has time for a multi-day baking marathon? What if I told you that you could create the most adorable, festive, and delicious Christmas cookies with absolutely no baking required? This, my friends, is the ultimate Christmas cookie hack, and it’s a total game-changer. We’re taking a simple, store-bought chocolate-covered biscuit—the classic Wagon Wheel—and transforming it into two different, incredibly charming holiday characters: a goofy, pretzel-antlered reindeer and a sweet little Christmas pudding. This is more than a recipe; it’s a fun, low-stress, and wonderfully creative art project that ends in a delicious treat. I came up with this idea in a pinch for a school holiday party, and the kids went absolutely wild for them! It’s the perfect way to get into the festive spirit without ever turning on your oven.
Why This is the BEST Christmas Cookie Hack!
- Absolutely No Baking Required: This is the ultimate shortcut! By using a store-bought cookie as our base, we skip the baking and go straight to the fun part: decorating!
- A Super Fun Activity for Kids: With simple steps like attaching candy eyes and piping chocolate, this is the perfect, low-mess holiday activity to get the little ones involved in the kitchen.
- Two Adorable Designs in One: This recipe shows you how to make two different festive treats—charming reindeer and classic Christmas puddings—for a beautifully varied and impressive platter.
- Uses Simple, Easy-to-Find Ingredients: You can find everything you need for these adorable creations in the baking and candy aisles of your local grocery store.
- Impressive Results with Minimal Effort: These cookies look so special and homemade, no one will ever guess your brilliant shortcut. They’re perfect for cookie exchanges and holiday parties!
Recipe Snapshot
| Prep Time | 30 minutes |
| Cook Time | 5 minutes (for melting chocolate) |
| Total Time | 35 minutes |
| Servings | 16 decorated cookies |
| Calories | See recipe card for details |
| Course | Dessert, Snack |
| Cuisine | American, Holiday |
| Method | No-Bake, Decorating |
Your North Pole Workshop Shopping List
This festive project is all about the fun of assembly! Here’s what you’ll need to create your edible art.

→ The Cookie Base & “Glue”
- Wagon Wheels: 16 of them. These round, chocolate-coated biscuits are the perfect, no-fuss canvas.
- Dark Chocolate & White Chocolate: Our delicious, edible “glue” for attaching decorations and for creating the pudding “custard.”
→ For the Reindeer Decorations (Makes 8)
- Candy Eyeballs: 16 of them, for that goofy, charming expression.
- Red M&M’s: 8 of them, to create Rudolph’s iconic shiny nose!
- Pretzels: 16 mini pretzels for the perfect, salty, crunchy antlers.
→ For the Christmas Pudding Decorations (Makes 8)
- Green Jelly Snake: Just one! We’ll slice it thin to create the most adorable little holly leaves.
- Mini Red M&M’s: 24 of them, to act as the perfect little holly berries.
Let’s Decorate! Crafting Your Festive Treats, Step-by-Step
This is all about having fun and getting creative. Set up your ingredients in small bowls for an easy decorating station!
Phase 1: Melt the Chocolate (Time: ~5 minutes)
First, we’ll prep our edible “glue” which is the key to bringing our creations to life.
- Melt the Chocolates. Place the dark chocolate and the white cooking chocolate into two separate, microwave-safe bowls. Microwave each bowl in 30-second increments, stirring in between, until the chocolate is completely melted and smooth.
Phase 2: Create the Reindeer (8 Cookies)
It’s time to build our adorable reindeer friends!
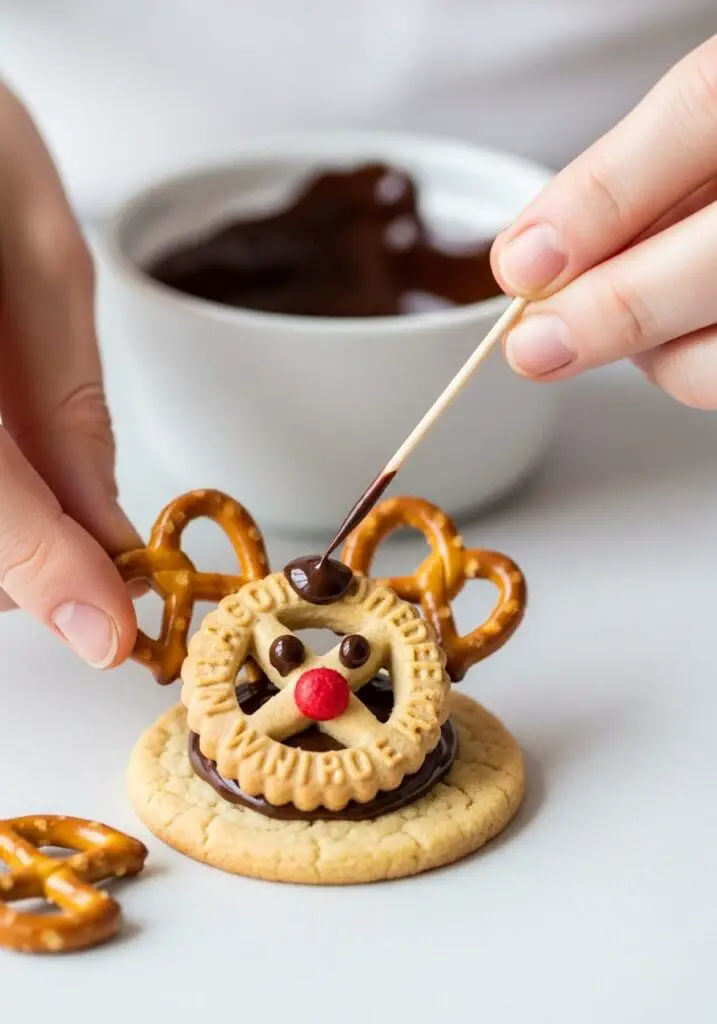
- Make the Face. Take one Wagon Wheel. Dab a tiny amount of melted dark chocolate on the back of two candy eyeballs and one red M&M, and press them onto the biscuit to create the eyes and nose.
- Attach the Antlers. Dab a little more melted dark chocolate onto the top curved edge of two pretzels. Gently press them onto the top of the biscuit to create the antlers.
Pro Tip: You may need to hold the pretzels in place for a few seconds until the chocolate starts to set. Repeat to create 8 reindeer in total.
Phase 3: Create the Christmas Puddings (8 Cookies)
Now for our classic, festive little puddings!

- Add the “Custard”. Take the remaining 8 Wagon Wheels. Spoon the melted white chocolate into a small zip-lock bag and snip a tiny corner off. Pipe the white chocolate over the top third of each biscuit to look like dripping custard.
- Add the “Holly”. Thinly slice the green jelly snake on a diagonal to create little leaf shapes. While the white chocolate is still wet, arrange two snake pieces and three mini red M&M’s on top of the “custard” to look like a sprig of holly. Repeat to create 8 pudding cookies.
Phase 4: Let Them Set!
- Be Patient. Set all your beautifully decorated biscuits on a platter or a sheet of parchment paper and let them sit at room temperature for about 30 minutes, or until all the chocolate has completely hardened and set. Then, they’re ready to serve!
WiseRecipes’ Top Tips for Perfect Cookie Hacks!
- The Chocolate is Your Glue: Think of the melted chocolate as a delicious cement. A small dab on the back of each decoration is all you need to hold it firmly in place once it sets.
- Create a Decorating Station: The best way to do this, especially with kids, is to have all your decorations (eyeballs, M&Ms, pretzels) in small, separate bowls, ready to go before you even melt the chocolate.
- Be Patient with the Antlers: The pretzel antlers are the trickiest part. Hold them in place for about 10-15 seconds to give the chocolate a moment to start setting so they don’t slide off.
- Use a Piping Bag (or Ziplock!): For the neatest white chocolate “custard” on your puddings, a small piping bag or a simple zip-lock bag with a tiny corner snipped off is much easier than trying to use a spoon.
- Let Them Set Completely: Before you attempt to stack or store these cookies, make sure the chocolate is fully hardened. You can pop them in the fridge for 10 minutes to speed this up.
Easy Christmas Cookie Hacks (Reindeer & Pudding Cookies)
Ingredients
Equipment
Method
- Place dark and white chocolate in separate microwave-safe bowls. Microwave each in 30-second increments, stirring in between, until fully melted and smooth.
- For each of 8 biscuits, use a small dab of melted dark chocolate to attach 2 candy eyeballs and 1 red M&M to create a face.
- Use a dab of melted dark chocolate to attach 2 pretzels to the top of each reindeer biscuit to create antlers. Hold them in place for a few seconds until secure.
- Spoon the melted white chocolate into a snap-lock bag and snip off a tiny corner. Pipe the white chocolate onto the top of the remaining 8 biscuits to create ‘custard’.
- Thinly slice the green jelly snake diagonally. While the white chocolate is still wet, arrange 2 snake pieces and 3 mini red M&M’s on each biscuit to create holly leaves and berries.
- Set all decorated biscuits aside for at least 30 minutes, or until the chocolate has completely set.
Notes
Creative Twists: More Fun Cookie Hack Ideas!
- Snowman Cookies: Use a white chocolate-covered biscuit. Use melted dark chocolate to create coal eyes and a mouth, and a small piece of an orange candy for the carrot nose.
- Christmas Ornament Cookies: Use the white chocolate as a base on a Wagon Wheel, then use a variety of colorful sprinkles and mini M&Ms to create festive ornament designs.
- Swap the Cookie Base: This decorating concept would also be adorable on large, round shortbread cookies, Oreos dipped in chocolate, or even digestive biscuits.
- Use a Different “Holly”: If you can’t find a green jelly snake, you can use green sprinkles, or even pipe a little bit of green-tinted white chocolate for the leaves.
Keep Them Festive! Storing Your Decorated Cookies
These cookies store well, making them perfect to prep a day or two before a party!
Room Temperature Storage
Once the chocolate has fully set, you can store these decorated cookies in a single layer in an airtight container at room temperature. They will stay fresh for up to 5 days. If you need to stack them, place a sheet of parchment paper between the layers to protect your beautiful decorations.
FAQs: Your Christmas Cookie Hack Questions, Answered!
My chocolate is too thick to pipe neatly. How can I fix it?
If your melted white chocolate is too thick, you can stir in a tiny amount (about 1/4 teaspoon at a time) of a neutral-flavored oil like canola or coconut oil. This will thin it out and make it much smoother for piping.
Where can I find candy eyeballs?
Candy eyeballs have become very popular and are a fantastic decorating staple to have on hand! You can usually find them in the baking or seasonal aisle of most major grocery stores, as well as at craft stores or online.
Can I use a different color of M&M for the reindeer nose?
Of course! While red is classic for Rudolph, you can absolutely use brown or any other color to create the rest of his reindeer friends.
Do I have to use Wagon Wheels?
No, they are just a great suggestion because of their round shape and chocolate coating! Any round, flat biscuit or cookie you have on hand would work as a great base for this fun decorating project.
These Christmas Cookie Hacks are the perfect embodiment of holiday fun. They’re a joyful, stress-free way to create a memorable and delicious treat that will bring a smile to everyone’s face. It’s a project that’s less about perfect baking and more about making sweet memories together. I hope you and your family have a blast creating your own little edible masterpieces. Happy holidays!