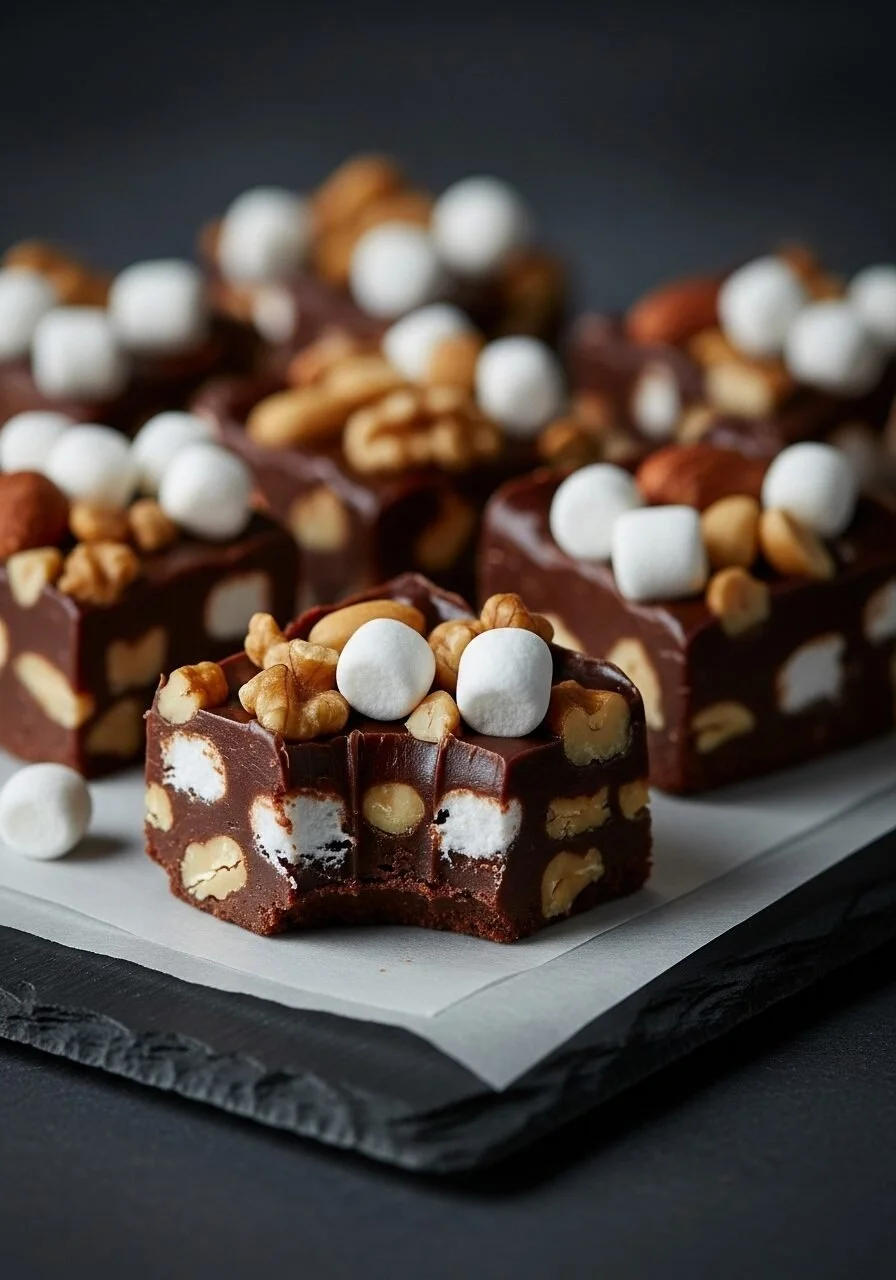
Easy Rocky Road Fudge
How This Easy Rocky Road Fudge Became My Go-To There are recipes that feel like work and recipes that feel like hugging someone warm. This Easy Rocky Road Fudge falls squarely into the latter for me. I first made it on a gray December afternoon when a last-minute neighbor drop-in turned into an impromptu cookie…
How This Easy Rocky Road Fudge Became My Go-To
There are recipes that feel like work and recipes that feel like hugging someone warm. This Easy Rocky Road Fudge falls squarely into the latter for me. I first made it on a gray December afternoon when a last-minute neighbor drop-in turned into an impromptu cookie swap. I had nothing more exotic than a can of sweetened condensed milk and a stubborn craving for chocolate, and what began as a pantry rescue has been my favorite ever since. If you want to see the version that originally inspired me, I sometimes compare notes with an easy rocky road fudge recipe I found online, but I’ve made a few tiny changes to suit how my family likes it.
The smell that fills the house while this comes together is intoxicating: warm, rich chocolate with a faintly toasted nut aroma and a whisper of vanilla. It’s a small, comforting thing that tastes much fancier than the few minutes it actually takes.
What Goes Into It (and Why Each Thing Matters)
I never like to treat ingredients like a list to memorize, so when I tell you what goes in, think of it as me pulling things out of the pantry as I talk. For the chocolate base I use 3 cups of semisweet chocolate chips because they melt smoothly and give you that classic fudge depth without being too sweet. I always keep a 14-ounce can of sweetened condensed milk on hand for moments like this; its sweetness and creamy body are the shortcut to a luscious, sliceable set. A quarter cup of butter contributes silkiness and helps the fudge hold together, and for flavoring I add a teaspoon of vanilla extract and a quarter teaspoon of kosher salt to round everything out. Then the fun stuff: 1 1/2 cups of mini marshmallows, divided so some get chopped into the mix and some top the fudge, and 1 1/4 cups of toasted nuts, coarsely chopped, divided the same way so you get both interior chew and a crunchy crown.
When choosing nuts, I like to toast them briefly in a dry pan until they become fragrant and slightly darker; that little brown nuttiness pops against the sweet chocolate. Toasting is an optional step, but it’s one of those tiny things that changes the whole character of the fudge.
Making It: The Simple, Almost Lazy Method I Use
I’m a believer in not overcomplicating a good thing, so I make this in a few straightforward moves. First, I prep the pan: line an 8×8 or 9×9-inch pan with aluminum foil, leaving an overhang, and spray the foil with cooking spray. That overhang is a lifesaver when it’s time to lift out the fudge cleanly.
Then the melting: in a large microwave-safe bowl, combine the chocolate chips, the sweetened condensed milk, and the butter. I microwave the mixture in 1-minute increments, stirring well after each one, for about 2 to 3 minutes total, until the chocolate is fully melted and the mixture is smooth. A tip here is to heat just long enough to melt; stirring after each minute finishes the job and prevents burned chocolate. If you don’t have a microwave you can do this over a double boiler and get the same glossy result.
Once it’s silky, I stir in the vanilla extract and the salt until the fudge is smooth and glossy. Then I fold in 1 cup of the mini marshmallows and 1 cup of the chopped nuts, stirring until they are just combined. The marshmallows inside give that pillowy texture, while the nuts provide crunch.
I pour the fudge into the prepared pan and smooth it into an even layer with a spatula. On top I sprinkle the remaining half cup of mini marshmallows and a quarter cup of nuts. I press them down gently so they adhere to the surface; when the fudge chills they sit pretty on top like a promise of texture. Place the pan in the refrigerator and chill for at least 2 hours, or until the fudge is completely firm. When it’s set, I use the foil overhangs to lift the entire block out of the pan and cut it into small, 1-inch squares to serve at room temperature. Cutting when it is at room temperature gives you clean edges without too much crumbling.
One small trick I’ve learned is to let the fudge warm on the counter for 10 to 15 minutes after the fridge so it’s not rock hard. It should give slightly when you press it and have that dense, slightly springy chew. If it’s too soft, it needs more chilled time; if it’s too crumbly, perhaps the chocolate-to-milk ratio was off or it didn’t cool long enough.
Getting the Texture Just Right and Other Little Tricks
If texture is a thing you obsess over like I do, here are a few things I’ve learned without turning the recipe into a chemistry exam. Use semisweet chips rather than chunks; they melt more predictably. Stir after each microwave burst to distribute the heat evenly; a stray unmelted chunk can make for grainy fudge. And when you fold in the marshmallows, do it quickly; they will partially melt into the chocolate and create those pockets of goo that make rocky road special. For salt, kosher works well because it dissolves easily and enhances chocolate without making any bite taste salty.
I often make this ahead for parties. It stores beautifully: keep it in an airtight container at room temperature for up to a week, or refrigerate for longer storage. If you refrigerate, let the squares sit out briefly before serving so they soften. When I bring a tray to a potluck, I put a note for people to let pieces sit a few minutes—tiny patience, big payoff.
A Few Ways I Change It Up and When It Didn’t Go As Planned
I love the classic version, but I tinker depending on the mood. Sometimes I swap half a cup of the chips for dark chocolate for a deeper, less sweet profile. Other times I toss in a handful of dried cranberries or use slivered almonds instead of mixed nuts for a cleaner crunch. If I’m feeling whimsical around the holidays, a sprinkle of crushed peppermint on top brightens it up.
Not everything is foolproof. Once I added too many marshmallows and the fudge never fully set; lesson learned—keep the proportions balanced. Another time I tried melting everything too quickly and ended up with thick, lumpy chocolate; that reminded me why gentle heat and patient stirring are worth it.
And for those wondering about what to serve it with, I like to pair the small dense squares with a cup of coffee or a glass of cold milk. The contrast makes each bite sing. For a party, they’re great on a dessert board alongside cookies and nuts, or tucked into little paper cups to keep them tidy.
Conclusion
If you want a simple, crowd-pleasing dessert that feels special without a lot of fuss, this Easy Rocky Road Fudge is one of my favorite go-tos. For another take on this classic and a little inspiration, I often look back at Rocky Road Fudge – Barefeet In The Kitchen for comparison and ideas. And if you ever find yourself with a can of sweetened condensed milk and a chocolate emergency, you now know exactly how to turn that into something delicious.

Easy Rocky Road Fudge
Ingredients
Method
- Line an 8x8 or 9x9-inch pan with aluminum foil, leaving an overhang, and spray the foil with cooking spray.
- In a large microwave-safe bowl, combine the chocolate chips, sweetened condensed milk, and butter.
- Microwave in 1-minute increments, stirring well after each, for about 2 to 3 minutes until melted and smooth.
- Stir in the vanilla extract and salt until smooth.
- Fold in 1 cup of mini marshmallows and 1 cup of chopped nuts until just combined.
- Pour the mixture into the prepared pan and smooth with a spatula.
- Sprinkle remaining marshmallows and nuts on top, pressing gently to adhere.
- Chill in the refrigerator for at least 2 hours until firm.
- Use the foil overhang to lift the fudge from the pan, then cut into 1-inch squares.
- Allow to sit out for 10-15 minutes before serving for best texture.