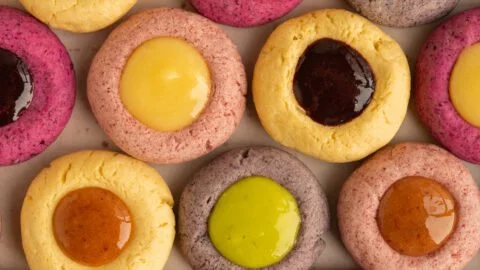
Fruity Thumbprint Cookies
I still remember the first time I made Fruity Thumbprint Cookies for a summer picnic; the sun was doing that golden thing through the kitchen window and the house smelled like butter and citrus. Someone asked if they were store-bought and I almost took it as a compliment until my sister grabbed the last one…
I still remember the first time I made Fruity Thumbprint Cookies for a summer picnic; the sun was doing that golden thing through the kitchen window and the house smelled like butter and citrus. Someone asked if they were store-bought and I almost took it as a compliment until my sister grabbed the last one and declared them “dangerously good.” I’ve been tweaking this little recipe ever since—sometimes I fill the centers with a bright lime curd, sometimes with a quick fruit jam—but the core of it stays the same, and that’s probably why I keep coming back to it. If you want a fun, bright cookie that sounds fancier than it feels, this is it. You can also peek at a sibling version of these fruity thumbprints if you like to compare notes.
How I Found This Little Gem
I learned the base from my grandmother, who always used simple pantry things: butter, sugar, flour. Over the years I started folding in 2/3 cup of crushed freeze dried fruit to the dough for an intense fruity pop without adding moisture, and I began making a lime curd for the centers when limes were in season. The first ingredient list that stuck in my head is straightforward: 6 tablespoons butter, 1/2 cup granulated sugar, 1 egg for the dough, 1 teaspoon vanilla, 1 1/4 cups flour, 1/2 teaspoon salt, and 2/3 cup freeze dried fruit. For the curd I use another egg, 1/3 cup granulated sugar, 1 teaspoon cornstarch, 1/4 cup lemon or lime juice, 1 teaspoon vanilla extract, a pinch of salt, the zest of 4 limes if I’m doing lime curd, 2 tablespoons butter, and sometimes a tiny drop of green food coloring. Saying the ingredients out loud always feels like telling a secret: simple, but with one or two tricks that make them sing.
The Secret Behind Perfect Fruity Thumbprint Cookies
It’s small things: making sure the butter is soft but not greasy, crushing the freeze dried fruit into a powder so it distributes evenly, and resisting the urge to overwork the dough. I cream the 6 tablespoons of butter with the 1/2 cup granulated sugar until it’s pale and a little fluffy, then add the egg and 1 teaspoon vanilla. Fold in the 1 1/4 cups flour with 1/2 teaspoon salt, and finally stir in the crushed 2/3 cup freeze dried fruit. Chill the dough for about 20 minutes; it’s easier to roll and keeps the cookies from spreading too much.
A quick aside about the freeze dried fruit: crushing it in a spice grinder gives you a bright, concentrated flavor that doesn’t wet the dough. If you’d rather, you can try a pineapple coconut twist or a richer filling like the cheesecake-style centers I sometimes use when I want something more decadent.
Getting the Texture Just Right
For the cookies: preheat your oven to 350 degrees Fahrenheit. Roll the dough into walnut-sized balls, place them on a lined baking sheet, and press your thumb—or the back of a small spoon—into the center to make an indentation. Bake for about 10 to 12 minutes until the edges just begin to take on a light golden hue; the smell of butter and fruit will let you know you’re close. Remove from the oven, press the centers again if they puff up, and let them cool for a couple of minutes before filling so the curd or jam doesn’t run all over the tray.
One tip I always give: if you want a cleaner-looking thumbprint, dip your thumb in a little flour so it doesn’t stick. Another trick is to chill the sheet between batches if your kitchen is warm—cookies that go into a too-hot oven spread and flatten. When they’re done, the bottom should be set and lightly golden but not dark; the centers should still look a bit soft because whatever you spoon in will set as it cools.
I like to pair the fruity centers with other cookie ideas, and sometimes I’ll make a batch inspired by a chocolate heart thumbprint for a holiday table. You can also swirl a little cream cheese in if you want a richer bite, a nod to the cheesecake-style centers I sometimes make for birthday platters.
For the curd:
When I make lime curd, I whisk together the second egg with 1/3 cup granulated sugar and 1 teaspoon cornstarch until smooth. Then I add 1/4 cup lime (or lemon) juice, 1 teaspoon vanilla extract, a pinch of salt, and the zest of 4 limes if I’m being extra zesty. I pour this mixture into a small saucepan and cook over medium-low heat, stirring constantly, until it thickens enough to coat the back of a spoon—this usually takes just a few minutes. Take it off the heat, whisk in 2 tablespoons butter until glossy, and add a drop of green food coloring if you want that candy-lime hue. Let it cool before filling the cookies so it doesn’t melt right through.
A personal tip here: cook the curd slowly. If you hurry the heat you’ll get little cooked egg bits instead of a smooth, glossy curd. If that happens, strain it through a fine mesh and promise yourself to be gentler next time.
A Few Things I’ve Learned About Timing and Serving
These cookies are a wonderful make-ahead treat. I’ll often bake them the day before a gathering and fill them the morning of so the curd is fresh. Leftovers keep surprisingly well: store baked, unfilled cookies in an airtight container at room temperature for up to two days, or freeze them in a single layer then transfer to a sealed bag for up to three months. The curd keeps in the fridge for about a week; if you’re making the curd a day ahead, pour it into a jar and press a piece of plastic directly on the surface to prevent a skin from forming.
When serving, I love a clean slate of flavors: a little scoop of vanilla ice cream is divine with the tangy curd, or you can keep it simple and put them on a platter with fresh berries. They are also lovely with tea—green tea cuts through the richness—or a fizzy lemonade on a hot day.
Little Ways to Make It Your Own
Variations are my favorite part. You can skip the curd and use a dollop of jam, or try chocolate ganache for a more indulgent center. Swap the freeze dried fruit for cocoa powder and nuts if you want a chocolatey dough, or fold in lemon zest for extra brightness. If you want to get creative, try a red velvet dough and fill with a cream cheese swirl to echo that red velvet cream cheese variation I sometimes make for Valentine’s Day.
I love this recipe because it’s forgiving, bright, and endlessly adaptable. The way the butter browns faintly at the edges, the soft give of the cookie when you press your thumb into it, and the zing of citrus curd in the center always feel celebratory without being fussy. Once you have the base down—6 tablespoons butter, 1/2 cup sugar, 1 egg, 1 teaspoon vanilla, 1 1/4 cups flour, 1/2 teaspoon salt, and 2/3 cup freeze dried fruit—you’ve got a hundred small paths to play with.
Conclusion
If you want to see a different take on thumbprints with a white chocolate and peanut butter jam twist, check out this lovely recipe for White Chocolate Peanut Butter and Jelly Thumbprint Cookies for inspiration. For a more traditional, European-style raspberry version, I also like the look of this classic German Raspberry Thumbprint Cookies – Husarenkrapfen – Ahu Eats which captures that charming, jam-centered heritage.
Fruity Thumbprint Cookies
Ingredients
Method
- Cream the softened butter with granulated sugar until pale and fluffy.
- Add the egg and vanilla extract, mixing until combined.
- Fold in flour and salt.
- Stir in the crushed freeze dried fruit.
- Chill the dough for about 20 minutes.
- Preheat the oven to 350°F (175°C).
- Roll the chilled dough into walnut-sized balls and place them on a lined baking sheet.
- Press your thumb or the back of a small spoon into the center of each ball to create an indentation.
- Bake for 10-12 minutes until the edges are light golden brown.
- Remove from the oven, press down the centers again if they puff up, and let cool.
- In a bowl, whisk the egg, sugar, and cornstarch until smooth.
- Add lime (or lemon) juice, vanilla extract, salt, and zest.
- Cook in a saucepan over medium-low heat, stirring constantly, until thickened.
- Remove from heat and whisk in butter until glossy.
- Let cool before filling the cookies.