Grandma’s Secret Butter Cookies (The Easiest Recipe!)
Imagine a perfectly simple, melt-in-your-mouth butter cookie, with crisp, delicate edges and a tender, yielding center, all crowned with a sparkling layer of sugar. This, my friends, is that cookie. It’s a timeless classic, a nostalgic treat that tastes like pure, simple, buttery happiness. This recipe comes from my grandmother’s old, grease-stained recipe box, written…
Imagine a perfectly simple, melt-in-your-mouth butter cookie, with crisp, delicate edges and a tender, yielding center, all crowned with a sparkling layer of sugar. This, my friends, is that cookie. It’s a timeless classic, a nostalgic treat that tastes like pure, simple, buttery happiness.
This recipe comes from my grandmother’s old, grease-stained recipe box, written on a faded index card and simply titled “Secret Cookies.” For years, I thought the secret was some exotic, forgotten ingredient. But as it turns out, the secret isn’t in what you add, but in what you don’t: no leavening, no complicated steps, no chilling time. The secret is their shocking simplicity.
I promise you, this is one of the easiest and most rewarding cookie recipes you will ever make. The dough comes together in minutes and yields a massive batch of about 80 cookies, making it absolutely perfect for holidays, bake sales, or for stocking your cookie jar. The simple technique of pressing them with a sugar-dipped glass is what makes them so uniquely beautiful.
Get ready to master a timeless classic that will fill your home with the most incredible buttery aroma and become an instant family favorite.

Why These “Secret” Butter Cookies Are So Magical!
You are going to fall completely in love with the simple charm of these cookies. They are a beloved tradition for a reason! Here’s why:
- Melt-In-Your-Mouth Texture: Made with a generous amount of butter and only egg yolks, these cookies are unbelievably rich and tender with a delicate, sandy texture.
- Shockingly Simple & Fast: The dough comes together in minutes with just 5 basic ingredients, and best of all, there is absolutely no chilling required!
- It Makes a HUGE Batch: This one recipe yields around 80 cookies, making it the absolute champion for holiday cookie platters, parties, and gifts.
- Wonderfully Nostalgic: This is a classic, old-fashioned cookie that tastes like something your grandmother would have made. It’s pure, simple, and perfect.
- The Perfect Canvas for Sprinkles: The simple act of pressing them with colored sugar makes them look so festive and beautiful with almost zero effort.
Recipe Snapshot
| Prep Time | 15 minutes |
| Cook Time | 10 minutes |
| Total Time | 25 minutes |
| Yields | About 80 cookies |
| Calories | Approx. 65 kcal per cookie |
| Course | Dessert, Snack |
| Cuisine | American |
| Difficulty/Method | Easy / Baking |
Your Shopping List for a Big Batch of Happiness
The beauty of this recipe is its incredibly short and simple ingredient list. It’s all about quality!

→ For the Cookie Dough
- 3/4 pound (3 sticks) salted butter, softened → This is the star of the show! Using good quality salted butter is key for the best flavor.
- 1 3/4 cup granulated sugar → For the perfect, classic sweetness.
- 2 egg yolks → Using only yolks makes the cookies extra rich and tender.
- 2 teaspoon vanilla extract → A non-negotiable for that warm, classic flavor.
- 3 1/2 cup all-purpose flour → The simple structure for our perfect cookies.
→ For the Sparkling Topping
- Red, green, or multi-colored sugar → Use sanding sugar or sparkling sugar for the best, most beautiful crunch and color.
Let’s Bake! Crafting Your Classic Butter Cookies
Ready to fill your home with the best smell on earth? This process is so quick and satisfying.
Part 1: The Simple, No-Chill Dough
- Prep Your Oven: First things first, preheat your oven to 350°F (180°C). These cookies are baked on ungreased cookie sheets.
- Cream Butter and Sugar: In the bowl of a stand mixer fitted with a paddle attachment (or in a large bowl with a hand mixer), beat the softened butter and granulated sugar together until they are light and fluffy.
- Add Yolks and Vanilla: Add the two egg yolks and the vanilla extract, and mix well until everything is combined and smooth.
- Mix in the Flour: Add the flour all at once and mix on low speed until it’s thoroughly combined and a soft, thick dough has formed. Don’t overmix!

Part 2: The Signature Press & Bake
- Roll the Dough: Use a teaspoon or a small cookie scoop to portion out the dough. Roll each portion between your palms to create small, uniform balls. Place them on your ungreased cookie sheet, leaving a little space between them.
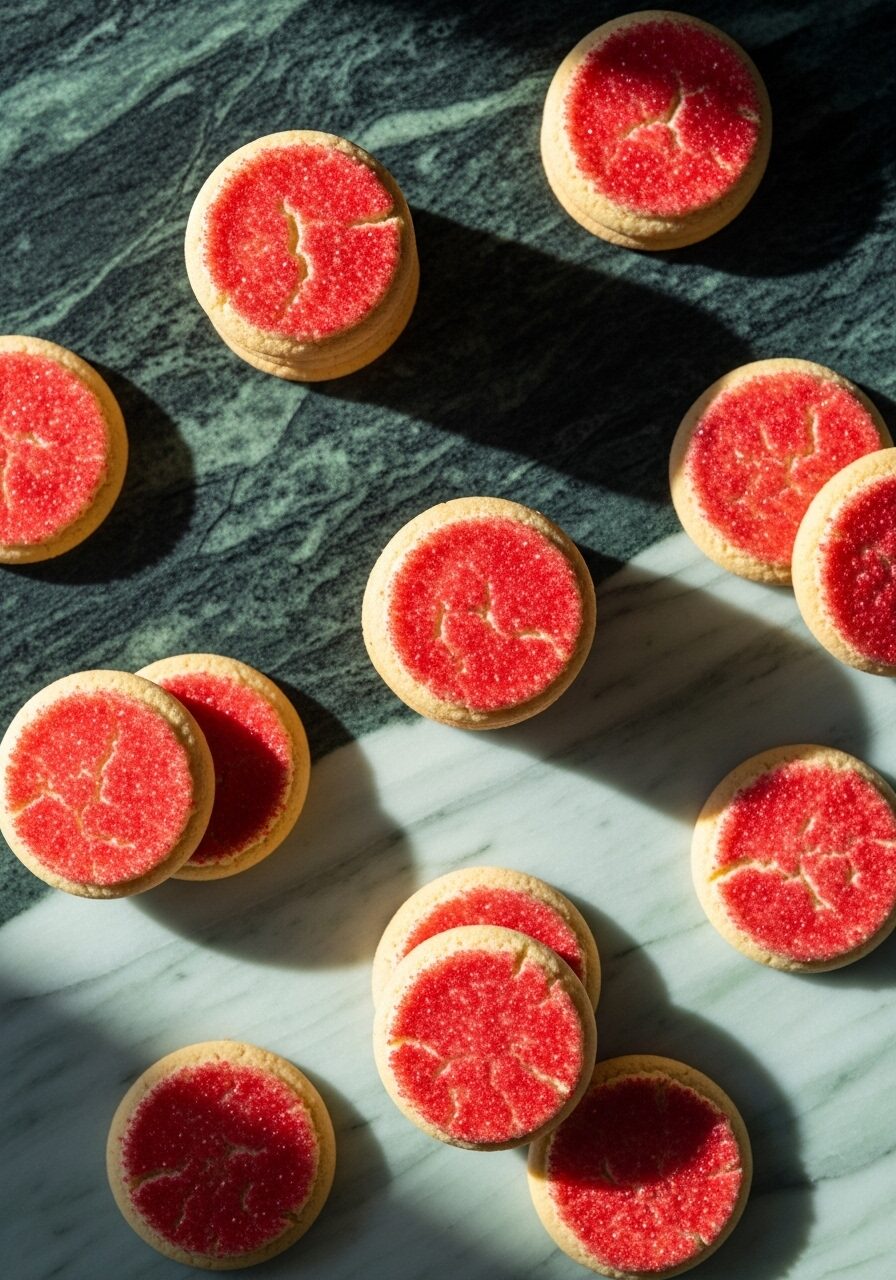
- The Sugar Press: Pour your colored sugar onto a small plate. Take a flat-bottomed glass (a pretty, patterned one is extra fun!) and dip the bottom into the colored sugar. Firmly press the sugar-coated glass onto a ball of dough to flatten it into a disc. Repeat for all the cookies, re-dipping the glass in sugar for each one.
- Bake to Perfection: Bake for about 10 minutes. Watch them like a hawk! These delicate cookies can burn easily. They’re done when the very edges are just starting to turn a pale golden brown.
- Rest and Cool: This is a crucial step! Let the cookies rest on the hot baking sheet for 1-2 minutes. They are very fragile when they’re hot, and this helps them set up. Then, carefully transfer them to a wire rack to cool completely.

WiseRecipes’ Top Tips for Perfect Butter Cookies
This is a simple recipe, but these little details are what make it truly special and foolproof.
- Use Good, Salted Butter. I can’t stress this enough. In a recipe with so few ingredients, the quality of your butter is everything. Using salted butter is a classic, old-fashioned trick that gives these cookies the perfect flavor balance.
- Don’t Overmix After Adding Flour. The key to a tender, melt-in-your-mouth cookie (and not a tough one) is to mix the flour until it’s just combined. Stop the mixer as soon as the dough comes together.
- The Glass Press is the Magic Step. This simple technique is what gives the cookies their signature look. It creates a beautiful, slightly crackled edge and ensures the sparkling sugar adheres perfectly to the top.
- Watch Them Like a HAWK. Seriously. The difference between a perfectly baked butter cookie and a burnt one is about 60 seconds. Pull them out when the very edges are just beginning to turn a pale golden color. They will continue to set on the hot pan.
- Let Them Rest on the Pan! These cookies are extremely delicate and fragile when they first come out of the oven. That 1-2 minute rest on the hot baking sheet is essential for them to firm up just enough to be moved to a cooling rack without breaking.
Creative Twists: Delicious Ways to Customize Your Cookies
This simple cookie is a perfect canvas for your own creative touches! Here are some ideas:
- Add Citrus Zest: Add the finely grated zest of one lemon or orange to the dough with the sugar for a bright, fresh flavor.
- Almond Flavor: Swap 1 teaspoon of the vanilla extract for 1/2 teaspoon of almond extract for a classic, nutty flavor.
- Chocolate Dipped: Once cooled, dip half of each cookie in melted dark or white chocolate.
- Holiday Spices: Add a 1/2 teaspoon of ground cardamom or a 1/4 teaspoon of ground nutmeg to the flour for a warm, spiced version.
- Make Sandwich Cookies: Sandwich two cooled cookies together with your favorite jam or a thin layer of buttercream.
- Different Toppings: Mix your colored sugar with some festive nonpareils or sprinkles before pressing.
- Make Them “Thumbprints”: Instead of flattening with a glass, gently press your thumb into the center of each ball of dough and fill the indentation with a small dollop of raspberry jam before baking.
- Use a Cookie Stamp: If you have a cookie stamp, you can press that into the dough ball instead of using a glass for a more intricate pattern.
Keep Them Fresh! Storing Your Butter Cookies
One of the best parts about this recipe is that the cookies stay crisp and delicious for a long time!
- Room Temperature: Store the cooled cookies in an airtight container or a cookie tin at room temperature. They will stay wonderfully crisp and fresh for at least a week.
- Freezing the Dough: This dough freezes beautifully! You can roll it into a log, wrap it well, and freeze for up to 3 months. Just slice and bake from frozen (you may need to add a minute or two to the bake time). You can also freeze the pre-rolled balls and press/bake them from frozen.
- Freezing Baked Cookies: The baked cookies also freeze perfectly. Let them cool completely, then store them in a freezer-safe container or bag for up to 3 months.
Grandma’s Secret Butter Cookies
Ingredients
Method
- Preheat oven to 350°F (180°C).
- In a mixer, cream the softened butter and sugar until light and fluffy. Add the egg yolks and vanilla, mixing well.
- Add the flour and mix on low speed until thoroughly combined and a soft dough forms. Do not overmix.
- Roll mounded teaspoonfuls of dough into balls and place on an ungreased cookie sheet.
- Dip the bottom of a flat-bottomed, patterned glass in colored sugar and press onto each dough ball to flatten it.
- Bake for about 10 minutes, watching carefully, until the edges are just lightly golden brown.
- Let the cookies rest on the baking sheet for 1-2 minutes to set, then gently transfer to a wire rack to cool completely.
Notes
FAQs: Your Butter Cookie Questions, Answered!
Do I really not have to chill the dough?
That’s the secret! This dough has a high flour-to-fat ratio and no leavening, which means the cookies hold their shape beautifully without needing any time in the fridge. It’s a fantastic recipe for when you want cookies now.
Can I use unsalted butter instead of salted?
Yes, you can. If you only have unsalted butter, just increase the amount of salt in the recipe from a pinch to about 1/2 teaspoon to get that same perfect flavor balance.
My dough seems very dry and crumbly. Is that right?
Yes, this is a fairly stiff, dry dough, almost like a shortbread. It might look a little crumbly after mixing, but it should come together easily when you roll it into balls with the warmth of your hands. If it’s absolutely not coming together, your butter might have been a bit too cold—just let it sit for 15 minutes and try again.
Can I use a different type of sugar for the topping?
For the best sparkle and crunch, I highly recommend using sanding sugar or sparkling sugar, which have large crystals that reflect light beautifully. Regular granulated sugar will work in a pinch, but it will melt into the cookie more and won’t have the same decorative effect.
My Final Thoughts: A Timeless, Simple Treasure
These “Secret” Butter Cookies are a beautiful reminder that sometimes, the simplest things are the most delicious. They are a pure, unadulterated celebration of butter, sugar, and vanilla. I hope this timeless recipe brings a little bit of old-fashioned warmth and happiness into your kitchen and becomes a treasured tradition for you, too.