Spooky & Sweet! My Easy Halloween Oreo Roll (No Bake, Totally Epic!)
Oh, my friends, who here isn’t utterly charmed by the playful, slightly spooky magic of Halloween? It’s the perfect excuse to get creative in the kitchen, especially with treats that bring a smile (or a delightful shiver!) to every face. Today at WiseRecipes, I’m beyond excited to share a recipe that perfectly embodies that spirit:…
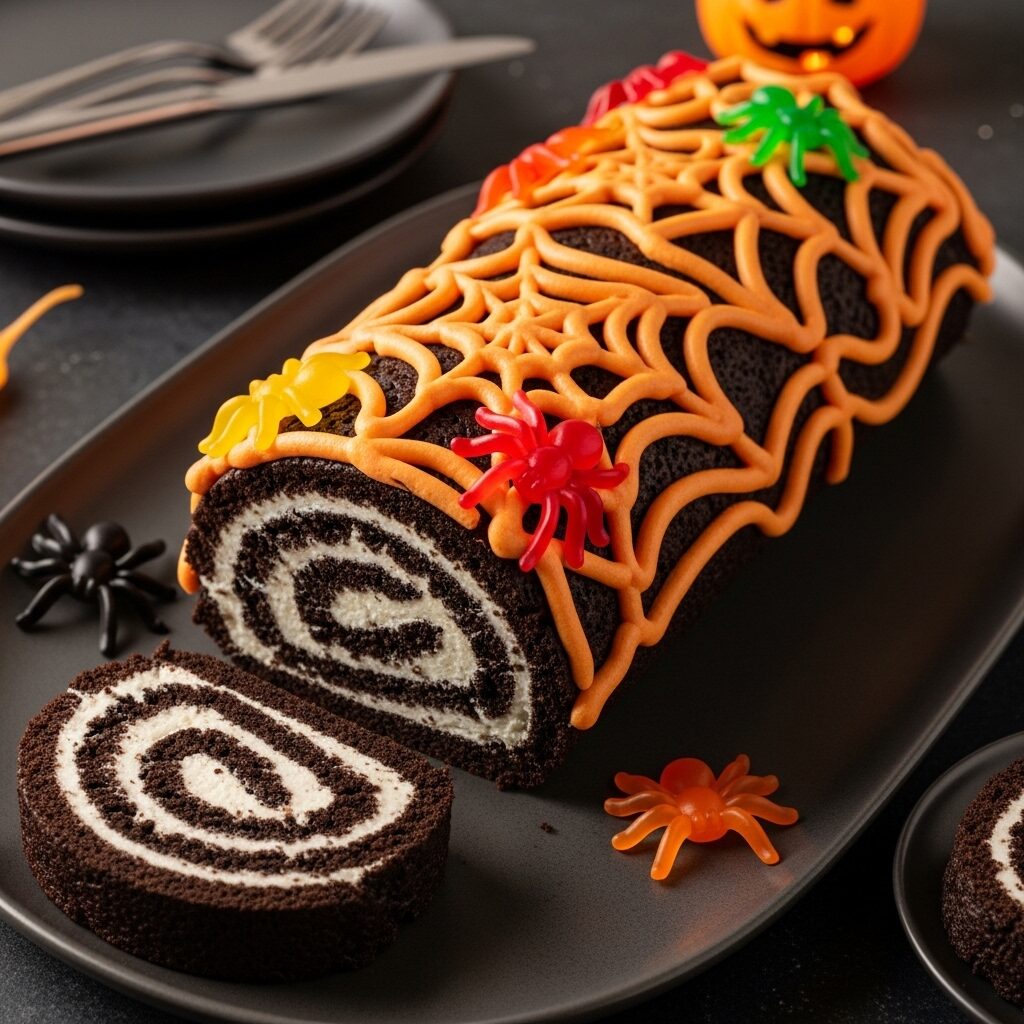
Oh, my friends, who here isn’t utterly charmed by the playful, slightly spooky magic of Halloween? It’s the perfect excuse to get creative in the kitchen, especially with treats that bring a smile (or a delightful shiver!) to every face. Today at WiseRecipes, I’m beyond excited to share a recipe that perfectly embodies that spirit: this incredible Halloween Oreo Roll! Seriously, prepare your taste buds for pure bliss – a rich, dark chocolate cookie crust, rolled around a luscious, creamy buttercream filling, and then adorned with a spooky marshmallow web and playful gummy spiders. It’s a haunted masterpiece, and it is pure joy in every single bite!
I just adore a recipe that feels incredibly special and playful but is secretly super simple and lightning-fast to make. This Halloween treat is exactly that! It’s a fantastic way to transform humble chocolate sandwich cookies and marshmallows into a powerhouse party food that will have everyone reaching for more. Forget complicated baking; we’re talking about ridiculously flavorful and satisfying treats that come together with just 35 minutes of active prep and a few hours of chilling. This isn’t just a dessert; it’s a mood-lifter, a fantastic Halloween party staple, and honestly, a guaranteed hit every single time. This Halloween Oreo Roll recipe yields 6-8 generous servings, making it perfect for school parties, trick-or-treat gatherings, or any time you crave amazing, effortless fun. Trust me, once you try this incredible combination, you’ll be making it again and again!
Why This [EASY!] Halloween Oreo Roll Will Be Your New Go-To!
This isn’t just another Halloween treat; it’s a creative, sweet, and incredibly satisfying culinary delight. Here’s why I’m absolutely smitten with it:
- No-Bake, No Fuss: This is the magic! You don’t need to turn on the oven for this dessert. Just mix, roll, chill, and decorate, making it perfect for quick prep and keeping your kitchen cool.
- Classic Oreo Flavor, Elevated: We’re taking that beloved, nostalgic taste of chocolate sandwich cookies and transforming it into an elegant, rolled dessert, filled with a rich buttercream. It’s an undeniable upgrade!
- Spooky Fun Decoration: The marshmallow web is so incredibly fun and easy to create, giving the roll that perfect eerie, haunted look. Add a few gummy spiders, and you’ve got a show-stopper!
- Creamy & Crunchy Textures: From the crisp cookie crust to the luscious buttercream filling, and the stretchy marshmallow web, every bite offers a delightful textural adventure.
- Perfect for Make-Ahead: This dessert is designed to be made ahead! Simply prepare, chill, and then decorate just before serving, making it ideal for busy party days.
Your Shopping List for Spooky Roll Bliss: Gather What You’ll Need
Creating this incredible Halloween Oreo Roll uses a blend of classic pantry staples and fun Halloween decorations. Here’s what you’ll want to grab to get started!
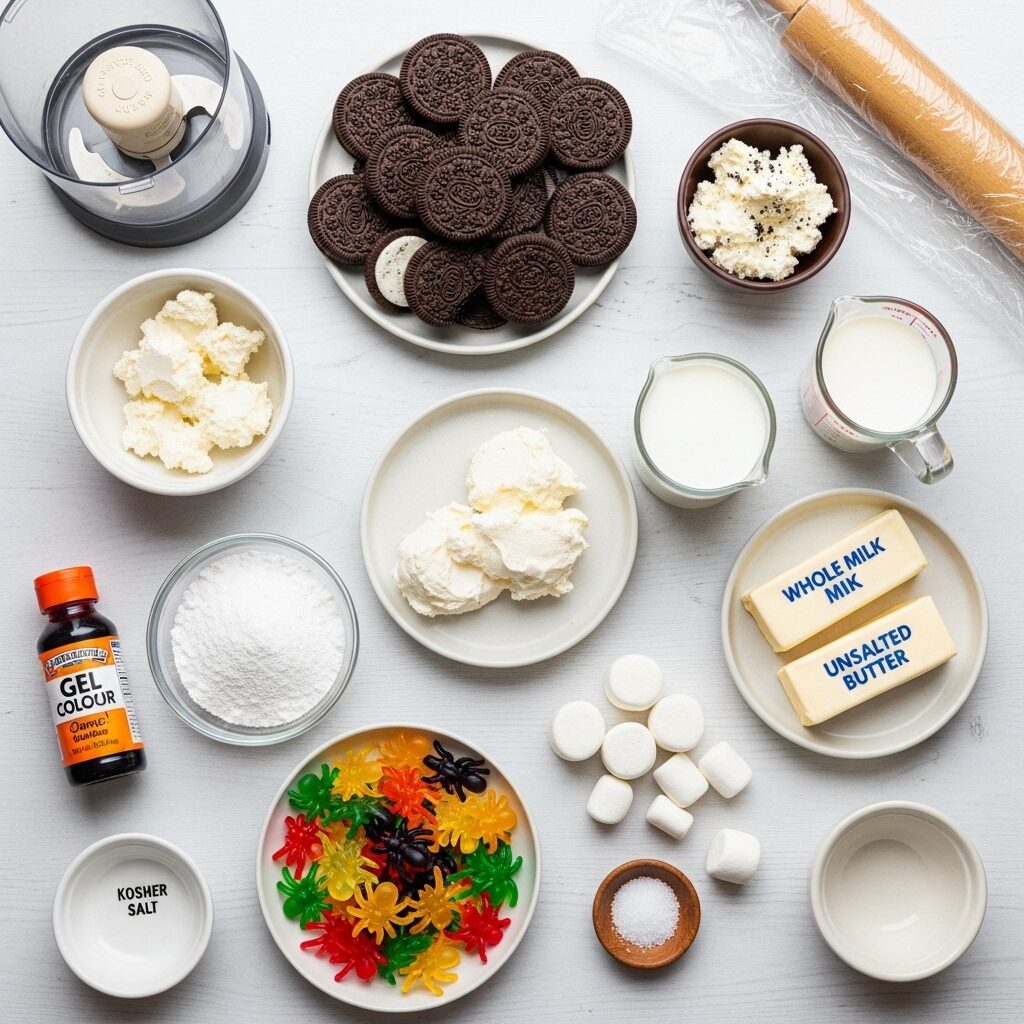
→ For the Rich Oreo Cookie Dough
- 1 (15-ounce) package double creme filled chocolate sandwich cookies: Such as Oreo Double Stuf – we’ll use the cookies and the filling!
- 8 ounces cream cheese, at room temperature: Adds creaminess and helps bind the cookie dough.
- 2 tablespoons whole milk: To adjust dough consistency.
→ For the Luscious Buttercream Filling
- 8 ounces cream cheese, at room temperature: (This is the creme filling reserved from the cookies, plus extra if needed).
- 1 stick (8 tablespoons) unsalted butter, at room temperature: For a rich, creamy buttercream.
- 2 cups confectioners’ sugar: For sweetness and smooth consistency.
- Kosher salt: A pinch, to balance the sweetness.
→ For the Spooky Marshmallow Web & Garnish
- 6 ounces marshmallows (about 24): Our secret for that amazing, stretchy web!
- Orange gel food coloring: To tint our marshmallow web.
- Gummy spiders, for decorating: For that essential spooky, creepy-crawly touch!
Let’s Create! Crafting Your Perfect Halloween Oreo Roll, Step-by-Step
This recipe is designed for maximum fun and minimal fuss. The chilling time is important, so plan accordingly!
Part 1: Preparing Our Oreo Cookie Dough Base
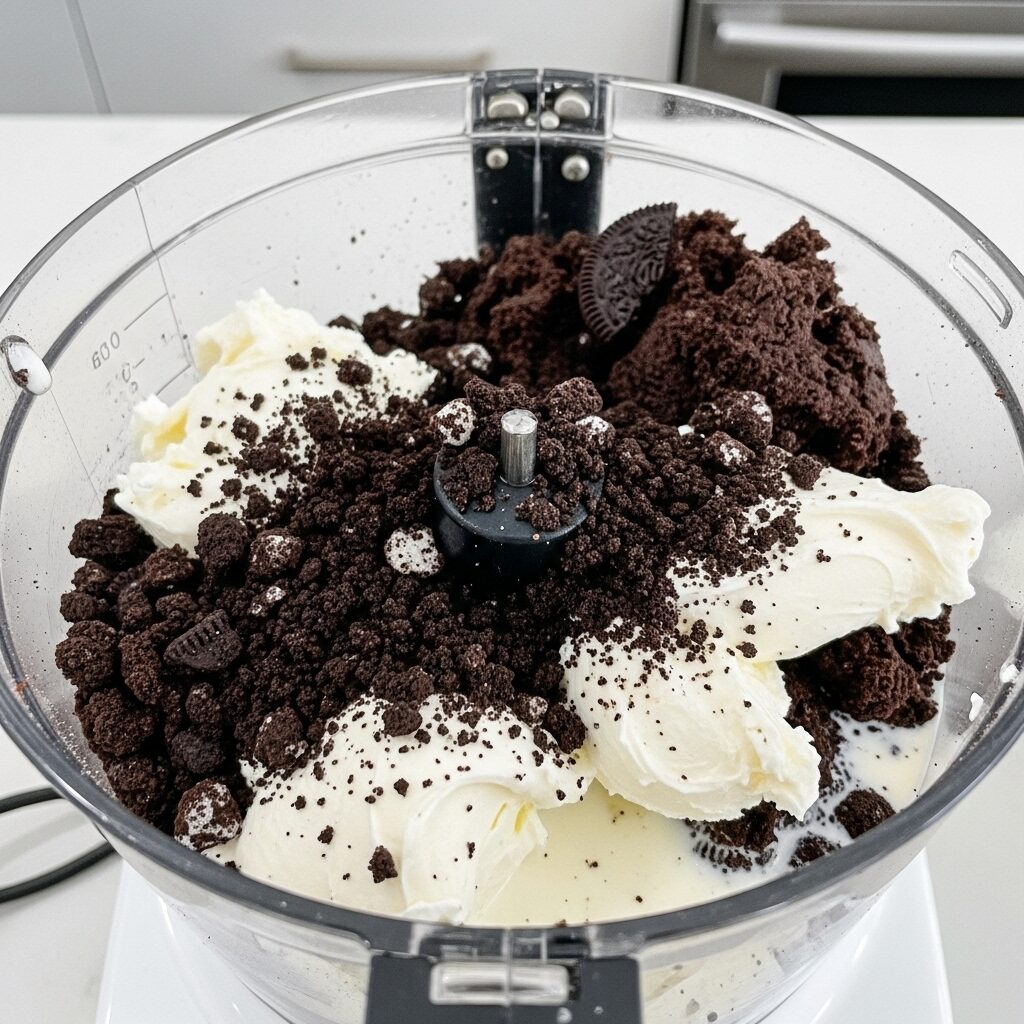
- Separate Cookies & Creme: Carefully scrape the creme filling from the 15-ounce package of double creme filled chocolate sandwich cookies into a small bowl and set aside. Transfer the chocolate cookie wafers to a food processor.
- Make Cookie Crumbs: Pulse the cookies in the food processor until they are finely ground, about 20 times.
- Form Cookie Dough: To the finely ground cookie crumbs, add the 8 ounces of cream cheese (at room temperature). Pulse until the mixture is evenly mixed and starts to form a dough, about 15 times, scraping down the sides as needed. If the mixture feels too thick or crumbly, add 1 tablespoon of the whole milk and pulse again. The dough should be the consistency of a soft sugar cookie dough.
- Roll Out Dough: Transfer the cookie dough to a large sheet of plastic wrap on a clean work surface. Cover with another large sheet of plastic wrap and use a rolling pin to roll out the dough to a 9-by-12-inch rectangle. Set aside.
Part 2: Making the Luscious Buttercream & Assembling the Roll
- Make Buttercream: In the same (cleaned) food processor, combine the 1 stick (8 tablespoons) softened unsalted butter with the reserved creme filling from the cookies. Process until smooth, about 30 seconds. Add 1 cup of the confectioners’ sugar and process until smooth. Add the remaining 1 cup confectioners’ sugar and a pinch of kosher salt and process until smooth. Finally, add the remaining 1 tablespoon whole milk and process until the buttercream is beautifully light and fluffy, about 30 seconds.
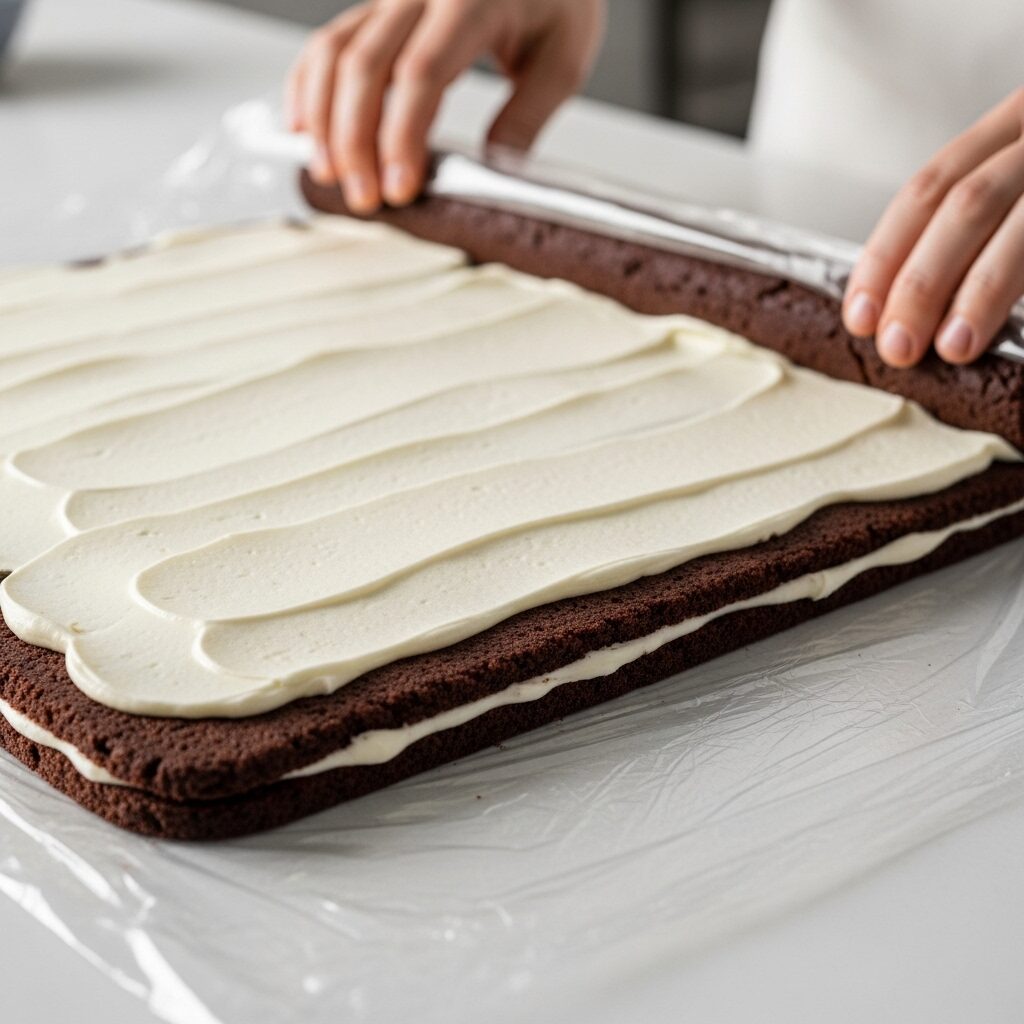
- Spread Buttercream: Position the rolled-out cookie dough rectangle with a shorter side facing you. Carefully remove the top sheet of plastic wrap. Evenly spread the luscious buttercream all the way to the edges on three sides of the rectangle, leaving a ½-inch border clear on the short side opposite you. This border helps contain the filling when you roll.
- Roll the Dough: Starting from the short side closest to you (the side with no border), carefully roll the dough away from you into a tight log, using the bottom sheet of plastic wrap to help you roll without sticking. Place the roll seam-side down.
- Chill Firmly: Tightly wrap the log with the excess plastic wrap, and twist the two ends of the plastic wrap to tighten the roll even further. Refrigerate until the roll is thoroughly firm, at least 4 hours, or ideally overnight. This chilling is crucial for holding its shape and neat slicing!
Part 3: Decorating Our Spooky Roll & Serving!
- Prep for Decorating: When you’re ready to serve, unwrap the firm Oreo roll and carefully transfer it to a serving platter.
- Make Marshmallow Web: In a large microwave-safe bowl, combine the 6 ounces of marshmallows (about 24) with 12 drops of orange gel food coloring. Microwave until the marshmallows lose their shape, about 1 minute. Stir well until deflated and evenly colored (a vibrant orange!). Let cool slightly, about 1 minute – you want it warm and pliable, but not too hot.
- Create Web Effect: Lightly dip your fingers (I recommend wearing disposable gloves for easy cleanup!) into the marshmallow mixture. Gently stretch the sticky marshmallow between your hands, pulling it until it becomes thin and weblike. Stretch and wrap this marshmallow web around the Oreo roll until the web effect covers it entirely, creating a spooky, tangled look.
- Add Gummy Spiders: While the marshmallow web is still sticky, quickly decorate it with candy gummy spiders, pressing them gently to adhere.
- Set & Serve! Let the decorated roll stand until the marshmallow web is firm, about 10 minutes. Slice into generous portions and serve immediately! Prepare for spooky smiles and delicious bites!
WiseRecipes’ Top Tips for Oreo Roll Mastery!
This fun Halloween dessert is incredibly easy, but these WiseRecipes insights will help you achieve Halloween Oreo Roll perfection every single time!
- Softened Cream Cheese & Butter: Ensure your cream cheese and butter are at room temperature. This is crucial for achieving a smooth, lump-free cookie dough and a light, fluffy buttercream.
- Don’t Over-Process Cookies: When pulsing the chocolate sandwich cookies, aim for fine crumbs, but don’t over-process them into a paste. You want that cookie texture!
- The Power of the Plastic Wrap: The two sheets of plastic wrap are your absolute best friends for this recipe! They make rolling out the dough easy and are essential for helping you roll the dough into a tight log without sticking, and then for tightening and chilling.
- Respect the Chill! The 4-hour (or overnight!) chilling time is non-negotiable for this no-bake roll. It allows the dough and buttercream to firm up perfectly, making it easy to slice and preventing a messy dessert.
- Work Quickly with Marshmallow Web: Once you microwave the colored marshmallows, they will be very sticky and set quickly. Work fast when stretching and applying the web! Wearing disposable gloves makes cleanup a breeze.
- Gummy Spiders for Fun: Don’t forget the gummy spiders (or other creepy-crawly candies)! They are the perfect finishing touch for that classic Halloween “spooky fun” vibe.
Easy Halloween Oreo Roll (No Bake, Totally Epic!)
Ingredients
Equipment
Method
- Scrape the creme filling from the cookies into a small bowl (set aside). Transfer the cookies to a food processor and pulse until finely ground (about 20 times).
- Pulse in the cream cheese, scraping down sides, until a dough forms (about 15 times). Add 1 tbsp milk if too thick.
- Transfer dough to a large sheet of plastic wrap on a work surface. Cover with another large sheet of plastic wrap and roll out to a 9-by-12-inch rectangle. Set aside.
- Combine butter with the reserved creme filling in the same food processor and process until smooth (about 30 seconds).
- Add 1 cup confectioners’ sugar and process until smooth. Add remaining 1 cup confectioners’ sugar and a pinch of salt and process until smooth. Add remaining 1 tbsp milk and process until buttercream is light and fluffy (about 30 seconds).
- Position dough with shorter side facing you. Remove top plastic wrap and evenly spread buttercream to edges (leave 1/2-inch border on short side opposite you).
- Roll dough away from you into a log using plastic wrap. Place seam-side down. Tightly wrap with excess plastic and tie ends to tighten.
- Refrigerate until firm, at least 4 hours, up to overnight.
- When ready to serve, unwrap roll and transfer to a serving platter.
- Combine marshmallows with orange gel food coloring in a large microwave-safe bowl and microwave until marshmallows lose shape (about 1 minute). Stir until deflated and evenly colored. Cool slightly (about 1 minute).
- Dip fingers (wear disposable gloves) into marshmallow mixture and stretch until thin and weblike. Stretch and wrap marshmallow around roll until web effect covers it. Decorate with candy gummy spiders while sticky. Let stand until firm (about 10 minutes).
- Slice and serve immediately.
Notes
Creative Twists: Delicious Ways to Customize Your Spooky Roll!
This Halloween Oreo Roll is already fantastic, but it’s also a wonderful canvas for your culinary creativity! Here are some ideas I love to play with:
- Different Cookie Flavors: Experiment with other flavors of chocolate sandwich cookies! Golden Oreos for a “ghostly” white roll, or mint Oreos for a spooky green twist.
- Candy Mix-ins: Gently fold ½ cup of mini chocolate chips, sprinkles, or chopped nuts (if not nut-free!) into the buttercream before spreading.
- Wormy Web: Instead of spiders, use colorful gummy worms to decorate the marshmallow web!
- Food Coloring Fun: Use purple, black, or even green gel food coloring for the marshmallow web for different spooky effects.
- Cream Cheese Swirl (in the dough!): For an extra tangy dimension, you could add 2 tablespoons of cream cheese directly to the melted chocolate cookie crumbs before adding the main cream cheese in step 3.
- Spiced Twist: Add a tiny pinch of ground cinnamon or nutmeg to the cookie crumbs for a subtle warming spice.
Keep It Spooky! Storing Your Halloween Treat
You’ve created something truly special, so let’s make sure it stays fresh and delicious!
- Refrigerator Storage: Once completely set, store your Halloween Oreo Roll (decorated) in an airtight container in the refrigerator for up to 3 days. The flavors will continue to meld, and it will remain wonderfully firm.
- Serving Temperature: This roll is best served chilled, straight from the refrigerator.
- Freezing? Not Recommended: I do not recommend freezing the fully assembled and decorated Oreo roll. The marshmallow web and gummy candies can become sticky or brittle upon thawing, and the texture of the cream cheese-based dough might change.
- Make-Ahead Prep: This recipe is perfect for making ahead! Prepare the entire roll (including the marshmallow web and spiders) up to 1-2 days in advance, then store chilled until serving. The chilling time is crucial for flavors to meld!
FAQs: Your Top Halloween Oreo Roll Questions, Answered!
Q: What are “double creme filled chocolate sandwich cookies”?
A: This refers to cookies like Oreo Double Stuf, which have extra cream filling compared to standard Oreos. The extra cream is used to enrich the buttercream. You can use regular Oreos, but the buttercream might be slightly less rich.
Q: My cookie dough is too sticky/crumbly. What went wrong?
A: Dough consistency can vary slightly based on the cookies and cream cheese. If too sticky, try chilling it a bit longer. If too crumbly, pulse in a tiny bit more milk (½ teaspoon at a time) until it forms a cohesive dough.
Q: Can I skip the plastic wrap for rolling?
A: I highly recommend against skipping the plastic wrap! It’s essential for rolling out the sticky cookie dough evenly without it adhering to your work surface and for helping you roll the log tightly. It also makes cleanup much easier.
Q: My marshmallow web isn’t stretchy. What went wrong?
A: This usually happens if the marshmallows were either overheated (they become brittle) or underheated (not fully melted). Ensure you microwave only until they lose their shape (about 1 minute for 6 oz.) and then stir well. The slight cooling (1 minute) is also key for stretchiness.
Q: Can I use different candies for decoration?
A: Absolutely! This is where you can get really creative. Gummy worms, candy corn, mini chocolate chips, sprinkles, or even edible glitter would all be fantastic for decorating your spooky Oreo roll.
And there you have it, my friends—your guide to crafting the most delightful, impressive, and truly satisfying Halloween Oreo Roll! This WiseRecipes creation is more than just a dessert; it’s a testament to how simple ingredients, when treated with a little love and smart steps, can come together to create something truly extraordinary. It’s a vibrant, exciting meal that you’ll genuinely look forward to eating, day after day.
I am genuinely so excited for you to try these and experience the delicious magic yourself. Please, please come back and let me know in the comments below what your favorite part of this spooky-fun roll was, or any fun twists you tried! Happy cooking from WiseRecipes!