Homemade Biscoff Macarons
The Secret Behind Perfect Homemade Biscoff Macarons There’s something incredibly special about macarons, especially when they’re infused with the delightful flavor of Biscoff cookie butter. When I first discovered this recipe for homemade Biscoff macarons, I was filled with anticipation. I couldn’t wait to create those delicate, colorful beauties that are not only a feast…
The Secret Behind Perfect Homemade Biscoff Macarons
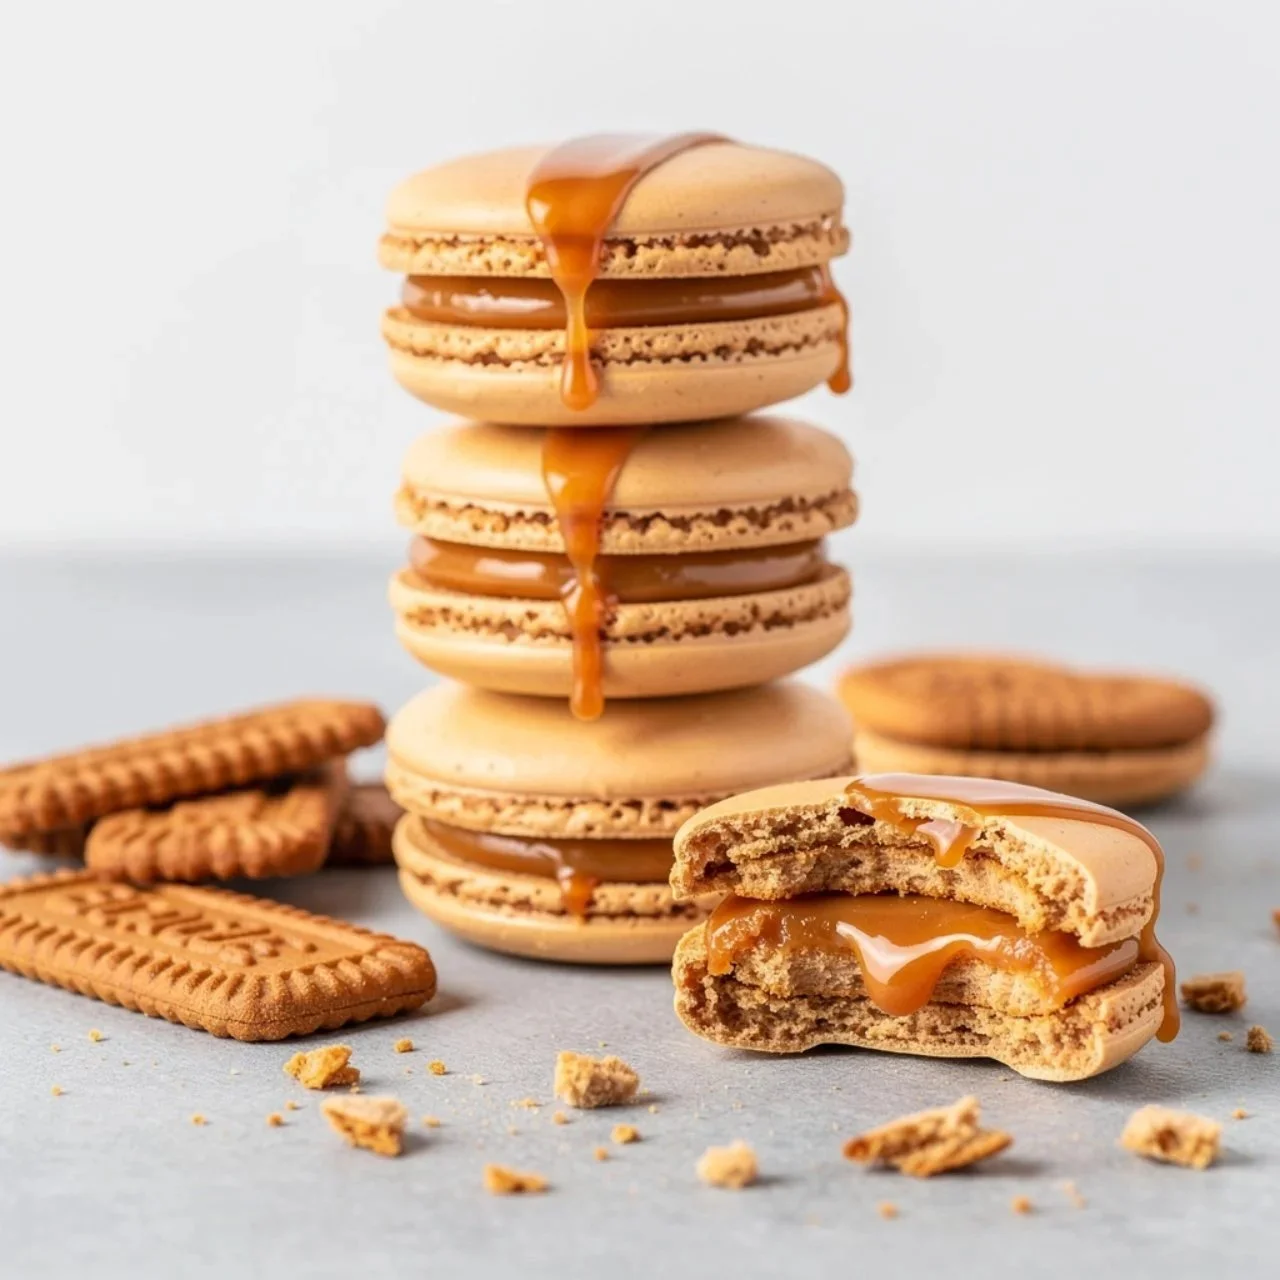
There’s something incredibly special about macarons, especially when they’re infused with the delightful flavor of Biscoff cookie butter. When I first discovered this recipe for homemade Biscoff macarons, I was filled with anticipation. I couldn’t wait to create those delicate, colorful beauties that are not only a feast for the eyes but also a treat for the taste buds. Plus, the simplicity of the ingredients makes this a recipe you’ll want to revisit time and again. You may also find Best Homemade English Muffins useful.
To dive into this lovely baking adventure, you’ll need a handful of ingredients: 1 cup of almond flour, 1 ¾ cups of powdered sugar, 3 large egg whites, ¼ cup of granulated sugar, 1 teaspoon of vanilla extract, ¼ cup of cookie butter (Biscoff spread), ½ cup of heavy cream, and 1 tablespoon of unsalted butter. These components come together to create an impressive dessert that will surely impress friends and family.
Getting the Texture Just Right
One of the best parts of making macarons is the satisfying process of achieving that perfect meringue. To start, preheat your oven to 300°F (150°C) and line a baking sheet with parchment paper. Now, sift together the almond flour and powdered sugar into a bowl—the finer the mixture, the better the texture of your macarons will be. When I first started, I underestimated the importance of this step, but trust me, it makes a significant difference.
Next, you’ll need to whip your egg whites in a separate bowl until they become foamy. Gradually add the granulated sugar until the mixture reaches stiff peaks. This is my favorite part because watching the transformation from liquid to airy fluff is simply magical. Fold in the almond flour mixture gently until everything combines seamlessly. The key here is to be gentle; you want to preserve as much air as possible.
I often find it helpful to remember a past meringue failure when folding the mixtures. I whisked too aggressively, and my macarons turned out flat. Now, I take my time with this crucial step.
Piping the Macaron Shells
Once you have your batter ready, transfer it to a piping bag lined with a round tip. This is where the magic happens! Pipe small circles onto the prepared baking sheet. This part requires a bit of practice, but don’t worry if they aren’t perfect on the first try—they’ll still taste wonderful! After piping, you’ll want to let the macaron shells sit for about 30-60 minutes until a skin forms on top. During this wait, I usually enjoy a cup of tea and dream about the flavors that are about to come together.
After the shells have set, bake them for 15-20 minutes, keeping a close watch until they’re no longer sticky on top. This is the moment when your kitchen will fill with the sweet, comforting aroma of baked goods, and you’ll know it’s almost time to enjoy your creations.
Crafting the Ganache
Now, it’s time for the filling, and this is what makes these macarons truly special. Heat the heavy cream until it just simmers, then pour it over the cookie butter and add the unsalted butter. Stir this mixture until it’s smooth, creating a delicious ganache that perfectly complements the macaron shells. If you’re looking for more tips on perfecting your macaron technique, you might want to check out this foolproof guide to French macarons.
Once your ganache is ready, pipe it onto half of the macaron shells and sandwich them with the other halves. I find that allowing the macarons to mature in the fridge for at least 24 hours enhances the flavors beautifully.
A Few Things I’ve Learned
Throughout my journey with macarons, I’ve picked up several nuggets of wisdom. First, always use room-temperature egg whites; they whip up much better than cold ones. Also, consider experimenting with flavors—I’ve made variations with matcha and raspberry that turned out wonderfully. Storing leftover macarons is easy; simply keep them in an airtight container in the fridge, and they will retain their delightful texture and flavor.
Another great tip is to serve these macarons alongside a cup of coffee or tea. The subtle sweetness of the Biscoff macarons pairs perfectly with a warm beverage, making them an ideal indulgence for any time of day.
The Best Part About This Dish
What I adore most about these homemade Biscoff macarons is not just their taste but the joy of sharing them with loved ones. Each bite is an explosion of flavor, with the soft, chewy texture contrasting beautifully with the creamy ganache. Whenever I serve these, I’m met with smiles and satisfied sighs, a delightful reminder of why I love baking.
The process may seem a bit daunting at first, especially for beginners, but with patience and practice, you can master this art. If you’re ever feeling stuck, remember that baking is about learning through experimentation. Don’t hesitate to make adjustments and discover what works best for you.
Conclusion
In conclusion, making homemade Biscoff macarons is not just a culinary task; it’s an enjoyable journey that brings joy and satisfaction. Whether for a special occasion or just because, these treats never fail to impress. For more inspiration and macaron recipes, you might want to explore these Lotus Biscoff Macarons, which offer a unique twist on the traditional version. Happy baking!