Homemade Choco Taco
The Joys of Making Homemade Choco Tacos The other day, I was reminiscing about those summer nights spent running to the ice cream truck, eagerly waiting to get my hands on a Choco Taco. There’s something magical about the combination of a crisp, cone-shaped shell filled with creamy ice cream and coated in rich chocolate….
The Joys of Making Homemade Choco Tacos
The other day, I was reminiscing about those summer nights spent running to the ice cream truck, eagerly waiting to get my hands on a Choco Taco. There’s something magical about the combination of a crisp, cone-shaped shell filled with creamy ice cream and coated in rich chocolate. So, instead of waiting for my next nostalgic dessert moment, I decided to recreate this treat at home. What I discovered was that making homemade Choco Tacos is not only easy but also incredibly satisfying! You may also find 4Th Of July Chocolate Covered Strawberries 2 useful.
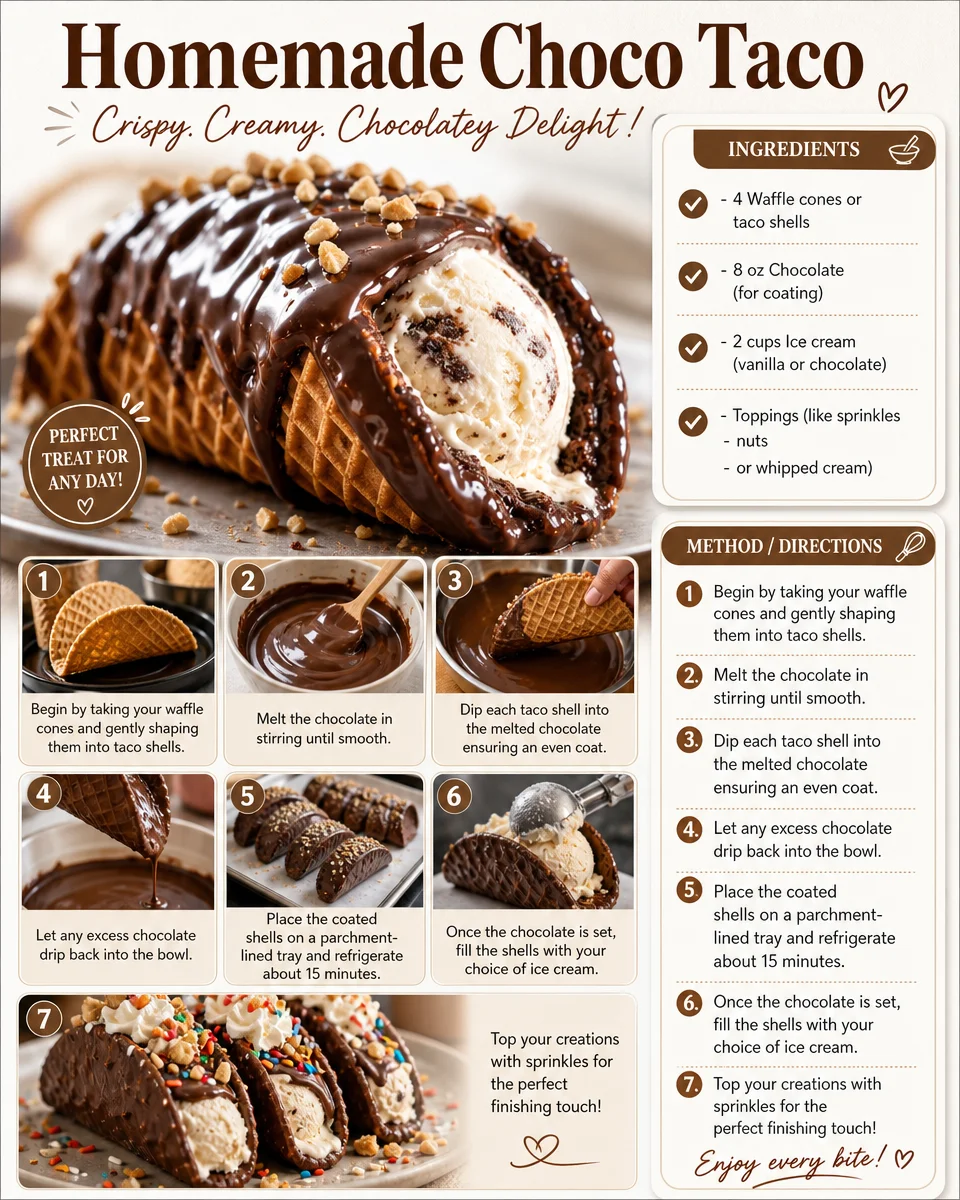
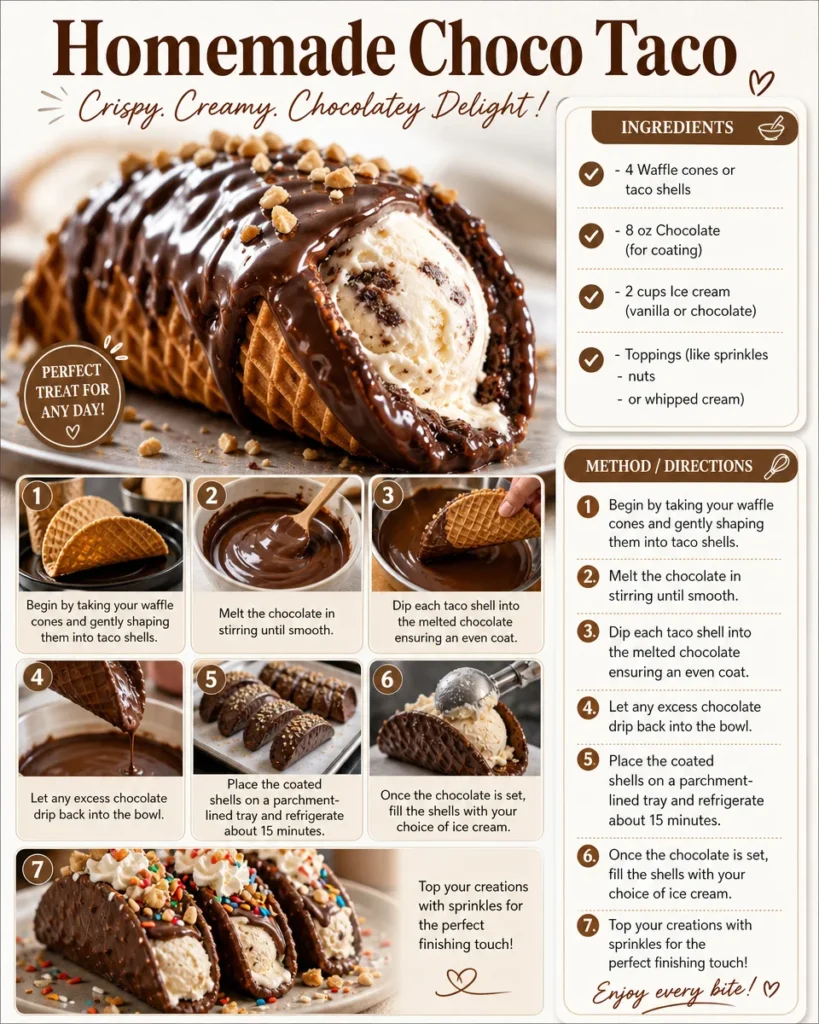
Now, let me walk you through this delightful journey of flavors, warmth, and creativity. To start your own adventure, you’ll need a few simple ingredients: four waffle cones, eight ounces of chocolate for coating, two cups of your favorite ice cream—vanilla or chocolate works beautifully—and some fun toppings like sprinkles, nuts, or whipped cream.
Shaping the Taco Shells
Begin by carefully taking those waffle cones, which are the foundation of our taco shells. If you’re lucky enough to find taco-shaped cones, you’re already one step ahead! If not, don’t worry—just gently shape your cones into taco shells by pressing them slightly at the base. This process might take a minute, but it’s well worth the effort.
While I was making these, I thought about how fun it is when friends come over and everyone can personalize their toppings. It’s almost a mini ice cream party! In fact, you could consider pairing these with something savory, like 30-minute one-pot taco soup, creating a light-hearted meal followed by a sweet dessert!
The Chocolate Coating
Next up is the chocolate coating. I like to melt the chocolate in a microwave-safe bowl, turning on the microwave in 30-second increments to avoid burning it. Stir vigorously once the chocolate starts to melt, mixing until it’s smooth and glossy. The aroma that fills the kitchen at this point is simply irresistible!
Take each taco shell and dip it into the melted chocolate, ensuring you cover it evenly. Don’t be shy—make sure to let any excess chocolate drip back into the bowl. Once you’ve coated all your shells, place them onto a baking sheet lined with parchment paper and pop them in the freezer for about 15 minutes, allowing the chocolate to harden to a delightful crunch.
Filling with Ice Cream
Once the chocolate is set, it’s time for the fun part—filling those taco shells with ice cream! I recommend using softened ice cream for easier scooping. Vanilla works brilliantly for that classic flavor, but feel free to get creative with chocolate or even fruity flavors if you’re feeling adventurous. I usually take a spoonful of ice cream, gently packing it down into the shell.
At this point, let your imagination run wild! You can garnish your Choco Tacos with all sorts of toppings. Whether you prefer a sprinkle of nuts for a little crunch, a dollop of whipped cream, or lots of colorful sprinkles, the sky is the limit. As a personal tip, I love to keep some sticky caramel sauce on hand as well—it adds an extra layer of decadence!
Serving and Enjoying
Now that your Homemade Choco Tacos are filled and beautifully topped, you should serve them immediately. Watching your friends’ eyes light up upon seeing these treats is one of the best parts of the process. If you happen to have leftovers (which is rare in my household), you can store the assembled tacos in the freezer, but be mindful that the waffle cones may lose some of their crispness over time.
One thing I’ve learned through trial and error is to be mindful of how long you let them sit after assembling. They’re best enjoyed fresh, but if you’re assembling them for a party, doing it just before serving is ideal.
Variations to Try
The beauty of this homemade dessert is its versatility. If you want to switch things up, try using different flavored cones or even making a cookie taco shell with a baked cookie instead. You can dive into nutty flavors by adding crushed almonds or pecans, or create a berry-inspired taco with a scoop of strawberry or raspberry ice cream topped with fresh fruit. The options are endless!
It’s also fun to explore some seasonal variations. For example, during the holidays, a peppermint ice cream filling can give it a festive twist, while adding a drizzle of white chocolate on top takes it up a notch.
Conclusion
Homemade Choco Tacos are a delightful treat that spark fond memories while offering endless customization options. The process of making them is approachable and allows you to create a dessert that’s truly your own. If you’re looking for other creative dessert ideas, you can explore more recipes like the Homemade Choco Tacos Recipe, or try making some fun chocolate-covered strawberries to go along! Enjoy your sweet creations!
Choco Tacos
Ingredients
Method
- Gently shape waffle cones into taco shells by pressing them slightly at the base.
- Melt the chocolate in a microwave-safe bowl in 30-second increments, stirring until smooth.
- Dip each taco shell into the melted chocolate, ensuring even coverage.
- Let excess chocolate drip back into the bowl and place the coated shells on a parchment-lined baking sheet.
- Freeze the taco shells for about 15 minutes to allow the chocolate to harden.
- Once the chocolate is set, fill taco shells with softened ice cream, packing it down gently.
- Garnish with desired toppings such as nuts, whipped cream, or sprinkles.
- Optionally, drizzle caramel sauce for added flavor.
- Serve immediately after assembling for the best experience.