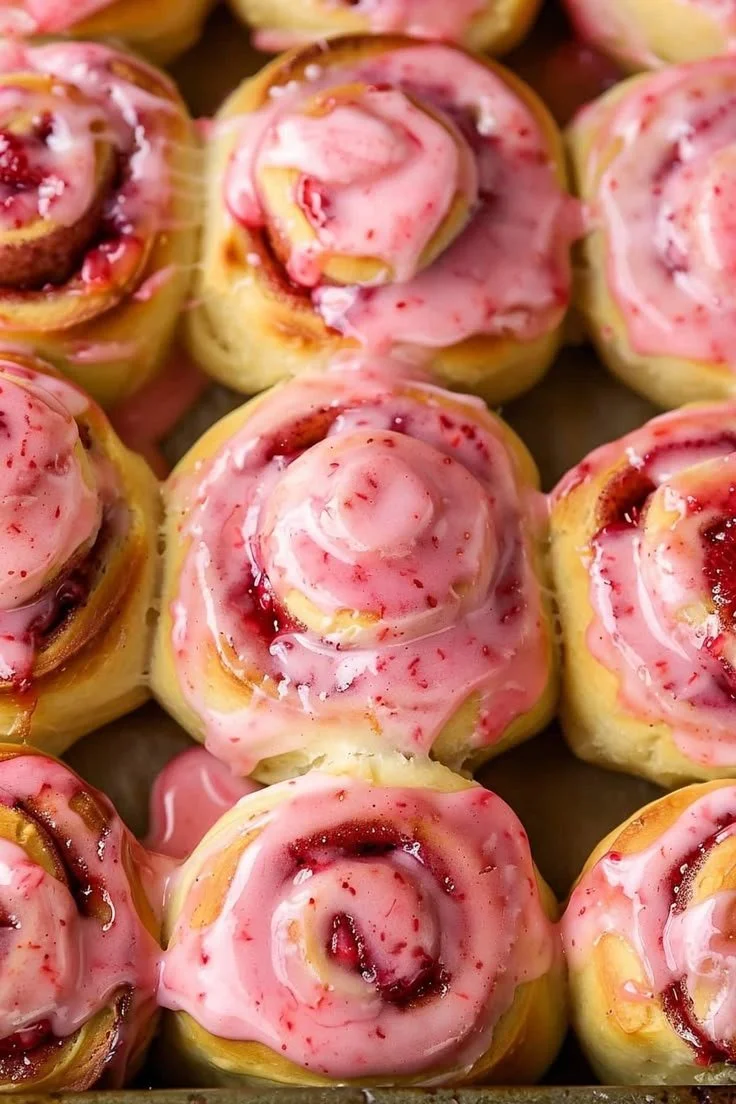
The Ultimate Homemade Honey Buns: Seriously Soft, Sweet, & Glazed to Perfection!
Oh, friends, let me tell you about a morning favorite that utterly transforms any ordinary day into something special: Homemade Honey Buns. Seriously, there’s just something magical about a warm, soft, ridiculously sweet pastry, isn’t there? When I’m craving that ultimate comfort, few things hit the spot quite like these. They’re a symphony of everything…
Oh, friends, let me tell you about a morning favorite that utterly transforms any ordinary day into something special: Homemade Honey Buns. Seriously, there’s just something magical about a warm, soft, ridiculously sweet pastry, isn’t there? When I’m craving that ultimate comfort, few things hit the spot quite like these. They’re a symphony of everything wonderful: a pillowy soft dough, a fragrant burst of cinnamon sugar swirled throughout, and then, the pièce de résistance—a decadent, creamy honey glaze that just melts right into every nook and cranny. Forget those sad, often stale store-bought versions; these from-scratch beauties are a revelation, and once you try them, you’ll know exactly why taking the time to make them yourself is so incredibly, deliciously rewarding.
I know, I know. Making honey buns from scratch sounds like a big project, maybe even a little daunting if you’re not super experienced with yeast doughs. And yes, it’s a labor of love, marked as “intermediate” for a reason. But trust me on this: I’ve poured all my favorite tips and tricks into this recipe, breaking down every single step so you can absolutely, confidently create bakery-worthy soft honey buns right in your own kitchen. We’ll dive into the forgiving magic of yeast, the satisfying rhythm of rolling, and the sheer, unadulterated joy of biting into that first sticky, sweet, perfectly tender bun. Get ready to fill your entire home with the most intoxicating aroma and your tummy with the most irresistible treat, perfect for a lazy Sunday, a special holiday brunch, or just because you deserve something truly amazing!

Why These Homemade Honey Buns Are About to Become Your Obsession
This isn’t just another recipe; it’s the one you’ll come back to, time and time again.
- A Texture That Dreams Are Made Of: We’re talking cloud-like, pillowy, melt-in-your-mouth soft. Seriously, the texture of this dough is what sets these honey buns apart. It’s light, tender, and just begging to be devoured.
- That Irresistible Sticky Glaze: It’s not just sweet; it’s got that perfect, almost gooey, sticky quality that you expect from a classic honey bun. The glaze isn’t an afterthought; it’s a luscious, flavorful blanket that ties everything together beautifully.
- Pure, Unadulterated Nostalgia: There’s a reason honey buns are a timeless comfort food. This WiseRecipes rendition captures all that cozy, nostalgic charm but elevates it with the unbeatable taste of fresh, homemade ingredients. It truly tastes like love.
- A Baking Adventure with a Sweet Reward: Yes, there’s some hands-on time and a couple of rises, but honestly, the process is incredibly therapeutic. And the moment you pull these golden beauties from the pan and slather them with glaze? Pure, profound satisfaction. It’s a project that pays off in the most delicious way possible!
Your Shopping List for Honey Bun Bliss: Gather What You’ll Need
This impressive treat comes together with just a handful of quality ingredients. I’ve broken them down into the three main parts of our honey bun journey, so you know exactly what goes where.

→ For the Soft Dough
- 3 cups all-purpose flour, plus more for rolling
- 3 tablespoons granulated sugar, for the dough
- 1 tablespoon instant yeast
- ½ teaspoon salt, for the dough
- ½ cup warm water, between 105°F-115°F: Crucial for activating the yeast without killing it. Use a thermometer!
- 1/3 cup honey, for the dough
- 1 large egg
- 1 teaspoon vanilla extract, for the dough
- ¼ cup shortening, melted
- Vegetable or peanut oil, as needed for frying
→ For the Cinnamon Sugar Swirl
- ¼ cup granulated sugar, for cinnamon sugar
- 1 ½ teaspoon cinnamon
→ For the Creamy Glaze
- 4 2/3 cup powdered sugar, for the glaze
- 2 ½ tablespoons honey, for the glaze
- 1 tablespoon melted butter, for the glaze (Note: If strictly dairy-free, substitute with melted vegan butter or shortening)
- ½ teaspoon vanilla extract, for the glaze
- ¼ teaspoon salt, for the glaze
- Warm water, as needed for glaze
Let’s Bake! Crafting Your Perfect Honey Buns, Step-by-Step
Alright, let’s get our hands (a little bit) sticky! Making these homemade honey buns is a process, but each stage is deeply satisfying and builds towards that incredible final result. Take your time, enjoy the journey, and trust the process!
Part 1: The Soft Dough (The Foundation of Flavor)
- Combine Dry Ingredients: Grab the bowl of your trusty stand mixer. Into it, whisk together your 3 cups of all-purpose flour, 3 tablespoons of granulated sugar, 1 tablespoon of instant yeast, and ½ teaspoon of salt. Give it a good, thorough whisk to make sure everything is nicely distributed. Then, just set this dry mixture aside for a moment.
- Prepare Wet Ingredients: In a separate, medium-sized bowl, whisk together your ½ cup warm water (seriously, check that temperature—it’s important!), 1/3 cup honey, 1 large egg, and 1 teaspoon vanilla extract. Get it all nicely combined.
- Add Melted Shortening: Next, melt your ¼ cup shortening until it’s liquid and smooth. Pour it right into your wet ingredients, mixing until everything looks perfectly homogenous.
- Mix Dough: Attach your dough hook to your stand mixer. Now, pour all those lovely wet ingredients into the dry mixture in the mixer bowl. Start mixing on a low speed. It’ll look a bit shaggy and messy at first, but keep mixing until the wet and dry ingredients are completely combined and you don’t see any dry pockets of flour. It will come together, I promise!
- Knead to Perfection: Once everything’s combined, bump that mixer speed up to medium and let it knead the dough for a full 8 minutes. This is where the magic happens for that soft, chewy texture! You’ll notice the dough becoming smooth, elastic, and it should eventually pull cleanly away from the sides of the bowl.
- First Rise: Time for the dough’s beauty sleep! Gently shape your beautifully kneaded dough into a neat ball. Lightly oil a clean glass bowl (I usually use vegetable or peanut oil) and place the dough ball inside, giving it a flip to coat the top with oil. This little trick stops a dry crust from forming. Now, cover the bowl tightly with plastic wrap and find a cozy, draft-free, slightly warm spot. An oven that’s been turned off but has its light on is perfect, or even a sunny windowsill. Let it rise for 1 to 2 hours, or until it has almost doubled in size. This slow rise is key for developing amazing flavor!
Part 2: Shaping & Second Rise (The Cinnamon Swirl Magic)
- Prepare Cinnamon Sugar: While our dough is happily puffing up, let’s get our cinnamon sugar ready. In a small bowl, whisk together the ¼ cup granulated sugar and 1 ½ teaspoon cinnamon until it’s evenly mixed and smells absolutely divine. Set it aside.
- Roll Out Dough: Once your dough has just about doubled in size, gently turn it out onto a lightly floured, clean work surface. Grab your rolling pin and roll the dough out into a nice, even rectangle, roughly 12 inches long and 8 inches wide. Aim for consistent thickness here.
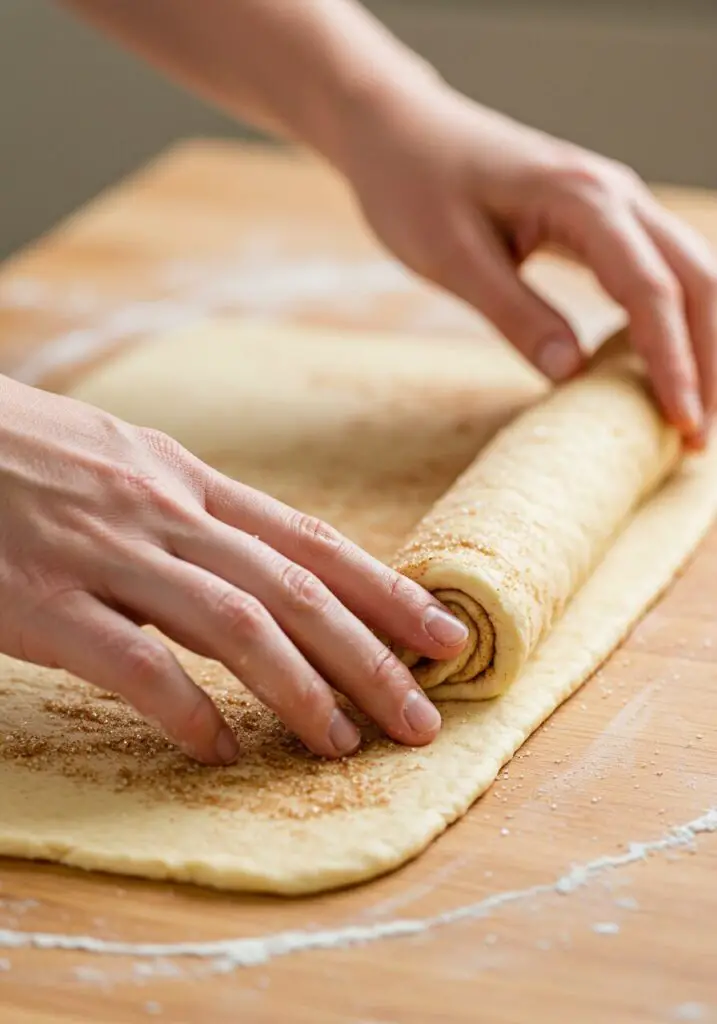
- Apply Cinnamon Sugar: Now for the good stuff! Generously dust the entire surface of your rolled-out dough with that amazing cinnamon-sugar mixture. Make sure to leave a clean edge (about ½ inch) along one of the long sides – this will be our sealing edge. Gently press the cinnamon sugar into the dough with your fingertips or the palm of your hand to help it stick better.
- Roll & Seal: Starting from the long side opposite your clean edge, carefully and tightly roll the dough up into a neat log. Roll it towards that clean edge. Once you reach the end, lightly brush the clean edge with just a little water (think of it as edible glue!). Press that clean edge firmly into the roll and use your fingers to smooth and seal it securely.
- Cut the Buns: Time to make our individual honey buns! Using a super sharp serrated knife, first, trim off about 1 ½ inches from each pinched end of the roll (these ends usually don’t have quite enough filling, but they make great chef’s snacks!). Then, carefully cut the remaining log into 1-inch thick pieces, aiming for 10 equally sized buns.
- Second Rise: Place each beautiful cut honey bun onto a parchment-lined baking sheet, making sure to leave at least 2 inches of space between them. Lightly press down on each slice to flatten it slightly, and gently reshape them with your fingers if needed. Now, loosely cover them with plastic wrap or a clean kitchen towel and let them rise again in a warm, draft-free spot for about 45 minutes. You’re looking for them to be puffy, but not fully doubled in size.
Part 3: Frying & Glazing (The Grand Finale)
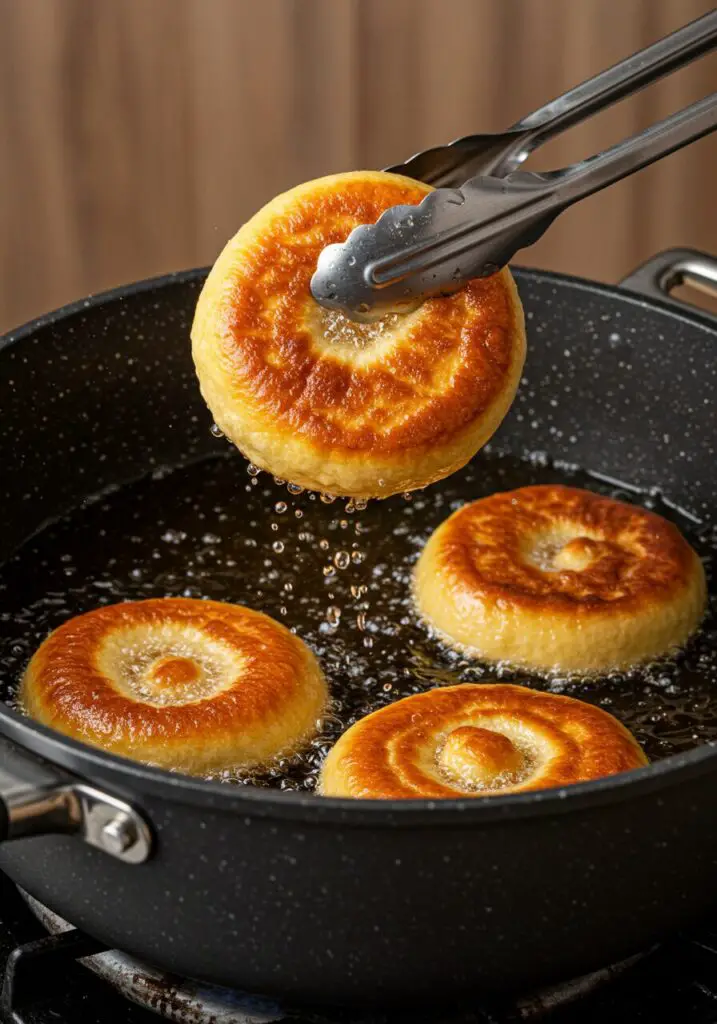
- Heat Oil (Frying Method): Midway through the second rise, it’s time to get our frying station ready. Pour your vegetable or peanut oil into a large, heavy-bottomed pan or stockpot until the oil is about 3 inches deep. Heat the oil over medium heat until it hits a steady 365°F (185°C). Seriously, use a clip-on pot thermometer here; consistent temperature is absolutely crucial for perfectly fried buns!
- Prepare Glaze: Just before you’re ready to start frying, whisk together all your glaze ingredients in a medium bowl: 4 2/3 cup powdered sugar, 2 ½ tablespoons honey, 1 tablespoon melted butter, ½ teaspoon vanilla extract, and ¼ teaspoon salt. Now, add warm water slowly, just a teaspoon at a time, whisking constantly until the glaze is wonderfully smooth, thick, and pourable, but definitely not too thin.
- Fry the Honey Buns: Once your buns have finished their second rise, give them one last gentle press down with your fingers. Carefully place a few honey buns into the hot oil, making sure you don’t crowd the pan – work in batches! Fry them for 90 seconds on one side, then gently flip them with tongs and fry for an additional 90 seconds on the other side, until they are absolutely gorgeous and golden brown on both sides.
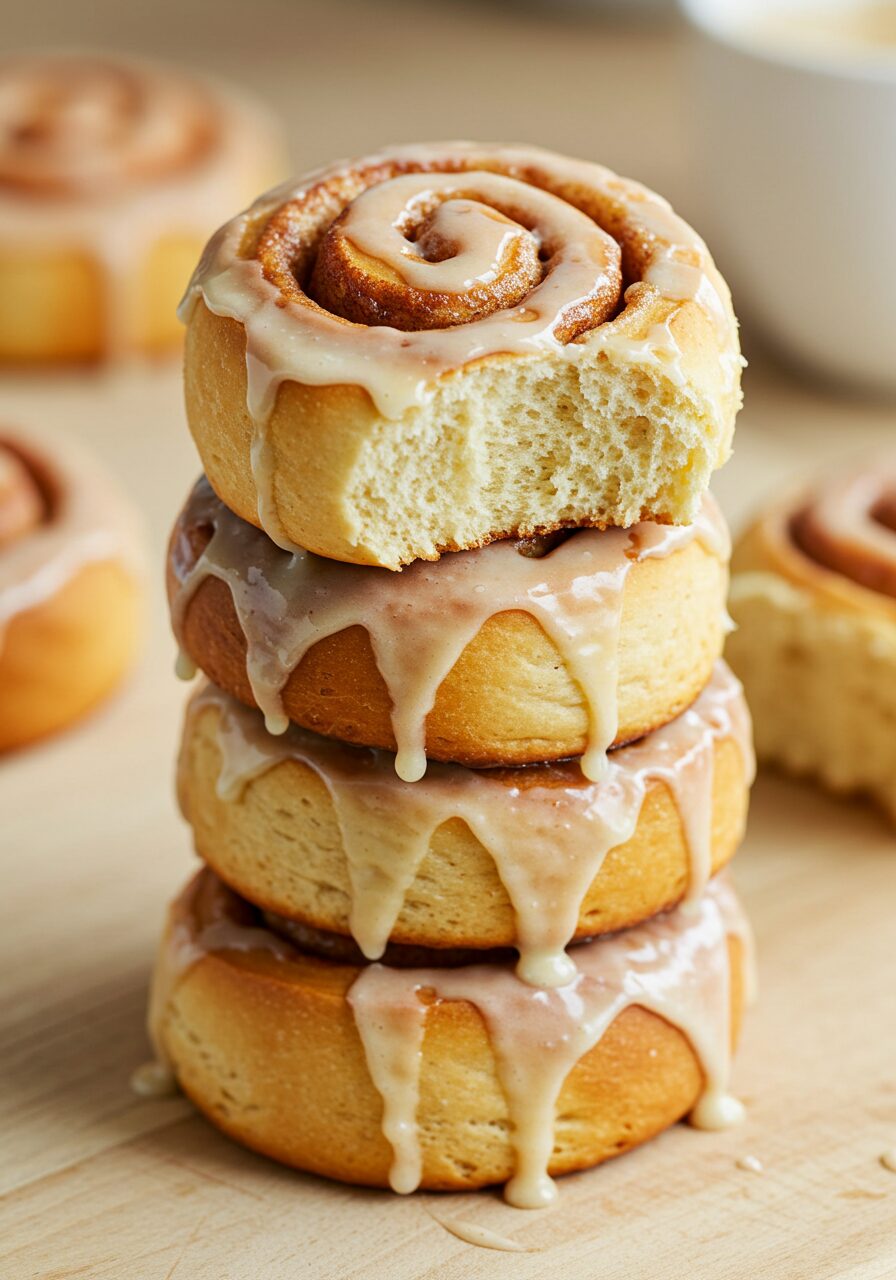
- Drain and Glaze Immediately: As soon as those honey buns are golden brown and beautiful, take them out of the oil and place them onto a wire cooling rack that’s set over a paper towel-lined baking sheet (to catch any excess glaze). While they’re still hot, immediately dip each bun into that amazing glaze, making sure it’s thoroughly coated!
- Repeat: Return the freshly glazed buns to the cooling rack. Keep repeating the frying and glazing process with any remaining honey buns. You can serve them warm for an ultimate treat, or let them cool slightly—they’re delicious either way!
WiseRecipes’ Best-Kept Secrets for Honey Bun Perfection
I get it, yeast dough can feel a bit intimidating sometimes. But these little pearls of wisdom from WiseRecipes will genuinely help you nail these honey buns every single time.
- Your Thermometer is Your Yeast’s Best Friend: I truly cannot stress this enough – the water temperature for activating yeast is the most critical factor. Too cold, and your yeast will be sleepy; too hot, and it’s a goner. That 105°F-115°F (40°C-46°C) sweet spot is where your yeast thrives, so please use a digital thermometer! [For more yeast wisdom, check out My Guide to Working with Yeast (Internal Link)]
- Resist the Urge to Over-Flour: It’s so tempting to keep adding flour if your dough feels sticky, but too much flour equals dry, tough buns. Stick to the recipe, and trust that proper kneading for the full 8 minutes will develop the gluten and make the dough less sticky and more elastic.
- Perfect Oil Temperature is a Game-Changer (Just like Yeast!): Just like with our yeast, consistent oil temperature when frying is non-negotiable. If your oil is too cool, your beautiful buns will soak up too much oil and end up greasy. Too hot, and they’ll burn on the outside before cooking through. Again, that clip-on pot thermometer is your best buddy! Aim for a steady 365°F (185°C). [For more on safe and effective frying, check out this Food Safety & Deep Frying guide (External Link)]
- Glaze While They’re Still Warm: This is the key to that perfect, slightly absorbed, and wonderfully sticky glaze. Dip those honey buns right after they come out of the oil (or oven, if you’re baking!). The warmth helps the glaze adhere and soak in just enough to create that irresistible coating.
Creative Twists: Delicious Ways to Customize Your Honey Buns
While these classic honey buns are truly perfect as they are, they’re also a fantastic blank canvas for your own culinary creativity! Here are a few ideas that I love:
- Baked Honey Buns (My Go-To for Less Fuss): If deep-frying isn’t your jam (or you’re just looking for a slightly less indulgent treat), you can absolutely bake these! After the second rise, preheat your oven to 350°F (177°C) with the rack in the lower third. Bake them for about 18 minutes, or until they’re beautifully lightly golden brown. Let them rest for 5 minutes after baking, then dip or brush generously with the glaze. Still absolutely divine!
- Nutty Honey Buns: For a lovely crunch and extra depth of flavor, sprinkle a generous handful of finely chopped pecans or walnuts over the cinnamon sugar mixture before you roll up the dough.
- Zesty Orange Glaze: Want a brighter, citrusy kick? Add 1-2 teaspoons of finely grated orange zest to your honey glaze mixture. The orange pairs surprisingly beautifully with the honey and cinnamon.
- Fully Dairy-Free Glaze: Since our dough is already dairy-free, you can make the entire recipe suitable for dairy-free diets by simply substituting the melted butter in the glaze with an equal amount of melted vegan butter or additional shortening.
- Mini Honey Buns: If you’re hosting a party or just want bite-sized treats, cut your rolled-up dough into ½-inch pieces instead of 1-inch. Just remember to adjust the frying time down to about 60-75 seconds per side.
Soft Homemade Honey Buns
Ingredients
Equipment
Method
- Combine Dry Ingredients: In the bowl of your stand mixer, whisk together the 3 cups of all-purpose flour, 3 tablespoons of granulated sugar, 1 tablespoon of instant yeast, and ½ teaspoon of salt. Give it a good whisk to ensure everything is evenly distributed. Set this dry mixture aside for a moment.
- Prepare Wet Ingredients: In a separate medium-sized bowl, whisk together the ½ cup warm water (make sure it’s between 105°F-115°F, use a thermometer!), 1/3 cup honey, 1 large egg, and 1 teaspoon vanilla extract.
- Add Melted Shortening: Melt the ¼ cup shortening until it’s liquid. Add it to your wet ingredients, mixing until everything is well combined and homogenous.
- Mix Dough: Attach a dough hook to your stand mixer. Pour the wet ingredients into the dry ingredients in the mixer bowl. Turn the mixer on low speed and mix until the wet and dry ingredients are thoroughly combined and no dry pockets of flour remain. The dough will look shaggy at first, then come together.
- Knead to Perfection: Once combined, increase the mixer speed to medium and knead the dough for a full 8 minutes. This develops the gluten, which is essential for that incredibly soft and chewy texture we’re after. The dough should become smooth, elastic, and pull away from the sides of the bowl.
- First Rise: Shape the kneaded dough into a neat ball. Lightly oil a clean glass bowl (vegetable or peanut oil works great) and place the dough ball inside, flipping it once to coat the top with oil. This prevents a dry crust from forming. Cover the bowl tightly with plastic wrap and place it in a draft-free, slightly warm spot (like a turned-off oven with the light on, or a sunny spot) to rise. Let it rise for 1 to 2 hours, or until it has almost doubled in size. This slow rise builds flavor!
- Prepare Cinnamon Sugar: While your dough is happily rising, take a small bowl and whisk together the ¼ cup granulated sugar and 1 ½ teaspoon cinnamon. Set this fragrant mixture aside.
- Roll Out Dough: Once the dough has almost doubled in size, gently turn it out onto a lightly floured, clean work surface. Using a rolling pin, roll the dough out into a rectangle approximately 12 inches long and 8 inches wide. Aim for even thickness.
- Apply Cinnamon Sugar: Generously dust the surface of the rolled-out dough with your cinnamon-sugar mixture. Leave a clean edge (about ½ inch) along one of the long sides. Gently press the cinnamon sugar into the dough with your fingertips or the palm of your hand to help it adhere.
- Roll & Seal: Starting from the long side opposite the clean edge, carefully and tightly roll the dough up into a log. Roll towards the clean edge. Once rolled, lightly brush the clean edge with a little water (this acts as a “glue”). Press the clean edge firmly into the roll and use your fingers to smooth and seal it securely.
- Cut the Buns: Using a sharp serrated knife, trim off the pinched ends from the roll, about 1 ½ inches per end. Then cut it equally into 1-inch pieces and place each piece onto a parchment-lined baking sheet with at least 2” space between them. Press down lightly on each slice and lightly shape each one with your fingers, then let rise for about 45 minutes – until puffy, but not doubled in size.
- Second Rise: Place each cut honey bun onto a parchment-lined baking sheet, leaving at least 2 inches of space between them. Lightly press down on each slice to flatten it slightly, and gently reshape if needed. Cover them loosely with plastic wrap or a clean kitchen towel and let them rise again in a warm, draft-free spot for about 45 minutes. They should look puffy, but not fully doubled in size.
- Heat Oil (Frying Method): Part of the way through the second rise, prepare your frying oil. Pour vegetable or peanut oil into a large heavy-bottomed pan or stockpot until it’s about 3 inches deep. Heat the oil over medium heat until it reaches 365°F (185°C). Use a clip-on pot thermometer to monitor the temperature; this is crucial for even frying.
- Prepare Glaze: Just before you’re ready to fry, whisk together all the glaze ingredients in a medium bowl: 4 2/3 cup powdered sugar, 2 ½ tablespoons honey, 1 tablespoon melted butter, ½ teaspoon vanilla extract, and ¼ teaspoon salt. Add warm water a teaspoon at a time, whisking constantly, until the glaze is smooth, thick, and pourable, but not too thin.
- Fry the Honey Buns: Once the rolls have completed their second rise, gently press them down one last time with your fingers. Carefully place a few honey buns into the hot oil, making sure not to overcrowd the pan. Fry for 90 seconds on one side, then flip them gently with tongs and fry for an additional 90 seconds on the other side, until they are beautifully golden brown on both sides.
- Drain and Glaze Immediately: Once golden brown, remove the honey buns from the oil and place them onto a wire cooling rack set over a paper towel-lined baking sheet (to catch excess glaze). Immediately (while still hot!), dip each bun into the prepared glaze, ensuring it’s thoroughly coated.
- Repeat: Return the glazed buns to the cooling rack. Repeat the frying and glazing process with any remaining honey buns. Serve warm or allow them to cool slightly.
Notes
Keep ‘Em Fresh: Storing Your Homemade Honey Buns (If They Last!)
Once you’ve poured your heart into making these delicious soft honey buns, you’ll want to make sure they stay fresh and tender!
- Room Temperature Storage: The golden rule for storing these is to let them cool completely after glazing. If you store them warm, condensation will form, and they’ll get soggy – no fun! Once fully cooled, tuck them into an airtight container or a large, zip-top baggie. They’ll stay wonderfully fresh and delightfully soft at room temperature for up to 5 days.
- Believe Me, They’re Best The Next Day: This might sound wild, but I genuinely think these honey buns are often even better on the second day! After they’ve had a chance to sit in an airtight container for a day or two, the flavors really meld and deepen, and that amazing glaze soaks in beautifully, creating an even more cohesive and delicious texture.
- Freezing for Later: Planning ahead? Honey buns freeze like a dream! Once they’re completely cooled, wrap individual buns tightly in plastic wrap, then pop them into a freezer-safe bag or container. They can happily chill in the freezer for up to three months. To reheat, thaw them at room temperature, then give them a gentle warm-up in the microwave for 15-30 seconds, or a quick bake in a 300°F oven for 5-10 minutes. Pure bliss, any time!
FAQs: Your Top Questions About Homemade Honey Buns, Answered!
Q: Can I use active dry yeast instead of instant yeast?
A: Yes, absolutely! If you’re using active dry yeast, you’ll just need to “proof” it first. In the “Prepare Wet Ingredients” step, combine the warm water, honey, and yeast in a bowl and let it sit for about 5-10 minutes until it gets nice and foamy. Once it’s foamy, you can add the egg, vanilla, and shortening, then proceed with the rest of the recipe as written.
Q: My dough isn’t rising. What went wrong?
A: Oh, that’s a common baking bummer! Usually, the biggest culprit is inactive yeast. This could happen if your yeast is expired (always check the date!), or if the water you used was either too hot (which kills the yeast) or too cold (which means it won’t activate properly). Double-check that your yeast is fresh and your water temperature is accurate next time. A really cold kitchen can also slow down a rise, so try to find a warmer spot for it.
Q: Can I prepare the dough ahead of time?
A: Yes, you totally can! This is a fantastic make-ahead option. After the first rise (Step 6), gently punch down the dough, pop it back into the oiled bowl, cover it tightly, and then you can refrigerate it overnight (it’ll keep happily for up to 24 hours). The next day, just let it come to room temperature for about 30-60 minutes before you proceed with rolling and shaping (starting at Step 8).
Q: How do I know when the honey buns are fully cooked inside?
A: When you’re frying, aim for that beautiful deep golden-brown color on both sides. If your oil temperature is correct (that magic 365°F!), 90 seconds per side should cook them right through. If you’re baking them, they should be lightly golden brown and sound hollow when you tap them on the bottom. For extra assurance, an instant-read thermometer inserted into the center of a baked bun should read around 200-205°F (93-96°C).
Q: Why are my honey buns greasy after frying?
A: This usually happens if your frying oil isn’t hot enough. If the oil is too cool, the dough just sits there and soaks up too much of it. Make sure your oil consistently stays at that 365°F (185°C) mark using your thermometer. Also, avoid overcrowding the pan, as this can drop the oil temperature significantly. Frying in batches is key!
And there you have it, my friends—your comprehensive guide to crafting the most delightful Soft Homemade Honey Buns! This WiseRecipes creation, while it asks for a little love and patience, truly delivers unparalleled softness, incredible flavor, and that perfect sticky glaze that makes them absolutely irresistible. It’s more than just a recipe; it’s a testament to the sheer joy and magic of homemade baking.
I am genuinely so excited for you to try these and experience the delicious magic yourself. Please, please come back and let me know in the comments below if you tried the frying or baking method, and what your absolute favorite part was! Happy baking from WiseRecipes!