Irresistible St. Patrick’s Green Velvet Mini Bundt Cakes
That first St. Patrick’s morning I still remember the first time I tried to make something small, green, and joyful for St. Patrick’s Day: the kitchen was fogged with powdered sugar, the kids were arguing about shamrock stickers, and I wanted a dessert that felt festive without being fussy. The result was a tray of…
That first St. Patrick’s morning
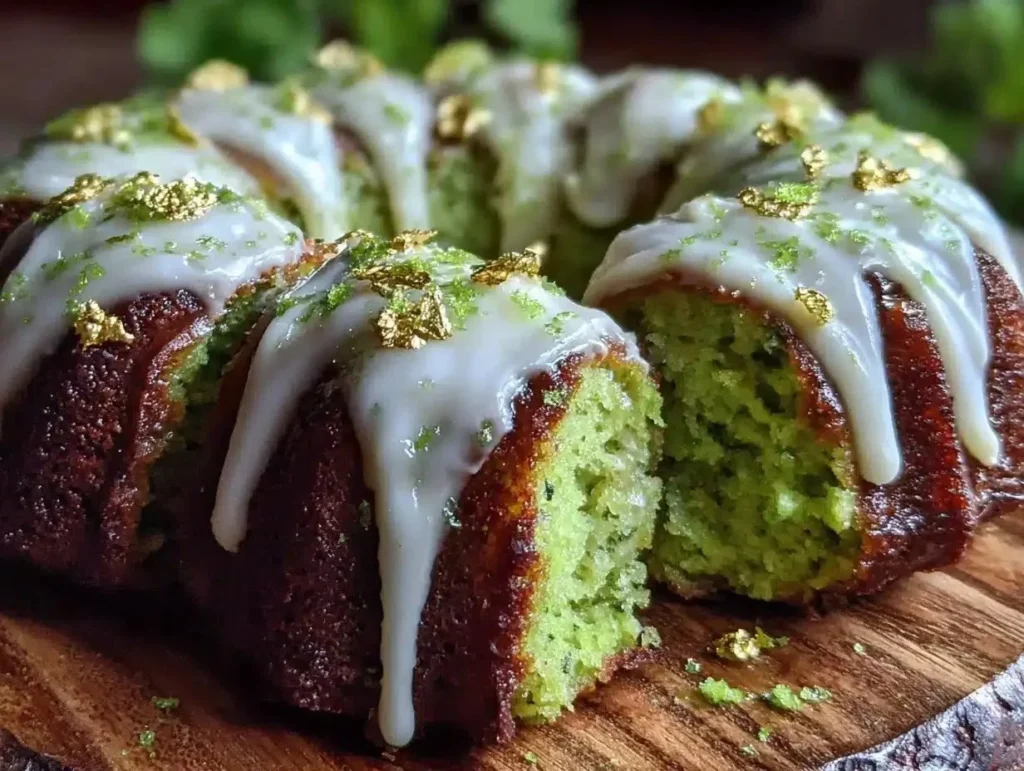
I still remember the first time I tried to make something small, green, and joyful for St. Patrick’s Day: the kitchen was fogged with powdered sugar, the kids were arguing about shamrock stickers, and I wanted a dessert that felt festive without being fussy. The result was a tray of tiny, glossy mini bundts—bright, soft, and impossibly cute. If you like the idea of a themed treat that is serious on texture but playful in color, these St. Patrick’s Green Velvet Mini Bundt Cakes are the kind of thing you’ll make on repeat. If you want a slightly different small cake, I once riffed on this idea into cupcakes; for inspiration see green velvet cupcakes.
The small-scene ingredient list
Before I get carried away, here’s everything you need laid out plainly:
- 2 cups (240g) all-purpose flour
- 1 ½ cups (300g) granulated sugar
- 2 tbsp unsweetened cocoa powder (preferably Dutch-processed)
- 1 tsp baking powder
- ½ tsp baking soda
- ½ tsp salt
- 1 cup (240ml) buttermilk, room temperature (or dairy-free milk with 1 tbsp vinegar)
- ½ cup (120ml) vegetable oil
- 2 large eggs, room temperature
- 2 tsp vanilla extract
- ½ tsp green food coloring (gel or liquid)
- 4 oz (115g) cream cheese, softened (for glaze)
- 1 cup (120g) powdered sugar (for glaze)
- 1-2 tbsp milk or cream (to thin glaze as needed)
You can also look to other mini cake ideas for size and bake-time comparisons, like these chocolate cranberry mini cakes.
Why cocoa matters here
Calling this "green velvet" rather than simply "green cake" is deliberate. The 2 tablespoons of unsweetened cocoa powder give the crumb a faint depth that velvet-style cakes need; it’s subtle, not chocolatey, but it keeps the crumb tender and gives you that classic velvet mouthfeel. Dutch-processed cocoa is preferable because it blends smoothly and contributes to a silkier texture. The oil and buttermilk create richness and keep these mini bundts moist long after baking.
Practical tip 1: If you don’t have buttermilk, whisk 1 tablespoon of vinegar into dairy-free milk and let it rest five minutes. This lets the acid react with baking soda and gives lift.
The moment the batter goes green
Here’s how the kitchen choreographed itself the day I learned the best green is pastel and the texture is everything. Follow the steps exactly for reliable results:
Preheat oven to 350°F (175°C). Grease mini bundt pan thoroughly with butter or non-stick spray, then dust with flour. In a large bowl, sift together flour, cocoa powder, baking powder, baking soda, and salt. In another bowl, whisk granulated sugar and vegetable oil until smooth. Add eggs one at a time, whisking well after each addition. Stir in buttermilk, vanilla extract, and green food coloring until batter is light green and silky. Gradually fold dry ingredients into wet mixture gently with a spatula until combined but still tender.
Spoon batter evenly into mini bundt pan cavities, filling about ¾ full. Bake for 18-22 minutes, checking at 18 minutes with a toothpick; it should come out clean or with a few moist crumbs. Let cakes cool in pan for 10 minutes, then invert onto a cooling rack to cool completely. For glaze (optional), beat cream cheese, powdered sugar, and milk or cream until smooth. Drizzle over cooled cakes.
Practical tip 2: Use a small cookie scoop so each cavity gets the same amount of batter. That evens baking times and keeps your presentation tidy.
Practical tip 3: If your bundt cavities are deep, check at 18 minutes and then every 2 minutes to avoid overbaking. Tiny cakes go from perfect to dry surprisingly quickly.
The small reveal and the texture I chase
When you invert the pan after ten minutes the cakes should slip right out with gentle taps. The crumb will be fine and tender thanks to the oil and buttermilk. I look for a slight spring in the center and a toothpick that comes away clean or with a few moist crumbs—this is how you know it is done right.
Personal touch: I introduced these to a friend who insists cakes must be "serious." He ate two, then admitted they tasted like "a simpler, happier brownie" and asked the source of the green. That memory always makes me smile when decorating them.
Variation idea 1: Swap the cream cheese glaze for a simple lemon glaze (powdered sugar and lemon juice) for a brighter finish. It plays wonderfully against the cocoa note.
Variation idea 2: Add ¼ teaspoon mint extract with the vanilla for a minty twist, or fold in 2 tablespoons of mini chocolate chips for texture.
The Fifteen-Minute Pan Test and the trick for unmolding
Sometimes the little bundts cling. If they stick, let them cool a few minutes longer, then run a thin knife around each cavity before turning. Lightly oiled pans are your friend. Also, for shiny, uniform cakes dust with a little extra powdered sugar once glazed for a bakery look.
Practical tip 4: If the bottoms look darker than you like, rotate the pan halfway through baking. This helps even heat exposure in older ovens.
Leftovers, swaps, and what to serve with
Storage: These mini bundts store well. Keep them in an airtight container at room temperature for up to 2 days. Refrigerate if you use the cream cheese glaze; they’ll keep 4-5 days chilled. For longer storage, freeze unglazed cakes for up to 2 months; thaw at room temperature, then glaze.
What to serve with: These are perfect alongside a cup of strong coffee, a milky latte, or a herbal tea. If you want to turn them into a small-plated dessert, serve one warm with a dollop of whipped cream or softened vanilla ice cream.
Substitutions: Use a neutral oil you like; melted butter changes texture slightly but works. If you need a dairy-free glaze, substitute dairy-free cream cheese and plant-based milk to thin.
I sometimes port this mini concept into other flavor territories. If you enjoy small cheesecakes, the texture and timing remind me of mini cheesecakes I made when experimenting with peanut butter and chocolate; see my notes on chocolate peanut butter mini cheesecakes for contrast and technique ideas.
A small practice in celebration
This recipe solves the problem I always have around holidays: how to make something festive without going overboard. The cakes are small, shareable, and forgiving, and the green is celebratory rather than theatrical. They’re great for a class party, a brunch, or a quiet dessert that still feels dressed up.
Final baking check: toothpick test clean or with a few crumbs, slight spring in the center, and a light color around the edges. When those line up, your mini bundts are ready for the cooling rack and the glaze.
Conclusion
If you love the idea of a moist, festive little cake with a velvet crumb and a hint of cocoa, these St. Patrick’s Green Velvet Mini Bundt Cakes are a simple and satisfying celebration in miniature. For a different kind of moist chocolate cake that uses beer for richness and a surprisingly similar texture principle, check out this Moist Chocolate Guinness Cake Recipe.
St. Patrick’s Green Velvet Mini Bundt Cakes
Ingredients
Method
- Preheat oven to 350°F (175°C). Grease mini bundt pan thoroughly with butter or non-stick spray, then dust with flour.
- In a large bowl, sift together flour, cocoa powder, baking powder, baking soda, and salt.
- In another bowl, whisk granulated sugar and vegetable oil until smooth.
- Add eggs one at a time, whisking well after each addition.
- Stir in buttermilk, vanilla extract, and green food coloring until batter is light green and silky.
- Gradually fold dry ingredients into wet mixture gently with a spatula until combined but still tender.
- Spoon batter evenly into mini bundt pan cavities, filling about ¾ full.
- Bake for 18-22 minutes, checking at 18 minutes with a toothpick; it should come out clean or with a few moist crumbs.
- Let cakes cool in pan for 10 minutes, then invert onto a cooling rack to cool completely.
- For glaze (optional), beat cream cheese, powdered sugar, and milk or cream until smooth.
- Drizzle over cooled cakes.