Jolly Santa Cookies: The Cutest Christmas Cookie Ever!
There are some Christmas cookies that are just so charming, so full of holiday spirit, they instantly become a beloved tradition. These Jolly Santa Cookies are, without a doubt, one of those cookies. This isn’t your average cut-out cookie; it’s a delightful, three-dimensional creation that brings Santa Claus to life in the most delicious way…
There are some Christmas cookies that are just so charming, so full of holiday spirit, they instantly become a beloved tradition. These Jolly Santa Cookies are, without a doubt, one of those cookies. This isn’t your average cut-out cookie; it’s a delightful, three-dimensional creation that brings Santa Claus to life in the most delicious way possible. We start with a rich, buttery, and incredibly tender cookie dough that we divide and color to create Santa’s iconic red suit and hat. Then, through a fun and easy process of rolling and assembling little balls of dough, we build our adorable, chubby Santas right on the baking sheet! The final touches of a fluffy cream cheese buttercream beard and trim, chocolate chip eyes, and a bright red M&M nose make these little guys absolutely irresistible. I made a batch of these for a holiday cookie exchange, and they were the star of the show, eliciting gasps of delight from everyone. They are a true labor of love, a fun and creative baking project that results in the most festive and heartwarming treat you’ll make all season.

Why These Santa Cookies Will Steal Your Heart (and the Show)!
- Unbelievably Adorable: The 3D, hand-shaped design makes these Santa cookies look like little edible sculptures. They are a true work of art that will be the centerpiece of any cookie platter.
- A Fun, Creative Baking Project: Rolling and assembling the little balls of dough to build Santa is a wonderfully tactile and fun activity, perfect for a cozy afternoon of holiday baking.
- Rich, Buttery, and Delicious: This isn’t just about looks! The cookie base is a wonderfully tender, rich butter cookie that melts in your mouth, perfectly complemented by the tangy cream cheese buttercream.
- No Special Cookie Cutters Needed: You create these beautiful shapes entirely by hand, so you don’t need to hunt down a specific Santa cookie cutter.
- Perfect for Holiday Gifting: A box filled with these charming Santa cookies is one of the most special and personal gifts you can give during the holiday season.
Recipe Snapshot
| Prep Time | 45 minutes |
| Cook Time | 15 minutes |
| Total Time | 1 hour |
| Servings | 14 Santa Cookies |
| Calories | 691 kcal per serving |
| Course | Dessert |
| Cuisine | American, Holiday |
| Method | Baking |
Your North Pole Baking List
Creating these jolly little fellas is easy with these classic, high-quality baking staples.
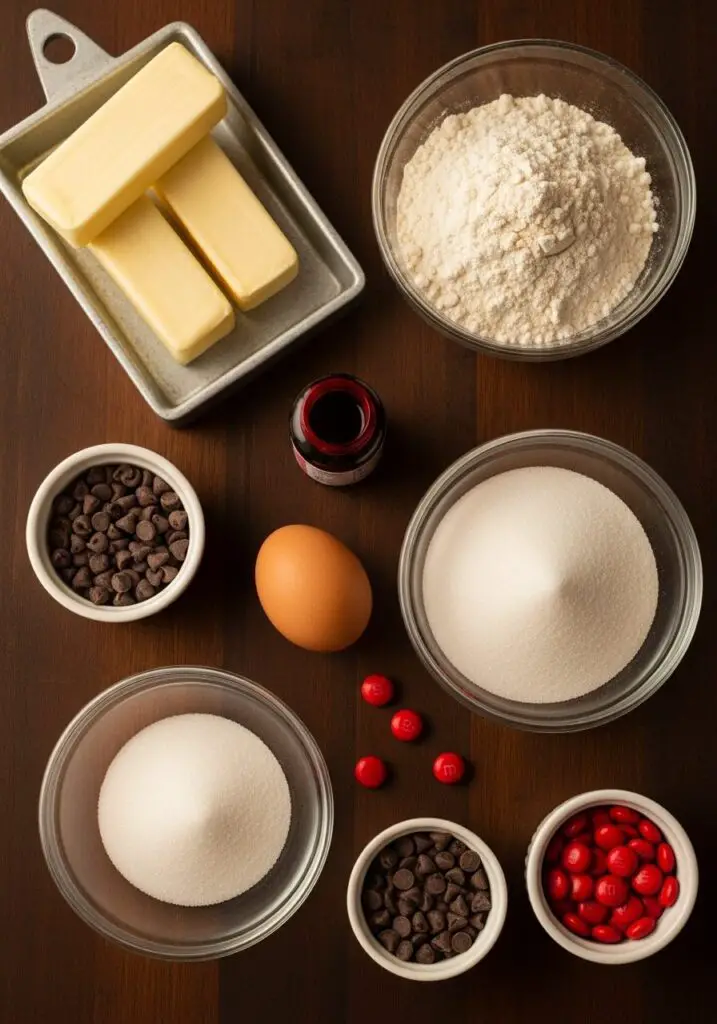
→ For the Butter Cookie Dough
- Salted Butter: 2 sticks (1 cup), softened to room temperature. The key to a rich, flavorful cookie.
- Granulated Sugar: 1/2 cup.
- Large Egg: 1, at room temperature to ensure it incorporates smoothly.
- Vanilla Extract: 2 teaspoons for that classic, warm flavor.
- All-Purpose Flour & Kosher Salt: The structure and balance for our dough.
- Red Food Coloring: 1-2 teaspoons. A gel food coloring will give you the most vibrant Santa suit red.
→ For the Fluffy Buttercream & Decorations
- Salted Butter & Cream Cheese: Both softened to room temperature for a smooth, tangy, and fluffy buttercream.
- Vanilla Extract & Powdered Sugar: The flavor and sweetness for our frosting.
- Mini Chocolate Chips: For Santa’s classic coal-black eyes and the buttons on his suit.
- Mini Holiday M&Ms: A single red one makes the perfect, shiny nose!
Let’s Bake Santa! Your Step-by-Step Guide to a Jolly Treat
This is a wonderfully creative project. The key is to make all your little dough balls first, then enjoy the assembly line process!
Phase 1: Make and Color the Cookie Dough (Time: ~10 minutes)
First, we’ll create the delicious, buttery dough that will form our Santas.
- Preheat and Prep. Preheat your oven to 350°F. Line two large baking sheets with parchment paper.
- Cream the Base. In a large mixing bowl, cream together the softened butter, sugar, and vanilla with a mixer on medium-high speed for 3-5 minutes, until very light and fluffy. Beat in the egg until just combined.
- Finish the Dough. Add the flour and salt, and beat on low speed until a cohesive dough forms.
- Divide and Color. Remove about 1 cup of the dough and set it aside (this will be the plain dough for his face, hands, and trim). To the remaining dough in the bowl, add 1 teaspoon of red food coloring and mix until combined, adding a little more color if needed to achieve a vibrant red.
Phase 2: Assemble Your Santas! (Time: ~20 minutes)
This is where the magic happens! It’s easiest to roll all your pieces first, then assemble each Santa.
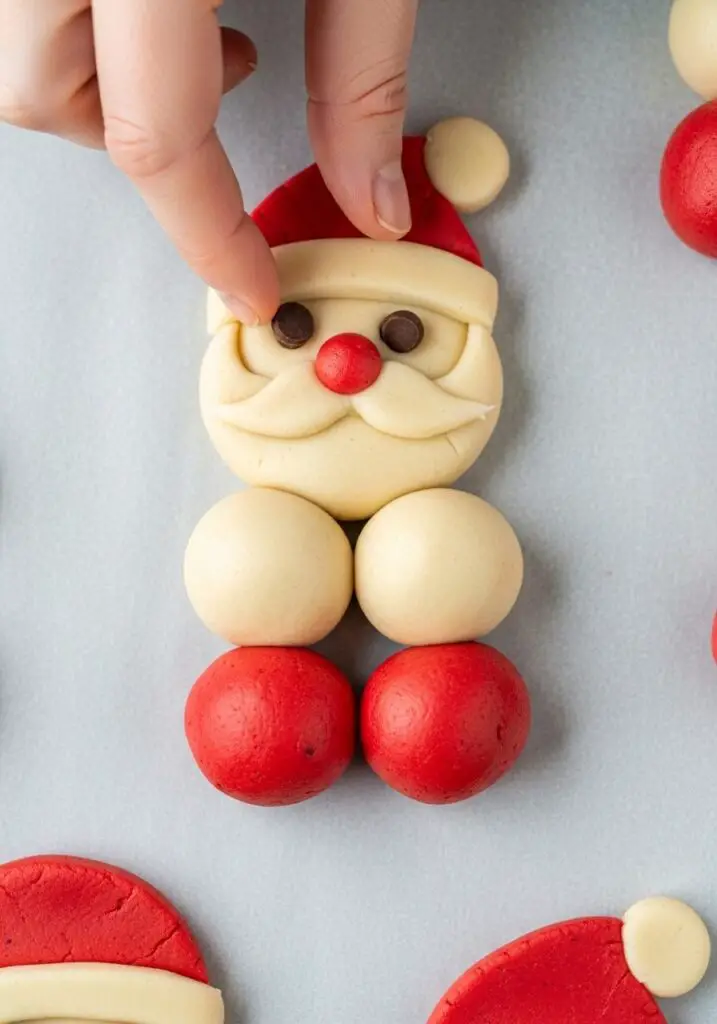
- Roll All the Pieces. For each Santa, you will need to roll the following: From the RED dough, roll one 1-inch ball (body) and five 1/2-inch balls (hat, arms, legs). From the PLAIN dough, roll one 3/4-inch ball (head) and five 1/4-inch balls (hands, feet, hat pom-pom).
- Build Santa’s Body. On the prepared baking sheet, place the large 1-inch red ball and gently flatten it to about 1/2-inch thickness. This is his belly. Attach two of the 1/2-inch red balls for legs at the bottom, and two for arms at the sides.
- Add His Head and Trimmings. Attach the 3/4-inch plain ball above the body for his head, and gently flatten it. Attach the small 1/4-inch plain balls to the ends of the arms and legs for his hands and feet.
- Give Him a Hat. Shape the last 1/2-inch red ball into a triangle and attach it to the top of his head. Place the last tiny 1/4-inch plain ball at the tip of the hat for a pom-pom.
- Add the Face. Gently press two mini chocolate chips into his head for eyes and three down his belly for buttons. Repeat to create all your Santas, arranging them about 2 inches apart.
Phase 3: Bake, Cool, and Decorate (Time: ~15 mins + cooling)
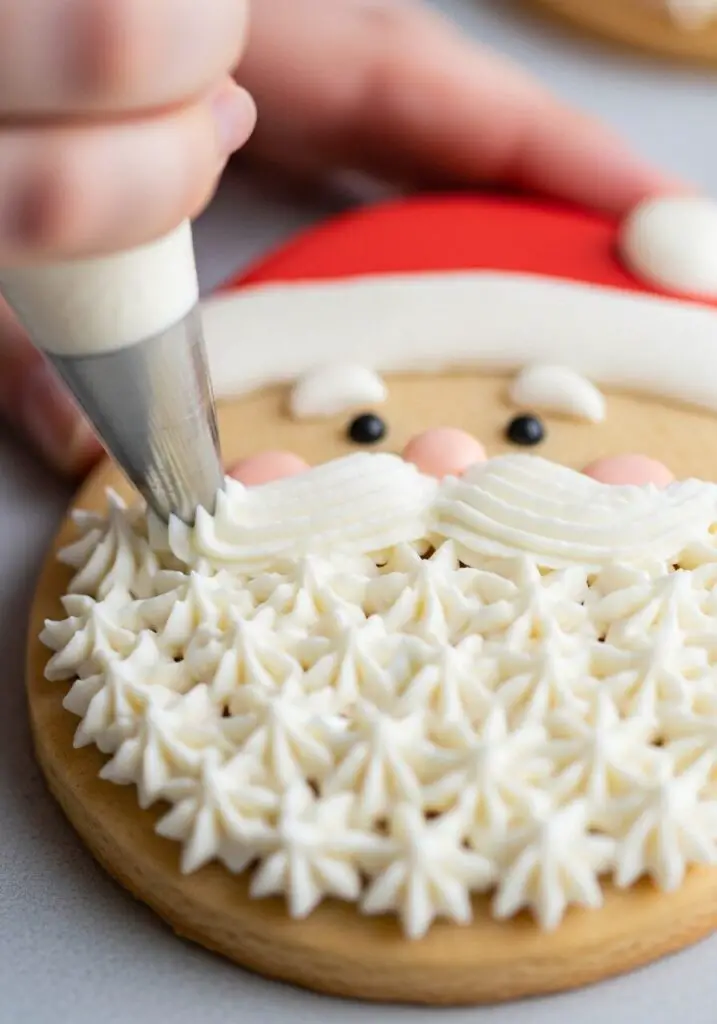
The final touches of fluffy buttercream bring our Santas to life!
- Bake. Transfer the baking sheets to the oven and bake for 12-15 minutes, until the edges are lightly golden. Let the cookies cool on the baking sheet for a few minutes before transferring to a wire rack to cool completely.
- Make the Buttercream. In the bowl of a stand mixer, whip the softened butter and cream cheese together for 3-4 minutes until extra light and fluffy. Add the powdered sugar and vanilla and beat for another 2 minutes until fully combined and whipped.
- Decorate! Transfer the frosting to a piping bag fitted with a small star or round tip. Pipe the fluffy beard around Santa’s face. Pipe a trim on his hat, cuffs, and the bottom of his coat. Place a small red M&M for his nose. Let the frosting set before storing.
WiseRecipes’ Top Tips for Perfect Santa Cookies!
- Use Room Temperature Ingredients: For the fluffiest cookie dough and smoothest buttercream, it’s crucial that your butter, egg, and cream cheese are all at a proper room temperature before you start mixing.
- Don’t Overmix After Adding Flour: Once you add the flour to your cookie dough, mix only until it’s just combined. Overmixing can lead to tough cookies.
- Chill if Needed: If your kitchen is warm and the dough becomes sticky and hard to handle, don’t hesitate to chill it for 15-20 minutes. This will make rolling the small balls much easier.
- Whip Your Buttercream Well: Beating the butter and cream cheese for a full 3-4 minutes before adding the sugar is the secret to an incredibly light and fluffy frosting.
- Assembly Line is Best: For an efficient process, roll all the little red and plain balls you need for all the cookies first. Then, you can quickly assemble each Santa without stopping to roll more dough.
Jolly Santa Christmas Cookies
Ingredients
Equipment
Method
- Preheat the oven to 350°F. Line 2 baking sheets with parchment paper. In a large mixing bowl, cream together 1 cup butter, sugar, and 2 tsp vanilla until light and fluffy. Beat in the egg. Add the flour and salt, and beat until a dough forms.
- Remove 1 cup of the dough and set aside. To the remaining dough, add the red food coloring and mix until combined.
- For each Santa, form the dough into small balls: from the red dough, one 1-inch ball (body) and five 1/2-inch balls (hat/limbs). From the plain dough, one 3/4-inch ball (head) and five 1/4-inch balls (hands/feet/pom-pom).
- On the prepared baking sheet, assemble the Santas by gently flattening the body, attaching the limbs and head, then adding the hands, feet, and hat. Press in mini chocolate chips for eyes and buttons.
- Bake the cookies for 12-15 minutes, until lightly golden on the bottom. Let cool completely on a wire rack.
- To make the frosting, whip 1/2 cup butter and the cream cheese until light and fluffy, 3-4 minutes. Add the powdered sugar and 1 tsp vanilla and beat for 2 more minutes until whipped.
- Transfer the frosting to a piping bag. Pipe the beard around Santa’s face, a pom-pom and trim on his hat, and trim on his cuffs and coat. Place one red mini M&M for his nose. Let frosting set.
Notes
Creative Twists: Delicious Ways to Customize Your Cookies!
- Add Some Flavor: Add 1/4 teaspoon of almond extract or a little bit of orange zest to the cookie dough for a different flavor profile.
- Sparkly Santa: Sprinkle the plain dough parts with a little white sanding sugar before baking to give Santa’s trim a beautiful sparkle.
- Chocolate Santas: Replace 1/4 cup of the flour in the red dough with unsweetened cocoa powder to create a delicious chocolate-cherry flavored Santa suit.
- Different Noses: A small red hot candy or a red sprinkle would also work perfectly for Santa’s nose.
Keep Santa Fresh! Storing Your Holiday Cookies
These beautiful cookies are a work of art, so proper storage is key!
Storing and Make-Ahead
The frosting on these cookies will set up, but it will remain relatively soft. It’s best to store these cookies in a single layer in a wide, airtight container at room temperature for up to 3 days. If you need to stack them, place a sheet of parchment paper between the layers very carefully. The unfrosted cookies can be baked and frozen for up to 3 months; just thaw and decorate as directed!
FAQs: Your Jolly Santa Cookie Questions, Answered!
Is the cream cheese in the frosting optional?
Yes, as the recipe suggests, it is optional. However, I highly recommend it! The small amount of cream cheese adds a wonderful, subtle tang that cuts through the sweetness of the powdered sugar and creates a much more balanced and delicious frosting.
My dough is too sticky to roll into balls. What should I do?
This is an easy fix! This is a soft butter cookie dough, so if your kitchen is warm, it can become sticky. Just wrap the dough in plastic and chill it in the refrigerator for 20-30 minutes. The cold will firm up the butter and make it much easier to handle.
Can I make these cookies gluten-free?
Yes! You can substitute the all-purpose flour with a good-quality measure-for-measure gluten-free flour blend. The cookies may be slightly more delicate, but they will still be delicious.
What kind of piping tip is best for the beard?
A small star tip will give you that classic, fluffy “swirl” look for the beard and trim. A small round tip will create a more “bubbly” look, like the cookies in the photo. Both are adorable!
These Jolly Santa Cookies are so much more than a dessert; they are a festive activity, a beautiful gift, and a delicious new holiday tradition all in one. They are a wonderful way to spend a cold afternoon, filling your home with the warm scent of baking and creating something that is sure to bring joy to everyone who sees (and eats!) it. I hope you have a blast bringing your own little Santas to life. Happy Holidays!