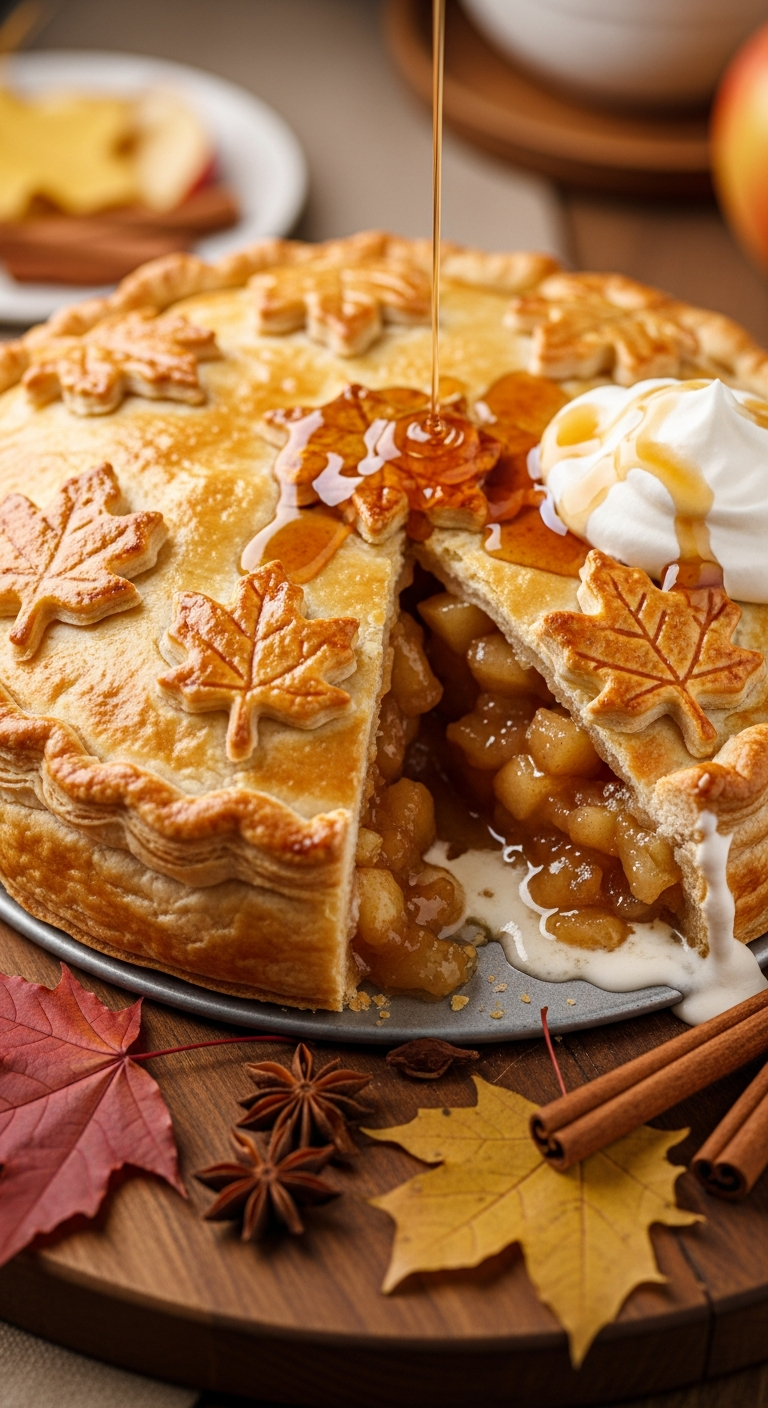
The Ultimate Maple Cream Apple Pie (with Leaf Crust!)
Imagine a classic apple pie, but elevated to something truly magical. Picture tender, tart Granny Smith apples, bathed not just in cinnamon and sugar, but in a rich, luscious sauce of pure maple syrup and heavy cream. Now, imagine it’s crowned not with a simple lattice, but with a stunning cascade of delicate, golden-brown pastry…
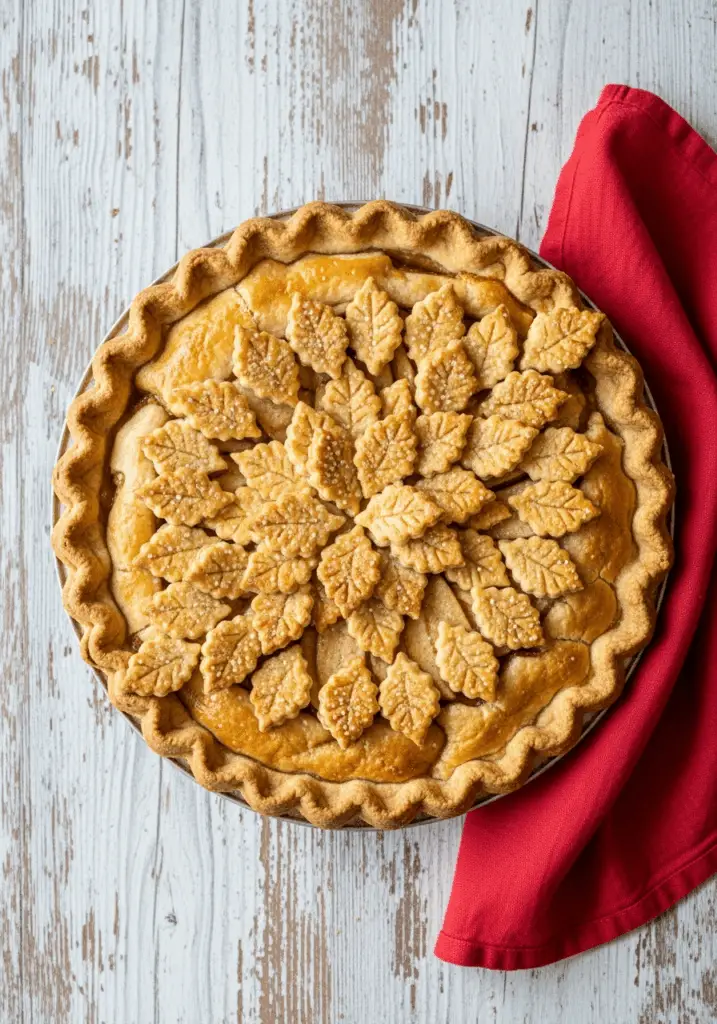
Imagine a classic apple pie, but elevated to something truly magical. Picture tender, tart Granny Smith apples, bathed not just in cinnamon and sugar, but in a rich, luscious sauce of pure maple syrup and heavy cream. Now, imagine it’s crowned not with a simple lattice, but with a stunning cascade of delicate, golden-brown pastry leaves. That, my friends, is the breathtaking, autumnal beauty of this Maple and Cream Apple Pie. It is, without a doubt, the most elegant and delicious apple pie you will ever bake.
I promise you, the decorative leaf crust isn’t just for show (though it is a true show-stopper!). It creates the perfect ratio of flaky, buttery pastry to rich, tender apple filling in every single bite. This is the pie that will grace your holiday table, the one that will have everyone reaching for their cameras before they reach for their forks. It’s a true masterpiece that is surprisingly simple to create.
Get ready to elevate your baking game and create a stunning, unforgettable apple pie that tastes even better than it looks.

Why This Will Be Your New Signature Apple Pie!
You are going to be so incredibly proud of this beautiful and delicious pie. It is a guaranteed sensation. Here’s why you have to try it:
- A Stunning, Artistic Presentation: The cascade of delicate pastry leaves makes this pie a true edible work of art and the perfect centerpiece for any holiday or special occasion.
- Incredibly Rich and Unique Flavor: The combination of real maple syrup and heavy cream creates a silky, caramel-like sauce for the apples that is a delicious departure from a traditional pie.
- Perfectly Balanced Sweet and Tart: Using tart Granny Smith apples is key. Their firm texture holds up to baking, and their bright, tangy flavor is the perfect counterpoint to the sweet maple cream sauce.
- Foolproof Filling: The use of cornstarch ensures that your filling will set up beautifully every time, with no dreaded “soggy bottom.”
- Easier Than It Looks: While the final result is breathtaking, the process is straightforward. If you can use a cookie cutter, you can create this beautiful leaf crust!
Recipe Snapshot
| Prep Time | 40 minutes |
| Cook Time | 45 minutes |
| Total Time | 1 hour 25 minutes |
| Servings | 8 servings |
| Calories | 557 kcal per serving |
| Course | Dessert |
| Cuisine | American |
| Difficulty/Method | Intermediate / Baking |
Your Shopping List for This Autumnal Masterpiece
This recipe uses classic pie ingredients with a special, flavorful twist. Here’s what you’ll need:
→ For the Pie Crust
- Dough for a double-crust 9-inch pie → Use your favorite all-butter homemade recipe or a high-quality store-bought version.
- 1/2 teaspoon 2% milk → For brushing the leaves to help them brown beautifully.
→ For the Maple Cream Apple Filling
- 1 cup sugar → Plus 1/4 teaspoon for sprinkling on top.
- 3 tablespoons cornstarch → Our secret weapon for a perfectly set filling.
- 1/2 teaspoon salt → To balance all the sweetness.
- 6 cups thinly sliced, peeled Granny Smith apples → Their tartness and firm texture are essential for this recipe.
- 6 tablespoons pure maple syrup → Use the real stuff! The flavor is unmatched.
- 1/4 cup heavy whipping cream → Creates the luscious, silky sauce.
Let’s Get Baking! Your Step-by-Step Guide
Ready to create a truly spectacular pie? Let’s break it down into the filling, the crust, and the beautiful assembly.
Part 1: The Luscious Maple Cream Filling
- Preheat the Oven: Get your oven preheating to 400°F (200°C).
- Mix the Dry Ingredients: In a very large bowl, combine 1 cup of the sugar, the cornstarch, and the salt.
- Coat the Apples: Add the thinly sliced Granny Smith apples to the bowl and toss them gently until every slice is evenly coated with the sugar mixture.
- Add the Maple Cream: In a separate small bowl or measuring cup, whisk together the maple syrup and the heavy whipping cream. Pour this magical mixture all over the coated apples and stir gently to combine. Set the filling aside.
Part 2: Assemble the Pie
- Prepare the Bottom Crust: On a lightly floured surface, roll out half of your pie dough into a circle that’s about 1/8-inch thick. Carefully transfer it to a 9-inch pie plate. Trim the crust so it extends about 1/2 inch beyond the rim of the plate, then flute the edge decoratively.
- Add the Filling: Pour the entire apple filling into the prepared pie crust, mounding the apples slightly in the center.
- Create the Leaf Topping: Roll out the remaining half of the pie dough to a 1/8-inch thickness. Using a 1-1/2 inch leaf-shaped cookie cutter, cut out as many leaves as you can.
- Decorate the Pie: Arrange the pastry leaves over the top of the apple filling, overlapping them slightly to create a beautiful, textured cascade. If you like, you can use a sharp knife to lightly score veins onto some of the leaves before placing them.
- Final Touches: Gently brush the tops of the leaves with the milk and sprinkle with the remaining 1/4 teaspoon of sugar. This will give them a lovely shine and a slightly crunchy finish.
Part 3: Bake to Golden Perfection
- Protect the Edges: Loosely cover the fluted edge of the pie with a strip of aluminum foil or a pie shield. This prevents the edges from burning before the center is cooked.
- First Bake: Bake for 20 minutes at 400°F.
- Final Bake: Carefully remove the foil from the edges. Continue to bake for another 20-25 minutes, until the crust and the leaves are a deep golden brown and you can see the filling bubbling thickly through the gaps.
- Cool Completely: This is a crucial step! Let the pie cool completely on a wire rack for several hours. This allows the filling to set up properly. Refrigerate any leftovers.
Maple and Cream Apple Pie with Leaf Crust
Ingredients
Equipment
Method
- Preheat oven to 400°F. In a large bowl, combine 1 cup sugar, cornstarch and salt. Add apples and toss to coat. In a separate bowl, combine maple syrup and cream, then pour over the apple mixture and stir.
- On a lightly floured surface, roll half the dough to a 1/8-in.-thick circle and transfer to a 9-in. pie plate. Trim crust to 1/2 in. beyond the rim and flute the edge. Add the apple filling.
- Roll the remaining dough to 1/8-in. thickness. Cut out crust with a 1-1/2-in. leaf-shaped cookie cutter. Arrange the cutouts over the filling, overlapping them slightly.
- Brush the cutouts with milk and sprinkle with the remaining 1/4 tsp sugar.
- Cover the edge of the pie loosely with foil. Bake for 20 minutes.
- Remove the foil and bake until the crust is golden brown and the filling is bubbly, about 20-25 minutes more.
- Cool completely on a wire rack to allow the filling to set before slicing. Refrigerate leftovers.
Notes
WiseRecipes’ Top Tips for a Perfect Pie
These simple secrets will ensure your Maple Cream Apple Pie is a flawless masterpiece.
- Use the Right Apples. Granny Smith apples are the perfect choice for this pie. They are very firm, so they hold their shape and don’t turn to mush, and their distinct tartness is essential to balance the sweetness of the maple cream sauce.
- Don’t Skip the Cornstarch. Cornstarch is the key to a filling that sets up perfectly and isn’t watery. It ensures you can get a clean, beautiful slice every time, once the pie has cooled completely.
- Keep Your Pie Dough Cold. Whether you’re making it from scratch or using store-bought, always work with cold pie dough. This is the secret to a tender, flaky crust. If the dough becomes warm and sticky while you’re working, don’t hesitate to pop it back in the fridge for 15 minutes.
- Protect Your Edges! The fluted edge of a pie crust is thinner and more exposed, so it will always brown faster than the top. Using a pie shield or a simple ring of aluminum foil for the first half of baking is the foolproof way to prevent burnt edges.
- Let It Cool Completely. Seriously. I know it’s the hardest part, but you must let the pie cool for at least 4-6 hours before slicing. The filling needs this time to cool down and fully set. Slicing into a hot pie will result in a soupy, runny filling. Patience will be rewarded!
Keep It Fresh! Storing Your Apple Pie
This pie is a wonderful treat that keeps well for several days.
- Storage: Once the pie has cooled completely, it’s best to store it in the refrigerator because of the cream in the filling. Cover it loosely with plastic wrap or foil. It will keep for up to 4-5 days.
- Serving: The pie is delicious served cold, straight from the fridge, or you can let it come to room temperature for about 30 minutes before serving. You can also gently reheat individual slices in a 350°F oven for about 10 minutes.
FAQs: Your Apple Pie Questions, Answered!
Can I use a different kind of apple?
While Granny Smiths are ideal for their tartness and texture, you can use other firm baking apples like Honeycrisp, Braeburn, or Golden Delicious. You may want to slightly reduce the sugar if using a sweeter apple variety.
Can I use a traditional top crust or a lattice instead of the leaves?
Absolutely! If you prefer a classic look, you can use the second piece of dough for a full top crust (be sure to cut vents for steam to escape) or to create a beautiful lattice. The baking time will remain the same.
My filling always seems watery. What am I doing wrong?
There are two likely culprits: not using a thickener like cornstarch, or not letting the pie cool completely before slicing. This recipe uses cornstarch to solve the first problem, so the most important thing you can do is have the patience to let it cool for several hours to allow the filling to fully gel and set.
Can I make this pie ahead of time?
Yes, this is a great pie to make a day in advance! The flavors will have even more time to meld together. Bake it completely, let it cool, then cover and store it in the refrigerator until you’re ready to serve.
Final Thoughts: A Slice of Autumnal Heaven
There is nothing that says “special occasion” quite like a stunning, homemade apple pie. This Maple and Cream version, with its beautiful, artistic crust, is a true labor of love that is as delightful to look at as it is to eat. It’s a spectacular centerpiece, a celebration of the season, and a memory-making dessert all in one. Happy baking!