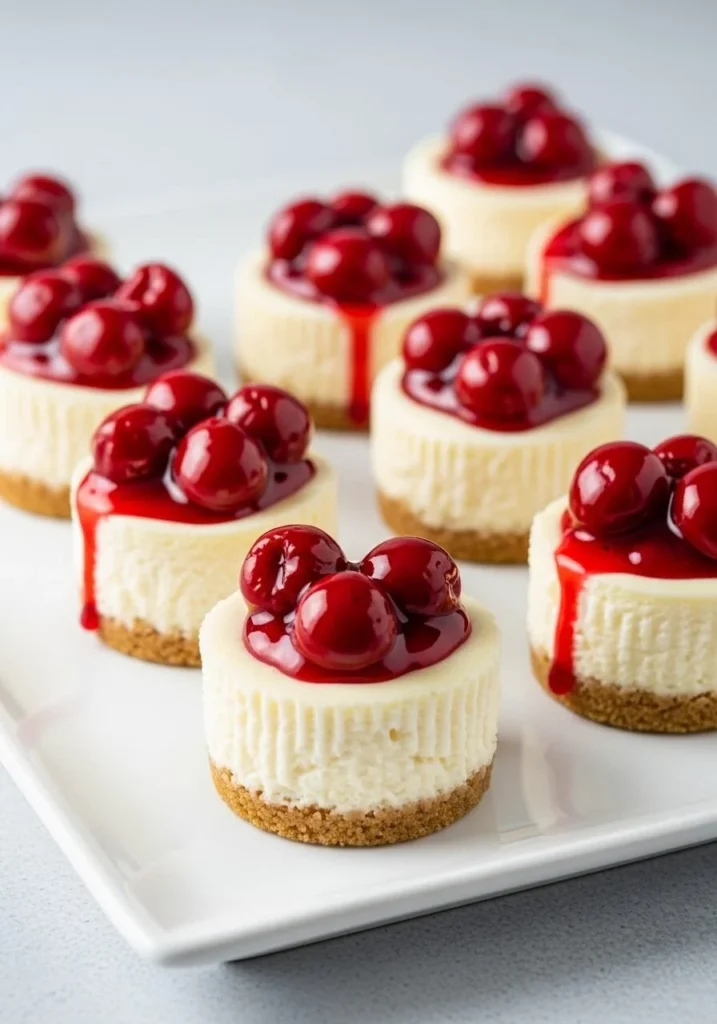
Mini Cheesecakes With Vanilla Wafer Crust
How I Fell in Love With Tiny Cheesecakes The first time I made Mini Cheesecakes With Vanilla Wafer Crust I was trying to impress a neighbor who’d just brought over a jar of jam, and the whole thing turned into the easiest, most gratifying little dessert I’d ever pulled together. I remember the kitchen smelling…
How I Fell in Love With Tiny Cheesecakes
The first time I made Mini Cheesecakes With Vanilla Wafer Crust I was trying to impress a neighbor who’d just brought over a jar of jam, and the whole thing turned into the easiest, most gratifying little dessert I’d ever pulled together. I remember the kitchen smelling faintly of sweetened condensed milk and lemon as the oven hummed at 275°F, and my dog circling my feet like he knew something good was coming. If you want the original inspiration, I once followed a version online and then adapted it to be even simpler; if you’re curious about another take on mini cheesecakes, you can look up this Mini Cheesecakes With Vanilla Wafer Crust recipe I used for ideas.
You don’t need a lot of fancy ingredients to make these. For this version I use 24 vanilla wafer cookies, 2 (8-ounce) packages cream cheese, softened, 3 large eggs, separated, 1 (14-ounce) can sweetened condensed milk, 1/4 cup freshly squeezed lemon juice, 1/4 teaspoon fine salt, and 1 (21-ounce) can cherry pie filling. That’s it. The vanilla wafers become the tiny crust under each cheesecake and you’ll get that soft, creamy filling that’s lightened by whipped egg whites so it never feels heavy on your tongue.
The Secret Behind Perfect Mini Cheesecakes With Vanilla Wafer Crust
Here’s the method in plain talk so you can see why it works. First, preheat the oven to 275°F. Line two 12-well muffin pans with cupcake liners and place one vanilla wafer in the bottom of each liner. That little wafer is the unsung hero; it crisps a bit in the oven and gives each bite a satisfying snap.
In a large bowl, beat the cream cheese until light and fluffy. Add the egg yolks and sweetened condensed milk, beating until smooth. Stir in the lemon juice. The lemon is subtle but it brightens the whole dessert and cuts through the sweetness in the best possible way. In a separate bowl, beat the egg whites and salt until soft peaks form. Gently fold the beaten egg whites into the cream cheese mixture until just combined and no streaks remain. Folding is where people can overdo it; you want to keep as much air as possible, so be gentle and patient.
Fill the muffin cups to about 1/2 inch from the top with the cheesecake mixture. Bake for 20 to 25 minutes until set, rotating the pans halfway. The low temperature is deliberate – it stops the custard from puffing and cracking and keeps the texture silky. I usually set a timer for 12 minutes, rotate the pans, then check again at 20.
Getting the Texture Just Right
When they come out of the oven the centers will look set but still slightly jiggly when you nudge the pan; that wobble is a good sign. Cool the cheesecakes in the pan completely before transferring them to the fridge for at least 2 hours until firm. If you try to top them hot you’ll have a runny mess, so don’t be impatient. Just before serving, remove the liners and top each cheesecake with cherry pie filling. The glossy cherries on top make them look like something you’d pay for, but they’re delightfully homemade.
A few practical tips that save me every time: make sure the cream cheese is truly softened so you don’t battle lumps; separate the eggs when they are cold but bring the whites to room temperature for better volume; and try not to overbeat the whites into the batter. One trick I learned is to run a thin knife around each cheesecake after they’ve chilled if the liners stick a bit — it helps them pop out clean. Another time-saver is that these freeze well for a quick sweet treat later.
A Few Things I’ve Learned
There are a few ways I tinker with this recipe depending on the occasion. Sometimes I use a different fruit topping — blueberries or a lemon curd are lovely alternatives — and other times I swap the cherry pie filling for a warm berry compote. If you want to be adventurous, a version with chocolate cookie crumbs is a fun twist; if you like contrasts of flavor, try a teaspoon of orange zest in the filling instead of lemon. If you want inspiration for another playful flavor pairing, here’s a fun riff on mini desserts like chocolate peanut butter mini cheesecakes that might spark ideas.
If you’re wondering how long these keep, I usually store leftovers in an airtight container in the refrigerator and they are happiest for up to four days. If I’m making these for a party, I’ll often bake them the night before and keep them chilled so the day of the event I only have to peel off the liners and spoon on the cherry topping. They also freeze well without the topping; flash freeze them on a tray and then move into a freezer-safe bag for up to a month. Thaw overnight in the fridge and add the cherry pie filling just before serving.
The Best Part About This Dish
What I love most is how approachable they are. The texture is creamy yet light, with a tender bite from the vanilla wafer beneath. The kitchen smells of sweet condensed milk and vanilla while they bake, and that cooling, fruity cherry topping gives you a bright pop of color. Serve them after a relaxed dinner with friends alongside a cup of coffee or a glass of sparkling wine — their small size makes them feel indulgent without being too much.
If something goes wrong, it’s usually because the oven temperature is off or the whites were overmixed. If the centers crack, it probably baked a little too hot; if they’re too jiggly after cooling, give them more time in the fridge. I once baked a batch and forgot to rotate the pans; one side got a touch more color, but everybody ate them anyway and complimented my “rustic” version.
Conclusion
If you want a quick reference or another inspiration page while you’re prepping, this link to a similar recipe is one I often look at for presentation ideas: Super Easy Mini Cheesecakes with Vanilla Wafer Crust. Give these a try when you want something that looks fancy but is fast to make — and tell your neighbor I said hi.
Mini Cheesecakes With Vanilla Wafer Crust
Ingredients
Method
- Preheat the oven to 275°F (approximately 135°C).
- Line two 12-well muffin pans with cupcake liners and place one vanilla wafer in the bottom of each liner.
- In a large bowl, beat the cream cheese until light and fluffy.
- Add the egg yolks and sweetened condensed milk, beating until smooth.
- Stir in the lemon juice.
- In a separate bowl, beat the egg whites and salt until soft peaks form.
- Gently fold the beaten egg whites into the cream cheese mixture until just combined.
- Fill the muffin cups to about 1/2 inch from the top with the cheesecake mixture.
- Bake for 20 to 25 minutes, rotating the pans halfway through. The centers will look set but still slightly jiggly.
- Cool the cheesecakes in the pan completely before transferring them to the fridge for at least 2 hours until firm.
- Remove the liners and top each cheesecake with cherry pie filling just before serving.