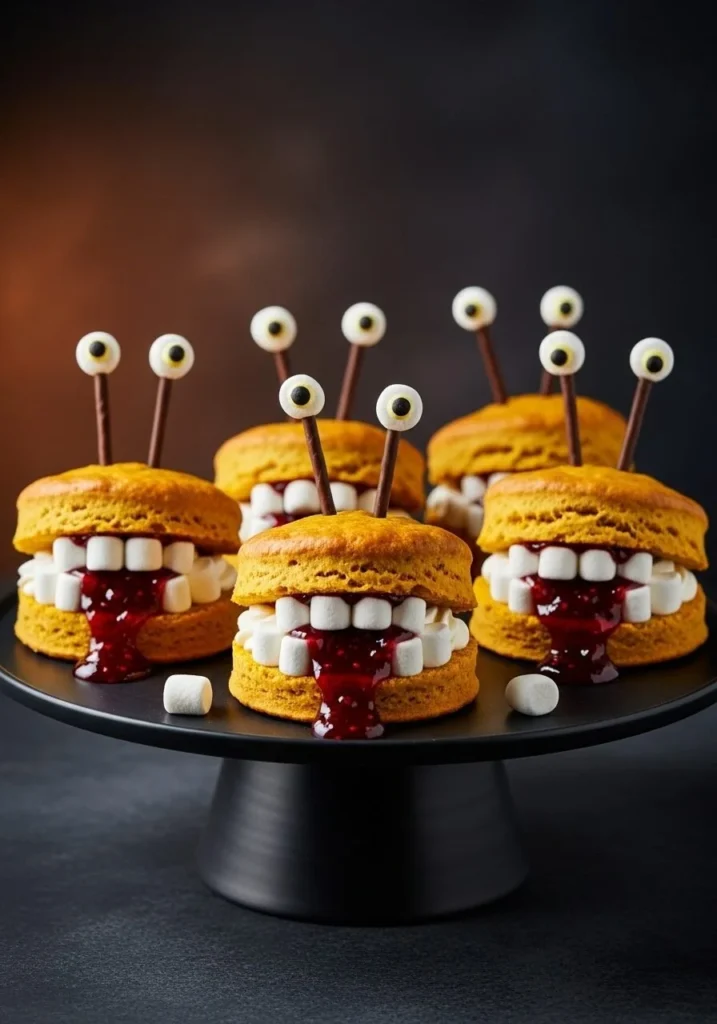
Monster Face Pumpkin Scones
A Halloween Staple I Can’t Resist The first time I made Monster Face Pumpkin Scones was the year my kitchen smelled like toasted pumpkin and cocoa while a thunderstorm did its best to be dramatic outside. I wanted something playful for a small, sugar-crazed group of kids and adults, and these felt exactly right: warm…
A Halloween Staple I Can’t Resist
The first time I made Monster Face Pumpkin Scones was the year my kitchen smelled like toasted pumpkin and cocoa while a thunderstorm did its best to be dramatic outside. I wanted something playful for a small, sugar-crazed group of kids and adults, and these felt exactly right: warm pumpkin sweets that you could dress up like a tiny, sticky monster. If you want a starting point for inspiration, I originally bookmarked a monster face pumpkin scones post that nudged me toward the idea of using chocolate buttons and biscuit sticks as eyeballs, and then I made the recipe my own.
You’ll need 300g pumpkin or butternut squash, peeled, deseeded and chopped, and the dry bones of the scones: 325g self-raising flour, plus extra for dusting, 1 ½ tsp bicarbonate of soda, 60g caster sugar and ½ tsp salt. There’s 80g cold butter, cubed, and 3 tbsp milk to bring it together. For the theatrical faces you’ll want 12 Cadbury Dairy Milk Giant Buttons and 12 LU Mikado Milk Chocolate Biscuits, plus 12 Edible Eyes. To fill and decorate: 6 tbsp seedless raspberry jam, 6 tbsp clotted cream and mini white marshmallows for teeth, with icing sugar for dusting.
The Secret Behind Perfect Monster Face Pumpkin Scones
I always start by saying exactly what the recipe asks: preheat the oven to 200°C (gas mark 6). While the oven heats, microwave the chopped pumpkin for 5-8 minutes until tender and mash it; then let it cool and chill. Cooling the pumpkin is my tiny, crucial trick because warm squash will make the butter melt too soon and the dough go wet. Once that’s chilled, pulse everything together.
In a food processor I pulse the self-raising flour, bicarbonate of soda, caster sugar and salt with the cold, cubed butter until the mix resembles breadcrumbs. Add the chilled pumpkin and the 3 tbsp milk, then pulse until just combined. The key phrase there is just combined; overworking will make the scones tough. Tip: if your dough looks a little sticky, a light dusting of extra flour on the work surface sorts it out without drying the scones.
I roll out the dough on a floured surface to about 2-3cm thick and stamp out six circles. Bake them for 16 minutes until golden and then cool on a wire rack. You’ll know they’re done when the tops are glossy and slightly cracked and the bottoms sound a little hollow if you tap them. While they bake, I make the eyes: attach chocolate buttons to the ends of biscuit sticks using edible glue and add an edible eye on each. It’s fiddly in the best way.
When the scones are cool, I cut each one in half. I warm the seedless raspberry jam so it spreads easily and then spread clotted cream on both halves. Press mini white marshmallows along the edge of the scone halves to make teeth and drizzle warm raspberry jam on the bottom half so it looks gloriously gooey. Close the scone, dust with icing sugar and insert the eye sticks into the top. Serve immediately. The combination of cool, rich clotted cream, tangy warm jam and those toasted pumpkin notes is everything.
Playing with Faces and Flavors
I don’t always stick to the script. If I’m feeling cheeky I’ll swap the seedless raspberry jam for blackberry or even a dark cherry conserve for a deeper color. If you want to make the recipe with a slightly different squash, butternut is an easy substitute and works beautifully, keeping the 300g measure the same. For a lower-sugar version I sometimes cut the caster sugar by a third and lean on a really ripe, sweet pumpkin.
Another way I get creative is with the “eyes.” Those 12 Cadbury Dairy Milk Giant Buttons and 12 LU Mikado Milk Chocolate Biscuits are perfect, but if you’re feeding a nut-allergy crowd you can use plain chocolate discs and paper straws instead of biscuit sticks. If you like protein snacks, try borrowing ideas from the best monster cookie protein balls and serve small balls alongside for a balanced, playful platter.
When They Tell You They’re Ready
Knowing when these are right is part memory and part sensory clues. The smell should be warm, nutty and a little sweet from the pumpkin. The texture inside should be soft but not gummy; if your scone splits and you can see a dry crumb you’ve probably overbaked. For the assembly, the jam should be warm enough to run slightly but not so hot it melts the clotted cream into nothing. Tip: warm the jam in short bursts in the microwave, stirring between bursts.
A few tips I’ve learnt along the way: chill the pumpkin so the butter stays cold when you mix, pulse instead of kneading to keep the scones light, and dust your stamping cutter with flour so you get clean edges. Also, if you’re making these for a crowd, you can pre-bake the plain scones and keep them in an airtight container. Reheat briefly in a warm oven before filling to revive that fresh-baked scent.
If you do have leftovers, which rarely happens in my house, unassembled scones keep best in an airtight container for up to 48 hours at room temperature or freeze well for up to a month. Filled scones with clotted cream should be eaten the same day; store any extra filled ones in the fridge and bring them back to room temperature before serving. Tip: freeze the baked plain scones flat, then toast gently from frozen to refresh.
Why I Keep Coming Back to These
I love this recipe because it’s equal parts silly and satisfying. The pumpkin gives a gentle orange color and a moist crumb, the clotted cream keeps each bite luxurious and the raspberry jam adds that bright, sticky contrast that makes every mouthful feel like a neat little celebration. It’s a brilliant recipe for getting kids involved without it feeling chaotic; they can press marshmallow teeth and decide whose monster looks angriest.
If you want to change the mood, try two variations: make them savory with a little grated cheddar and chopped chives instead of sugar and jam, or turn them into chocolate-pumpkin scones by folding in chocolate chips and skipping the clotted cream and jam for an adult treat. Each time I serve them someone asks for the recipe and then tells me their own way of dressing theirs up. That’s the best part.
Conclusion
If you enjoyed my take and want to compare notes with the original inspiration, the official Monster Face Pumpkin Scones Recipe | Waitrose & Partners is a lovely reference and has helpful photos to guide the silly decoration.
Monster Face Pumpkin Scones
Ingredients
Method
- Preheat the oven to 200°C (gas mark 6).
- Microwave the chopped pumpkin for 5-8 minutes until tender, then mash and let it cool.
- In a food processor, pulse the flour, bicarbonate of soda, caster sugar, and salt with the cold butter until it resembles breadcrumbs.
- Add the chilled pumpkin and milk, then pulse until just combined.
- Roll out the dough on a floured surface to about 2-3cm thick and stamp out six circles.
- Bake the scones for 16 minutes until golden, then cool on a wire rack.
- Note that they are done when the tops are glossy and slightly cracked, and the bottoms sound hollow when tapped.
- Attach chocolate buttons to the ends of biscuit sticks using edible glue and add an edible eye on each.
- Once scones are cool, cut each in half, warm the jam, and spread clotted cream on both halves.
- Press mini marshmallows along the edge of the scone halves to make teeth, drizzle warm raspberry jam on the bottom half, and close the scone.
- Dust with icing sugar and insert the eye sticks into the top.
- Serve immediately for best flavor.