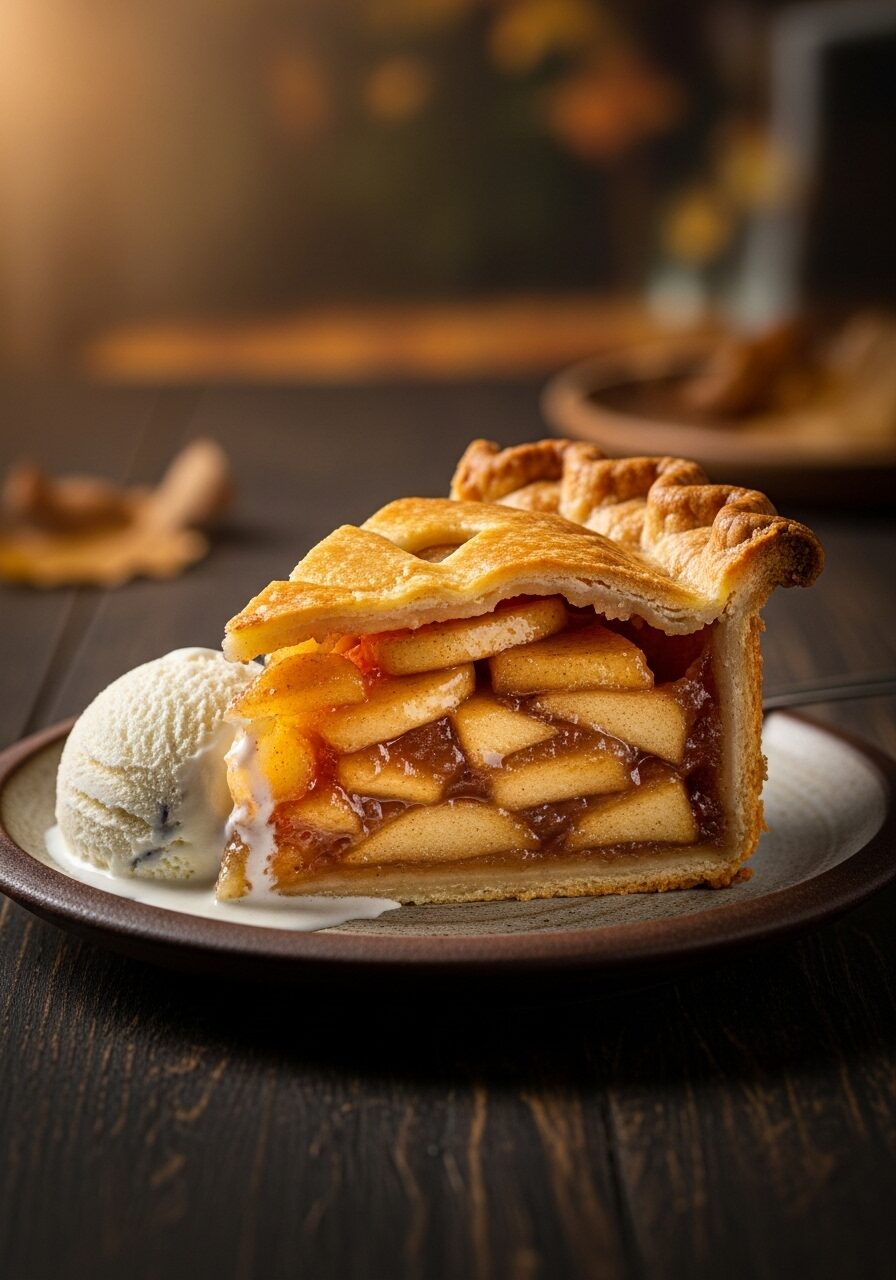
The Ultimate Old-Fashioned Apple Pie (Perfectly Flaky & Never Soupy!)
Imagine the most incredible, nostalgic aroma of warm cinnamon, buttery pastry, and sweet, baked apples filling every single corner of your home. Picture a slice of pie with a shatteringly flaky, golden-brown crust, holding a thick, jammy filling of tender apples that doesn’t collapse into a soupy mess. This, my friends, is not just a…
Imagine the most incredible, nostalgic aroma of warm cinnamon, buttery pastry, and sweet, baked apples filling every single corner of your home. Picture a slice of pie with a shatteringly flaky, golden-brown crust, holding a thick, jammy filling of tender apples that doesn’t collapse into a soupy mess. This, my friends, is not just a pie; it is the perfect, timeless, Old-Fashioned Apple Pie.
I was on a lifelong mission for this exact pie. For years, I chased the ghost of my grandmother’s perfect version, but my attempts often ended in a sad, watery filling and a soggy bottom crust. Sound familiar? Then, I discovered the secret, and it’s a bit of old-world magic mixed with a little modern science: maceration. It’s a fancy word for a simple process of letting the apples sit in sugar, and it is the absolute key to a perfect pie.
I promise you, this is the last apple pie recipe you will ever need. It is your foolproof guide to that perfectly flaky, all-butter crust and a thick, rich, perfectly spiced apple filling every single time. It’s a true show-stopper, the undisputed king of the Thanksgiving dessert table.
Get ready to master a timeless American classic and create a pie so good, it will become the stuff of family legend.

Why This Is the Best Apple Pie Recipe, Hands Down!
You are going to be so incredibly proud when you pull this masterpiece from your oven. It’s a classic for a reason, but our technique makes it foolproof. Here’s why:
- The Unbelievably Flaky All-Butter Crust: This is a classic, no-fuss pie dough that bakes up shatteringly crisp, tender, and buttery every single time.
- Thick, Jammy, Never-Watery Filling: Our secret maceration technique pulls the excess water out of the apples before baking, resulting in a thick, concentrated, and perfectly saucy filling. No soggy bottoms here!
- A Show-Stopping Holiday Centerpiece: With its golden, vented crust and mounded apple filling, this pie is the absolute star of any Thanksgiving or Christmas dessert table.
- Perfectly Balanced Spice Blend: The warm, cozy mix of cinnamon, ginger, nutmeg, and cloves perfectly complements the tart apples without overpowering them.
Recipe Snapshot
| Prep Time | 1 hour |
| Cook Time | 1 hour 15 minutes |
| Resting/Chilling Time | 3 hours |
| Total Time | 5 hours 15 minutes |
| Servings | 10-12 servings |
| Calories | 364 kcal per serving |
| Course | Dessert |
| Cuisine | American |
| Difficulty/Method | Intermediate / Baking |
Your Shopping List for a Classic Masterpiece
This recipe uses simple, classic ingredients where quality truly shines. Let’s get everything in order.

→ For the Flaky Pie Dough
- 1 1/3 cups all-purpose flour, 2 tsp granulated sugar, & 1/2 tsp kosher salt → The simple dry ingredients for our crust.
- 8 tablespoons (1 stick) cold unsalted butter → Cold, cold, cold! This is non-negotiable for a flaky crust.
- 2 to 3 tablespoons ice water → It must be ice cold to keep our butter from melting.
→ For the Jammy Apple Filling
- 4 ¼ pounds tart apples (about 8 large) → Granny Smith are the non-negotiable champion for this recipe!
- 1 cup packed light brown sugar → For a deep, molasses-tinged sweetness.
- A perfect spice blend: 2 1/2 tsp ground cinnamon, 3/4 tsp kosher salt, 1/2 tsp ground ginger, and 1/4 tsp each of grated nutmeg and ground cloves.
- 1/4 cup tapioca starch → Our secret weapon! It creates a thick, clear, and glossy filling, unlike flour or cornstarch.
→ For the Golden Egg Wash
- 1 large egg & 1 large egg yolk → The combination creates the most beautiful, deep golden-brown shine.
- 1 tablespoon heavy cream & a pinch of salt → For a perfect, glossy finish.
Let’s Bake! Crafting Your Perfect Apple Pie
Ready to create a true American classic? Don’t be intimidated by the process; we’ll break it down into simple, satisfying steps.
Part 1: The All-Important Apple Filling Prep (Maceration)
- Mix the Spices: In a gallon-sized zip-top bag, combine the brown sugar, cinnamon, salt, ginger, nutmeg, and cloves.
- Prep and Coat the Apples: Peel, quarter, and core your apples, then slice them into 1/2-inch wedges. Add the apple slices to the bag with the sugar-spice mixture. Seal the bag tightly and tumble it around until the apples are roughly coated.
- The Magic Maceration Step: Let this bag sit at room temperature for at least 3 hours (or up to 8 hours in the fridge). Flip it over every so often. This is the most important step! It draws a huge amount of water out of the apples before they go in the pie, which is the secret to a thick, jammy filling and no soggy bottom. You’ll see a lot of syrup form in the bottom of the bag.
Part 2: Assemble Your Masterpiece
- Prep Your Crust: While the apples are doing their magic, prepare your favorite double-crust pie dough recipe (or use a quality store-bought one). Fit the bottom crust into your pie plate and keep both it and the top crust chilling in the fridge.
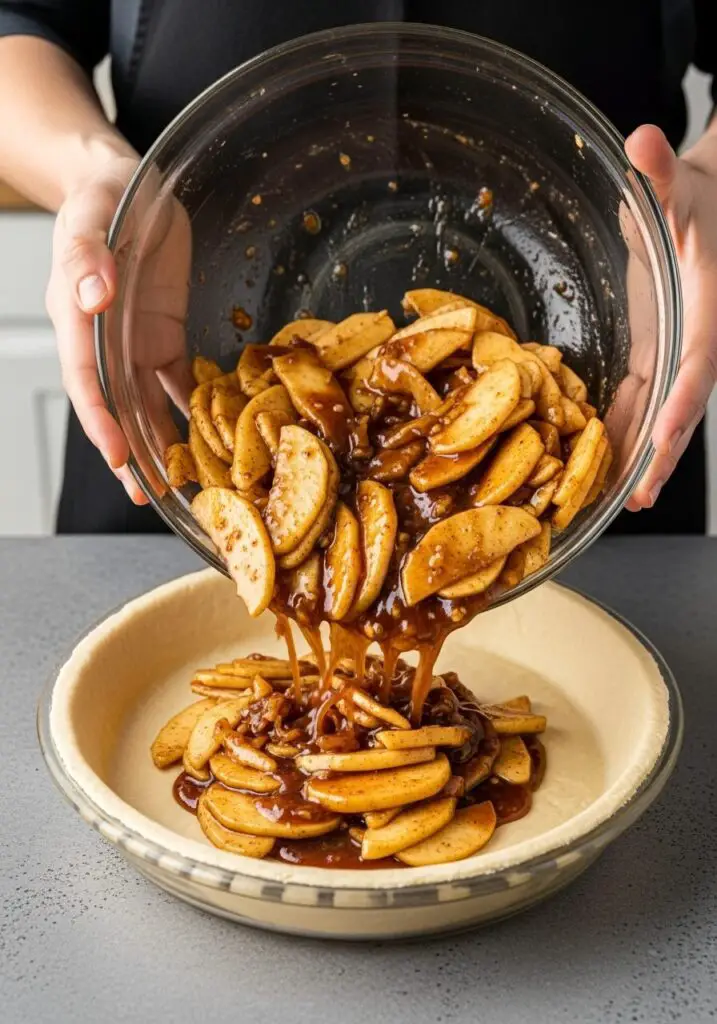
- Finish the Filling: Add the tapioca starch to the bag of macerated apples. Reseal it and toss everything to combine. The syrup in the bag will combine with the starch to create your perfect filling.
- Fill and Top the Pie: Pour the entire contents of the bag—apples and all that glorious syrup—into your prepared pie shell. Arrange the slices into a nice, relatively flat mound. Drape the top crust over the pie. Pinch the top and bottom crusts together to seal, then trim the excess to about 3/4 inch. Tuck the edge under itself and crimp as desired.
- The Final Chill: Pop the entire assembled pie back into the fridge for at least 30 minutes to an hour. A cold pie hitting a hot oven is the secret to a super flaky crust!
Part 3: Bake to Golden Perfection
- Prep for Baking: While the pie chills, adjust your oven rack to the lower-middle position and preheat to 400°F (200°C).
- Egg Wash and Vent: Whisk the egg, egg yolk, cream, and salt together for the egg wash. Brush this mixture all over the top of your chilled pie. Using a sharp knife, cut about six 3-inch vents in the top of the crust to allow steam to escape.
- Bake!: Place the pie on a parchment-lined baking sheet (to catch any drips!) and bake for about 75 minutes. The goal is an internal temperature of 195°F (91°C) in the very center, which ensures the tapioca has activated and thickened the filling.
- Cool Completely! (This is Crucial!): Let the pie cool at room temperature for at least 1 hour, but several hours is even better. You MUST let it cool for the filling to set up properly before slicing.

WiseRecipes’ Top Tips for a Perfect Apple Pie
This is a technique-driven recipe. These secrets will guarantee a flawless, bakery-quality pie.
- Maceration is Non-Negotiable. I know it feels like a long time, but that 3-hour rest for the apples is the single most important step for a perfect, non-watery filling. It draws out the excess moisture so you get a thick, jammy sauce, not apple soup.
- Tapioca Starch is the Secret Thickener. Don’t substitute this if you can help it! Unlike cornstarch which can be cloudy or flour which can be gummy, tapioca starch cooks up to be completely clear and glossy, creating a beautiful, professional-looking filling.
- Keep Everything COLD. This is the golden rule of pie dough. Your butter, your water, and even your hands should be as cold as possible. Chilling the assembled pie before baking is also a key step for the flakiest possible crust.
- Bake on a Lower Rack. Placing your pie on the lower-middle oven rack ensures the bottom crust gets enough direct heat to cook through and become beautifully crisp and golden, which is another key to avoiding a soggy bottom.
- Let It Cool COMPLETELY. I know it’s torture, but you cannot slice into a hot apple pie! The filling needs several hours to cool and set completely. If you cut it too soon, even a perfectly made pie will run everywhere. This is the secret to those perfect, clean slices.
Creative Twists: Delicious Ways to Customize Your Pie
The classic is perfect, but it’s also a wonderful canvas for your own creativity!
- Add a Salted Caramel Drizzle: Drizzle the top of the finished pie or individual slices with a warm salted caramel sauce.
- Make a Cheddar Crust: Grate about 1 cup of sharp cheddar cheese and work it into your pie dough with the butter for that classic sweet and savory combination.
- Use a Different Topping: Instead of a double crust, top the pie with a buttery, oaty crumble or streusel topping.
- Add Cranberries: Toss a cup of fresh or frozen cranberries in with the apples for a beautiful, tart, festive twist perfect for the holidays.
- Boozy Apples: Add 2 tablespoons of bourbon, brandy, or Calvados to the apple mixture during the maceration step.
- Create a Lattice Top: If you’re feeling fancy, weave the top crust into a beautiful lattice design before adding the egg wash.
- Add a Little Zest: The zest of one lemon or orange added to the sugar and spice mixture will add a lovely, bright note to the filling.
- Make Hand Pies: Use the dough and filling to create individual, portable hand pies. Just be sure to adjust the baking time!
Keep It Fresh! Storing Your Apple Pie
This pie is a fantastic make-ahead dessert! Here’s how to store it.
- Make-Ahead: The pie dough can be made up to 2 days in advance and kept well-wrapped in the fridge. You can also assemble the entire unbaked pie and freeze it for up to 3 months! Bake directly from frozen, adding 15-20 minutes to the bake time.
- Room Temperature: The baked and cooled pie is best stored loosely covered at room temperature. It will keep beautifully for up to 3 days.
- Reheating: To re-crisp the crust and serve it warm, just place a slice in a 350°F (180°C) oven for about 10-15 minutes.
Old-Fashioned Apple Pie
Ingredients
Method
- For the Filling: In a gallon-sized zip-top bag, combine the brown sugar, cinnamon, salt, ginger, nutmeg, and cloves. Add the sliced apples, seal the bag, and tumble to coat.
- Let the apples macerate at room temperature for at least 3 hours, flipping the bag occasionally. This will draw a significant amount of liquid from the apples.
- Add the tapioca starch to the bag of apples and their syrup. Reseal and toss to combine thoroughly.
- Place your bottom pie crust in a pie plate. Pour the entire apple filling mixture into the pie shell. Drape the top crust over the pie. Pinch the edges to seal, trim, and tuck the dough under itself. Crimp the edges.
- Refrigerate the assembled pie until cold and firm, at least 30 minutes. Meanwhile, preheat the oven to 400°F (200°C) with a rack in the lower-middle position.
- For the Egg Wash: Whisk the egg, egg yolk, cream, and salt together. Brush this mixture over the chilled pie. Cut six 3-inch vents in the top of the crust.
- Place the pie on a parchment-lined baking sheet and bake for about 75 minutes, or until the filling is bubbly and registers 195°F (91°C) in the center.
- Let the pie cool at room temperature for at least 1 hour (preferably longer) before slicing and serving. This is crucial for the filling to set.
Notes
FAQs: Your Old-Fashioned Apple Pie Questions, Answered!
Help! My bottom crust is always soggy!
This recipe is designed to defeat the soggy bottom! The three keys are: 1) Macerating the apples to remove excess water before baking. 2) Using tapioca starch to effectively thicken the juices. 3) Baking the pie on a lower oven rack to ensure the bottom crust gets enough heat to cook through and become crisp.
What are the best apples for apple pie?
For this specific recipe, a firm, tart baking apple like Granny Smith is highly recommended. They hold their shape beautifully during the long bake and their tartness is the perfect balance to the sweet, spiced filling. Other great baking apples include Honeycrisp, Braeburn, and Golden Delicious.
Can I use cornstarch instead of tapioca starch?
You can in a pinch, but the texture will be different. Tapioca starch creates a uniquely clear, glossy, and silky sauce. Cornstarch can sometimes make the filling a bit cloudy or slightly gelatinous. If you must substitute, use half the amount of cornstarch (2 tablespoons).
Do I really have to let the apples sit for 3 hours?
Yes! I know it seems like a long, fussy step, but it is the single most important secret to this recipe’s success. It’s a completely hands-off step, and it is the only way to guarantee a thick, jammy, non-watery filling. It is worth the wait, I promise!
My Final Thoughts: A Slice of Timeless Tradition
This Old-Fashioned Apple Pie is more than just a dessert; it’s a tradition, a centerpiece, and a slice of pure, unadulterated comfort. It’s a beautiful, rewarding project that proves that with a few simple secrets, you can create a truly perfect, timeless classic in your own kitchen. I hope this recipe brings a little bit of that old-fashioned warmth and magic to your holiday table!