Old-Fashioned Homemade Banana Pudding from Scratch
The First Time I Made Old-Fashioned Homemade Banana Pudding from Scratch I still remember the first time I decided to make this Old-Fashioned Homemade Banana Pudding from Scratch for a family gathering. It smells like warm vanilla and bananas the moment the custard begins to thicken—the kind of smell that pulls people into the kitchen…
The First Time I Made Old-Fashioned Homemade Banana Pudding from Scratch
I still remember the first time I decided to make this Old-Fashioned Homemade Banana Pudding from Scratch for a family gathering. It smells like warm vanilla and bananas the moment the custard begins to thicken—the kind of smell that pulls people into the kitchen without even meaning to. I used 2.5 cups whole milk and about 0.75 cup granulated sugar, and I remember fretting over whether four egg yolks would be enough to make the custard rich. It was. I layered 4 ripe bananas, sliced, between a box of vanilla wafers and that warm custard and watched relatives go back for thirds. If you like nostalgic desserts, you might enjoy this; it’s what led me to experiment with a a riff I tried with a banana pudding cheesecake later on.
The Secret Behind the Custard
The custard is where this dessert lives or dies for me. I start by whisking 0.75 cup granulated sugar, 3 tbsp cornstarch, and a pinch of salt in a saucepan so the dry ingredients are evenly distributed. Whisk sugar, cornstarch, and salt in a saucepan. Slowly add 2.5 cups whole milk and 4 egg yolks, whisking constantly so the eggs temper and don’t scramble. Cook over medium heat, stirring constantly, until thickened. You want the custard to coat the back of a spoon with a glossy sheen; that’s how you know it’s done right. Remove from heat and stir in 2 tbsp unsalted butter and 1.5 tsp vanilla extract to give it that velvet finish and vanilla perfume. A little butter and real vanilla lift the texture and the scent into something comforting and grown-up.
A small tip I use when making the custard is to have everything measured and within reach. When the texture changes, it does so quickly. If you’re nervous about overcooking, take it off the heat a touch early—the residual warmth will finish the thickening. Also, taste for sweetness after it cools slightly; if your bananas are very sweet, you can reduce the sugar a touch next time.
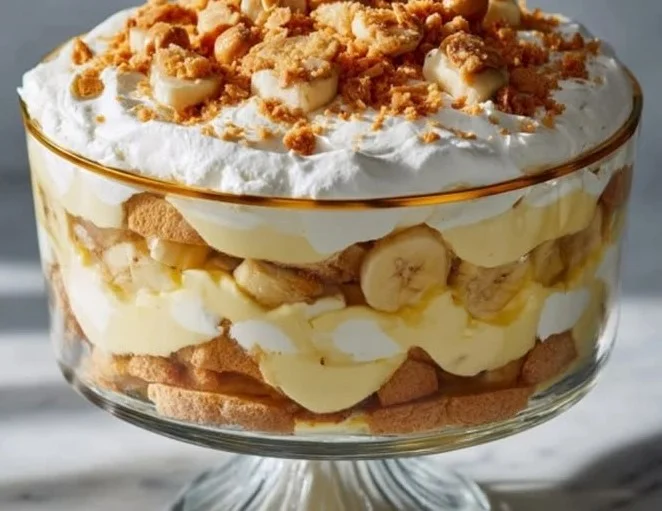
Putting It Together (and a Few Tricks)
Assembling this is almost meditative. I layer wafers, bananas, and custard in a dish; repeat layers and finish with custard. For texture, I like to place a single layer of vanilla wafers across the bottom, then banana slices that are just thin enough to drape but not so thin they disappear. A quick personal trick: slice the bananas right before layering so they stay bright and don’t brown. If I’m making it ahead of time I’ll toss the banana slices with a few drops of lemon juice, but that’s only if it will sit longer than a few hours.
Once the final custard layer is poured, I whip 1 cup heavy whipping cream with 2 tbsp powdered sugar until soft peaks form and spread it on top. Whip cream with powdered sugar and spread on top. That cloud of whipped cream keeps the pudding from being too heavy and adds that fresh creaminess I crave. Another tip: if you like a little texture contrast, crush a handful of vanilla wafers and sprinkle them between layers or on top before the cream—people love the little crunch.
If anything goes wrong during assembly it’s usually the bananas turning brown or the custard being too thin. For the latter, a few minutes back on low heat with constant stirring will usually rescue it, but be gentle—heat and eggs are a fragile friendship. When the layers are set, chill at least 4 hours before serving; this helps the wafers soften slightly and the flavors to marry. I often make it the night before when hosting, and that leads right into how I store leftovers.
When It’s Just Right and What to Serve With It
You’ll know the pudding is done right when the custard is silky, the bananas are fresh tasting, and the wafers are tender but still bring a whisper of cookie texture. The top should be a pale cloud of whipped cream, with the edges showing the soft vanilla wafer crumbles. For serving, I like it chilled, spooned into shallow bowls so each serving has the right wafer-to-banana ratio. It pairs beautifully with a strong coffee or a simple iced tea; the pudding is sweet enough that a slightly bitter drink balances it well. For a holiday spread, I sometimes serve it alongside a warm fruit pie; my go-to next to this is often a classic apple pie, which you can read about when I want something baked and cinnamon-forward like this apple pie recipe.
If you have leftovers, press plastic wrap directly onto the surface before chilling to keep the whipped cream from forming a skin and the bananas from browning. Stored in the refrigerator, it will keep for about 2 to 3 days; the texture will change as the wafers continue to soften, but honestly, some people prefer it that way. I sometimes spoon the leftovers into small jars for a grab-and-go treat the next day.
A Few Ways I Make It My Own
I love a recipe that welcomes tweaks. One variation I make is caramelizing the banana slices in a little brown sugar and butter for a deeper flavor, which gives a toffee note to the pudding. Another is swapping the vanilla wafers for chocolate sandwich cookies if I want a chocolate-banana mood. For a tropical turn, stir some toasted shredded coconut into the whipped cream. If you’re adventurous, a splash of bourbon in the custard (added off heat) gives an adult edge. Each change has a cost and a benefit: caramelized bananas add complexity but make the dessert heavier, while changing the cookie shifts the overall sweetness and texture balance.
I have a soft spot for rice puddings and other nostalgic sweets, and when I want to switch things up but keep the same cozy feeling I sometimes make an old-fashioned baked rice pudding instead, which carries the same comfort in a different texture that I also love.
Conclusion
If you want to compare how other cooks approach this classic, The Southern Lady Cooks offers a charming take on an old-fashioned banana pudding that echoes my love for the simple, comforting flavors of this dish: The Southern Lady Cooks’ old-fashioned banana pudding recipe. For another from-scratch version with slightly different techniques and notes, this scratch recipe at The Kitchen Is My Playground is a great read: Old-Fashioned Banana Pudding from Scratch recipe.
Old-Fashioned Homemade Banana Pudding
Ingredients
Method
- In a saucepan, whisk together the sugar, cornstarch, and salt.
- Gradually add the whole milk and egg yolks, whisking constantly to prevent the eggs from scrambling.
- Cook over medium heat, stirring constantly, until the mixture thickens and coats the back of a spoon.
- Remove from heat and stir in the butter and vanilla extract.
- In a dish, layer vanilla wafers, followed by banana slices and custard. Repeat layers, finishing with custard.
- Whip the heavy cream with powdered sugar until soft peaks form and spread it over the top.
- If desired, crush a handful of vanilla wafers and sprinkle them on top or between layers.
- Chill the pudding in the refrigerator for at least 4 hours before serving.
- Keep leftovers covered with plastic wrap to prevent browning.